blambert/azure - Windows Azure ASP.MVC Web Roles - Thinking Outside The Box
Azure Ninja Part 2! (空色の忍者)
In my last posting I showed you how to run an Azure Worker Role outside the Development Fabric. In this posting, I am going to show you how to run an ASP.NET MVC Web Role outside the fabric, too.
No special code required, all you need is IIS to be installed and running locally.
For background on setting up your machine for Azure Development, and ASP.NET MVC, there are any number of posts on the net. I have written the following posts on the topic, which might be useful:
https://blogs.msdn.com/blambert/archive/2009/02/13/first-azure-project-using-asp-net-mvc.aspx (updated for RC2)
https://blogs.msdn.com/blambert/archive/2009/02/13/creating-an-azure-asp-net-mvc-project.aspx
https://blogs.msdn.com/blambert/archive/2009/02/17/more-azure-asp-net-mvc.aspx
Note that ASP.NET MVC Release Candidate 2 has shipped (on March 3rd, 2009), so you will want to download it. I’ve updated the first link above to reflect this.
Also, there is a hotfix:
You will want. See Cloudy in Seattle (Jim Nakashima’s excellent Azure blog), for his postings on all this.
Now that you’ve got everything set-up for writing a Windows Azure ASP.MVC Web Role, let’s sort out how we can run one outside the Development Fabric.
All you need to do is copy your ConfigurationSettings from your ServiceConfiguration.csfg:
 <Role name="Web">
<Instances count="1" />
<ConfigurationSettings>
  <Setting name="AccountName" value="X"/>
  <Setting name="AccountSharedKey" value="Y"/>
  <Setting name="BlobStorageEndpoint" value="https://blob.core.windows.net"/>
  <Setting name="QueueStorageEndpoint" value = "https://queue.core.windows.net"/>
  <Setting name="TableStorageEndpoint" value="https://table.core.windows.net"/>
  <Setting name="UsePathStyleUris" value="true" />
</ConfigurationSettings>
</Role>
And put them into the Web.Config file of your ASP.NET MVC Worker Role in the appSettings section of the Web.Config’s configuration section:
 <configuration>
  <appSettings>
    <add key="AccountName" value="X" />
    <add key="AccountSharedKey" value="Y" />
    <add key="BlobStorageEndpoint" value="https://blob.core.windows.net" />
    <add key="QueueStorageEndpoint" value="https://queue.core.windows.net" />
    <add key="TableStorageEndpoint" value="https://table.core.windows.net" />
    <add key="UsePathStyleUris" value="true" />
  </appSettings>
</configuration>
The format of how you specify them is a little different. But they are the same values.
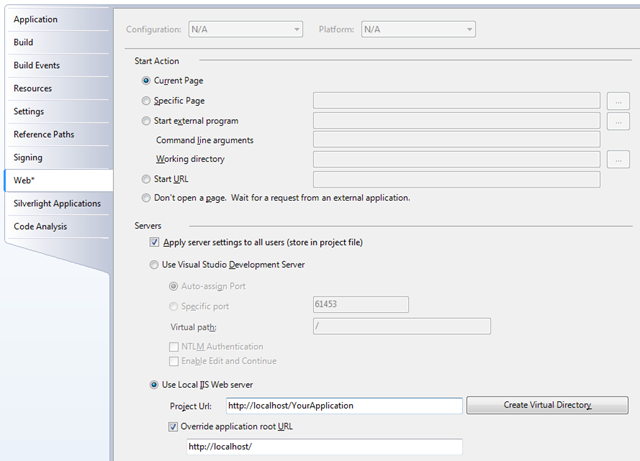
Next, configure your ASP.NET MVC Web Role to use your Local IIS Web server. Right click on the ASP.NET MVC Web Role’s project file, and select Properties.
On the Web section, change the configuration to something like:
Selecting “Override application root URL” will keep your routing working. And try it out.
It turns out that this was pretty well illustrated in the Azure SDK’s HelloFabric sample, but, since my first Azure Web Role was an ASP.NET MVC Web Role, I never even looked at HelloFabric. I started from scratch and sorted out how to do all this through experimentation (which was more fun and a better learning experience, anyway).
Best!
Brian
Comments
- Anonymous
March 10, 2009
PingBack from http://www.anith.com/?p=17400
