Choosing the right Kubernetes object for deploying workloads in Azure - Part 4
This material has been added to a full eBook, Kubernetes Objects on Microsoft Azure.
Introduction
The previous post in this series covered the Kubernetes dashboard. This post will build upon that knowledge. It will cover the practical aspects of putting those concepts into practice. The following posts in this series will cover deploying a 2-tier application (front-end + database) on Kubernetes. This post discusses getting the back-end service running on Kubernetes.
Considerations for deployment
The last post covered various deployment resources, such as pods, Deployment, HorizontalPodAutoscaler, DaemonSet, StatefulSet, and so on. It can be a challenge to select the right deployment resource for a given workload. Below is a quick summary of what resources are suitable for certain types of workloads.
Pod
Pods are a good starting point for getting containers running on Kubernetes. They are a very basic way to deploy containers on Kubernetes. However, they should not be used to deploy an application. While the simplicity of pods is a big advantage, they lack features such as auto-healing in case one fails or in the case of a node failure.
Deployment
Deployment solves problems associated with pods. It ensures that a specified number of pods are always running, even if there are pod failures. It uses the replicas value to achieve this behavior. Deployment uses ReplicaSet in the background for pod creation, updates, and deletions.
HorizontalPodAutoscaler
While a deployment ensures that a specified number of pods are always running, there are situations where this number needs to be between a range that is based on a workload. A typical scenario is of a front-end web application where the number of instances (or pods) should be based on a resource utilization (such as CPU, Memory, and so on). This is where HorizontalPodAutoscaler comes in handy. It provides an auto-scale functionality for pods.
DaemonSet
DaemonSet is a good deployment option if a functionality is tied to a physical node of a Kubernetes cluster. Common examples are node resource utilization and node monitoring. They are ideal for any infrastructure concerns.
StatefulSets
If there is workload where data-loss is unacceptable, StatefulSets are an ideal deployment option. Most of the database workloads are good candidates to be deployed as a StatefulSet. They store their state on external storage providers so that both a pod crash and even a cluster crash don't result in data loss.
Deploying database
This section covers running SQL Server on Linux in Kubernetes. Like any database, database files (.mdf, .ndf, .ldf) loss is unacceptable. in case of a cluster crash. Kubernetes StatefulSet is an ideal deployment object that will allow you to use external persistent storage. In this case, the solution uses Azure Disk Storage as the storage provider. However, there are a number of other storage solutions that can be used. To set up a SQL Server database on Azure Storage on Kubernetes, complete the following steps.
Create a secret
Running SQL Server as a container involves passing at least 2 environment variables. They are ACCEPT_EULA and SA_PASSWORD. Out of them, SA_PASSWORD is obviously a secret. The previous post covered what secrets are. This post will show you how to apply it. To create a secret use following command:
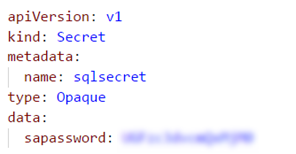
Figure 1. Creating a secret.
sapassword is declared as a secret above with its value specified as a base64 encoded value of a real password.
Create a StorageClass
StorageClass provides the specifications of the external persistent storage for a SQL Server database. Use Azure Disk Storage as an external persistent storage. Ensure that storageAccount is in the same resource group as the Kubernetes cluster. See Figure 2.

Figure 2. Creating a StorageClass.
Create a Persistent Volume Claim
A storage PersistentVolumeClaim ensures that data is stored on an external storage device outside Kubernetes cluster. It refers to StorageClass created earlier. It also specified accessMode and the storage resource requirement (10 GB below). See Figure 3.

Figure 3. Creating a PersistentVolumeClaim.
Create a service
When a database runs as a pod, it needs to have fixed endpoints (Protocol, Port, IP address, and so on) that can be called. Kubernetes services provide this abstraction. Unlike a pod, a service is a set of pods identified by a selector. Running as a service decouples how other pods or applications access them. Figure 4 shows how a service is created.

Figure 4. Creating a service.
Two notable specifications above are type: LoadBalancer and selector. Having a service type as LoadBalancer provides a load-balanced endpoint to connect with SQL Server. In most cases, this will be desirable when multiple applications, including the ones that run outside a cluster, are expected to connect with SQL Server. These applications can connect to SQL Server using loadBalancerIP, PortNo as a server name, as shown in Figure 5.
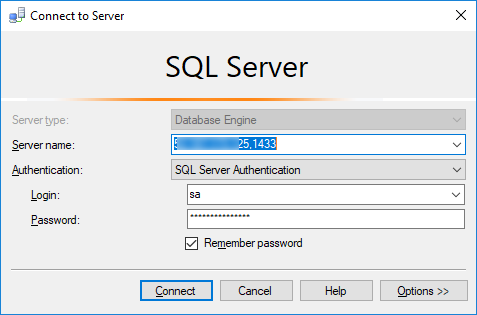
Figure 5. Connecting the applications to SQL Server.
However, there may be cases where SQL Server is expected to be accessed only by services or pods that are running inside a cluster. In such cases, a service can be run as a headless service. selector identifies a set of pods that run together as a service. The service sqlservice is going to look for pods with the label app: sqlinux and group them together to form a service.
StatefulSet
StatefulSet uses all the components created earlier. Figure 6 shows a template to create it.
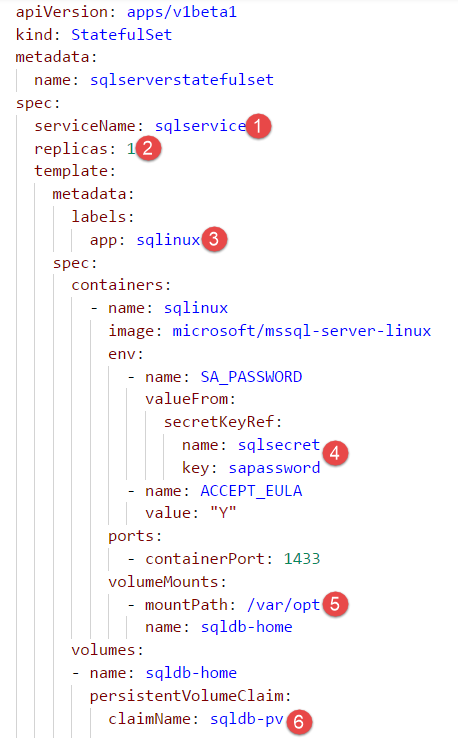
Figure 6. Creating a StatefulSet.
Here are the different pieces:
- Service: It is marked under spec: serviceName. This is the same service that was created earlier.
- replicas: They mark the number of pods to be created.
- labels: They are used to identify the pods that will make up the service. The value app: sqlinux should be same in both service as well as statefulset.
- secret: It is used to set environment variable SA_PASSWORD.
- volumeMount: It specifies directory on pod that will be mounted on external storage.
- persistentVolumeClaim: It is used to set the persistent volume claim defined earlier.
Combining these pieces and creating a YAML file to run, yields the result shown in Figure 7.

Figure 7. Creating a YAML file.
Record the service External endpoint IP, PortNo from the Kubernetes dashboard. As shown in Figure 8, click Services in the left pane, and then look for the External endpoints for sqlservice.

Figure 8. Finding the External endpoints port number.
Use that IP and SA password to connect from SQL Server Management Studio. See Figure 9.

Figure 8. Connecting from SQL Server Management Studio.
Run the custom database creation script to create a new database.
StatefulSet creates data disks in the Azure Storage account. You can validate that as well. First check the volume name in the Kubernetes dashboard. See Figure 9.
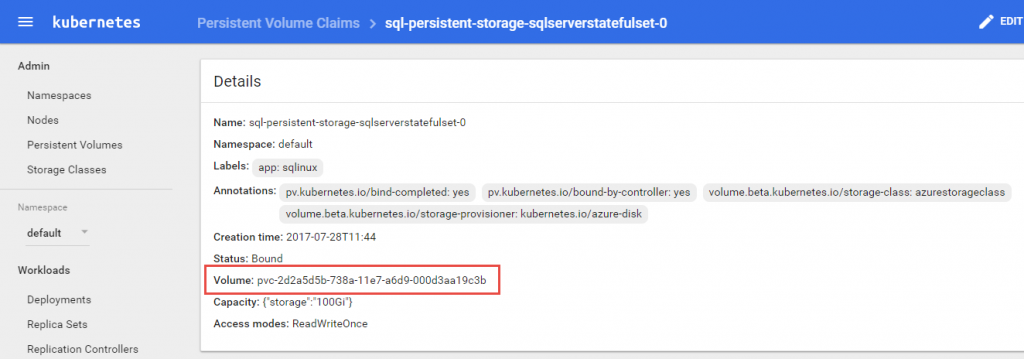
Figure 9. Checking the volume name.
This volume should be available in the Azure Storage account as well. See Figure 10.
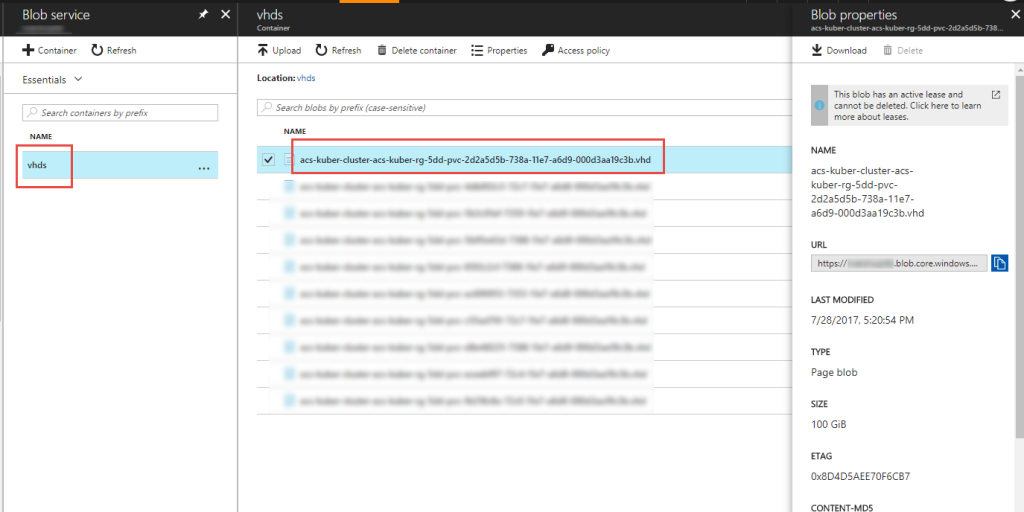
Figure 10. Finding the volume in an Azure Storage account.
Verifying data persistence
It's time to verify that the data is really getting stored on external storage. SSH onto the node that is running the pod. Run the fdisk -l command to display the partition tables for the devices (see Figure 11). Azure Disk is attached as a device on the node.
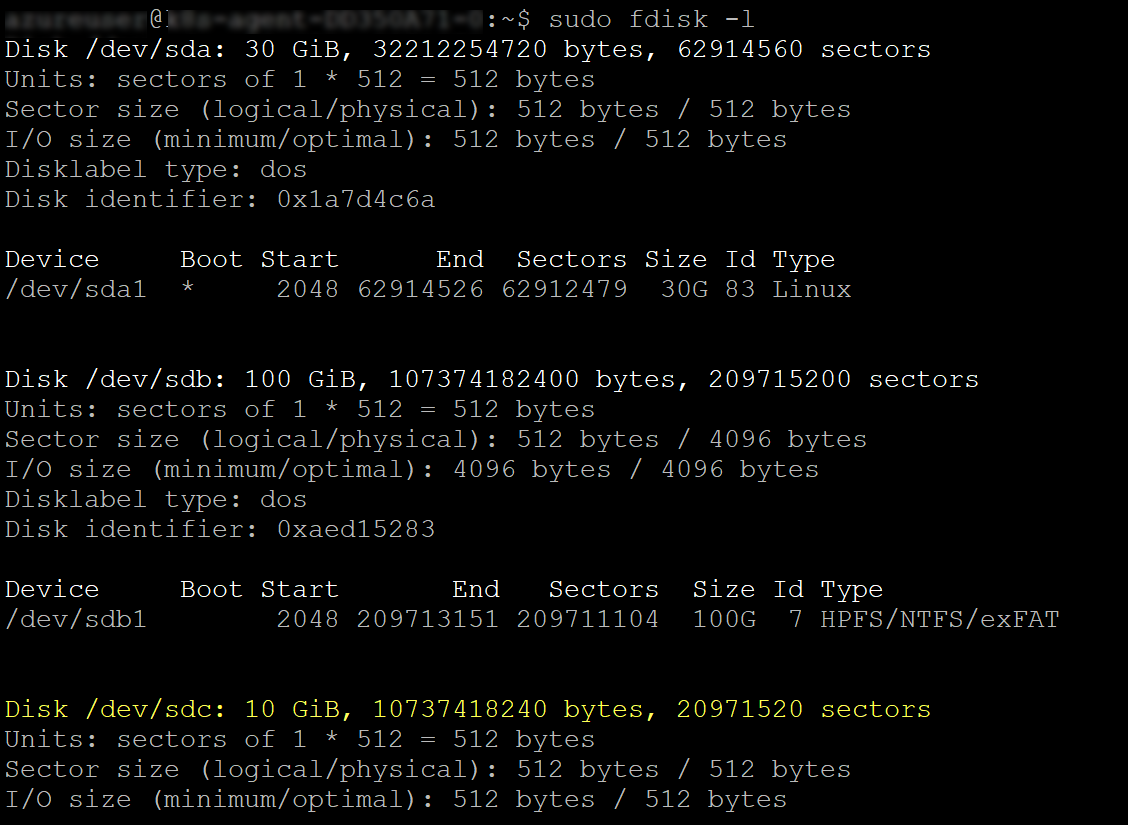
Figure 11. Running the fdisk -1 command.
As Figure 11 shows, /dev/sdc matches 10GiB storage from Azure Disk. This can be used to mount on a directory and verify its content.

Figure 12. Showing how the files are stored on Azure Disk.
The sequence from Figure 12 is as follows:
- Create a temporary directory.
- Mount it from the external volume.
- List its content.
- Navigate to the /mssql/data folder, which holds the SQL Server data and log files.
- List its content, and verify that the .mdf and .ldf files are created for the new database.
This proves that SQL Server data and log files are stored on Azure Disk. Even if the Kubernetes cluster crashes, the data can be safely recovered from those files.
My next post will cover creating an ASP.Net Core application that will connect to this database server.
Comments
- Anonymous
October 31, 2017
Continue on to Part 5 of this series: https://blogs.msdn.microsoft.com/azurecat/2017/10/24/choosing-the-right-kubernetes-object-for-deploying-workloads-in-azure-part-5/Return to Part 3 of this series: https://blogs.msdn.microsoft.com/azurecat/2017/10/24/choosing-the-right-kubernetes-object-for-deploying-workloads-in-azure-part-3/Return to the Overview article for this series: https://blogs.msdn.microsoft.com/azurecat/2017/10/24/choosing-the-right-kubernetes-object-for-deploying-workloads-in-azure/ - Anonymous
January 22, 2018
This material has been added to a full eBook, Kubernetes Objects on Microsoft Azure: https://azure.microsoft.com/en-us/resources/kubernetes-objects-on-microsoft-azure/en-us/