The ViewModel Pattern in Silverlight – An Example
During the last few weeks I was working with Silverlight again quite a bit. This meant I had to write some code for several showcase projects, too. Of course no real production code (beware) but nevertheless in the end the applications were doing what they were supposed to do. However as it usually happens in those cases you have to decide between a quick and dirty fire and forget kind of stumble into the programming of the app or to put some basic effort in planning and designing to have at least the basic rudiment of an application architecture. And although I’m in the role of architect evangelist I’m always tempted to start coding without big thinking right away. This time however we took some time and designed our applications so that we would have a nice separation between UI and application logic. In particular we chose a ViewModel approach which is quite common in the world of WPF and Silverlight. ViewModel stands for Model-View-ViewModel (MVV) and is a variation of the widely known Model-View-Controller (MVC) pattern. I won’t dig deep into the explanation of this patterns as they have been described in depth at many places already including John Gossman’s or David Hill’s Blog for MVV or the Portland Pattern Repository for MVC. This said I want to focus on a short example driven walkthrough on how to create an Silverlight Application implementing the MVV pattern.
The example application allows to view songs and song lyrics of the current top artists listed on LastFM. In order to aggregate the data this small sample application already is a mash up of two different web services.
- LastFM REST web service provides the list of top artists
- The LiyricsWiki REST web service provides the lyrics for a particular song
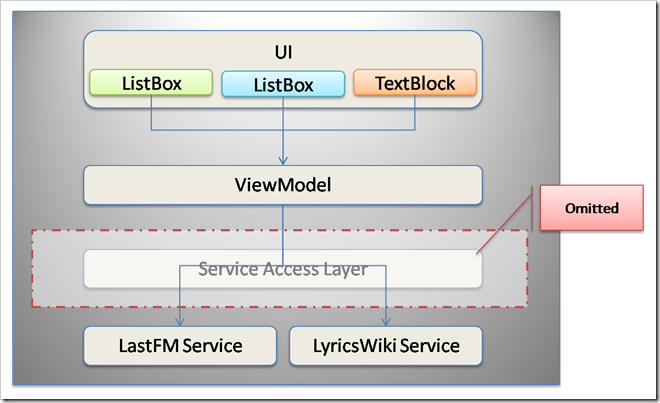
So in order to give you a high level impression of the application here is a simple architecture sketch.
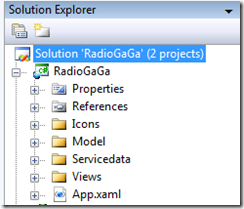
The Visual Studio 2008 project is organized accordingly. To maintain the highest level of simplicity a service access layer has been omitted although this would be something you would probably want to consider in a real application development project.
The folders contain the following:
- Icons contains the icons for the Silverlight 3 out-of-browser feature as I enabled OOB for this sample app however it is obviously not relevant for the ViewModel part
- Model contains, well, the ViewModel class and any other class necessary to build the object model for this application. In this case those are classes like Artist and Track which mainly consist of private fields and the related public properties.
- Views contains the UI which in this sample is a single XAML page with it’s code behind
- Servicedata contains some constant REST URIs for the services I call
As this baseline structure could be already called something like a best practice for ViewModel projects one could use such a structure as a base template for such applications.
Now let’s start with the meat of the application. The best way to start off with would probably be to create an empty ViewModel class stub which basically is a standard C# class stub. Next step could be to create something like a ViewModel Base class which enables change notification for properties of the ViewModel. This is absolutely helpful in order to have your views automatically updated when the properties change to which any UI Element is bound to.
This would look something like this:
 public abstract class ViewModelBase : INotifyPropertyChanged
 {
     protected void OnPropertyChanged(string propertyName)
     {
         PropertyChangedEventHandler handler = PropertyChanged;
         if (handler != null)
         {
             handler(this, new PropertyChangedEventArgs(propertyName));
         }
     }

     public event PropertyChangedEventHandler PropertyChanged;
 }
So the ViewModel then extents this ViewModelBase class and instantly gains those notification capabilities when the OnPropertyChanged method is called in the setter of a property.
The same requirement also exists for collections which are data bound however this is almost even easier as Silverlight (as well as WPF) comes with a special collection class which implements the Observer pattern which of course is tightly related with any MVC pattern. This class is a generic collection class and is called ObservableCollection<T>. So with this knowledge we can start filling our ViewModel with life. For this sample this would look like the following up until now:
 public class RadioGaGaViewModel : RadioGaGa.Model.ViewModelBase
     {
         #region Fields
         private ObservableCollection<Artist> topArtists;
         private ObservableCollection<Track> topTracks;
         private string currentLyrics = string.Empty;
         #endregion

         #region C'tor
         public RadioGaGaViewModel()
         {
             this.topTracks = new ObservableCollection<Track>();
             this.topArtists = new ObservableCollection<Artist>();
         }
         #endregion

         #region Properties
         public string CurrentLyrics
         {
             get { return this.currentLyrics; }
             set
             {
                 this.currentLyrics = value;
                 OnPropertyChanged("CurrentLyrics");
             }
         }

         public ObservableCollection<Track> TopTracks
         {
             get { return this.topTracks; }
         }

         public ObservableCollection<Artist> TopArtists
         {
             get { return this.topArtists; }
         }
         #endregion
     }
Now what we have to do next is to make the ViewModel available to the UI for data binding. This can be easily done by following this little sequence of tasks:
- Register an event handler for the Loaded-Event of the UserControl in the XAML markup of the respective view.
 <UserControl
     ...
     x:Class="RadioGaGa.MainPage"
     Loaded="OnMainPage_Loaded">
- Create a handler method stub in the code behind file of the XAML page
 private void OnMainPage_Loaded(object sender, RoutedEventArgs e)
         {

         }
- Instantiate a new ViewModel object
 private void OnMainPage_Loaded(object sender, RoutedEventArgs e)
         {
             RadioGaGaViewModel model = new RadioGaGaViewModel();

         }
- Create a public property which sets the DataContext for the UserControl
 public RadioGaGaViewModel ViewModel
         {
             get { return DataContext as RadioGaGaViewModel; }
             set { DataContext = value; }
         }
- Set the property and assign the ViewModel instance you just created
 private void OnMainPage_Loaded(object sender, RoutedEventArgs e)
         {
             RadioGaGaViewModel model = new RadioGaGaViewModel();
             ViewModel = model;
         }
After doing all this you can bind your the properties of your UI controls to the Properties of your ViewModel which are surfaced to the controls via the DataContext set on the top level FrameworkElement. For example you could create a DataTemplate for the items of a ListBox and could bind the respective properties like shown in the sample below.
 <ListBox.ItemTemplate>
     <DataTemplate>
         <Border CornerRadius="5" BorderThickness="1" BorderBrush="Black" Margin="1,0,0,1" Padding="2" MinWidth="320">
             <Border.Background>
                 <LinearGradientBrush EndPoint="0.5,1" StartPoint="0.5,0">
                     <GradientStop Color="#FFB2B2B2"/>
                     <GradientStop Color="#FFFFFFFF" Offset="1"/>
                 </LinearGradientBrush>
             </Border.Background>
             <Grid Height="55" HorizontalAlignment="Left">
                 <Grid.ColumnDefinitions>
                     <ColumnDefinition MaxWidth="40" />
                     <ColumnDefinition />
                 </Grid.ColumnDefinitions>
                 <StackPanel Orientation="Vertical" Grid.Column="0" MaxWidth="40" HorizontalAlignment="Left">
                     <TextBlock Text="{Binding Path=Rank}" FontSize="12" FontWeight="Bold" Foreground="Black" TextAlignment="Left" VerticalAlignment="Center" Padding="5,0,0,0" />
                     <Image Source="{Binding Path=Images[0]}" Height="30" Width="30" HorizontalAlignment="Left"/>
                 </StackPanel>
                 <StackPanel Orientation="Vertical" Grid.Column="1" HorizontalAlignment="Left">
                     <TextBlock Text="{Binding Path=Title}" FontSize="12" FontWeight="Bold" Foreground="Black" TextAlignment="Left" VerticalAlignment="Center" Padding="5,0,0,0" />
                     <StackPanel Orientation="Horizontal">
                         <TextBlock Text="Artist:" FontSize="12" Foreground="Black" TextAlignment="Left" VerticalAlignment="Center" Padding="5,0,0,0" />
                         <TextBlock Text="{Binding Path=Artist.ArtistName}" FontSize="12" Foreground="Black" TextAlignment="Left" VerticalAlignment="Center" Padding="5,0,0,0" />
                     </StackPanel>
                     <TextBlock Text="{Binding Path=Playcount}" FontSize="12" Foreground="Black" TextAlignment="Left" VerticalAlignment="Center" Padding="5,0,0,0" />
                 </StackPanel>
             </Grid>
         </Border>
     </DataTemplate>
 </ListBox.ItemTemplate>
And that’s basically all for creating a ViewModel pattern based architecture. Next step would be to implement the business logic that fills the ViewModel properties. In my case these are the calls to the different REST based web services, which of course are called asynchronously (also as Silverlight doesn’t support anything else) in order to still have an responsive UI while the services are accessed.
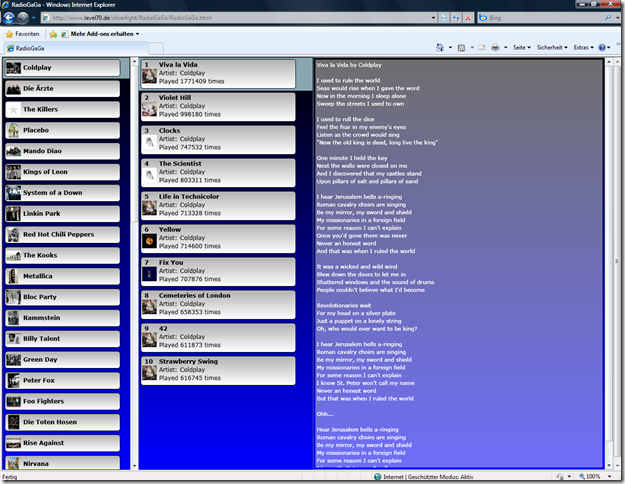
For our sample the final result can be tested here: https://www.level70.de/silverlight/RadioGaGa/RadioGaGa.html
As I already equipped my development machines with Silverlight 3 Beta this only works with the SL3 Beta runtime. So if you are still on 2 you have to be content with this screenshot (pretty, eh? ;))
The Visual Studio 2008/SL 3 Beta Tools solution can be downloaded from my SkyDrive.
I hope this all is helpful and easy to understand. As always feel free to send comments or corrections, etc.
Two more Sidenotes:
- LyricsWiki also offers a SOAP web service however I was not able to use it with Silverlight when letting Visual Studio generate the service proxy (with svcutil for Silverlight probably). So I switched to the REST based version
- This project can quite easily be migrated to WPF and vice versa. I’ve done this two time due to the fact mentioned in <1> because I wasn’t aware of the REST interface in the beginning. This shows that WPF and Silverlight get closer and closer with their features and APIs so that a develop once run everywhere scenario will become more and more feasible.
| Share |
Comments
- Anonymous
June 09, 2009
PingBack from http://www.codedstyle.com/the-viewmodel-pattern-in-silverlight-%e2%80%93-an-example-2/ - Anonymous
June 11, 2009
Oh, so complicated. but it worth read!


