Step-By-Step: Cloud Management Gateway
Introduction
ConfigMgr 1610 introduced the Cloud Management Gateway, an Azure based solution to manage clients on internet. The benefit is that you don't expose your infrastructure on the internet. The Azure VM(s) running behind the Cloud Management Gateway (Azure web service) are managed by Microsoft.
At a high level, the clients communicate to an Azure web service which acts a proxy to forward ConfigMgr client traffic to the on-premise MP/SUP via a new Site System role called Cloud Management Gateway Connection Point. For content distribution, you can leverage a Cloud Distribution Point. The Software Update contents are downloaded directly from Windows Update.
Let's start the journey to manage the clients over internet.
Important Note These procedures use an enterprise Root certification authority (CA) and certificate templates appropriate for a test environment ( as a proof of concept). Please ensure that your existing CA infrastructure is deployed as per Microsoft and Industry recommendations. For further assistance on CA/PKI infrastructure, please consult your PKI deployment documentation for the required procedures or engage Microsoft to follow best practices to deploy the required certificates for a production environment.
Environment
For a better understanding, here's a snapshot of the environment I am using to demonstrate the feature. A remote site system server will be configured to host the HTTPS roles along with the Cloud Management Gateway Connection Point.
Role |
Server Name |
Operating System |
Domain Controller
|
DC1.contoso.com | Windows Server 2016 Data Center |
ConfigMgr Primary Site (HTTP)
|
Primary1.contoso.com | Windows Server 2016 Data Center |
ConfigMgr Remote Site System (HTTP to HTTPS)
|
Remote1.contoso.com | Windows Server 2016 Data Center |
| Windows Clients | Win101.contoso.comWin7.contoso.com | Windows 10 Enterprise x64 v1511Windows 7 Enterprise x64 Sp1 |
| Azure Subscription | N/A | N/A |
1 Certificate Requirements
Note - Although its possible to use an HTTP MP/SUP for CMG functionality, this blog post follows the recommendation of HTTPS over HTTP. Its also a requirement for Modern Management Scenario.
The Clients and the Site System servers MP/SUP would still require a certificate to authenticate and encrypt communication. Here's the list of certificates you need –
- Azure Management Certificate
- Client Authentication Certificate
- Server Authentication Certificate
- Cloud Management Gateway Certificate
- Client Root Certificate
1.1 Azure Management Certificate
An Azure management certificate is required to deploy Azure services by authenticating with Service Management APIs.
- Instructions to Create a new self-signed certificate
Here's a screenshot of the 2 certificates I created following the instructions above -

Instructions to Upload the above certificate to Azure
I used the certificate named contoso.cloudapp.net.cer to import into the Azure portal.

1.2 Client Authentication Certificate
The following systems require a Client Authentication Certificate –
- Management Point
- Windows Clients
Follow the instructions in the TechNet link to –
- Create and Issue the Workstation Authentication Certificate Template on the Certification Authority
- Configuring Autoenrollment of the Workstation Authentication Template by Using Group Policy
- Automatically Enroll the Workstation Authentication Certificate and Verifying Its Installation on Computers
1.3 Server Authentication Certificate
The following systems require a Server Authentication Certificate –
- Management Point
- Software Update Point
Follow the instructions in the TechNet link to –
- Create and Issue the Web Server Certificate Template on the Certification Authority
- Request the Web Server Certificate. [For each server hosting the MP & SUP role in HTTPS mode.]
- Configure IIS to Use the Web Server Certificate. [On each server hosting the MP & SUP role in HTTPS mode.]
- Additional configuration for WSUS Website - https://technet.microsoft.com/en-us/library/bb633246.aspx
Once you have completed the steps in section 1.2 and 1.3 the remote site system server Remote1.contoso.com will have 2 certificates as below -

1.4 Cloud Management Gateway Certificate
We need an additional certificate for the Cloud Management Gateway to authenticate the client requests sent via Azure Web Service.
First we need a template to issue this certificate, since the requirements are same as the Server Authentication Certificate we created in section 1.3, we will duplicate its template.
- Connect to the CA server and launch MMC > Certification Authority > Certificate Template > Right click and Manage.
- Select ConfigMgr Web Server Certificate > Right click and Duplicate Template
- Click on General tab and change the display name to ConfigMgr Cloud Certificate
- Click on Request Handling Tab > Check the box Allow private key to be exported. Click OK
- Close Certificate Template window to go back to Certification Authority
- Right click Certificate Template and click New > Certificate Template to Issue
- Select ConfigMgr Cloud Certificate and click OK
Now we are ready to request the new certificate from Remote1.contoso.com
Launch MMC and Certificates > Local Computer > Personal > Certificates
Right click Certificates > All Task > Request New Certificate
Start the wizard and choose ConfigMgr Cloud Certificate. Click more information to add details
In the Subject tab under Subject Name Type drop-down choose Common Name.
Enter a name which should end with .cloudapp.net
Note – This name should be unique in your Azure subscription. A storage account is also created with the same name. Launch the storage quick create feature to confirm the name is not taken already.
I used configmgrgw.cloudapp.net in my lab.
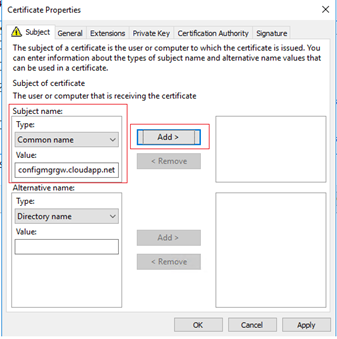
Click Add and OK to finish the wizard.
Once you have completed the steps in section 1.4 the remote site system server Remote1.contoso.com will have 3 certificates as below –

Next we need to Export the private key (.PFX) of the recently created certificate
- Right click on configmgrgw.cloudapp.net certificate > All Tasks > Export
- In the wizard choose the option Yes, export the private key.
- Proceed next to secure the certificate with a password and save the fixe with .PFX extension to finish the wizard.
Now I have 3 exported certificates, the 2 Azure Management Certificates and 3rd is the Cloud Management Gateway Certificate.

1.5 Client Root Certificate
Next we need the Client Root Certificate. We can leverage the Client Authentication certificate we generated in section 1.2
- Launch MMC and Certificates > Local Computer > Personal > Certificates
- Select the Client Authentication Certificate (sort by certificate template to identify).
- Right click and Open > Certification Path tab.
- Select the root certificate [Contoso Enterprise CA in my case] Click View Certificate
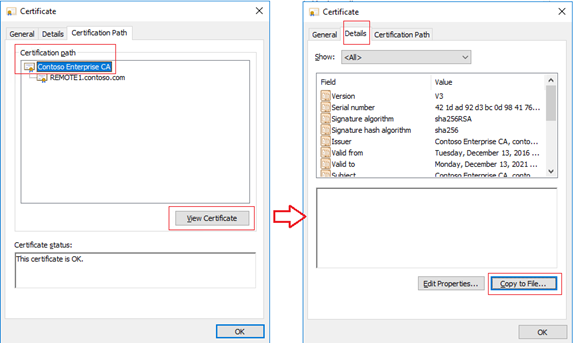
- This will open the Client Root Certificate. We need a copy of this certificate.
- Click Details tab and click the button Copy to File…
- Save the certificate with default settings.
Finally, we end up with 4 exported certificates'. 2 Azure Management Certificates, 1 Cloud Management Gateway Certificate and 1 Client Root Certificate.

2 HTTPS Configuration and Validation
Next we need to configure the Primary site for certificate authentication and validate the HTTPS site systems are responding to clients.
- Go to Administration > Site Configuration > Sites
- Properties of primary site > Client Computer Communication Tab
- Check the box – Use PKI client certificate (client authentication capability) when available.
- Clear the box – Clients check the certificate revocation list (CRL) for site systems. [Clear this only if you haven't published the CRL on internet.]
- Click OK to commit the changes.
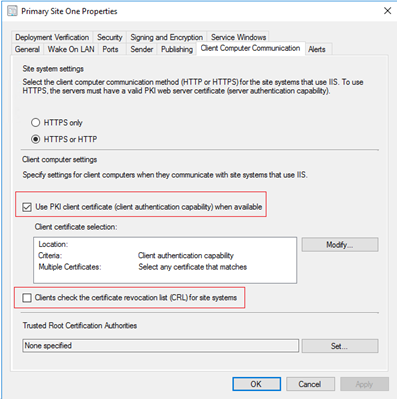
2.1 HTTPS MP [Skip this section if you already have an HTTPS MP]
The management point needs to be configured to accept HTTPS connection
- Go to Administration > Site Configuration > Servers and Site System Roles
- Select the Site Server holding the MP role which you plan to change to HTTPS. [Remote1.contoso.com in my lab]
- Under Site System Roles, select Management point and go to it properties
- Change the Client connections to HTTPS and click OK
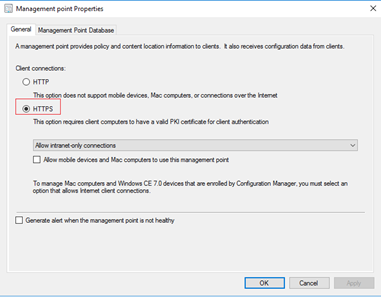
To validate the health of the MP, refer the following logs –
MPSetup.log – Confirm a successful installation
Installing E:\SMS\bin\x64\mp.msi REINSTALL=ALL REINSTALLMODE=vmaus CCMINSTALLDIR="E:\SMS_CCM" CCMSERVERDATAROOT="E:\SMS" USESMSPORTS=TRUE SMSPORTS=80 USESMSSSLPORTS=TRUE SMSSSLPORTS=443 USESMSSSL=TRUE SMSSSLSTATE=31 CCMENABLELOGGING=TRUE CCMLOGLEVEL=1 CCMLOGMAXSIZE=1000000 CCMLOGMAXHISTORY=1
mp.msi exited with return code: 0
Installation was successful.
MPControl.log – Confirm the status 200 OK
Call to HttpSendRequestSync succeeded for port 443 with status code 200, text: OK SMS_MP_CONTROL_MANAGER
You can also validate the MP Status from Console.
- Monitoring > System Status > Site Status [The MP in question should be green and Status OK]
- Monitoring > System Status > Component Status [The MP in question should be green and Status OK]
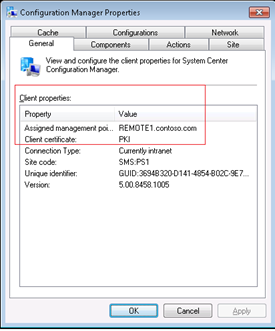
To validate the client HTTPS mode -
- You can check the Control panel applet. Client certificate should be PKI
2.2 HTTPS SUP [Skip this section if you already have an HTTPS SUP]
The Software Update point needs to be configured to accept HTTPS connection
- Go to Administration > Site Configuration > Servers and Site System Roles
- Select the Site Server holding the SUP role which you plan to change to HTTPS. [Remote1.contoso.com in my lab]
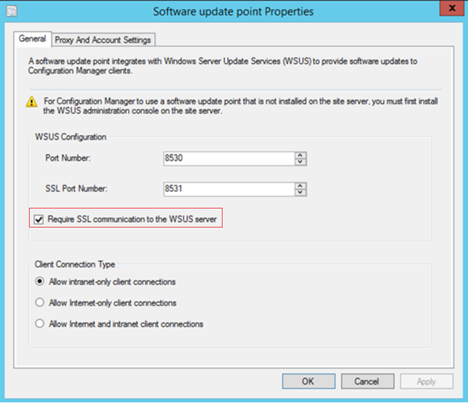
- Under Site System Roles, select Software update point and go to it properties
- Check the box Require SSL communication to the WSUS server and click OK.
To validate the changes –
Check in DB by running the query - Select * from WSUSServerLocations -- Check ISSSL = 1
On server side, check WCM.log
Attempting connection to WSUS server: REMOTE1.contoso.com, port: 8531, useSSL: True SMS_WSUS_CONFIGURATION_MANAGER
Successfully connected to server: REMOTE1.contoso.com, port: 8531, useSSL: True SMS_WSUS_CONFIGURATION_MANAGER
On the client side, refer the WUAHandler.log -
Enabling WUA Managed server policy to use server: https://REMOTE1.contoso.com:8531 WUAHandler
Local Policy – Specify intranet Microsoft update service location should have the HTTPS address

3 Enable and Configure Cloud Management Gateway
After completing sections 1 and 2, we are now ready to setup the Cloud Management Gateway.
3.1 Enable Feature
As of 1610 the Cloud Management Gateway is a Pre-Release feature which isn't enabled by default. Follow the steps below to enable –
- From the ConfigrMgr console, go to Administration > Site Configuration > Sites
- Select Primary Site and click on Hierarchy Settings from ribbon
- In the General tab check the box Consent to use Pre-Release features. Click OK

- Navigate to Updates and Servicing in the Administration page.
- Click on Features
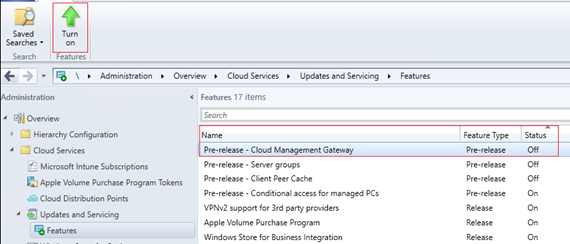
- Select Pre-release – Cloud Management Gateway and click Turn on from ribbon menu.
- Close and re-open the console.
3.2 Create Cloud Management Gateway
Now as we have enabled the feature, let's create the gateway –
In the ConfigMgr console navigate to Administration > Cloud Services > Cloud Management Gateway
From the ribbon menu click Create Cloud Management Gateway
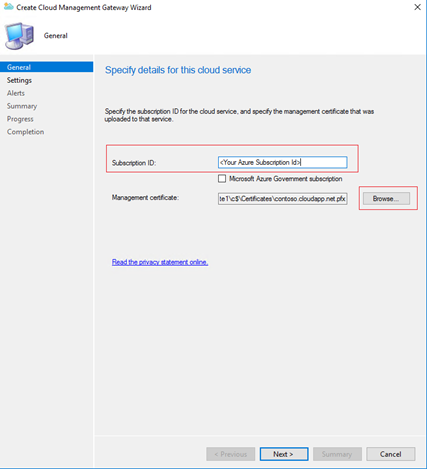
Enter the Subscription ID
Click Browse to choose the Management Certificate. This is the certificate export from section 1.1
Click Next
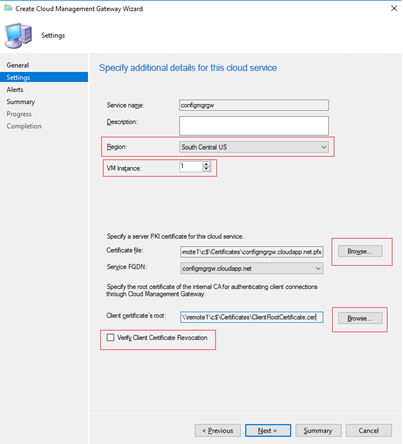
Now we need to provide details for the Azure Cloud Service which will be created in our subscription.
The Service name will be automatically populated once you provide the certificate information.
Select Region – The Azure region where the cloud service will be hosted.
Choose the number of VM Instances. A standard A2 VM will be hosted in Azure. Each VM can support approx 2000 simultaneous connections.
You can go up to 16 VMs. For each additional VM you need to increase the number of ports on the proxy by the number of virtual machines you use, starting at port 10124.
For Certificate File click Browse to choose the certificate created and exported in section 1.4
This will auto populate the Service FQDN and Service Name.
For Client certificate root click Browse to choose the certificate exported in section 1.5
Uncheck Verify Client Certificate Revocation. [Clear this only if you haven't published the CRL on internet.]
Click Next
Configure threshold settings as desired.
Click Next to finish the wizard.
To view the status, open CloudMgr.log You will see the Azure Cloud service is created and the CloudProxyService.cspkg file is deployed. You can also view the Azure console to see the Storage account and Cloud service.
Uploading file C:\Program Files\Microsoft Configuration Manager\inboxes\cloudmgr.box\CloudProxyService.cspkg to container deploymentcontainer with blob name configmgrgw.cspkg in storage account configmgrgw SMS_CLOUD_SERVICES_MANAGER
Deployment package is uploaded to https://configmgrgw.blob.core.windows.net/deploymentcontainer/configmgrgw.cspkg for service configmgrgw SMS_CLOUD_SERVICES_MANAGER

Once the provisioning is complete, the Status of Cloud Management Gateway in ConfigMgr console will change to Ready.

3.3 Add Site System Role - Cloud Management Gateway Connection Point
This is a new site system role required for communicating with the Azure Gateway created in step 3.2 I will use the remote1.contoso.com to add this site system role.
Go to Administration > Site Configuration > Servers and Site System Roles
Select the Site Server where you plan to install this role. [remote1.contoso.com]
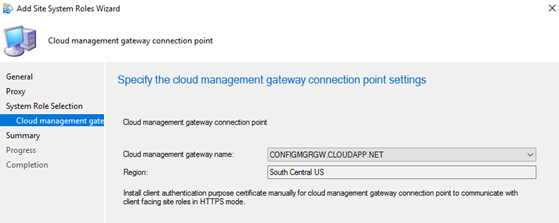
Add site system role and select Cloud management gateway connection point
The Gateway name and Region will be auto-populated and requires no further action. Finish the wizard.
A new log file is created SMS_CLOUD_PROXYCONNECTOR.log to monitor the activities.
TCP CONNECTION: Established TCP connection with Proxy server CONFIGMGRGW.CLOUDAPP.NET:10140 SMS_CLOUD_PROXYCONNECTOR
3.4 Configure Roles to accept Cloud Gateway traffic
Last step is to configure the site system roles [MP & DP] to listen and respond to Cloud Management Gateway traffic from internet clients.
Go to Administration > Site Configuration > Servers and Site System Roles
Select the Site System Server hosting the MP/SUP which you want to respond to the internet clients via Cloud Management Gateway.
Go to Management Point Properties and check the box Allow Configuration Manager cloud management gateway traffic.
Go to SUP Properties and check the box Allow Configuration Manager cloud management gateway traffic.
The connection automatically switches to Allow intranet and Internet connections.

Click OK to complete.
You can view the SMS_CLOUD_PROXYCONNECTOR.log to see the connection with Cloud Management Gateway.
ReportOnlineConnections - state message to send: <Connections ServerName="REMOTE1.CONTOSO.COM"><Connection ID="00f9a999-958a-4a30-b50d-2a35b7742bae" ConnectedInstances="1"/></Connections> SMS_CLOUD_PROXYCONNECTOR
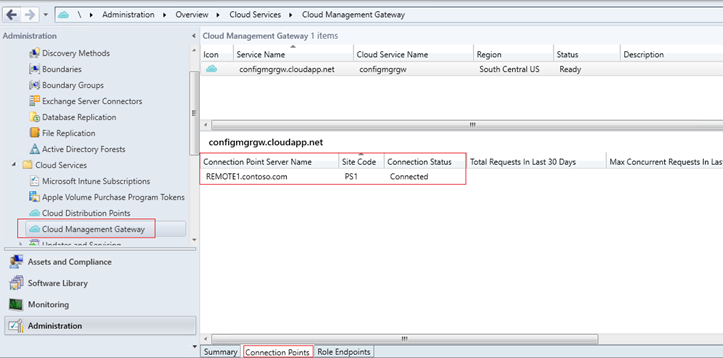
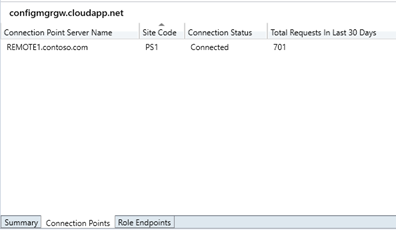
The connection points and connection status can also be viewed in the console under the Cloud Management Gateway Node.
4 Validate Internet Clients Management
4.1 Client Gateway Policies
The clients on the corporate network will receive the location of the cloud management gateway service which prepares them for internet management.
You can verify the information in the ConfigMgr control panel applet in the Network Tab.
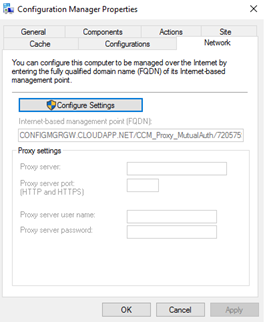
The information is also published under the following registry key - HKEY_LOCAL_MACHINE\SOFTWARE\Microsoft\SMS\Client\Internet Facing 
4.2 Management Point – Internet Connections
Now as we have the gateway policies, it's now time to test the internet client management. Switch one of the test client from the domain network to public internet.
- Open the ConfigMgr control panel applet to validate the Connection Type: Currently Internet. You will also notice the Assigned Management Point name is missing.

Make a configuration change from Primary Site and initiate machine policy on the internet client. View the PolicyAgent.log; LocationServices.log
Initializing download of policy 'CCM_Policy_Policy5.PolicyID="PS120001-PS10000C-BB8CD055",PolicySource="SMS:PS1",PolicyVersion="1.00"' from 'https://CONFIGMGRGW.CLOUDAPP.NET/CCM_Proxy_MutualAuth/72057594…./SMS_MP/.sms_pol?PS120001-PS10000C-BB8CD055.1_00' PolicyAgent_ReplyAssignmentsLSUpdateInternetManagementPoints:
Successfully refreshed internet MPs from MP CONFIGMGRGW.CLOUDAPP.NET/CCM_Proxy_MutualAuth/72057…... LocationServices
I created a test package and deployed it to the internet client which is now available in Software Center.
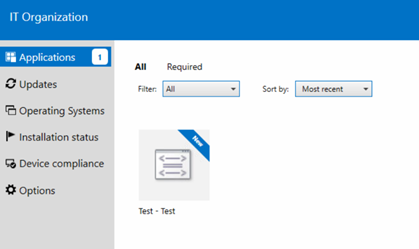
If you have a Cloud Distribution point, the client will be able to download the content.
4.3 Software Update Point – Internet Connections
The SUP proxy information is also sent to the client machines. Refer the registry key below for information -
HKEY_LOCAL_MACHINE\SOFTWARE\Policies\Microsoft\Windows\WindowsUpdate

When a new Scan request is sent, the location services reports the new WSUS location.
WSUS Path='https://CONFIGMGRGW.CLOUDAPP.NET/CCM_Proxy_ServerAuth/720575……', Server='REMOTE1.CONTOSO.COM', Version='3' LocationServices
Initializing download of policy 'CCM_Policy_Policy5.PolicyID="{442ECAD6-ABFA-4579-934F-9F71E21A72F3}",PolicySource="SMS:PS1",PolicyVersion="2.00"' from 'https://CONFIGMGRGW.CLOUDAPP.NET/CCM_Proxy_MutualAuth/7205…/SMS_MP/.sms_pol?{442ECAD6-ABFA-4579-934F
You can also check the status of the SUP proxy state by browsing the web service url below. Change the number 7205…. to the number for your cloud service.
https://configmgrgw.cloudapp.net/CCM_Proxy_ServerAuth/7205........../CLIENTWEBSERVICE/client.asmx
On my Windows 7 machine I deployed an update and have configured the deployment to download content from MU instead of DP.

Update (Site_D7D3DEFB-42AE-468E-AAB1-5ED2D51F28AC/SUM_81d78420-defd-4425-81c1-cad24afaa647) Progress: Status = ciStateDownloading, PercentComplete = 0, Result = 0x0 UpdatesDeploymentAgent
Download started for content 41844b78-fe16-4f15-b9a9-4bf44b09fc51.1 ContentAccess
Distribution Point='net: https://wsus.ds.download.windowsupdate.com/c/msdownload/update/software/secu/2016/04/windows6.1-kb3155178-x64\_8d5c4b10ce6a99858877fb3fe85d98fae6acc8ca.cab', Locality='WUMU' ContentAccess
4.4 Monitoring Cloud Management Gateway
You can monitor the status of the Gateway and the traffic from the ConfigMgr console. The Connection Points and Role Endpoints tab has this information.

Thanks,
Arnab Mitra
Comments
- Anonymous
April 21, 2017
Hi , this is a great article. I have a question about the management certificates FQDN that is used. In the article about the Azure Management certificates it states not to use the cloudapp.net extension but the domain used to connect. So basically your companies own domain. I see you used the cloudapp.net extension which I also tried but it was not working for me. Could you confirm which domain to use?thnx, Jeroen- Anonymous
April 21, 2017
Thanks Jeroen, the guidance for not using cloudapp.net is based on the fact that you cannot acquire a public SSL certificate for the cloudapp.net (or for any Azure-related) domain. For the Self signed option (recommended for labs) you can do whatever you want but it won't be a verified cert.
- Anonymous
- Anonymous
April 24, 2017
Hi-Thanks for the blog. May I know if we need to configure CMG for multiple regions, should we configuring CMG Connection Point in the respective regions site system roles and make them connect to respective Cloud Gateway in the same region? Can we have more than one server configured with the connection point role in the same region?- Anonymous
May 15, 2017
The comment has been removed- Anonymous
June 14, 2017
Just to confirm, in an environment with a CAS that has a CMG on different primaries. A client assigned to Primary A will report to CMG A and a client assigned to Primary B will report to CMG B?- Anonymous
June 14, 2017
Yes, your understanding is correct.
- Anonymous
- Anonymous
- Anonymous
- Anonymous
May 24, 2017
In the text it says "enable Pre-release – Conditional access for managed PCs", while the screenshot shows "Pre-Release - Cloud Management Gateway".- Anonymous
May 24, 2017
Thanks, i have updated it now.
- Anonymous
- Anonymous
May 29, 2017
Thanks for the tutorial! However i can't seem to get the connection working. I receive a CCM_E_BAD_HTTP_STATUS_CODE error code and the http logs on the Azure service gives a 500 0 64 error.Any tips on checking the root cause? Thanks!Kristof- Anonymous
May 30, 2017
Refer this link for a list of CMG Log files for troubleshooting purposes - https://docs.microsoft.com/en-us/sccm/core/plan-design/hierarchy/log-files#cloud-management-gateway
- Anonymous
- Anonymous
May 30, 2017
The comment has been removed- Anonymous
May 30, 2017
The comment has been removed- Anonymous
May 31, 2017
The comment has been removed- Anonymous
May 31, 2017
Refer the guidance in this docs article - https://docs.microsoft.com/en-us/sccm/core/servers/deploy/configure/install-cloud-based-distribution-points-in-microsoft-azure#a-namebkmkconfigdnsforclouddpsa-set-up-name-resolution-for-cloud-based-distribution-points- Anonymous
May 31, 2017
The comment has been removed- Anonymous
September 15, 2017
Yes, your understanding is correct.
- Anonymous
- Anonymous
- Anonymous
- Anonymous
- Anonymous
- Anonymous
June 11, 2017
Do you know Firewall port requirements for these cert communications between CA, Domain Controllers (if CA and DCs are not in same Forest with one way trust). Also, do you have details about the Firewall ports required between CA and MP (HTTPS) site system server?- Anonymous
June 12, 2017
I wouldn't setup a firewall exception for this task as long as i can export and import certificates. [Something like public certs but in this case no CRL checks]The challenge i see is for client certs. Refer this blog post for f/w guidance on AD-CS - https://blogs.technet.microsoft.com/pki/2010/06/25/firewall-rules-for-active-directory-certificate-services/
- Anonymous
- Anonymous
June 12, 2017
The comment has been removed- Anonymous
June 14, 2017
When you create the CMG, it creates a self signed cert in LocalComputer\SMS\Certificates this certificate will be used by the CMG-Connection Point role. You will see this in SMS_CLOUD_PROXYCONNECTOR.log - Anonymous
June 22, 2017
Alan, I'm seeing the same error in my connector log. Would love to hear if you found a solution.
- Anonymous
- Anonymous
August 14, 2017
If using your internal CA to create the certificate you should also set the Subject Alternate Name to match the CMG, not just the common name. The “Common Name” field of an SSL certificate, which contains the domain name the certificate is valid for, was actually phased-out via RFC nearly two decades ago. Instead, the SAN (Subject Alternative Name) field is the proper place to list the domain(s). - Anonymous
August 31, 2017
Hi Arnab,I have CAS and 2 primary sites. Can I use single CMG to configure CMG connection point on both primaries? Is there any limitation with CMG to support multiple CMG connection point?Is installing CMG connection point on Primary server is safe or should we create new site system server to host MP/SUP/CMGCPIs it mandatory to have public CA for webservice certificate?thanks,Sengar- Anonymous
August 31, 2017
The comment has been removed
- Anonymous
- Anonymous
September 01, 2017
The comment has been removed- Anonymous
September 15, 2017
Incase you missed to read the Note in section 1 - Although its possible to use an HTTP MP/SUP for CMG functionality, this blog post follows the recommendation of HTTPS over HTTP. Its also a requirement for Modern Management Scenario.
- Anonymous
- Anonymous
September 14, 2017
Hi, we created the Root Certificate, but when do we actually use it? I didn't see that part in your post.- Anonymous
September 15, 2017
Hi David, if you are referring to the client root cert in section 1.5, we do use it in section 3.2
- Anonymous
- Anonymous
September 25, 2017
HI Arnab, May I know if we need to specify the resource group defined under only "Cloud Service (classic)" while setting up the Cloud Management Gateway VM? Have been pushed why we are configuring the gateway under a "classic" :( Can you please clarify?- Anonymous
September 25, 2017
Hi Anantha, the feature is deployed as a cloud service package under classic model. ARM support is considered for future release.- Anonymous
September 26, 2017
Thanks Arnab...well I hope that future comes sooner...we had been holding this for a while....may i know if we configure CMG now in classic mode - will it be an issue when ARM support is introduced?- Anonymous
September 26, 2017
Also- does the support for "classic" gets over by the end of this year?- Anonymous
September 26, 2017
There is no committed timeline as its not considered a deployment blocker. - Anonymous
September 27, 2017
Thanks Arnab.
- Anonymous
- Anonymous
- Anonymous
- Anonymous
- Anonymous
October 01, 2017
The comment has been removed- Anonymous
October 01, 2017
Hi Arti, for the 400 non-domain joined machines, you can use Modern Management which requires CMG with an HTTPS MP.- Anonymous
October 01, 2017
The comment has been removed- Anonymous
October 01, 2017
The comment has been removed
- Anonymous
- Anonymous
- Anonymous
- Anonymous
November 29, 2017
The comment has been removed- Anonymous
November 29, 2017
Hi Jason, consider CMG as a PaaS where you dont host or maintain the infrastructure. When you create the CMG, it will create its own vm instance (Standard_A2) which can support upto 6k connections starting 1702.- Anonymous
November 29, 2017
Hi Arnab, Thanks for your reply. I am helping to set this up for a large corporate. The existing Azure subscription will be used and security is paramount. The policy doesn't allow for auto creation of VM on Azure due to security etc. So we had one created already, and secured. If setting up the CMG via the configmgr console will auto create a VM for us. The question is, would we be able to configure the CMG via the Console to point to the VM created by the server team? Thanks.Jason- Anonymous
December 12, 2017
Its not possible today. I understand there is a user voice feedback for this request to be considered in future.
- Anonymous
- Anonymous
- Anonymous