Porting and testing your classic desktop applications on Windows 10 S with the Desktop Bridge
On 2nd May Microsoft has announced Windows 10 S, a new Windows 10 edition (based on the same Creators Update version, which means build 15063) designed specifically for scenarios where the customer wants to put safety and security first above all when they use their devices. The main differences, in fact, compared to a standard Windows 10 Home, Pro or Enterprise edition are:
- You can get applications only from the Windows Store. If you try to install a desktop application with a classic installer, you will be blocked. This allows to increase the security of the system, because all the apps on the Store are validated by the certification team. Additionally, when it comes to pure Universal Windows Platform apps, they run in a sandbox, which makes impossible for them to harm the operating system.
- It enforces a series of code integrity checks which, for example, make impossible to execute processes that aren’t part of an application downloaded from the Store, including the most common Microsoft ones like CMD.EXE, REG.EXE or REGEDIT.EXE, or to manually install app packages that aren’t signed with the digital certificate provided by the Store. This means that, even if you get a malware or a virus from a website, it won’t be able to execute any malicious code, since every process execution will be blocked.
As you can easily understand, Windows 10 S is best suitable for:
- Educational environments, like schools of universities: Windows 10 S boots in no time and allows to quickly switch from one user (the student) to another. Due to the security enforcements, students won’t be able (intentionally or unintentionally) to corrupt the operating system, making life easier to:
- The IT Pro administrators of the school, which won’t have to format half of the machines of the school every other day.
- The teachers, who can start their digital lessons right away, without having to worry that some of the computers may have been corrupted by the students of the previous classroom.
- Users without high technical skills and that can be an easy target for malwares, spam and ransomwares. You can give a Windows 10 S computer to your father or to your grandmother without having to worry that they will probably call you twice per day because they accidentally did something which put their computer in unstable state.
Microsoft is launching today its own device with Windows 10 S preinstalled, which is the Surface Laptop. However, also our partners are going to release many devices with this new edition of Windows 10 at very compelling prices: during the event, Terry Myerson (Vice President of the Windows and Devices group), showcased some of them, starting as low as 189 $. And if you find out that Windows 10 S isn’t good enough for your needs, you will always have the option, anytime, to convert it to a regular Windows 10 Pro machine by paying a small price (49 $, which will be free instead for Surface Laptop purchasers until the end of 2017).
If you’re a developer, this introduction should have helped you to understand how Windows 10 S is another important piece of the Desktop Bridge puzzle: if converting a classic desktop application to a Universal Windows Package already offered many benefits (from a cleaner deployment process with minimum impact on the system to the opportunity of start integrating the Universal Windows Platform in applications based on other technologies), now the Desktop Bridge is also the way you can offer your classic desktop application to Windows 10 S users. As example, among the announcements made on 2nd May and at BUILD, Microsoft has revealed that many popular desktop applications are coming to the Store thanks to the Bridge: Spotify, iTunes and Office are just a few of the most important names, which will be in good companion with other important applications already available like Evernote, Adobe Photoshop Elements, Musixmatch, Arduino IDE, etc.
What does Windows 10 S mean for a developer?
If you haven’t already done it before, for sure it’s a great moment to start thinking seriously about the Universal Windows Platform, for your new desktop applications, and at the Desktop Bridge, to leverage the existing investments you have already made to create desktop applications with WPF, Windows Forms, Delphi, Electron, etc. Both ways will allow you start leveraging many of the great features that Windows 10 has introduced (like Windows Hello for biometric security, push notifications, live tiles, Cortana, etc.) and, at the same time, expand your audience, by allowing also Windows 10 S users to buy and use your application.
However, Windows 10 S introduces a new challenge for developers when it comes to the Desktop Bridge: pure UWP applications won’t have to deal with any limitation, since the sandbox doesn’t already allow to execute external processes, unless you use one of the supported ways offered by the platform (like a protocol, a file association, an app service, etc.). As such, a Universal Windows Platform app already satisfies, by default, all the code integrity checks that are performed by Windows 10 S. The same can’t be said about a Win32 application: they can execute external processes, they can try to invoke a system process like CMD.EXE or REG.EXE, etc. As such, a converted desktop application that works flawlessly on a regular Windows 10 machine may not work properly on Windows 10 S. How to test if your converted application is compliant also with Windows 10 S? The first answer could be “get a Windows 10 S machine”, but there are some challenges:
- At the time of writing, Windows 10 S isn’t available as a standalone operating system. You can’t buy a copy of it or you can’t download it, for example, if you have a MSDN subscription. It has been announced only as pre-installed on new devices.
- Even if the second option would be available in the future, you wouldn’t be able to use it for testing: the reason is that, as already mentioned before, the code integrity checks enforced by Windows 10 S don’t make sure only that you can get applications exclusively from the Store, but also that you can’t manually install any app package, unless it’s signed with the Store certificate (which, as you can imagine, it isn’t a viable option for any developer, since only Microsoft own this certificate).
As such, none of these options would work for a developer, because you will be forced to publish your application on the Store before checking if it’s compliant. So does this mean that there’s no way to test if a Desktop Bridge application is compliant with Windows 10 S without publishing it first?
Say hello to Device Guard!
Device Guard is a specific Windows 10 feature and, as described in the official documentation, is a combination of enterprise-related hardware and software security features that, when configured together, will lock a device down so that it can only run trusted applications that you define in your code integrity policies. Long story short: thanks to this feature, you can create some custom policies that apply a set of code integrity checks to make sure that only applications that satisfy them are allowed to run. This feature is widely used in the Enterprise world, since it reduces the chances that, intentionally or unintentionally, an employee can run malicious code or install an application which isn’t allowed by the company.
The Desktop Bridge team has released a set of policies for Device Guard that can help you to simulate the same code integrity checks applied by Windows 10 S on a regular Windows 10 machine, but with less limitations. Specifically, the two policies that are most useful for developers are called:
- Audit mode: when this policy is applied to your PC, your converted desktop application will run as if it’s running on a regular Windows 10 machine, but every compliance failure with the code integrity checks will be logged. Currently, the documentation suggests to start with this policy, since it will allow you to use all the features of your application, without facing weird crashes or exceptions. However, there’s a but: when the Code Integrity checks are enforced, every kind of failure will be logged, even simply the fact that you are launching a converted desktop application which isn’t singed with the Store certificate. As such, Audit mode can be useful, but you will have to filter all the noise and identify which are real errors (like you’re launching an external process) and false positives (like launching a process which is included in the package, but which simply isn’t signed with the Store certificate).
- Product mode policy with self-signed apps: this policy is more “annoying” because the testing flow won’t be as smooth as with Audit mode, but it’s more reliable . When this policy is applied, your Windows 10 machine will behave exactly like Windows 10 S, so all the code integrity checks will be indeed enforced, causing exceptions and errors if you will try to perform an unsupported operation. The biggest difference, compared to a standard Windows 10 S machine, is that the Desktop Bridge team has provided a special digital certificate to sign your apps: thanks to it, even if it’s not the Store one, you’ll be able to sideload converted desktop apps. This way, you’ll be able to test your application without having to submit it first on the Store.
There’s also a third policy, called Production mode, which, however, is useful only for the final validation of the application: this policy, in fact, will turn your machine exactly in a Windows 10 S copy, enforcing all the code integrity checks and allowing only apps signed with the Store certificate to be installed. As such, this policy can be used only for a final round of the testing after that your application has already passed the certification and has been published on the Store.
Let’s see now, using a sample application, how to apply these policies and perform our testing.
The sample application
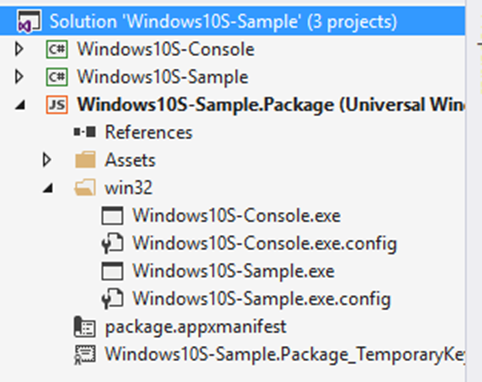
The sample application we’re going to use to test Windows 10 S is very simple. It’s a Visual Studio solution built with the JavaScript approach to handle the Desktop Bridge conversion (which is described in this post), made by two different classic desktop applications: a Windows Forms one and a console one. Thanks to the way the two projects are configured (I won’t go into the details, since everything is described in the already mentioned post), the final result is that both classic desktop applications will be included in the same app package:
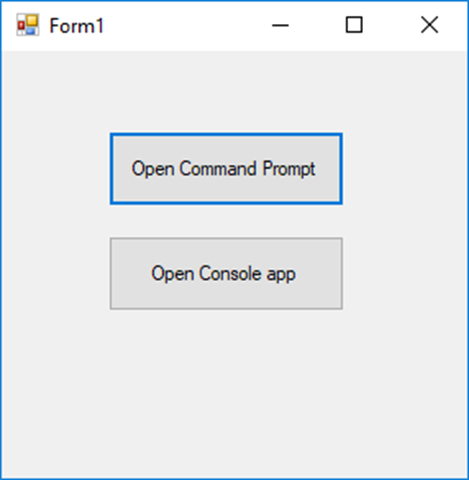
The main entry point of the app package (so the application that will be launched when you will click on the icon created in the Start menu) is the Windows Forms one (the file called Windows10S-Sample.exe), which looks like this:
The first button simply uses the Process.Start() method of the . NET Framework to launch the Windows command prompt (CMD.EXE):
 private void OpenCommandPrompt(object sender, EventArgs e)
{
    Process.Start("CMD.EXE");
}
The second button, instead, invokes the second console application that we have included in the same app package (the file Windows10S-Console.exe). Also in this case we use Process.Start() , but before we need to use the Reflection APIs to retrieve the path of the current folder. If you remember some of the older posts of this blog (like the one about integrating multiple executables in the same app package) you’ll know that, when a desktop application is running as converted, the APIs to retrieve the current working directory return a different folder than the installation one, so you can’t rely on them to get access to the files that are part of the same package. The trick used in the following code snippet is using the Reflection APIs to retrieve the path of the running assembly and, from there, get the location of the other process we want to launch:
 private void OpenConsoleApp(object sender, EventArgs e)
{
    string location = System.Reflection.Assembly.GetExecutingAssembly().Location;
    int index = location.LastIndexOf("\\");
    string source = $"{location.Substring(0, index)}\\Windows10S-Console.exe";
    Process.Start(source);
}
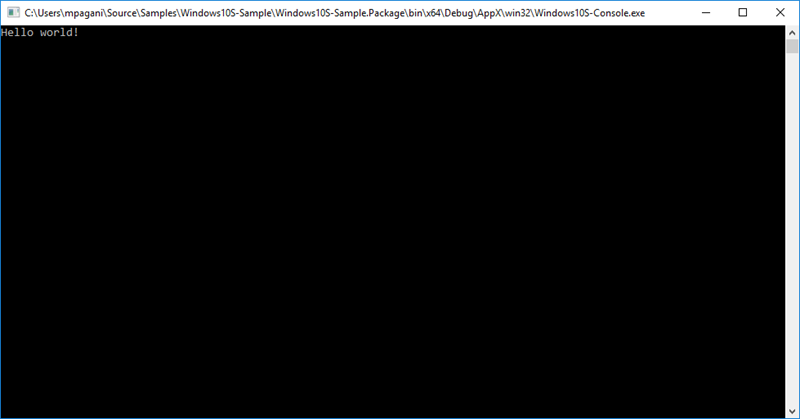
The console app does nothing more than displaying a “Hello world!” message to the user and waiting for the Enter key to be pressed to close itself:
It’s a very simple app and, if you will try the converted version (by deploying the JavaScript project of the Visual Studio solution) on your regular Windows 10 machine, everything will work as expected. But let’s see what happens with Windows 10 S.
How to simulate the Windows 10 S environment
The first suggestion to test if your apps are compliant with Windows 10 S is to leverage another Windows 10 machine that you don’t use very often or to create a Virtual Machine with a Windows 10 Pro or Enterprise installation. The reason is that, when these policies are applied, they limit the kind of operations you can do, so this is something you might not want to do on your production machine. Regardless of the path you have chosen, the first step is to download the compressed file that the Desktop Bridge team has made available in the official documentation: https://go.microsoft.com/fwlink/?linkid=849018
This file contains:
- A pair of .pfx and .cer files (called AppxTestRootAgency), which you will need to sign the application in a way that they can be manually sideloaded and launched also when the Production mode policy is enabled.
- A set of .p7b files, one for each policy that I have previously described.
To apply a policy, you have to:
- Identify the one you want to apply:
- SiPolicy_Audit.p7b is the one for Audit Mode.
- SiPolicy_Enforced.p7b is the one for Production Mode (a full Windows 10 S replica).
- SiPolicy_DevModeEx_Enforced.p7b is the one for Production mode with self-signed certificate (a full Windows 10 S replica, but with the option to sideload apps that are signed with the AppxTestRootAgency certificate).
- Take the file related to the policy you have chosen and rename it to SiPolicy.p7b.
- Copy this file in the folder C:\Windows\System32\CodeIntegrity\ . Of course, you will need to be administrator of the machine, since it’s a system folder.
- Reboot the machine. After the reboot, the policy will be in place and active.
Let’s see now how our sample app behaves in every scenario (with the exception of the Production mode since, as already mentioned, it works only if the app is published on the Store).
Testing with audit mode
If you install the sample app package with the audit mode enable, you won’t notice any difference compared to a standard Windows 10 machine. The app will start and you will be able both to press the first button (and see the Windows command prompt opening) and the second one (and see the console app opening). However, now open the Start menu or the Search bar, start typing even and choose Event Viewer from the results. In the left panel you will be able to browse the different log categories: the logs related to code integrity checks failure are stored under Application and Services Logs –> Microsoft –> Windows –> CodeIntegrity.You will see multiple entries, each for any operation you have performed.
The description of each entry will look like the following one:
Code Integrity determined that a process (\Device\HarddiskVolume4\Windows\System32\svchost.exe) attempted to load \Device\HarddiskVolume4\Program Files\WindowsApps\MatteoPagani.Windows10S-Sample_1.0.0.0_neutral__e8f4dqfvn1be6\win32\Windows10S-Sample.exe that did not meet the Enterprise signing level requirements or violated code integrity policy. However, due to code integrity auditing policy, the image was allowed to load.
As you can see, as already mentioned when I have described Audit mode, the problem with this policy is that this section gets easily full of false positives, because for Windows 10 S the facts that you’re launching an app which isn’t signed with the Store certificate or that you’re launching an external process (like CMD.EXE) are logged in the same way and with the same message. You can notice, in fact, that the description of the error is quite generic (that did not meet the Enterprise signing level requirements or violated code integrity policy). Among the three errors logged in the previous screenshot, only one it’s real: the one that has been triggered when we pressed the first button of the Windows Forms app and launched the command prompt. The other two are false positives and are caused simply by the fact that neither theWindows Forms process (Windows10S-Sample.exe) and the console process (Windows10S-Console.exe) are signed with the Store certificate.
As you can see, Audit mode can be useful, but you have to learn to filter out the noise and identify which are the real errors. A good starting point is this page taken from the Windows 10 S documentation, which lists all the built-in Windows 10 processes that can’t be executed on Windows 10 S:
- bash.exe
- cdb.exe
- cmd.exe
- cscript.exe
- csi.exe
- dnx.exe
- kd.exe
- lxssmanager.dll
- msbuild.exe
- ntsd.exe
- powershell.exe
- powershell_ise.exe
- rcsi.exe
- reg.exe
- regedt32.exe
- windbg.exe
- wmic.exe
- wscript.exe
Testing with production mode with a self-signed certificate
This policy is indeed more useful, even if it will make the overall testing phase slower. When it’s applied, every operation not supported by Windows 10 S will be blocked and you’ll get an exception, so that you can easily identify what you’re doing wrong. Before using your app with this policy, you will need to make a few changes, since you can’t sign it with any certificate, but you will have to apply the specific certificate that it’s included in the file that you have previously downloaded together with the Device Guard policy files.
The first change is that you need to open the AppxManifest.xml file of your application and temporarily change the Publisher attribute of the <Identity> node with the value CN=Appx Test Root Agency Ex (since it’s the subject of the testing certificate provided by the Desktop Bridge team), like in the following sample:
<Identity Name="MatteoPagani.Windows10S-Sample" ProcessorArchitecture="x64" Publisher="CN=Appx Test Root Agency Ex" Version="1.0.0.0" />
Then, after you have applied this change, you need to recreate the package, using the makeappx tool on the folder that contains the converted version of the app. If you’re using the Visual Studio solution, in order to get this folder you have to deploy the JavaScript project at least once, then you will find it in the bin\x64\Debug folder and it’s called AppX. Then, you will have to open the Developer Command Prompt for Visual Studio 2017 and run a command like the following one:
makeappx pack -p "Windows10S-Sample.appx" -d "<path of the AppX folder>" -l
In the end, you will have to sign the package from the same command prompt using the signtool application. However, this time, instead of using your own test certificate, you will have to use the AppxTestRootAgency.pfx one that we have downloaded before and launch the following command on the same folder where the Windows10S-Sample.appx file has been created:
signtool.exe sign /a /v /fd SHA256 /f "AppxTestRootAgency.pfx" "Windows10S-Sample.appx"
I won’t go into the details on how to use the makeappx and the signtool tools, since I’ve already talked about them in details in the following blog post, in the section titled Repackaging the app.
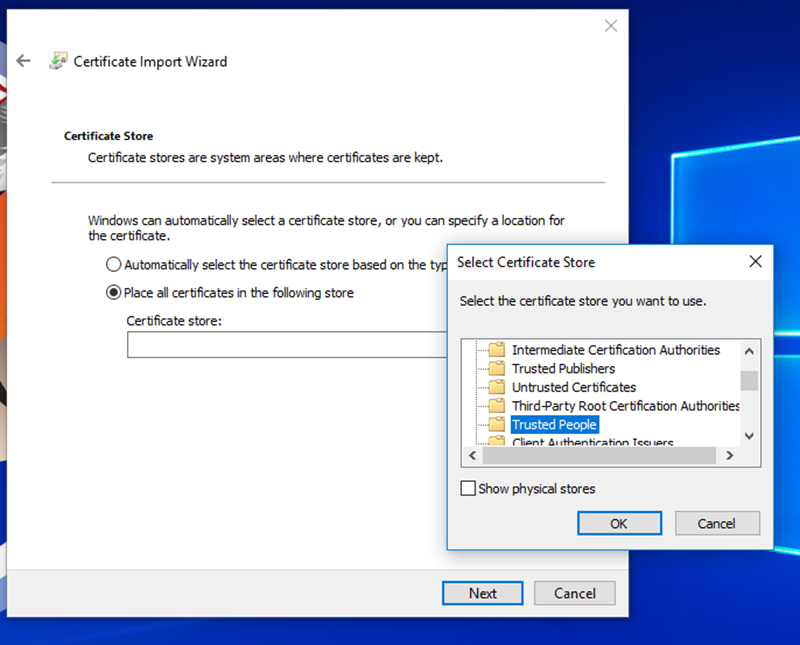
The last step won’t be surprising, since we did it many times to test our converted applications: by default, the AppxTestRootAgency.cer certificate isn’t trusted by a Windows 10 machine, so you need to double click on it and, following the wizard, make sure to install it at Local machine level and in the Trusted people store.
Now you can finally sideload the AppX file on your Windows 10 S “simulated” machine and, thanks to the Device Guard policy you have applied, you’ll be able to install and launch the converted version of the app without issues, even if it isn’t signed with the Store certificate. However, this time the sample app will behave differently than what we have experienced when we have installed it on our full Windows 10 machine. The app, in fact, will run normally but:
If we press the button to launch the Console App, it will open regularly. The reason is that the Console app isn’t an external process, but it’s been included inside the same app package of the Windows Forms one, so it’s allowed to run.
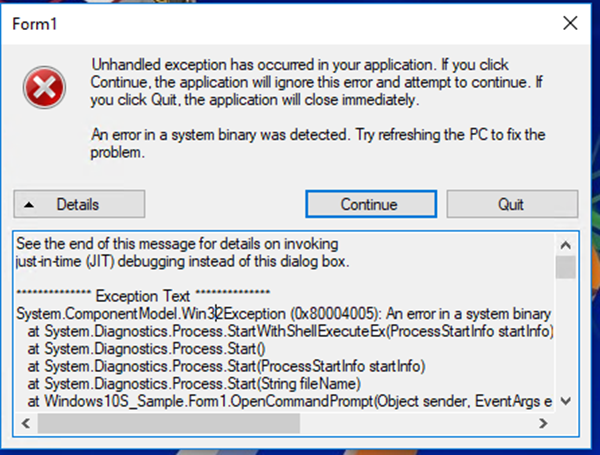
If we press the button to open the command prompt, this time we will get an exception, because we’re indeed trying to launch an external process:
Some common code integrity check failures
Before wrapping up, I would like to point out some common validation failures that the AppConsult team has found out in their everyday job with developers.
Electron applications
Electron (a framework to create cross-platform desktop applications based on web technologies and NodeJS) can be often source of issues on Windows 10 S. The reason is that, out of the box, it’s uncommon that you can develop a desktop application just with the tools provided by Electron, but you often need to add additional NodeJS modules in order to integrate more advanced features, like writing files on the hard disk, accessing to the registry, etc. However, sometimes it happens that these modules, instead of using a supported and approved approach by the operating system’s manufacturer, they leverage workarounds that often require to use external processes. A good example is when your Electron application needs to interact with the Windows registry. Many applications out there use a module called winreg to achieve this goal, which is available on GitHub: https://github.com/fresc81/node-winreg However, if you take a look at the source code of the JavaScript file that is included in the module, you will find that all the reading and writing operations are performed by invoking the REG.EXE process which, other than generally being a discouraged and unsupported way, would be blocked on a Windows 10 S machine. A workaround is to identify modules (like this one https://github.com/CatalystCode/windows-registry-node) that, instead, make use of the proper Windows APIs in a supported way. This way, since no external processes are involved, the converted app will run just fine even when it needs to perform operations against the system registry.
Dynamic code generation
Some frameworks may make use of dynamic code generation. A good example is JNA (Java Native Access), a Java library that allows to access to native code from a Java application (similarly to what you can do in the .NET Framework with P/Invoke). By default, this library generates the code in a dynamic way: when needed, the code required to access to the native APIs is created in a temporary folder and then loaded at runtime. The problem is that this approach violates the code integrity checks performed by Windows 10 S, because the code generated at runtime is loaded from a folder which is external to the installation folder where the AppX is deployed. In this case, the solution is to configure JNA to create static libraries (DLL files) instead of dynamic ones and make sure that the Java application will look for them in the AppX installation folder.
Wrapping up
I hope you didn’t get too bored reading this long post ![]() , but I think its content is very important for developers: Windows 10 S will play an important role in the future of the Microsoft ecosystem and, especially if you are working on educational or consumer applications that you want to bring on the Store with the Desktop Bridge, you need to be sure that they will work just fine also on Windows 10 S and not just on the traditional Windows 10 editions.
, but I think its content is very important for developers: Windows 10 S will play an important role in the future of the Microsoft ecosystem and, especially if you are working on educational or consumer applications that you want to bring on the Store with the Desktop Bridge, you need to be sure that they will work just fine also on Windows 10 S and not just on the traditional Windows 10 editions.
You can download the sample app used as a demo for this blog post from the following GitHub repository: https://github.com/qmatteoq/Windows10S-Sample
Comments
- Anonymous
December 09, 2017
Thanks for the post. Really helped me...
