My Take on an Azure Open Source Cross-Platform DevOps Toolkit–Part 10
| My Take on an Azure Open Source Cross-Platform DevOps Toolkit–Part 1 | Click Here |
| My Take on an Azure Open Source Cross-Platform DevOps Toolkit–Part 2 | Click Here |
| My Take on an Azure Open Source Cross-Platform DevOps Toolkit–Part 3 | Click Here |
| My Take on an Azure Open Source Cross-Platform DevOps Toolkit–Part 4 | Click Here |
| My Take on an Azure Open Source Cross-Platform DevOps Toolkit–Part 5 | Click Here |
| My Take on an Azure Open Source Cross-Platform DevOps Toolkit–Part 6 | Click Here |
| My Take on an Azure Open Source Cross-Platform DevOps Toolkit–Part 7 | Click Here |
| My Take on an Azure Open Source Cross-Platform DevOps Toolkit–Part 8 | Click Here |
| My Take on an Azure Open Source Cross-Platform DevOps Toolkit–Part 9 | Click Here |
| My Take on an Azure Open Source Cross-Platform DevOps Toolkit–Part 10 | Click Here |
| My Take on an Azure Open Source Cross-Platform DevOps Toolkit–Part 11 | Click Here |
| My Take on an Azure Open Source Cross-Platform DevOps Toolkit–Part 12 | Click Here |
Tagging and Pushing Image to https://hub.docker.com
Before we can run our container in the DC/OS cluster, we need to first tag it and push it to https://hub.docker.com.
Docker Hub is a cloud hosted service from Docker that provides registry capabilities for public and private content. Collaborate effortlessly with the broader Docker community or within your team on key content, or automate your application building workflows.
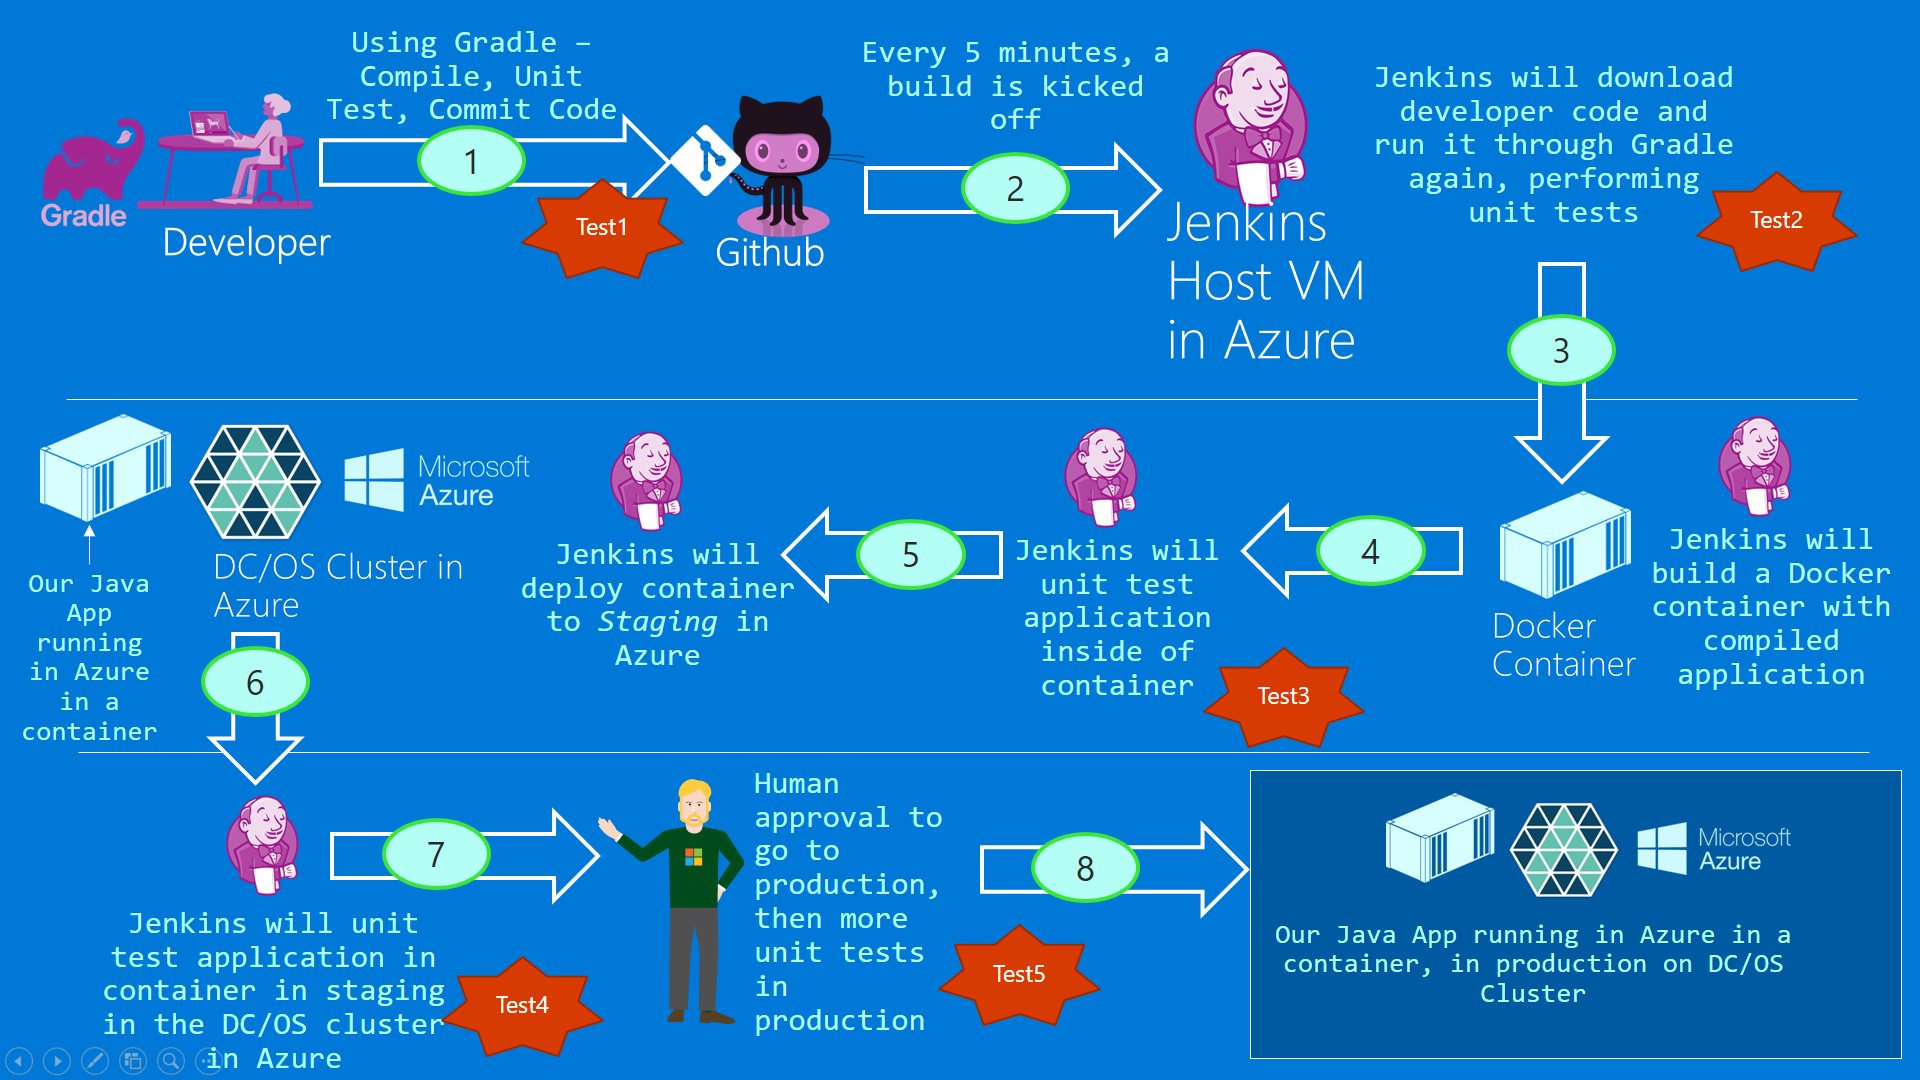
Figure 1: The big picture
Images at hub.docker.com
Below you can see that my image is already there. We'll as part of the devops pipeline, we need to automate this step. We will present some python code that does just that.
This image is available for anyone right now. That is because it is in a public repo. In a future post we will show how to run this image on a DC/OS cluster as part of the pipeline execution.
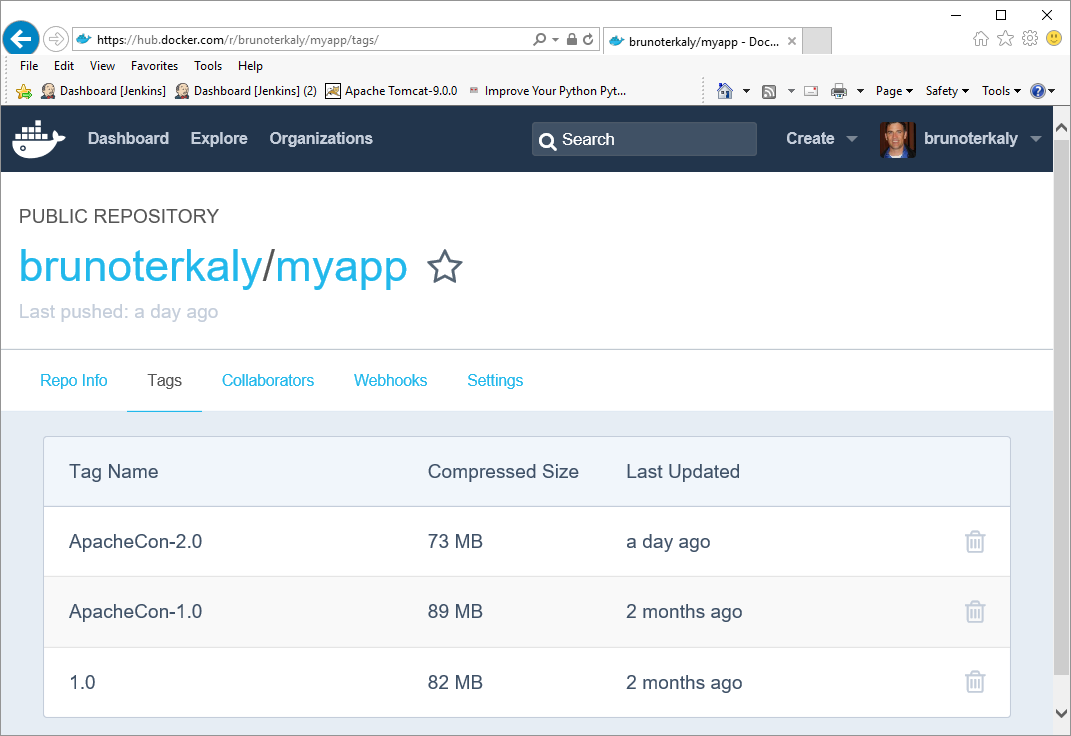
Figure 2: brunoterkaly/myapp:ApacheCon-2.0 at hub.docker.com
The current state of the pipeline
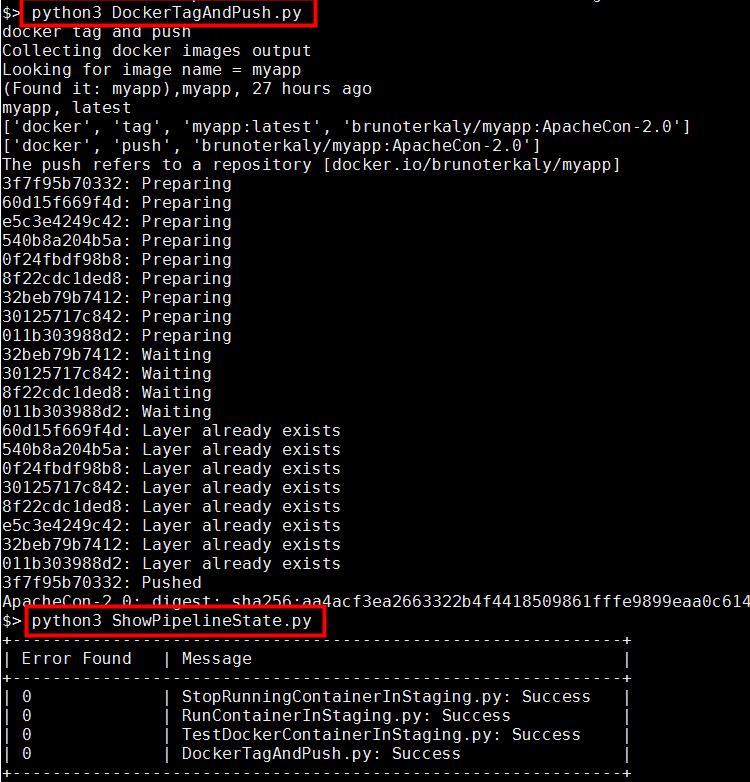
As you can see, we need to tag then push the image to hub.docker.com. Tagging is simply a way to provide the appropriate name brunoterkaly/myapp:ApacheCon-2.0. It says "ApacheCon-2.0" because I recently did a talk in Sevilla, Spain at ApacheCon Europe.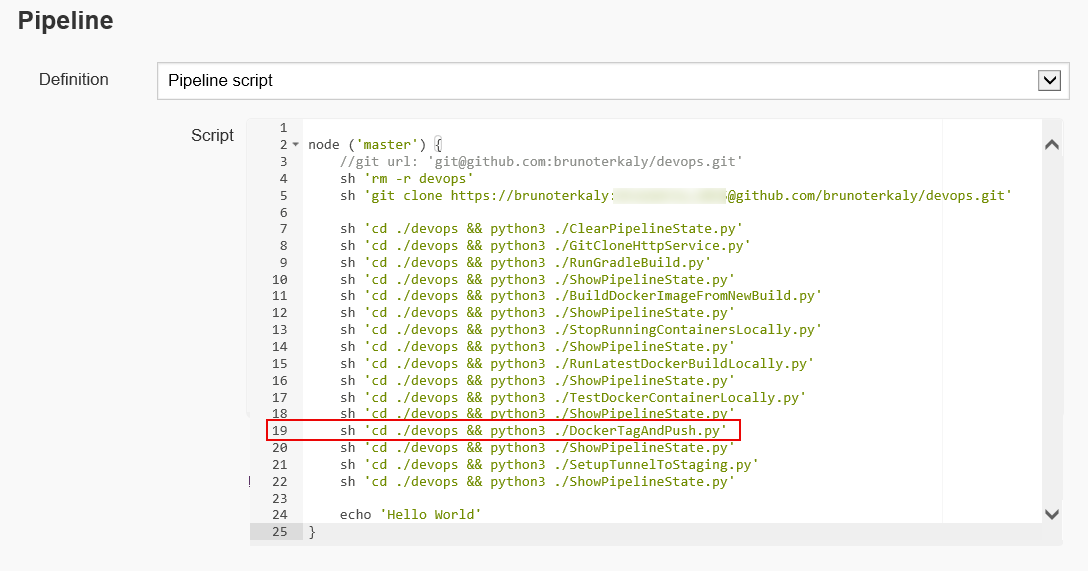
Figure 3: The current pipeline - DockerTagAndPush.py
How to build an image (tag and push to hub.docker.com)
Here is some context about what we are doing. There’s a couple of steps here. The first step is to actually copy our image up to hub.docker.com.
Once that is done, it can then be deployed to work cluster and run as a container.
This must all occur automatically as part of the pipeline
The main point here is that all of this must happen automatically as part of the pipeline execution. So in this post I will present the code that will tag and push our image up to the registry (hub.docker.com).
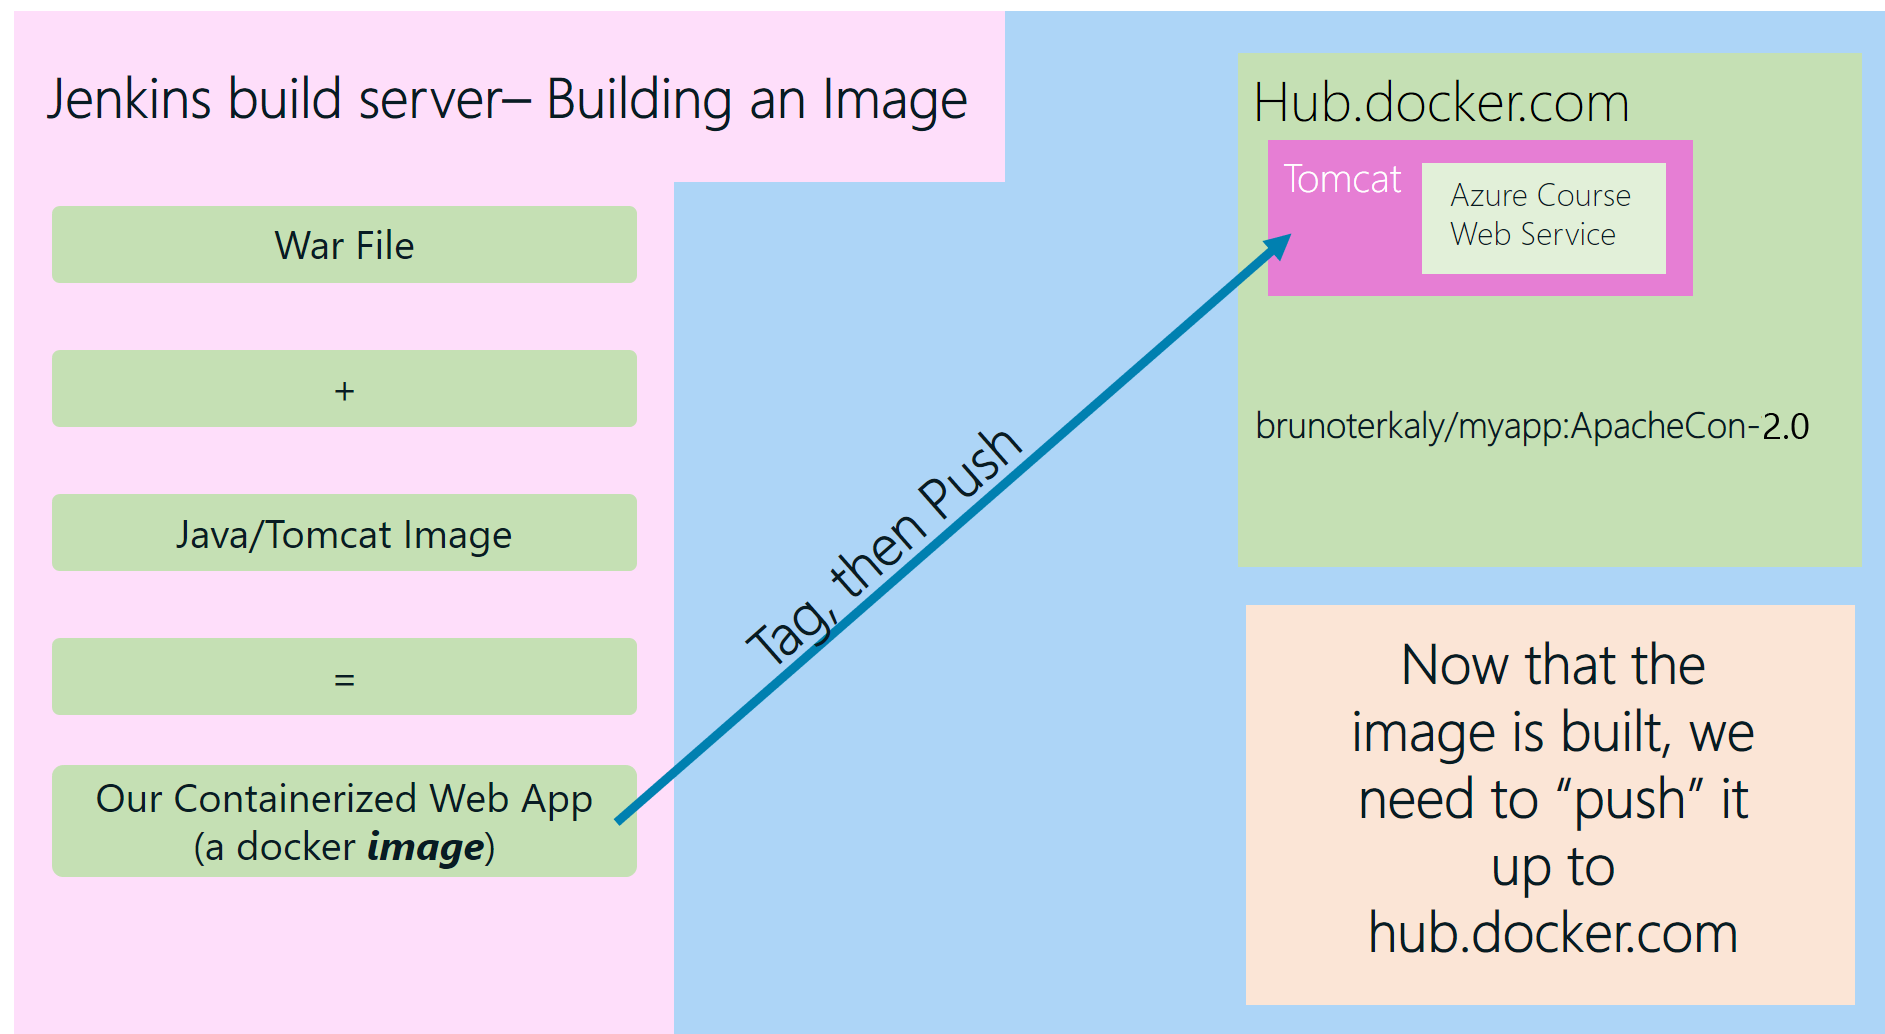
Figure 4: Image = Tomcat + myapp.war
ACS Clusters
The Azure DC/OS cluster can be anywhere in the world. We can deploy multiple clusters as needed. For any given cluster we can easily deploy our application there, directly from hub.docker.com.
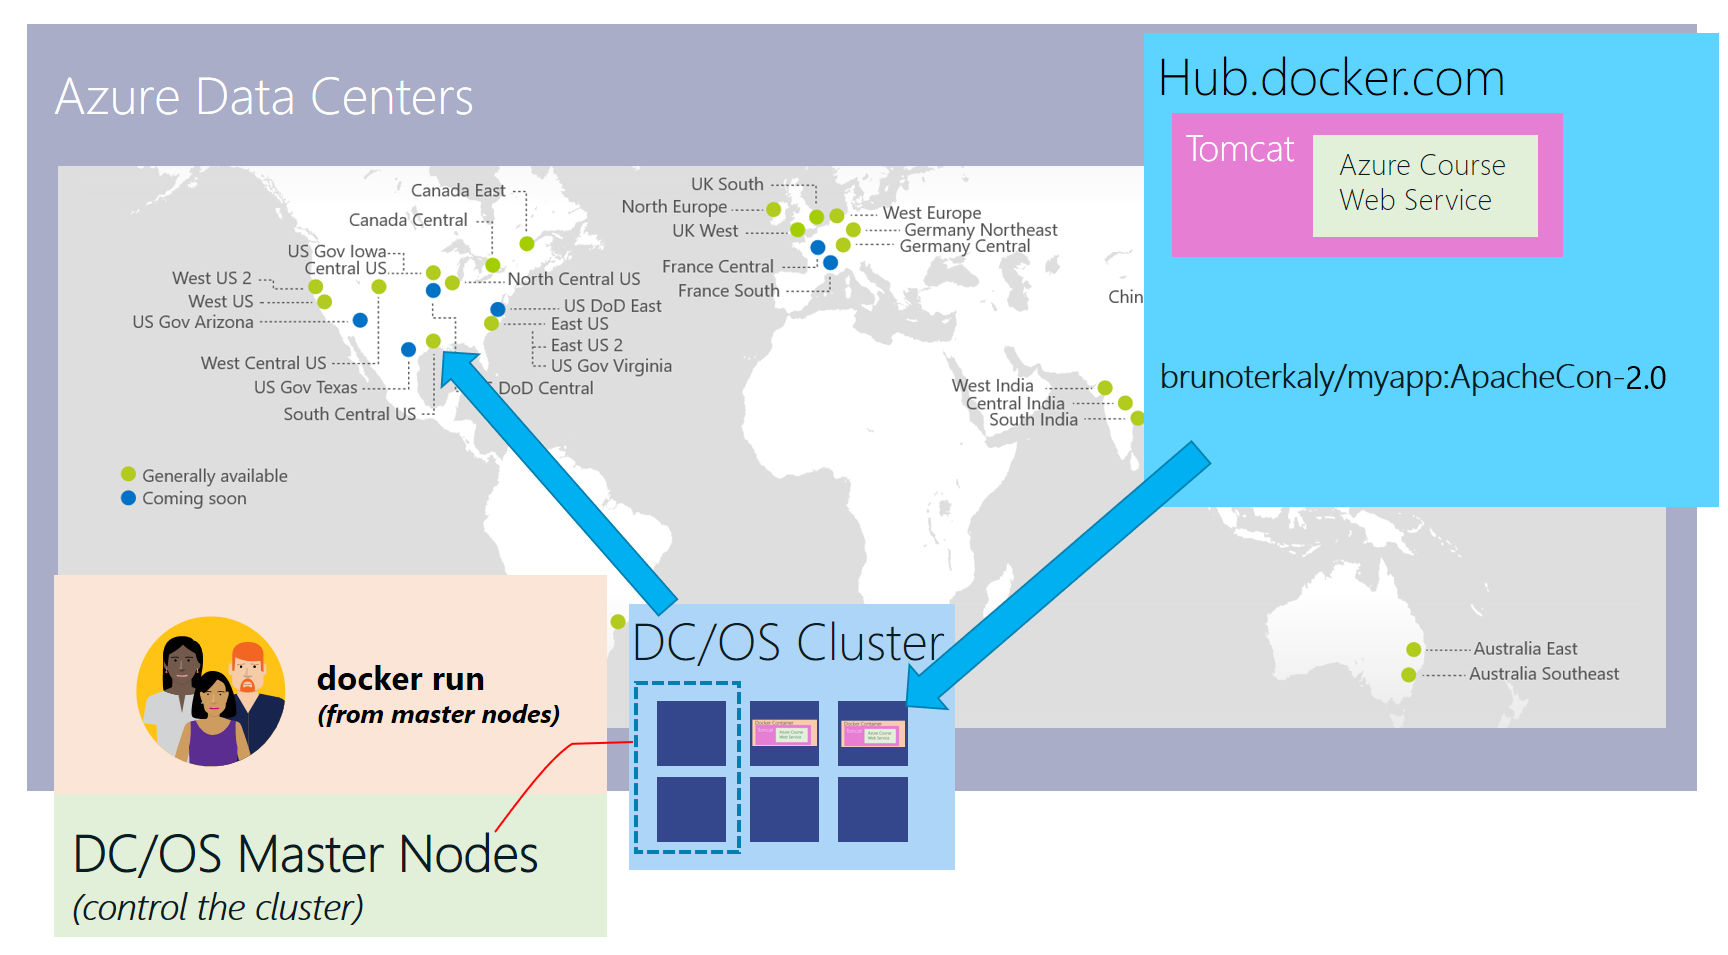
Figure 5: Azure's Global Footprint
Image = "Dockerfile" + "docker build"
This is a quick review of how our docker image is built. We kind of glossed over this in a previous post. But here I will make it clear. Our containerized application, stored on disk as an image, is created with the Dockerfile and the Docker build command. The Dockerfile is simply a text file that takes our war file and copies it into another pre-built image, which has Java and Tomcat installed already.
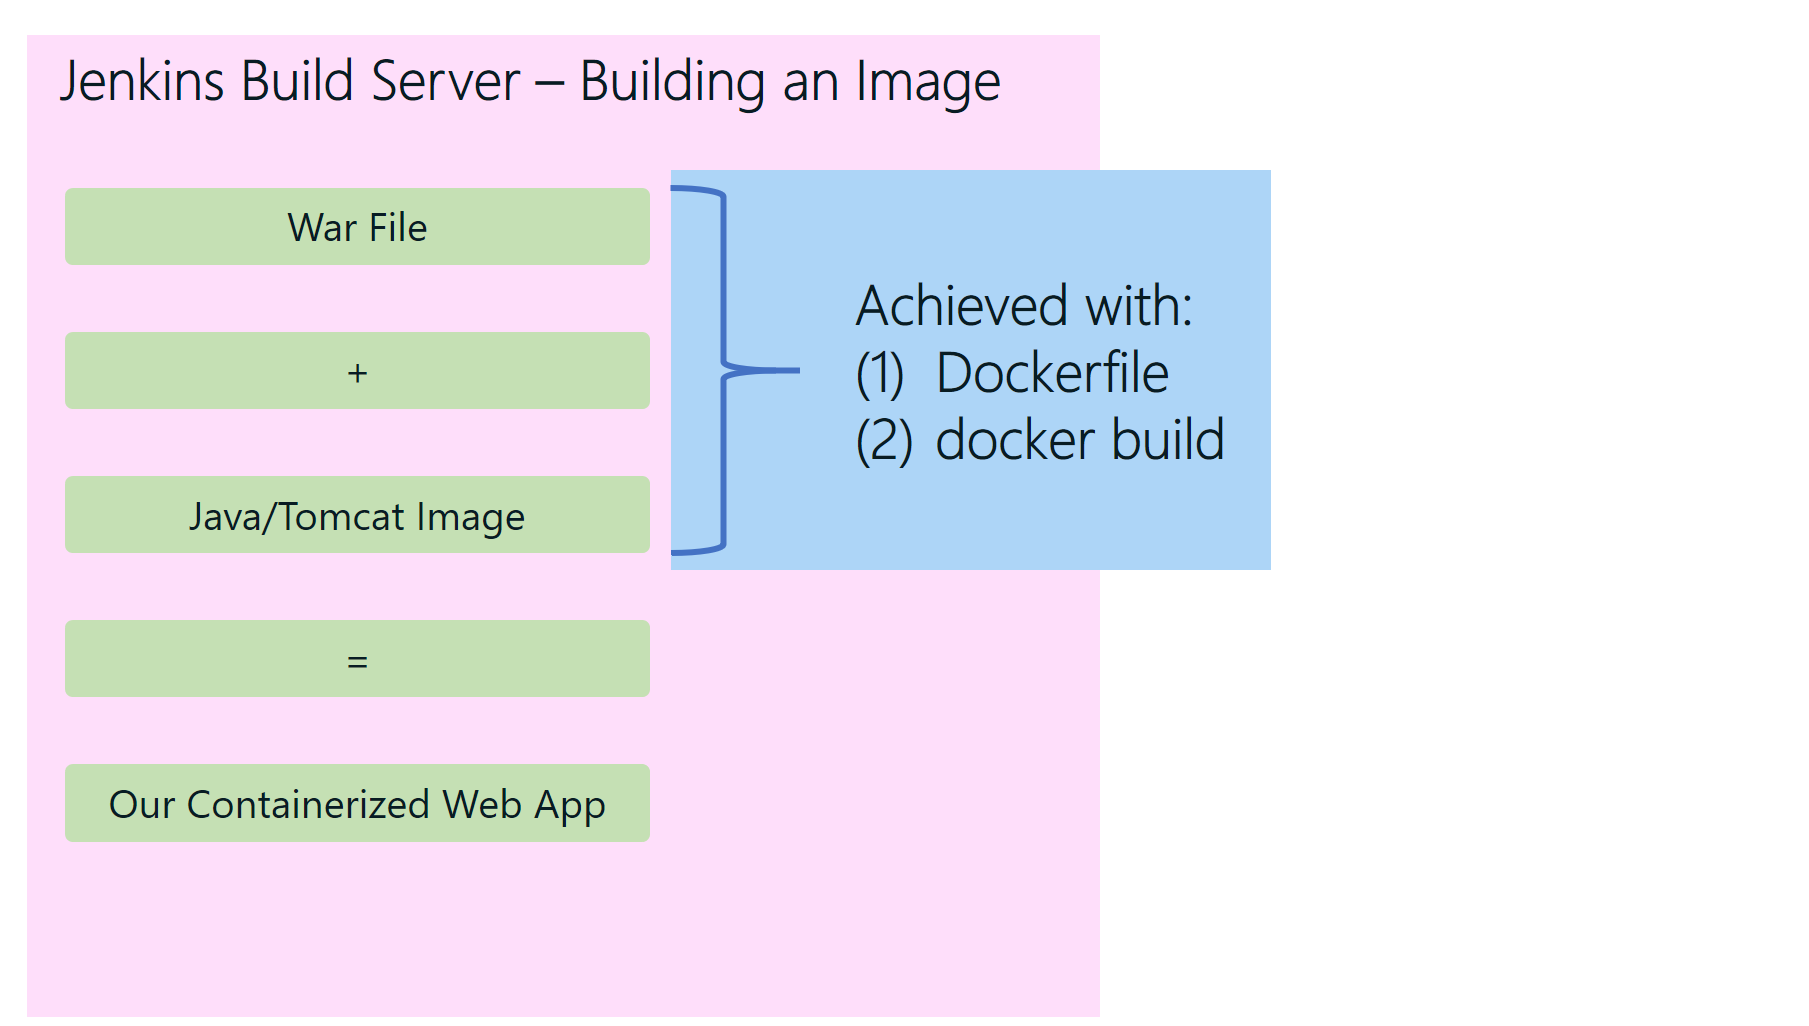
Figure 6: High level steps to build a docker image
Concepts in Image Building
The image below demonstrates how simple it is for us to take our myapp.war and hosted inside of the container that has tomcat and Java preinstalled. Online for which starting with another image already built for us, containing tomcat and Java. Line 7 shows how simple it is to take our war file and copy it into the appropriate Web server folder for Tomcat.
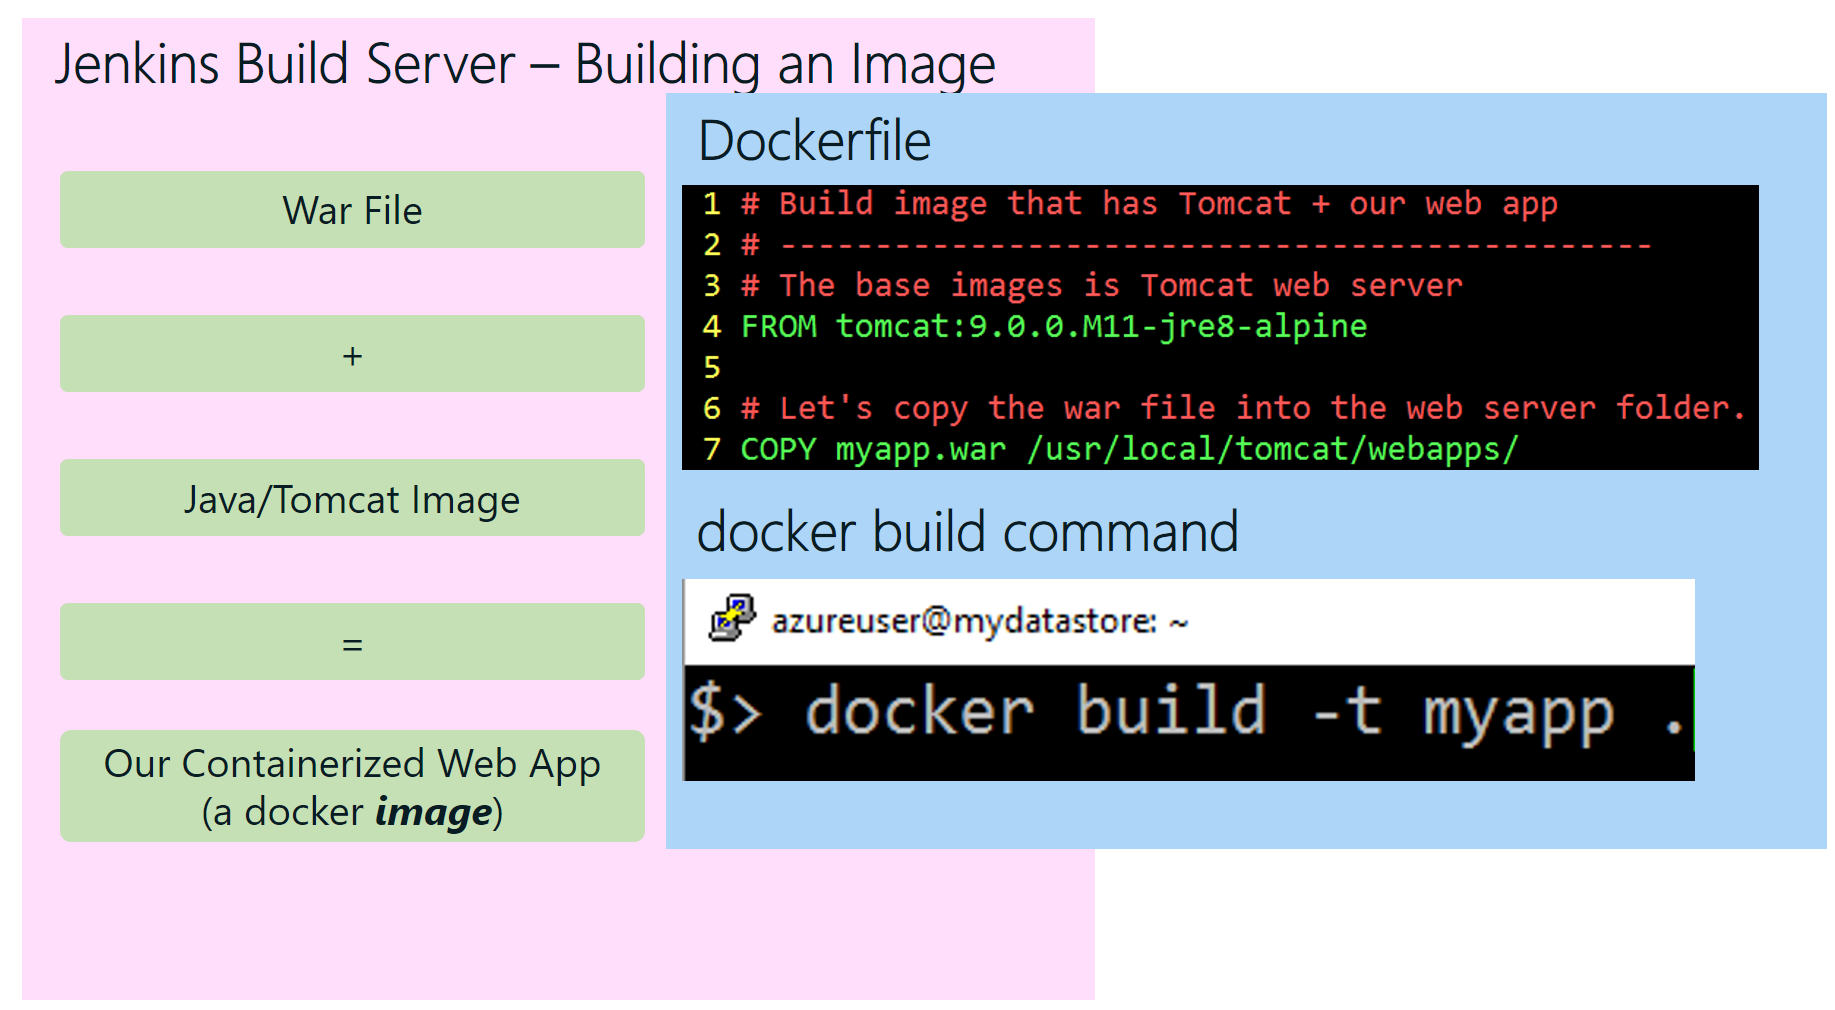
Figure 7: How to build our image
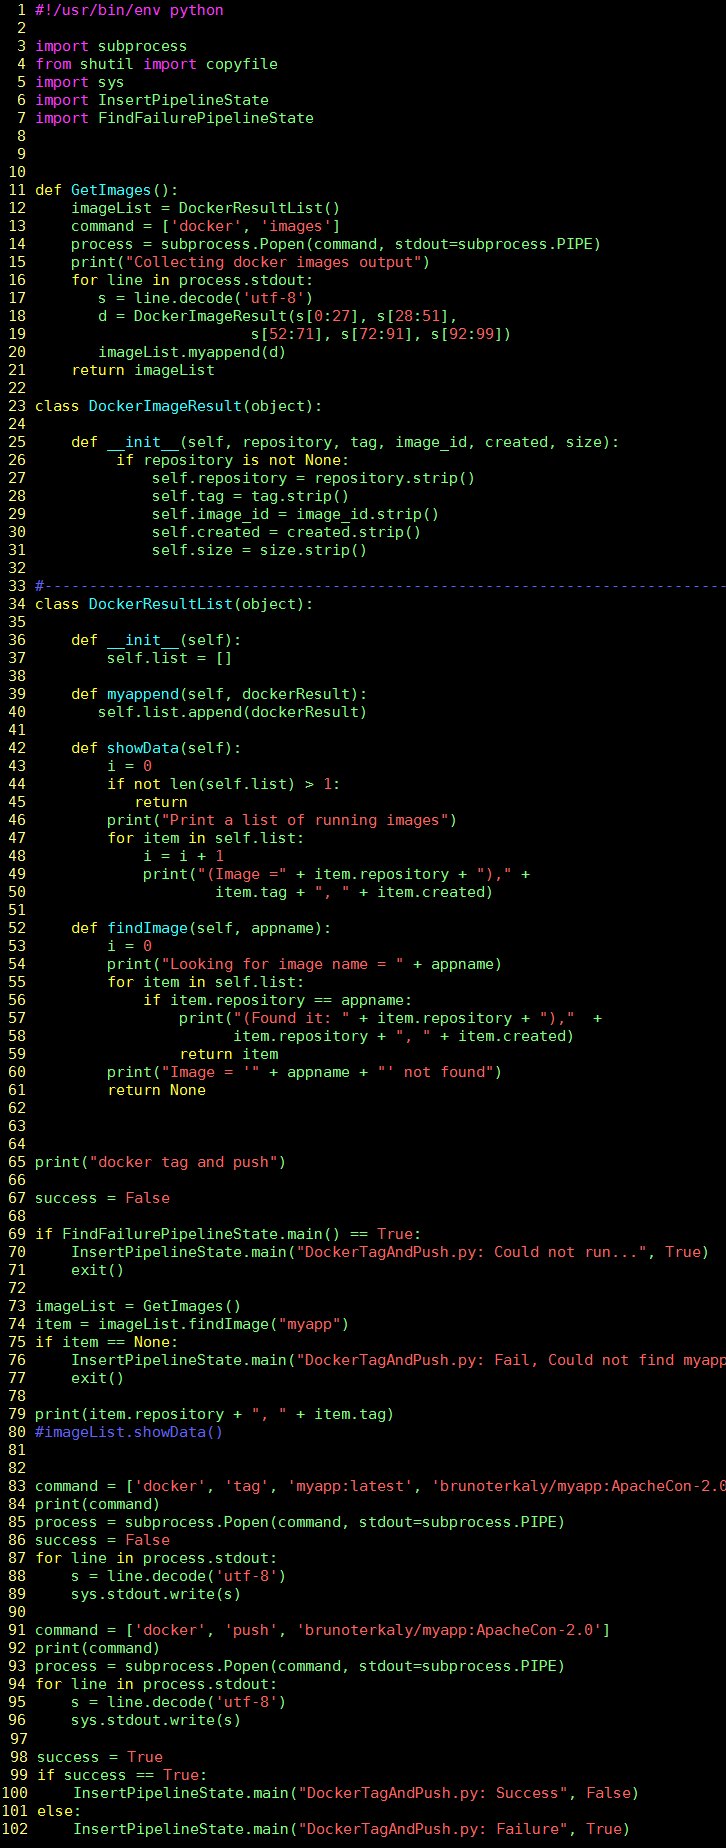
DockerTagAndPush.py
| 11-21 | Issues the docker images command to get a list of images that are present on the Jenkins Host. |
| 52-61 | Performs a search across all images on the Jenkins host. Hopefully, we will find **myapp**, which we built in previous steps. If we do find it, **tag** it and **push** to hub .docker.com. |
| 69-71 | Verify no previous error in pipeline. If errors found, exit immediately. |
| 73-77 | High level search for **myapp**. If not found record error and exit. |
| 83-89 | Tag the image appropriately. It probably makes sense to generalize this and increment version numbers. We will implement this improvement later. A tag is a way to name and version your image. After tagging our image, we can then push it to hub.docker.com using the docker push command. |
| 91-96 | This is what physically pushes the image to hub.docker.com. It essentially uploads the image. This is the core step to make the image available to run as a container in our DC/OS cluster. |
Figure 8: Source code: DockerTagAndPush.py
Testing DockerTagAndPush.py
Figure 9: Testing DockerTagAndPush.py
Conclusion
We covered a lot of ground in this post. We talked about the high-level concepts of building out our docker image. From there we described the process of building the image using the docker build command in combination with the dockerfile. We then went into some details on how one might tag, then push the image up to hub.docker.com.
