使用封包擷取搭配警示和 Azure Functions 進行主動式網路監視
Azure 網路監看員的封包擷取功能可建立擷取工作階段來追蹤虛擬機器 (VM) 的流入和流出流量。 擷取檔案可以有定義來只追蹤您想要監視之流量的篩選。 此資料將儲存在儲存體 Blob 或本地客體機器上。
這項功能可以從其他的自動化案例遠端啟動,例如 Azure Functions。 您可以根據定義的網路異常執行主動式擷取。 其他用途包括收集網路統計資料、取得有關網路入侵的資訊,以及偵錯用戶端/伺服器通訊。
在 Azure 中部署的資源會不間斷地執行。 我們很難主動隨時監視所有資源的狀態。 例如,如果凌晨 2:00 發生問題,會發生什麼事?
藉由使用 Azure 生態系統內的網路監看員、警示及函式,您可以使用資料和工具主動回應以解決網路中的問題。
必要條件
- 最新版的 Azure PowerShell。
- 網路監看員的現有執行個體。 如果您還沒有,請建立網路監看員執行個體。
- 在含有 Windows 擴充功能或 Linux 虛擬機器擴充功能的網路監看員所在區域中的現有虛擬機器。
案例
在此範例中,虛擬機器的流出流量較平時更多,而您希望能收到警示。 您可以使用類似的流程來為任何情況建立警示。
事件觸發警示時,封包層級的資料可協助分析流出流量增加的原因。 而您可以採取步驟,將虛擬機器回復至原始狀態。
此案例假設您有現有的網路監看員執行個體,以及具有有效虛擬機器的資源群組。
以下是封包擷取的工作流程:
- 事件觸發 VM 上的警示。
- 警示會呼叫您的 Azure 函式。
- 您的 Azure 函式會處理警示,並啟動網路監看員封包擷取工作階段。
- 封包擷取會在 VM 上執行並收集資料。
- 封包擷取檔案會上傳至儲存體帳戶以供您檢閱和診斷。
為自動化此流程,您會在 VM 上建立並連線一個在事件發生時觸發的警示。 您也會建立一個呼叫網路監看員的函式。
此案例:
- 建立啟動封包擷取的 Azure 函式。
- 在虛擬機器上建立警示規則,並設定警示規則以呼叫 Azure 函式。
建立 Azure 函數
如要建立 Azure 函式來處理警示,以及建立封包擷取,您必須先建立函數應用程式:
登入 Azure 入口網站。
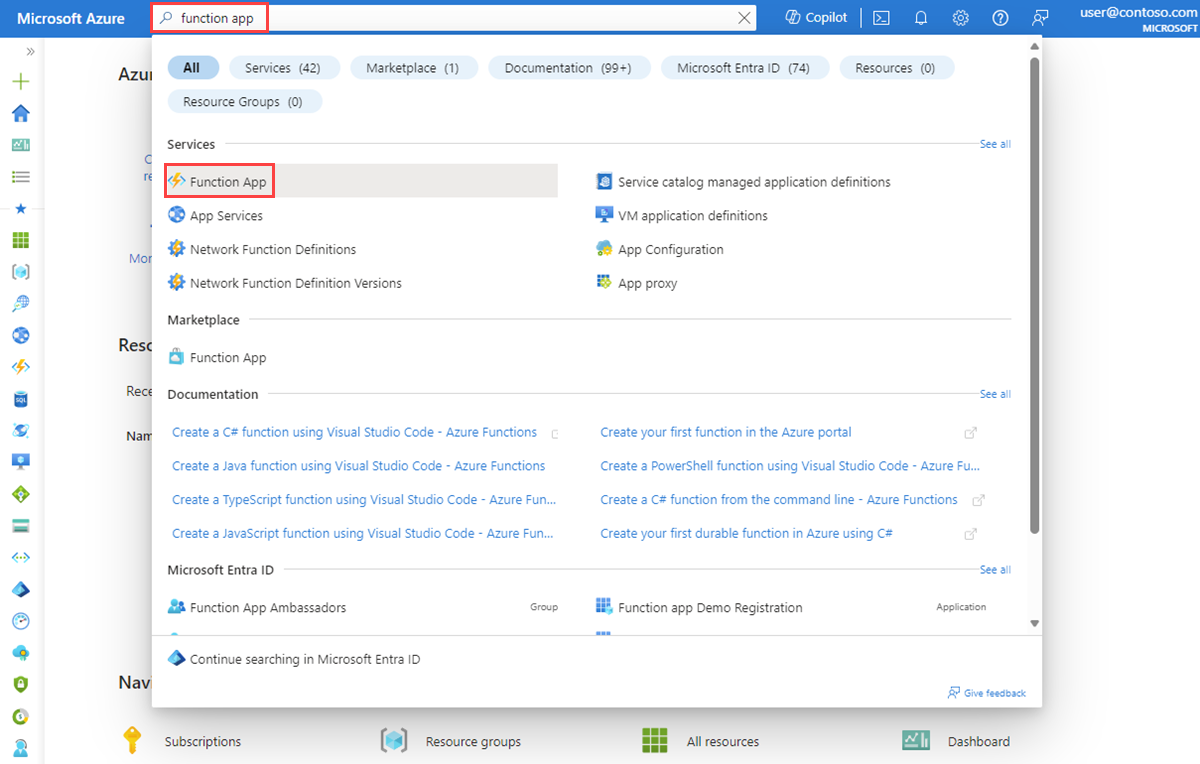
在入口網站頂端的搜尋方塊中,輸入「函數應用程式」。 選取搜尋結果中的 [函數應用程式]。
選取 + 建立。
在 [建立函數應用程式] 的 [基本] 索引標籤上,輸入或選取下列設定值:
- 在 [專案詳細資訊] 下,選取要建立函數應用程式的訂閱,以及要包含應用程式的資源群組。
- 在 [執行個體詳細資料] 下方:
- 於 [函數應用程式名稱] 輸入函數應用程式的名稱。 此名稱會附加 .azurewebsites.net。
- 對於 [您要部署程式碼或容器映像嗎?],請選取模式或發佈:[程式碼] 或 [容器映像]。
- 對於 [執行階段堆疊],請選取執行階段堆疊。
- 對於 [版本],請選取執行階段堆疊的版本。
- 對於 [區域],請選取您想在其中建立函數應用程式的區域。
- 在 [作業系統] 下,選取目前使用的作業系統類型。 Azure 將根據您選取的執行階段堆疊,建議應使用的作業系統類型。
- 在 [裝載] 下,選取要用於函數應用程式的方案類型。 從下列選項中選擇:
- 使用量 (無伺服器):用於事件驅動縮放,成本最低。
- Functions 進階:適用於企業級無伺服器應用程式,具有事件型縮放與網路隔離功能。
- App Service 方案:於重複使用現有 App Service 方案中的計算。
選取 [檢閱 + 建立] 以建立應用程式。
您現已可建立函數:
在已建立的函數應用程式中,選取 [函數],然後選取 [建立],以開啟 [建立函數] 窗格。
![[建立函數] 窗格的螢幕擷取畫面。](media/network-watcher-alert-triggered-packet-capture/create-function.png)
針對 [開發環境],選取 [在入口網站中開發]。
在 [選取範本] 下,選取 [HTTP 觸發程序]。
在 [範本詳細資料] 區段中:
- 對於 [新增函數],請輸入函數的名稱。
- 對於 [授權層級],請選取 [函數]。
選取 建立。
移至您所建立的函數,然後選取 [編碼 + 測試]。
![此螢幕擷取畫面顯示函數的 [程式碼 + 測試] 頁面。](media/network-watcher-alert-triggered-packet-capture/code-test.png)
設定驗證
若要使用 PowerShell Cmdlet,您必須在函數應用程式中設定驗證。 若要設定驗證,您必須設定環境變數,並將加密金鑰檔案上傳至函數應用程式。
注意
此案例僅提供了其中一種如何驗證 Azure Functions 的範例。 亦有其他方法可以執行這項作業。
下列 PowerShell 指令碼會建立名為 PassEncryptKey.key 的金鑰檔案。 它也會提供所提供密碼的加密版本。 此密碼和為了讓 Microsoft Entra 應用程式能夠進行驗證而定義的密碼相同。
#Variables
$keypath = "C:\temp\PassEncryptKey.key"
$AESKey = New-Object Byte[] 32
$Password = "<insert a password here>"

#Keys
[Security.Cryptography.RNGCryptoServiceProvider]::Create().GetBytes($AESKey)
Set-Content $keypath $AESKey

#Get encrypted password
$secPw = ConvertTo-SecureString -AsPlainText $Password -Force
$AESKey = Get-content $KeyPath
$Encryptedpassword = $secPw | ConvertFrom-SecureString -Key $AESKey
$Encryptedpassword
擷取環境變數的值
設定以下存取驗證值所需的環境變數:
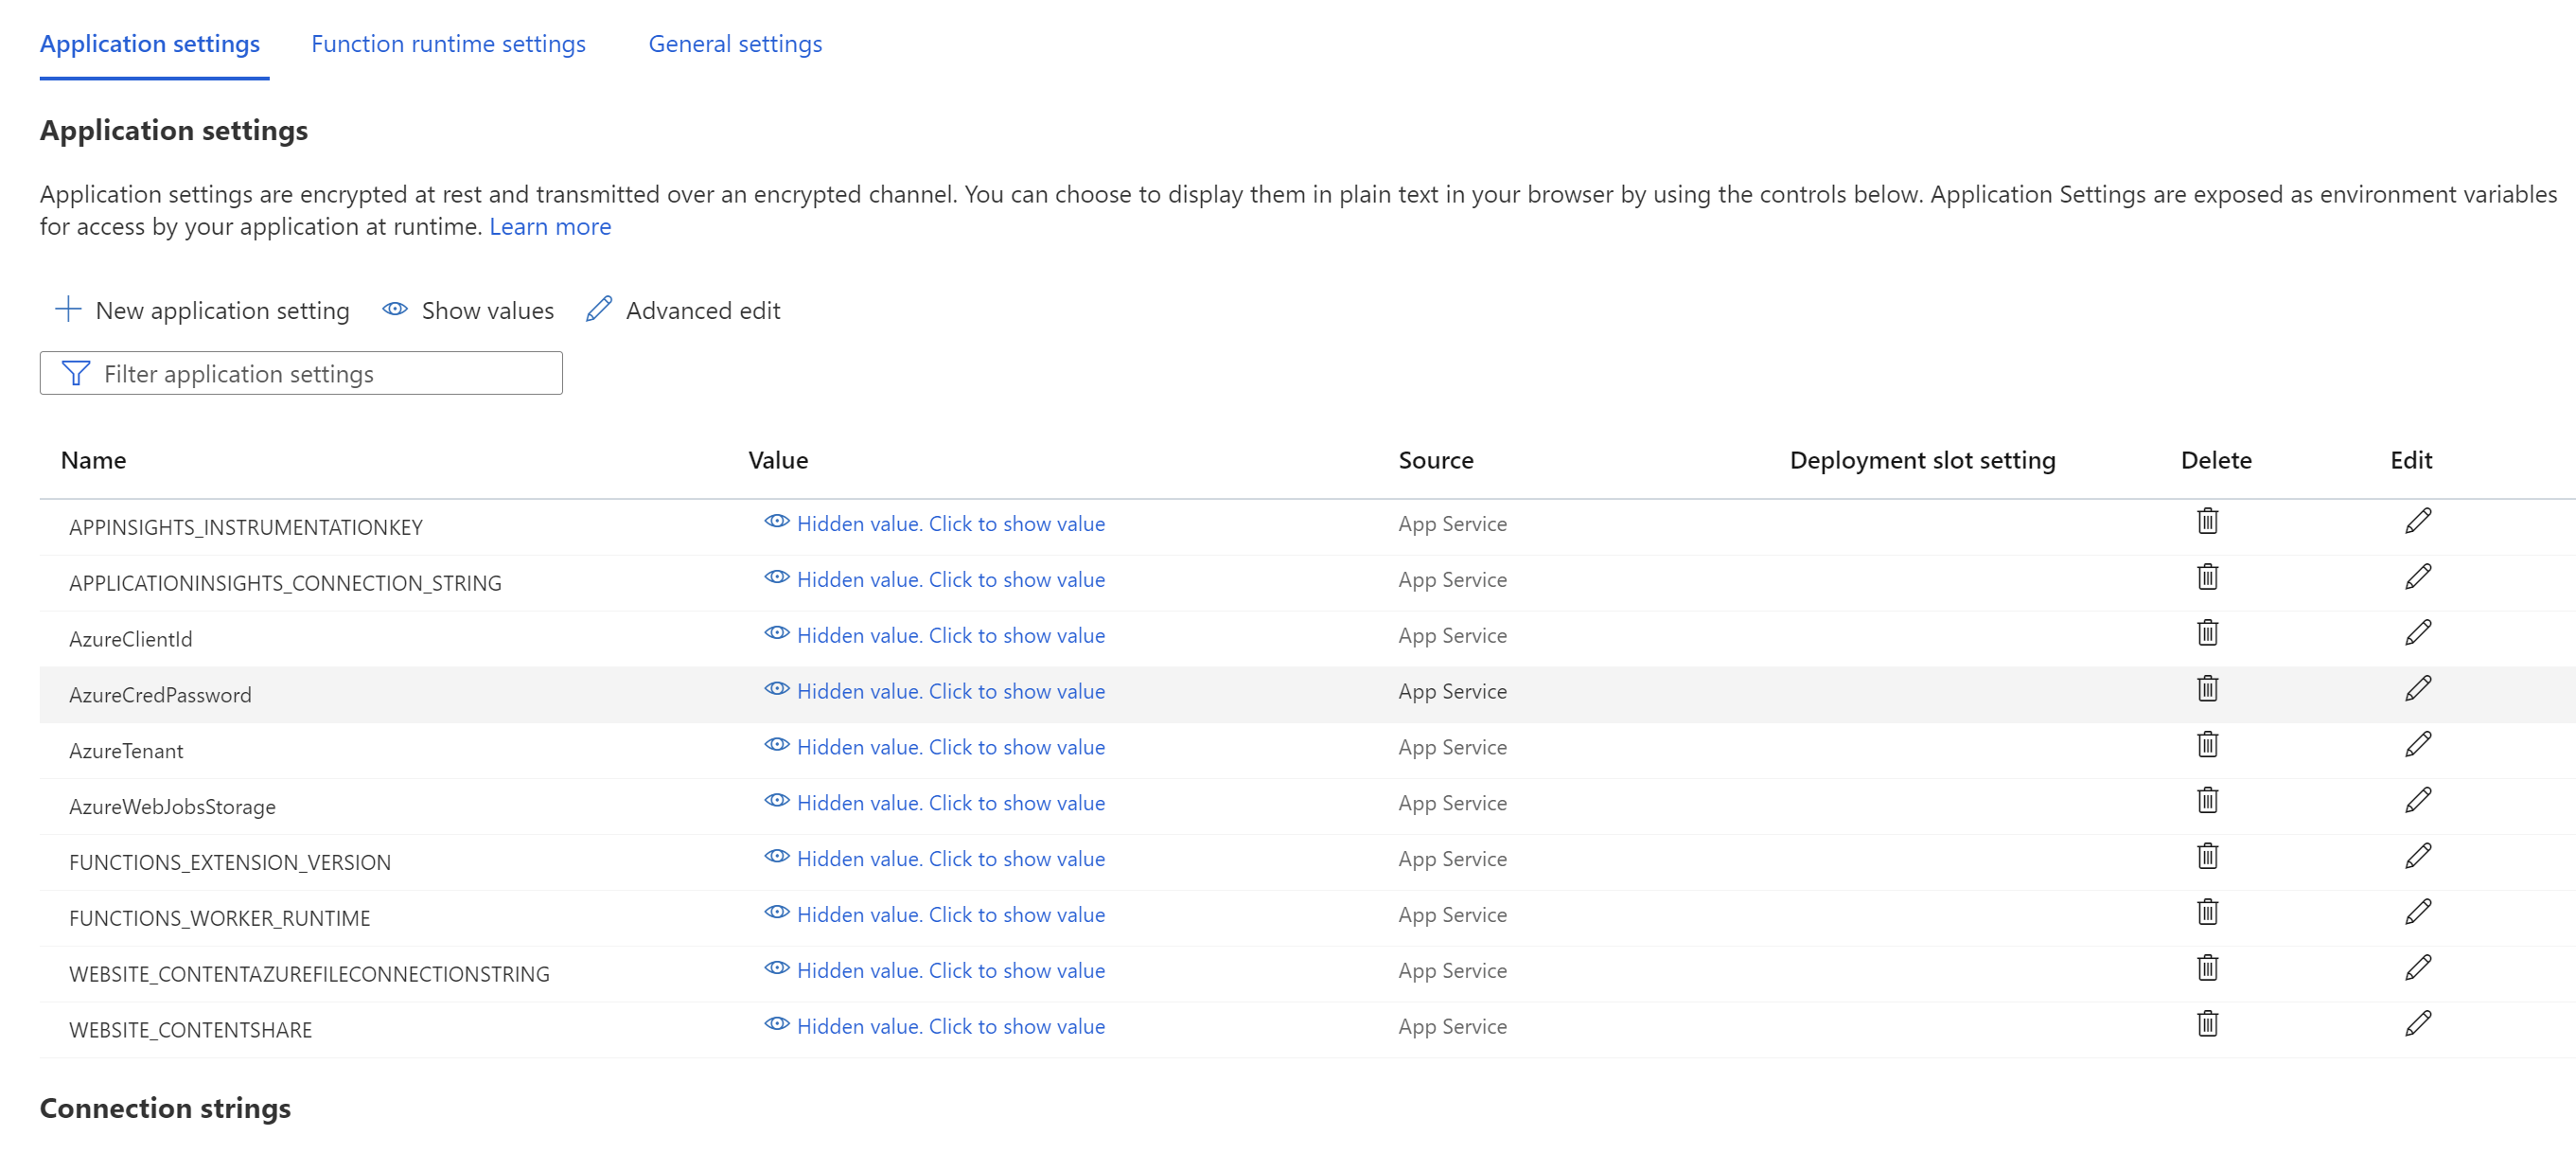
AzureClientIDAzureTenantAzureCredPassword
如果您已經有應用程式識別碼,請使用該應用程式的 AzureClientID、AzureTenant 和 AzureCredPassword 值。 如果沒有,請前往儲存環境變數一節。
AzureClientID
用戶端識別碼是 Microsoft Entra ID 中應用程式的識別碼。 如要取得用戶端識別碼:
如果您尚未有可使用的應用程式,請執行下列 Cmdlet 來建立應用程式:
$app = New-AzADApplication -DisplayName "ExampleAutomationAccount_MF" -HomePage "https://exampleapp.com" -IdentifierUris "https://exampleapp1.com/ExampleFunctionsAccount" -Password "<same password as defined earlier>"
New-AzADServicePrincipal -ApplicationId $app.ApplicationId
Start-Sleep 15]
New-AzRoleAssignment -RoleDefinitionName Contributor -ServicePrincipalName $app.ApplicationId
注意
建立應用程式時所使用的密碼,應該與稍早在儲存金鑰檔案時所建立的密碼相同。
在 Azure 入口網站中,選取 [訂用帳戶]。 選取要使用的訂用帳戶,然後選取 [存取控制 (IAM)]。
選擇要使用的帳戶,然後選取 [屬性]。 複製 [應用程式識別碼]。
AzureTenant
執行下列 PowerShell Cmdlet,以取得租用戶識別碼:
(Get-AzSubscription -SubscriptionName "<subscriptionName>").TenantId
AzureCredPassword
AzureCredPassword 環境變數的值是執行下列 PowerShell 範例所取得的值。 本範例等同於先前在設定驗證一節顯示的範例。 您需要的值是 $Encryptedpassword 變數的輸出。 本輸出是使用 PowerShell 指令碼所加密的服務主體密碼。
#Variables
$keypath = "C:\temp\PassEncryptKey.key"
$AESKey = New-Object Byte[] 32
$Password = "<insert a password here>"

#Keys
[Security.Cryptography.RNGCryptoServiceProvider]::Create().GetBytes($AESKey)
Set-Content $keypath $AESKey

#Get encrypted password
$secPw = ConvertTo-SecureString -AsPlainText $Password -Force
$AESKey = Get-content $KeyPath
$Encryptedpassword = $secPw | ConvertFrom-SecureString -Key $AESKey
$Encryptedpassword
儲存環境變數
如要儲存環境變數:
返回函數應用程式。 選取 [組態設定]>[應用程式設定]。

將環境變數及其值新增至應用程式設定,然後選取 [儲存]。
將 PowerShell 加入函式
現在,從 Azure 函式呼叫網路監看員。 根據需求,此函式的實作可能會不同。 不過,程式碼的一般流程如下︰
- 處理輸入參數。
- 查詢現有封包擷取以驗證限制,並且解決名稱衝突。
- 使用適當的參數建立封包擷取。
- 定期輪詢封包擷取,直到完成。
- 通知使用者封包擷取工作階段已完成。
下列範例是可在函數中使用的 PowerShell 程式碼。 您需要取代 subscriptionId、resourceGroupName 和 storageAccountName 的值。
# Input bindings are passed in via parameter block
param($Request, $TriggerMetadata)

$essentials = $Request.body.data.essentials
$alertContext = $Request.body.data.alertContext


# Storage account ID to save captures in
$storageaccountid = "/subscriptions/{subscriptionId}/resourceGroups/{resourceGroupName}/providers/Microsoft.Storage/storageAccounts/{storageAccountName}"

# Packet capture variables
$packetCaptureName = "PSAzureFunction"
$packetCaptureLimit = 100
$packetCaptureDuration = 30

# Credentials
# Set the credentials in the configurations
$tenant = $env:AzureTenant
$pw = $env:AzureCredPassword
$clientid = $env:AzureClientId
$password = ConvertTo-SecureString $pw -AsPlainText -Force
$credential = New-Object System.Management.Automation.PSCredential ($clientid, $password)

Connect-AzAccount -ServicePrincipal -Tenant $tenant -Credential $credential #-WarningAction SilentlyContinue | out-null

if ($alertContext.condition.allOf.metricNamespace -eq "Microsoft.Compute/virtualMachines") {

    # Get the VM firing this alert
    $vm = Get-AzVM -ResourceId $essentials.alertTargetIDs[0]

    # Get the Network Watcher instance in the VM's region
    $networkWatcher = Get-AzNetworkWatcher -Location $vm.Location

    # Get existing packet captures
    $packetCaptures = Get-AzNetworkWatcherPacketCapture -NetworkWatcher $networkWatcher

    # Remove an existing packet capture created by the function (if it exists)
    $packetCaptures | ForEach-Object { if ($_.Name -eq $packetCaptureName)
        {
            Remove-AzNetworkWatcherPacketCapture -NetworkWatcher $networkWatcher -PacketCaptureName $packetCaptureName
        }
    }

    # Initiate packet capture on the VM that fired the alert
    if ($packetCaptures.Count -lt $packetCaptureLimit) {
        Write-Output "Initiating Packet Capture"
        New-AzNetworkWatcherPacketCapture -NetworkWatcher $networkWatcher -TargetVirtualMachineId $vm.Id -PacketCaptureName $packetCaptureName -StorageAccountId $storageaccountid -TimeLimitInSeconds $packetCaptureDuration
    }
}
如果您使用舊的結構描述,請執行下列 PowerShell 程式碼:
# Input bindings are passed in via parameter block
param($Request, $TriggerMetadata)
$details = $Request.RawBody | ConvertFrom-Json


# Process alert request body
$requestBody = $Request.Body.data

# Storage account ID to save captures in
$storageaccountid = "/subscriptions/{subscriptionId}/resourceGroups/{resourceGroupName}/providers/Microsoft.Storage/storageAccounts/{storageAccountName}"

# Packet capture variables
$packetCaptureName = "PSAzureFunction"
$packetCaptureLimit = 100
$packetCaptureDuration = 30

# Credentials
# Set the credentials in the configurations
$tenant = $env:AzureTenant
$pw = $env:AzureCredPassword
$clientid = $env:AzureClientId

$password = ConvertTo-SecureString $pw -AsPlainText -Force
$credential = New-Object System.Management.Automation.PSCredential ($clientid, $password)

Connect-AzAccount -ServicePrincipal -Tenant $tenant -Credential $credential #-WarningAction SilentlyContinue | out-null

if ($requestBody.context.resourceType -eq "Microsoft.Compute/virtualMachines") {

    # Get the VM firing this alert
    $vm = Get-AzVM -ResourceGroupName $requestBody.context.resourceGroupName -Name $requestBody.context.resourceName

    # Get the Network Watcher instance in the VM's region
    $networkWatcher = Get-AzNetworkWatcher -Location $vm.Location

    # Get existing packet captures
    packetCaptures = Get-AzNetworkWatcherPacketCapture -NetworkWatcher $networkWatcher

    # Remove an existing packet capture created by the function (if it exists)
    $packetCaptures | ForEach-Object { if ($_.Name -eq $packetCaptureName)
        {
            Remove-AzNetworkWatcherPacketCapture -NetworkWatcher $networkWatcher -PacketCaptureName $packetCaptureName
        }
    }

    # Initiate packet capture on the VM that fired the alert
    if ($packetCaptures.Count -lt $packetCaptureLimit) {
        Write-Output "Initiating Packet Capture"
        New-AzNetworkWatcherPacketCapture -NetworkWatcher $networkWatcher -TargetVirtualMachineId $requestBody.context.resourceId -PacketCaptureName $packetCaptureName -StorageAccountId $storageaccountid -TimeLimitInSeconds $packetCaptureDuration
    }
}
在 VM 上設定警示
您可以設定警示,以在特定計量超出指派的閥值時通知使用者。 在此範例中,警示對象為傳送的網路輸出量總計計量,但您也可針對許多其他計量觸發警示。
建立警示規則
移至現有的虛擬機器,並新增警示規則。 在 [建立警示規則] 頁面上進行以下步驟:
在 [選取訊號] 窗格上,搜尋並選取訊號名稱。 在此範例中,所選的訊號為網路輸出量總計。 為虛擬機器在所有網路介面上送出的位元組數目。
在 [條件] 索引標籤中設定下列值,並選取 [下一步:動作]。
設定 值 閾值 靜態 彙總類型 平均 運算子 大於 閾值 3 檢查間隔 1 分鐘 回溯期間 5 分鐘 在 [動作] 索引標籤上,選取 [建立動作群組]。
在 [建立動作群組] 頁面上,選取 [訂閱]、[資源群組] 與 [區域] 值。 輸入動作群組名稱和顯示名稱,然後選取 [下一步:通知]。
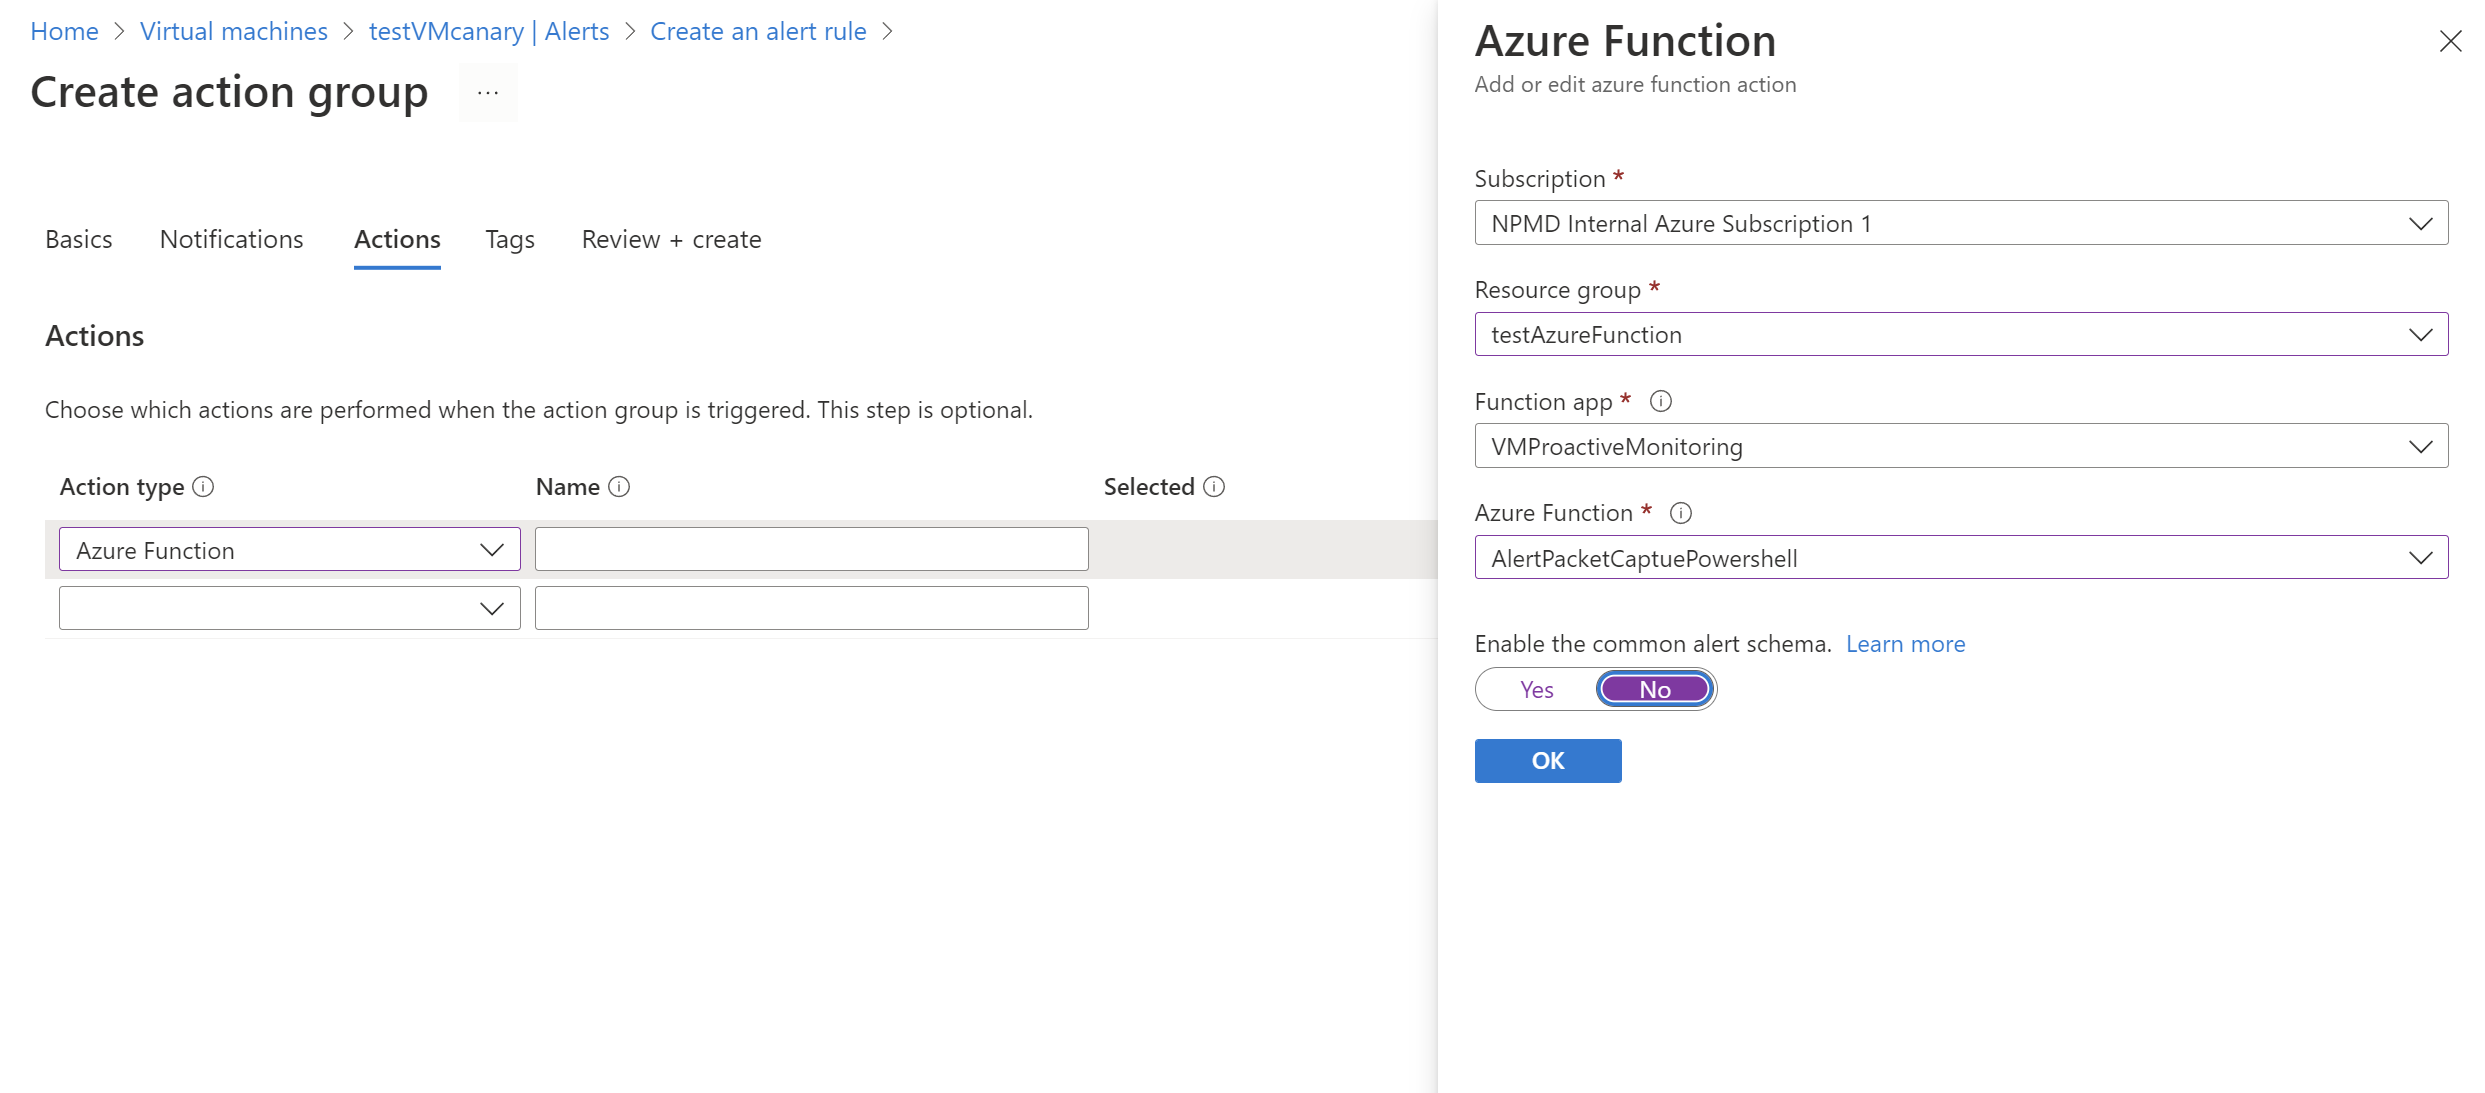
在 [通知] 索引標籤上,為 [動作類型] 選取 [Azure 函數]。
在 [Azure 函數] 窗格中,選取 [訂閱]、[資源群組]、[函數應用程式] 與 [Azure 函數] 值。

在 [啟用一般警示結構描述] 滑桿中,選取 [否]。 然後選取確定。
檢閱結果
準則觸發警示之後,網路監看員會建立封包擷取。 前往網路監看員,選取 [封包擷取]。 在這個頁面上,您可以選取檔案連結以下載封包擷取。
如果擷取檔案儲存在本機,則可登入虛擬機器來取得。
如需從 Azure 儲存體帳戶下載檔案的指示,請參閱適用於 .NET 的 Azure Blob 儲存體用戶端程式庫快速入門。 您也可以使用 Azure 儲存體總管工具。
下載擷取內容後,可以使用 Wireshark 等能夠讀取 .cap 檔案的工具來檢視擷取內容。
後續步驟
閱讀檢查及分析網路監看員封包擷取檔案來了解如何檢視封包擷取。

![Azure 入口網站中 [建立函數應用程式] 頁面的螢幕擷取畫面。](media/network-watcher-alert-triggered-packet-capture/create-function-app-basics.png)