透過 Azure 虛擬網路連線到 HDInsight 上的 Apache Kafka
了解如何透過 Azure 虛擬網路,直接連線到 HDInsight 上的 Apache Kafka。 本文件提供使用下列設定連線到 Kafka 的相關資訊:
- 從內部部署網路的資源。 此連線是使用您區域網路上的 VPN 裝置 (軟體或硬體) 建立的。
- 使用 VPN 軟體用戶端,從開發環境連線。
注意
建議您使用 Azure Az PowerShell 模組來與 Azure 互動。 若要開始使用,請參閱安裝 Azure PowerShell (部分機器翻譯)。 若要了解如何移轉至 Az PowerShell 模組,請參閱將 Azure PowerShell 從 AzureRM 移轉至 Az。
架構與規劃
HDInsight 不允許透過公用網際網路直接連線至 Kafka。 Kafka 用戶端 (生產者和取用者) 必須改用下列其中一個連線方法:
在與 HDInsight 上之 Kafka 相同的虛擬網路中執行用戶端。 開始在 HDInsight 上使用 Apache Kafka 文件中使用的就是此設定。 用戶端會直接在 HDInsight 叢集節點或相同網路中的另一部虛擬機器上執行。
將私人網路 (例如,您的內部部署網路) 連線至虛擬網路。 此設定可讓您內部部署網路中的用戶端直接使用 Kafka。 若要啟用此設定,請執行下列工作:
建立虛擬網路。
建立 VPN 閘道以使用站對站設定。 本文件中使用的設定會連線到內部部署網路中的 VPN 閘道裝置。
在虛擬網路中建立 DNS 伺服器。
設定每個網路中 DNS 伺服器之間的轉送。
在虛擬網路的 HDInsight 叢集上建立 Kafka。
如需詳細資訊,請參閱從內部部署網路連線到 Apache Kafka 一節。
使用 VPN 閘道與 VPN 用戶端,將個別機器連線至虛擬網路。 若要啟用此設定,請執行下列工作:
建立虛擬網路。
建立 VPN 閘道以使用點對站設定。 此設定可以搭配 Windows 和 macOS 用戶端使用。
在虛擬網路的 HDInsight 叢集上建立 Kafka。
設定 Kafka 進行 IP 公告。 此設定可讓用戶端使用訊息代理程式 IP 位址來連線,而不是網域名稱。
下載 VPN 用戶端並在開發系統上使用。
如需詳細資訊,請參閱使用 VPN 用戶端連線到 Apache Kafka 一節。
警告
基於下列限制,建議僅將此設定用於開發用途:
- 每個用戶端必須使用 VPN 軟體用戶端進行連線。
- VPN 用戶端不會將名稱解析要求傳遞至虛擬網路,因此您必須使用 IP 位址來與 Kafka 通訊。 IP 通訊需要 Kafka 叢集上的其他設定。
如需在虛擬網路中使用 HDInsight 的詳細資訊,請參閱規劃 Azure HDInsight 叢集的虛擬網路。
從內部部署網路連線到 Apache Kafka
若要建立 Kafka 叢集來與內部部署網路通訊,請遵循將 HDInsight 連線至內部部署網路文件中的步驟執行。
重要
建立 HDInsight 叢集時,請選取 Kafka 叢集類型。
這些步驟會建立下列設定:
- Azure 虛擬網路
- 站對站 VPN 閘道
- Azure 儲存體帳戶 (供 HDInsight 使用)
- HDInsight 上的 Kafka
若要確認 Kafka 用戶端可以從內部部署連線到叢集,請使用範例:Python 用戶端一節中的步驟。
使用 VPN 用戶端連線到 Apache Kafka
使用本節中的步驟來建立下列設定:
- Azure 虛擬網路
- 點對站 VPN 閘道
- Azure 儲存體帳戶 (供 HDInsight 使用)
- HDInsight 上的 Kafka
遵循使用點對站連線的自我簽署憑證文件中的步驟執行。 這份文件會建立閘道所需的憑證。
開啟 PowerShell 提示字元,並使用下列程式碼來登入您的 Azure 訂閱:
Connect-AzAccount
# If you have multiple subscriptions, uncomment to set the subscription
#Select-AzSubscription -SubscriptionName "name of your subscription"
使用下列程式碼來建立包含組態資訊的變數︰
# Prompt for generic information
$resourceGroupName = Read-Host "What is the resource group name?"
$baseName = Read-Host "What is the base name? It is used to create names for resources, such as 'net-basename' and 'kafka-basename':"
$location = Read-Host "What Azure Region do you want to create the resources in?"
$rootCert = Read-Host "What is the file path to the root certificate? It is used to secure the VPN gateway."

# Prompt for HDInsight credentials
$adminCreds = Get-Credential -Message "Enter the HTTPS user name and password for the HDInsight cluster" -UserName "admin"
$sshCreds = Get-Credential -Message "Enter the SSH user name and password for the HDInsight cluster" -UserName "sshuser"

# Names for Azure resources
$networkName = "net-$baseName"
$clusterName = "kafka-$baseName"
$storageName = "store$baseName" # Can't use dashes in storage names
$defaultContainerName = $clusterName
$defaultSubnetName = "default"
$gatewaySubnetName = "GatewaySubnet"
$gatewayPublicIpName = "GatewayIp"
$gatewayIpConfigName = "GatewayConfig"
$vpnRootCertName = "rootcert"
$vpnName = "VPNGateway"

# Network settings
$networkAddressPrefix = "10.0.0.0/16"
$defaultSubnetPrefix = "10.0.0.0/24"
$gatewaySubnetPrefix = "10.0.1.0/24"
$vpnClientAddressPool = "172.16.201.0/24"

# HDInsight settings
$hdiWorkerNodes = 4
$hdiVersion = "3.6"
$hdiType = "Kafka"
使用下列程式碼來建立 Azure 資源群組和虛擬網路︰
# Create the resource group that contains everything
New-AzResourceGroup -Name $resourceGroupName -Location $location

# Create the subnet configuration
$defaultSubnetConfig = New-AzVirtualNetworkSubnetConfig -Name $defaultSubnetName `
    -AddressPrefix $defaultSubnetPrefix
$gatewaySubnetConfig = New-AzVirtualNetworkSubnetConfig -Name $gatewaySubnetName `
    -AddressPrefix $gatewaySubnetPrefix

# Create the subnet
New-AzVirtualNetwork -Name $networkName `
    -ResourceGroupName $resourceGroupName `
    -Location $location `
    -AddressPrefix $networkAddressPrefix `
    -Subnet $defaultSubnetConfig, $gatewaySubnetConfig

# Get the network & subnet that were created
$network = Get-AzVirtualNetwork -Name $networkName `
    -ResourceGroupName $resourceGroupName
$gatewaySubnet = Get-AzVirtualNetworkSubnetConfig -Name $gatewaySubnetName `
    -VirtualNetwork $network
$defaultSubnet = Get-AzVirtualNetworkSubnetConfig -Name $defaultSubnetName `
    -VirtualNetwork $network

# Set a dynamic public IP address for the gateway subnet
$gatewayPublicIp = New-AzPublicIpAddress -Name $gatewayPublicIpName `
    -ResourceGroupName $resourceGroupName `
    -Location $location `
    -AllocationMethod Dynamic
$gatewayIpConfig = New-AzVirtualNetworkGatewayIpConfig -Name $gatewayIpConfigName `
    -Subnet $gatewaySubnet `
    -PublicIpAddress $gatewayPublicIp

# Get the certificate info
# Get the full path in case a relative path was passed
$rootCertFile = Get-ChildItem $rootCert
$cert = New-Object System.Security.Cryptography.X509Certificates.X509Certificate2($rootCertFile)
$certBase64 = [System.Convert]::ToBase64String($cert.RawData)
$p2sRootCert = New-AzVpnClientRootCertificate -Name $vpnRootCertName `
    -PublicCertData $certBase64

# Create the VPN gateway
New-AzVirtualNetworkGateway -Name $vpnName `
    -ResourceGroupName $resourceGroupName `
    -Location $location `
    -IpConfigurations $gatewayIpConfig `
    -GatewayType Vpn `
    -VpnType RouteBased `
    -EnableBgp $false `
    -GatewaySku Standard `
    -VpnClientAddressPool $vpnClientAddressPool `
    -VpnClientRootCertificates $p2sRootCert
警告
此程序可能需要幾分鐘的時間才能完成。
使用下列程式碼來建立 Azure 儲存體帳戶和 Blob 容器:
# Create the storage account
New-AzStorageAccount `
    -ResourceGroupName $resourceGroupName `
    -Name $storageName `
    -SkuName Standard_GRS `
    -Location $location `
    -Kind StorageV2 `
    -EnableHttpsTrafficOnly 1

# Get the storage account keys and create a context
$defaultStorageKey = (Get-AzStorageAccountKey -ResourceGroupName $resourceGroupName `
    -Name $storageName)[0].Value
$storageContext = New-AzStorageContext -StorageAccountName $storageName `
    -StorageAccountKey $defaultStorageKey

# Create the default storage container
New-AzStorageContainer -Name $defaultContainerName `
    -Context $storageContext
使用下列程式碼來建立 HDInsight 叢集︰
# Create the HDInsight cluster
New-AzHDInsightCluster `
    -ResourceGroupName $resourceGroupName `
    -ClusterName $clusterName `
    -Location $location `
    -ClusterSizeInNodes $hdiWorkerNodes `
    -ClusterType $hdiType `
    -OSType Linux `
    -Version $hdiVersion `
    -HttpCredential $adminCreds `
    -SshCredential $sshCreds `
    -DefaultStorageAccountName "$storageName.blob.core.windows.net" `
    -DefaultStorageAccountKey $defaultStorageKey `
    -DefaultStorageContainer $defaultContainerName `
    -DisksPerWorkerNode 2 `
    -VirtualNetworkId $network.Id `
    -SubnetName $defaultSubnet.Id
警告
此程序大約需要 15 分鐘才能完成。
設定 Kafka 進行 IP 公告
Apache Zookeeper 預設會將 Kafka 代理程式的網域名稱傳回給用戶端。 這個設定不會使用 VPN 軟體用戶端,因為它無法為虛擬網路中的實體使用名稱解析。 針對此設定,使用下列步驟來設定 Kafka 以公告 IP 位址而不是網域名稱:
使用網頁瀏覽器移至
https://CLUSTERNAME.azurehdinsight.net。 將CLUSTERNAME取代為 HDInsight 叢集上的 Kafka 名稱。出現提示時,請使用叢集的 HTTPS 使用者名稱和密碼。 此時會顯示叢集的 Ambari Web UI。
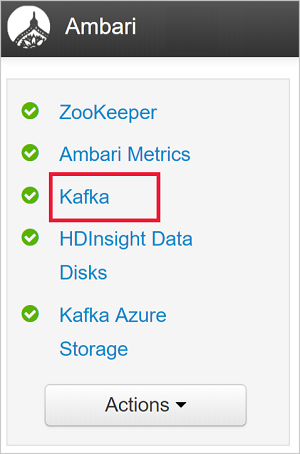
若要檢視 Kafka 上的資訊,請從左邊的清單選取 [Kafka]。

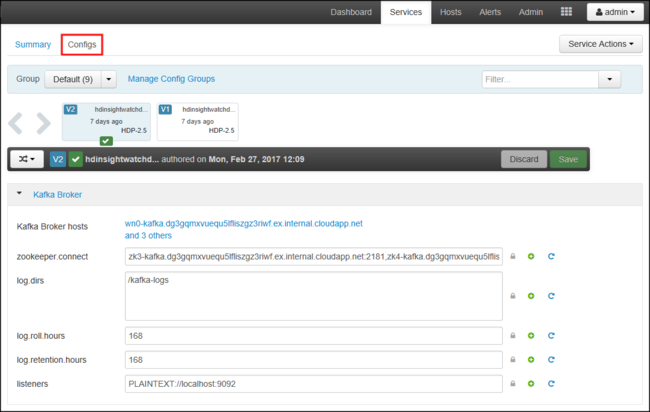
若要檢視 Kafka 組態,請從正上方選取 [Configs (設定)]。

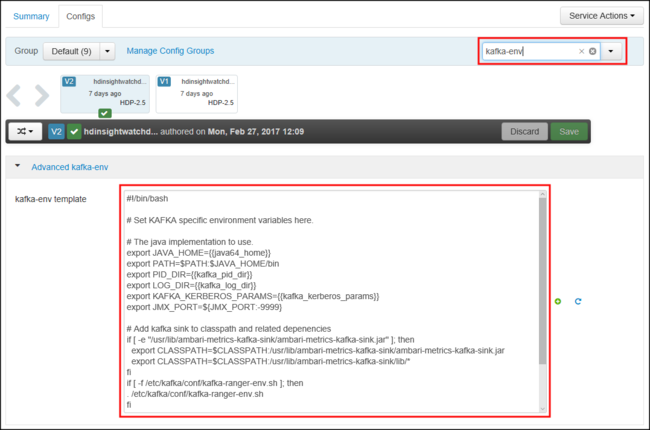
若要找出 kafka-env 組態,請在右上角的 [Filter (篩選)] 欄位中輸入
kafka-env。
若要設定 Kafka 公告 IP 位址,請在 [kafka-env-template] 欄位的底部加入下列文字︰
# Configure Kafka to advertise IP addresses instead of FQDN
IP_ADDRESS=$(hostname -i)
echo advertised.listeners=$IP_ADDRESS
sed -i.bak -e '/advertised/{/advertised@/!d;}' /usr/hdp/current/kafka-broker/conf/server.properties
echo "advertised.listeners=PLAINTEXT://$IP_ADDRESS:9092" >> /usr/hdp/current/kafka-broker/conf/server.properties
若要設定 Kafka 接聽的介面,請在右上角的 [Filter (篩選)] 欄位中輸入
listeners。若要設定 Kafka 在所有網路介面上接聽,請將 [listeners (接聽程式)] 欄位的值變更為
PLAINTEXT://0.0.0.0:9092。若要儲存組態變更,請使用 [Save (儲存)] 按鈕。 輸入描述變更的文字訊息。 儲存變更後,請選取 [OK (確定)]。

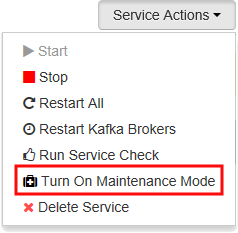
若要避免重新啟動 Kafka 時發生錯誤,請使用 [Service Actions (服務動作)] 按鈕,然後選取 [Turn On Maintenance Mode (開啟維護模式)]。 選取 [OK (確定)] 以完成此作業。

若要重新啟動 Kafka,請使用 [Restart (重新啟動)] 按鈕,然後選取 [Restart All Affected (重新啟動所有受影響項目)]。 確認重新啟動,然後在作業完成之後使用 [OK (確定)] 按鈕。
![[重新啟動] 按鈕,醒目提示重新啟動所有受影響的項目。](media/apache-kafka-connect-vpn-gateway/restart-required-button.png)
若要停用維護模式,請使用 [Service Actions (服務動作)] 按鈕,然後選取 [Turn Off Maintenance Mode (關閉維護模式)]。 選取 [OK (確定)] 以完成此作業。
連線到 VPN 閘道
若要連線到 VPN 閘道,請使用設定點對站連線文件的連線到 Azure 一節。
範例:Python 用戶端
若要驗證 Kafka 的連接能力,請使用下列步驟來建立和執行 Python 生產者和取用者:
使用下列其中一個方法來擷取 Kafka 叢集中節點的完整網域名稱 (FQDN) 與 IP 位址:
$resourceGroupName = "The resource group that contains the virtual network used with HDInsight"

$clusterNICs = Get-AzNetworkInterface -ResourceGroupName $resourceGroupName | where-object {$_.Name -like "*node*"}

$nodes = @()
foreach($nic in $clusterNICs) {
    $node = new-object System.Object
    $node | add-member -MemberType NoteProperty -name "Type" -value $nic.Name.Split('-')[1]
    $node | add-member -MemberType NoteProperty -name "InternalIP" -value $nic.IpConfigurations.PrivateIpAddress
    $node | add-member -MemberType NoteProperty -name "InternalFQDN" -value $nic.DnsSettings.InternalFqdn
    $nodes += $node
}
$nodes | sort-object Type
az network nic list --resource-group <resourcegroupname> --output table --query "[?contains(name,'node')].{NICname:name,InternalIP:ipConfigurations[0].privateIpAddress,InternalFQDN:dnsSettings.internalFqdn}"這個指令碼假設
$resourceGroupName是包含虛擬網路的 Azure 資源群組名稱。儲存所傳回的資訊,以便在後續步驟中使用。
使用下列命令來安裝 kafka-python 用戶端︰
pip install kafka-python若要將資料傳送至 Kafka,請使用下列 Python 程式碼︰
from kafka import KafkaProducer
# Replace the `ip_address` entries with the IP address of your worker nodes
# NOTE: you don't need the full list of worker nodes, just one or two.
producer = KafkaProducer(bootstrap_servers=['kafka_broker_1','kafka_broker_2'])
for _ in range(50):
   producer.send('testtopic', b'test message')
使用從本節的步驟 1 傳回的位址來取代
'kafka_broker'項目:如果您使用軟體 VPN 用戶端,使用背景工作節點的 IP 位址來取代
kafka_broker項目。如果您具有透過自訂 DNS 伺服器啟用的名稱解析,使用背景工作節點的 FQDN 來取代
kafka_broker項目。注意
此程式碼會將
test message字串傳送至testtopic主題。 HDInsight 上 Kafka 的預設設定不是用來建立主題 (如果不存在)。 請參閱如何將 HDInsight 上的 Apache Kafka 設定為自動建立主題。 或者,您也可以在產生訊息之前手動建立主題。
若要從 Kafka 擷取訊息,請使用下列 Python 程式碼︰
from kafka import KafkaConsumer
# Replace the `ip_address` entries with the IP address of your worker nodes
# Again, you only need one or two, not the full list.
# Note: auto_offset_reset='earliest' resets the starting offset to the beginning
#       of the topic
consumer = KafkaConsumer(bootstrap_servers=['kafka_broker_1','kafka_broker_2'],auto_offset_reset='earliest')
consumer.subscribe(['testtopic'])
for msg in consumer:
  print (msg)
使用從本節的步驟 1 傳回的位址來取代
'kafka_broker'項目:如果您使用軟體 VPN 用戶端,使用背景工作節點的 IP 位址來取代
kafka_broker項目。如果您具有透過自訂 DNS 伺服器啟用的名稱解析,使用背景工作節點的 FQDN 來取代
kafka_broker項目。
下一步
如需透過虛擬網路使用 HDInsight 的詳細資訊,請參閱規劃 Azure HDInsight 叢集的虛擬網路部署文件。
如需如何建立具點對站 VPN 閘道之 Azure 虛擬網路的詳細資訊,請參閱下列文件︰
如需使用 HDInsight 上 Apache Kafka 的詳細資訊,請參閱下列文件: