Azure 容器應用程式中的藍綠部署
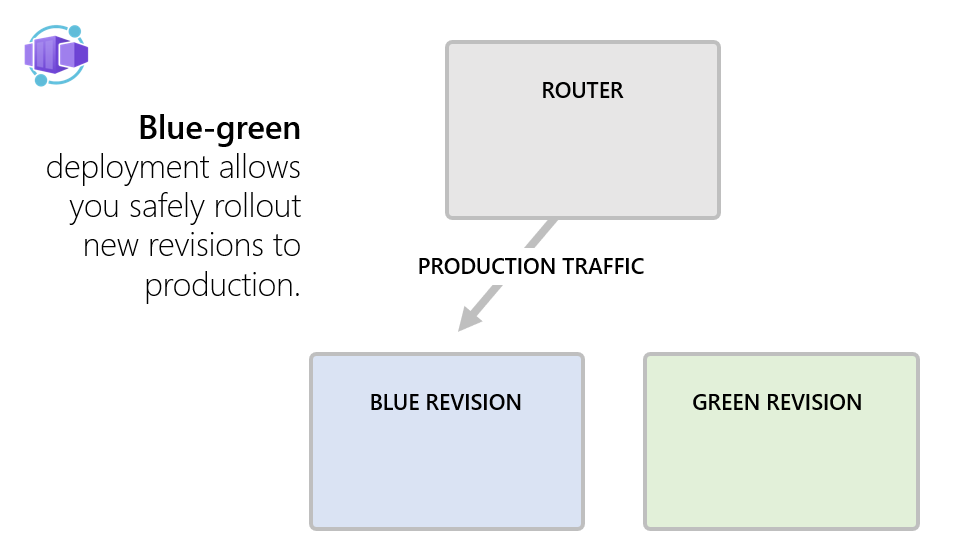
藍綠部署是一種軟體版本策略,目的在將停機時間降到最低,並降低與部署新版本應用程式相關的風險。 在藍綠部署中,會設定兩個完全相同的環境,稱為「藍色」和「綠色」。 一個環境 (藍色) 會執行目前的應用程式版本,而一個環境 (綠色) 會執行新的應用程式版本。
一旦綠色環境經過測試,就會將即時流量導向至其中,而藍色環境則用來在下一個部署週期期間部署新的應用程式版本。
您可以結合容器應用程式修訂、流量加權,以及修訂標籤,在 Azure 容器應用程式中啟用藍綠部署。

您可以使用修訂來建立應用程式的藍色和綠色版本執行個體。
| 修訂 | 描述 |
|---|---|
| 藍色修訂 | 標示為藍色的修訂是目前執行且穩定的應用程式版本。 此修訂是使用者與其互動的修訂,也是生產流量的目標。 |
| 綠色修訂 | 標示為綠色的修訂是藍色修訂的複本,但會使用較新版本的應用程式程式碼以及可能的新環境變數集。 它一開始不會收到任何生產流量,但可透過加上標籤的完整網域名稱 (FQDN) 進行存取。 |
測試並驗證新修訂之後,您就可以將生產流量指向新的修訂。 如果您遇到問題,您可以輕鬆地回復為舊版。
| 動作 | 描述 |
|---|---|
| 測試及驗證 | 綠色修訂經過徹底測試及驗證,以確保新版的應用程式能如預期運作。 此測試可能涉及各種工作,包括功能測試、效能測試和相容性檢查。 |
| 流量交換器 | 一旦綠色修訂通過所有必要的測試,就會執行流量交換器,讓綠色修訂開始提供生產負載。 此交換器會以受控制的方式完成,以確保順暢的轉換。 |
| 復原 | 如果綠色修訂中發生問題,您可以還原流量交換器,將流量傳回穩定藍色修訂。 如果新版本發生問題,此復原可確保對使用者的影響降到最低。 綠色修訂仍可供下一個部署使用。 |
| 角色變更 | 在成功部署至綠色修訂之後,藍色和綠色修訂的角色會變更。 在下一個發行週期中,綠色修訂代表穩定的生產環境,而新版的應用程式程式碼會在藍色修訂中部署及測試。 |
本文說明如何在容器應用程式中實作藍綠部署。 若要執行下列範例,您需要容器應用程式環境,您可以在其中建立新的應用程式。
注意
如需實作容器應用程式藍綠部署的 GitHub 工作流程完整範例,請參閱 containerapps-blue-green 存放庫。
建立已啟用多個使用中修訂的容器應用程式
容器應用程式必須將 configuration.activeRevisionsMode 屬性設定為 multiple,才能啟用流量分割。 若要取得具決定性的修訂名稱,您可以將 template.revisionSuffix 組態設定設為可唯一識別版本的字串值。 例如,您可以使用組建編號,或 git 認可簡短雜湊碼。
針對下列命令,使用了一組認可雜湊碼。
export APP_NAME=<APP_NAME>
export APP_ENVIRONMENT_NAME=<APP_ENVIRONMENT_NAME>
export RESOURCE_GROUP=<RESOURCE_GROUP>

# A commitId that is assumed to correspond to the app code currently in production
export BLUE_COMMIT_ID=fb699ef
# A commitId that is assumed to correspond to the new version of the code to be deployed
export GREEN_COMMIT_ID=c6f1515

# create a new app with a new revision
az containerapp create --name $APP_NAME \
  --environment $APP_ENVIRONMENT_NAME \
  --resource-group $RESOURCE_GROUP \
  --image mcr.microsoft.com/k8se/samples/test-app:$BLUE_COMMIT_ID \
  --revision-suffix $BLUE_COMMIT_ID \
  --env-vars REVISION_COMMIT_ID=$BLUE_COMMIT_ID \
  --ingress external \
  --target-port 80 \
  --revisions-mode multiple

# Fix 100% of traffic to the revision
az containerapp ingress traffic set \
  --name $APP_NAME \
  --resource-group $RESOURCE_GROUP \
  --revision-weight $APP_NAME--$BLUE_COMMIT_ID=100

# give that revision a label 'blue'
az containerapp revision label add \
  --name $APP_NAME \
  --resource-group $RESOURCE_GROUP \
  --label blue \
  --revision $APP_NAME--$BLUE_COMMIT_ID
將下列程式碼儲存到名為 main.bicep 的檔案中。
targetScope = 'resourceGroup'
param location string = resourceGroup().location

@minLength(1)
@maxLength(64)
@description('Name of containerapp')
param appName string

@minLength(1)
@maxLength(64)
@description('Container environment name')
param containerAppsEnvironmentName string

@minLength(1)
@maxLength(64)
@description('CommitId for blue revision')
param blueCommitId string

@maxLength(64)
@description('CommitId for green revision')
param greenCommitId string = ''

@maxLength(64)
@description('CommitId for the latest deployed revision')
param latestCommitId string = ''

@allowed([
  'blue'
  'green'
])
@description('Name of the label that gets 100% of the traffic')
param productionLabel string = 'blue'

var currentCommitId = !empty(latestCommitId) ? latestCommitId : blueCommitId

resource containerAppsEnvironment 'Microsoft.App/managedEnvironments@2022-03-01' existing = {
  name: containerAppsEnvironmentName
}

resource blueGreenDeploymentApp 'Microsoft.App/containerApps@2022-11-01-preview' = {
  name: appName
  location: location
  tags: {
    blueCommitId: blueCommitId
    greenCommitId: greenCommitId
    latestCommitId: currentCommitId
    productionLabel: productionLabel
  }
  properties: {
    environmentId: containerAppsEnvironment.id
    configuration: {
      maxInactiveRevisions: 10 // Remove old inactive revisions
      activeRevisionsMode: 'multiple' // Multiple active revisions mode is required when using traffic weights
      ingress: {
        external: true
        targetPort: 80
        traffic: !empty(blueCommitId) && !empty(greenCommitId) ? [
          {
            revisionName: '${appName}--${blueCommitId}'
            label: 'blue'
            weight: productionLabel == 'blue' ? 100 : 0
          }
          {
            revisionName: '${appName}--${greenCommitId}'
            label: 'green'
            weight: productionLabel == 'green' ? 100 : 0
          }
        ] : [
          {
            revisionName: '${appName}--${blueCommitId}'
            label: 'blue'
            weight: 100
          }
        ]
      }
    }
    template: {
      revisionSuffix: currentCommitId
      containers:[
        {
          image: 'mcr.microsoft.com/k8se/samples/test-app:${currentCommitId}'
          name: appName
          resources: {
            cpu: json('0.5')
            memory: '1.0Gi'
          }
          env: [
            {
              name: 'REVISION_COMMIT_ID'
              value: currentCommitId
            }
          ]
        }
      ]
    }
  }
}

output fqdn string = blueGreenDeploymentApp.properties.configuration.ingress.fqdn
output latestRevisionName string = blueGreenDeploymentApp.properties.latestRevisionName
使用以下命令,以 Bicep 範本部署應用程式:
export APP_NAME=<APP_NAME>
export APP_ENVIRONMENT_NAME=<APP_ENVIRONMENT_NAME>
export RESOURCE_GROUP=<RESOURCE_GROUP>

# A commitId that is assumed to belong to the app code currently in production
export BLUE_COMMIT_ID=fb699ef
# A commitId that is assumed to belong to the new version of the code to be deployed
export GREEN_COMMIT_ID=c6f1515

# create a new app with a blue revision
az deployment group create \
    --name createapp-$BLUE_COMMIT_ID \
    --resource-group $RESOURCE_GROUP \
    --template-file main.bicep \
    --parameters appName=$APP_NAME blueCommitId=$BLUE_COMMIT_ID containerAppsEnvironmentName=$APP_ENVIRONMENT_NAME \
    --query properties.outputs.fqdn
部署新的修訂並指派標籤
藍色標籤目前是指生產流量到達應用程式完整網域名稱的修訂。 綠色標籤是指即將推出至生產環境的新版本應用程式。 新的認可雜湊碼會識別新版的應用程式程式碼。 下列命令會針對該認可雜湊碼部署新的修訂,並以綠色標籤標示。
#create a second revision for green commitId
az containerapp update --name $APP_NAME \
  --resource-group $RESOURCE_GROUP \
  --image mcr.microsoft.com/k8se/samples/test-app:$GREEN_COMMIT_ID \
  --revision-suffix $GREEN_COMMIT_ID  \
  --set-env-vars REVISION_COMMIT_ID=$GREEN_COMMIT_ID

#give that revision a 'green' label
az containerapp revision label add \
  --name $APP_NAME \
  --resource-group $RESOURCE_GROUP \
  --label green \
  --revision $APP_NAME--$GREEN_COMMIT_ID
#deploy a new version of the app to green revision
az deployment group create \
    --name deploy-to-green-$GREEN_COMMIT_ID \
    --resource-group $RESOURCE_GROUP \
    --template-file main.bicep \
    --parameters appName=$APP_NAME blueCommitId=$BLUE_COMMIT_ID greenCommitId=$GREEN_COMMIT_ID latestCommitId=$GREEN_COMMIT_ID productionLabel=blue containerAppsEnvironmentName=$APP_ENVIRONMENT_NAME \
    --query properties.outputs.fqdn
下列範例示範如何設定流量區段。 具有藍色的修訂採用 100% 的生產流量,而以綠色commitId新增的修訂不會採用任何生產流量。commitId
{
  "traffic": [
    {
      "revisionName": "<APP_NAME>--fb699ef",
      "weight": 100,
      "label": "blue"
    },
    {
      "revisionName": "<APP_NAME>--c6f1515",
      "weight": 0,
      "label": "green"
    }
  ]
}
您可以使用標籤特定的 FQDN 來測試新部署的版本:
#get the containerapp environment default domain
export APP_DOMAIN=$(az containerapp env show -g $RESOURCE_GROUP -n $APP_ENVIRONMENT_NAME --query properties.defaultDomain -o tsv | tr -d '\r\n')

#Test the production FQDN
curl -s https://$APP_NAME.$APP_DOMAIN/api/env | jq | grep COMMIT

#Test the blue label FQDN
curl -s https://$APP_NAME---blue.$APP_DOMAIN/api/env | jq | grep COMMIT

#Test the green label FQDN
curl -s https://$APP_NAME---green.$APP_DOMAIN/api/env | jq | grep COMMIT
將生產流量傳送至綠色修訂
確認綠色修訂中的應用程式程式碼如預期般運作之後,100% 的生產流量會傳送至修訂。 綠色修訂現在會變成生產修訂。
# set 100% of traffic to green revision
az containerapp ingress traffic set \
  --name $APP_NAME \
  --resource-group $RESOURCE_GROUP \
  --label-weight blue=0 green=100
# make green the prod revision
az deployment group create \
    --name make-green-prod-$GREEN_COMMIT_ID \
    --resource-group $RESOURCE_GROUP \
    --template-file main.bicep \
    --parameters appName=$APP_NAME blueCommitId=$BLUE_COMMIT_ID greenCommitId=$GREEN_COMMIT_ID latestCommitId=$GREEN_COMMIT_ID productionLabel=green containerAppsEnvironmentName=$APP_ENVIRONMENT_NAME \
    --query properties.outputs.fqdn
下列範例示範如何在此步驟之後設定 traffic 區段。 具有新應用程式程式碼的綠色修訂會採用所有使用者流量,而使用舊應用程式版本的藍色修訂則不接受使用者要求。
{
  "traffic": [
    {
      "revisionName": "<APP_NAME>--fb699ef",
      "weight": 0,
      "label": "blue"
    },
    {
      "revisionName": "<APP_NAME>--c6f1515",
      "weight": 100,
      "label": "green"
    }
  ]
}
如果發生問題,請回復部署
如果在生產環境中執行之後,發現新的修訂有錯誤 (bug),您可以回復到先前的良好狀態。 復原之後,100% 的流量會傳送至藍色修訂中的舊版本,並將該修訂再次指定為生產修訂。
# set 100% of traffic to green revision
az containerapp ingress traffic set \
  --name $APP_NAME \
  --resource-group $RESOURCE_GROUP \
  --label-weight blue=100 green=0
# rollback traffic to blue revision
az deployment group create \
    --name rollback-to-blue-$GREEN_COMMIT_ID \
    --resource-group $RESOURCE_GROUP \
    --template-file main.bicep \
    --parameters appName=$APP_NAME blueCommitId=$BLUE_COMMIT_ID greenCommitId=$GREEN_COMMIT_ID latestCommitId=$GREEN_COMMIT_ID productionLabel=blue containerAppsEnvironmentName=$APP_ENVIRONMENT_NAME \
    --query properties.outputs.fqdn
修正錯誤 (bug) 之後,新版的應用程式會再次作為綠色修訂進行部署。 綠色版本最終會變成生產修訂。
下一個部署週期
現在,綠色標籤會標示目前執行穩定生產程式碼的修訂。
在下一個部署週期中,藍色會識別將新應用程式版本推出至生產環境的修訂。
下列命令示範如何準備下一個部署週期。
# set the new commitId
export BLUE_COMMIT_ID=ad1436b

# create a third revision for blue commitId
az containerapp update --name $APP_NAME \
  --resource-group $RESOURCE_GROUP \
  --image mcr.microsoft.com/k8se/samples/test-app:$BLUE_COMMIT_ID \
  --revision-suffix $BLUE_COMMIT_ID  \
  --set-env-vars REVISION_COMMIT_ID=$BLUE_COMMIT_ID

# give that revision a 'blue' label
az containerapp revision label add \
  --name $APP_NAME \
  --resource-group $RESOURCE_GROUP \
  --label blue \
  --revision $APP_NAME--$BLUE_COMMIT_ID
# set the new commitId
export BLUE_COMMIT_ID=ad1436b

# deploy new version of the app to blue revision
az deployment group create \
    --name deploy-to-blue-$BLUE_COMMIT_ID \
    --resource-group $RESOURCE_GROUP \
    --template-file main.bicep \
    --parameters appName=$APP_NAME blueCommitId=$BLUE_COMMIT_ID greenCommitId=$GREEN_COMMIT_ID latestCommitId=$BLUE_COMMIT_ID productionLabel=green containerAppsEnvironmentName=$APP_ENVIRONMENT_NAME \
    --query properties.outputs.fqdn