支持屏幕方向(DirectX 和 C++)
处理 DisplayInformation::OrientationChanged 事件时,通用 Windows 平台(UWP)应用可以支持多个屏幕方向。 在这里,我们将讨论在 UWP DirectX 应用中处理屏幕旋转的最佳做法,以便有效地使用 Windows 10 设备的图形硬件。
在开始之前,请记住,无论设备的方向如何,图形硬件始终以相同的方式输出像素数据。 Windows 10 设备可以确定其当前显示方向(具有某种传感器或软件切换),并允许用户更改显示设置。 因此,Windows 10 本身处理图像的旋转,以确保它们基于设备的方向“直立”。 默认情况下,你的应用会收到通知,指出某些内容在方向上发生了更改,例如窗口大小。 发生这种情况时,Windows 10 会立即旋转图像进行最终显示。 对于四个特定屏幕方向中的三个(稍后讨论),Windows 10 使用其他图形资源和计算来显示最终图像。
对于 UWP DirectX 应用, DisplayInformation 对象提供应用可以查询的基本显示方向数据。 默认方向为 横向,其中显示器的像素宽度大于高度;另一个方向为 纵向,其中显示方向为 90 度,宽度小于高度。
Windows 10 定义四种特定的显示方向模式:
- 横向 - Windows 10 的默认显示方向,被视为旋转的基本角度或标识角度(0 度)。
- 纵向 - 显示器已顺时针旋转 90 度(或逆时针 270 度)。
- 横向,翻转 - 显示器已旋转180度(翻转)。
- 纵向翻转 - 显示器已顺时针旋转 270 度(或逆时针 90 度)。
当显示器从一个方向旋转到另一个方向时,Windows 10 在内部执行旋转操作以将绘制的图像与新方向对齐,并且用户在屏幕上看到一张直立图像。
此外,Windows 10 还显示自动过渡动画,以在从一个方向切换到另一个方向时创建流畅的用户体验。 当显示方向发生变化时,用户会将这些班次视为显示的屏幕图像的固定缩放和旋转动画。 Windows 10 将时间分配给应用,以便在新方向中布局。
总的来说,这是处理屏幕方向更改的一般过程:
- 结合使用窗口边界值和显示方向数据,使交换链与设备的本机显示方向保持一致。
- 使用 IDXGISwapChain1::SetRotation 通知 Windows 10 交换链的方向。
- 更改呈现代码以生成与设备用户方向对齐的图像。
调整交换链的大小并预先旋转其内容
若要在 UWP DirectX 应用中执行基本显示大小调整和预旋转其内容,请执行以下步骤:
- 处理 DisplayInformation::OrientationChanged 事件。
- 将交换链调整为窗口的新尺寸。
- 调用 IDXGISwapChain1::SetRotation 以设置交换链的方向。
- 重新创建任何窗口大小依赖资源,例如呈现目标和其他像素数据缓冲区。
现在让我们更详细地看看这些步骤。
第一步是注册 DisplayInformation::OrientationChanged 事件的处理程序。 每次屏幕方向更改时都会在应用中引发此事件,例如当显示旋转时。
若要处理 DisplayInformation::OrientationChanged 事件,请在所需的 SetWindow 方法中连接 DisplayInformation::OrientationChanged 的处理程序,这是视图提供程序必须实现的 IFrameworkView 接口的方法之一。
在此代码示例中,DisplayInformation::OrientationChanged 的事件处理程序是一个名为 OnOrientationChanged 的方法。 引发 DisplayInformation::OrientationChanged 时,它会依次调用名为 SetCurrentOrientation 的方法,然后调用 CreateWindowSizeDependentResources。
void App::SetWindow(CoreWindow^ window)
{
  // ... Other UI event handlers assigned here ...

    currentDisplayInformation->OrientationChanged +=
        ref new TypedEventHandler<DisplayInformation^, Object^>(this, &App::OnOrientationChanged);

  // ...
}
}
void App::OnOrientationChanged(DisplayInformation^ sender, Object^ args)
{
    m_deviceResources->SetCurrentOrientation(sender->CurrentOrientation);
    m_main->CreateWindowSizeDependentResources();
}

// This method is called in the event handler for the OrientationChanged event.
void DX::DeviceResources::SetCurrentOrientation(DisplayOrientations currentOrientation)
{
    if (m_currentOrientation != currentOrientation)
    {
        m_currentOrientation = currentOrientation;
        CreateWindowSizeDependentResources();
    }
}
接下来,为新的屏幕方向调整交换链的大小,并准备在执行呈现时旋转图形管道的内容。 在此示例中, DirectXBase::CreateWindowSizeDependentResources 是一种处理调用 IDXGISwapChain::ResizeBuffers、设置 3D 和 2D 旋转矩阵、调用 SetRotation 以及重新创建资源的方法。
void DX::DeviceResources::CreateWindowSizeDependentResources()
{
    // Clear the previous window size specific context.
    ID3D11RenderTargetView* nullViews[] = {nullptr};
    m_d3dContext->OMSetRenderTargets(ARRAYSIZE(nullViews), nullViews, nullptr);
    m_d3dRenderTargetView = nullptr;
    m_d2dContext->SetTarget(nullptr);
    m_d2dTargetBitmap = nullptr;
    m_d3dDepthStencilView = nullptr;
    m_d3dContext->Flush();

    // Calculate the necessary render target size in pixels.
    m_outputSize.Width = DX::ConvertDipsToPixels(m_logicalSize.Width, m_dpi);
    m_outputSize.Height = DX::ConvertDipsToPixels(m_logicalSize.Height, m_dpi);

    // Prevent zero size DirectX content from being created.
    m_outputSize.Width = max(m_outputSize.Width, 1);
    m_outputSize.Height = max(m_outputSize.Height, 1);

    // The width and height of the swap chain must be based on the window's
    // natively-oriented width and height. If the window is not in the native
    // orientation, the dimensions must be reversed.
    DXGI_MODE_ROTATION displayRotation = ComputeDisplayRotation();

    bool swapDimensions = displayRotation == DXGI_MODE_ROTATION_ROTATE90 || displayRotation == DXGI_MODE_ROTATION_ROTATE270;
    m_d3dRenderTargetSize.Width = swapDimensions ? m_outputSize.Height : m_outputSize.Width;
    m_d3dRenderTargetSize.Height = swapDimensions ? m_outputSize.Width : m_outputSize.Height;

    if (m_swapChain != nullptr)
    {
        // If the swap chain already exists, resize it.
        HRESULT hr = m_swapChain->ResizeBuffers(
            2, // Double-buffered swap chain.
            lround(m_d3dRenderTargetSize.Width),
            lround(m_d3dRenderTargetSize.Height),
            DXGI_FORMAT_B8G8R8A8_UNORM,
            0
            );

        if (hr == DXGI_ERROR_DEVICE_REMOVED || hr == DXGI_ERROR_DEVICE_RESET)
        {
            // If the device was removed for any reason, a new device and swap chain will need to be created.
            HandleDeviceLost();

            // Everything is set up now. Do not continue execution of this method. HandleDeviceLost will reenter this method
            // and correctly set up the new device.
            return;
        }
        else
        {
            DX::ThrowIfFailed(hr);
        }
    }
    else
    {
        // Otherwise, create a new one using the same adapter as the existing Direct3D device.
        DXGI_SWAP_CHAIN_DESC1 swapChainDesc = {0};

        swapChainDesc.Width = lround(m_d3dRenderTargetSize.Width); // Match the size of the window.
        swapChainDesc.Height = lround(m_d3dRenderTargetSize.Height);
        swapChainDesc.Format = DXGI_FORMAT_B8G8R8A8_UNORM; // This is the most common swap chain format.
        swapChainDesc.Stereo = false;
        swapChainDesc.SampleDesc.Count = 1; // Don't use multi-sampling.
        swapChainDesc.SampleDesc.Quality = 0;
        swapChainDesc.BufferUsage = DXGI_USAGE_RENDER_TARGET_OUTPUT;
        swapChainDesc.BufferCount = 2; // Use double-buffering to minimize latency.
        swapChainDesc.SwapEffect = DXGI_SWAP_EFFECT_FLIP_SEQUENTIAL; // All UWP apps must use this SwapEffect.
        swapChainDesc.Flags = 0;
        swapChainDesc.Scaling = DXGI_SCALING_NONE;
        swapChainDesc.AlphaMode = DXGI_ALPHA_MODE_IGNORE;

        // This sequence obtains the DXGI factory that was used to create the Direct3D device above.
        ComPtr<IDXGIDevice3> dxgiDevice;
        DX::ThrowIfFailed(
            m_d3dDevice.As(&dxgiDevice)
            );

        ComPtr<IDXGIAdapter> dxgiAdapter;
        DX::ThrowIfFailed(
            dxgiDevice->GetAdapter(&dxgiAdapter)
            );

        ComPtr<IDXGIFactory2> dxgiFactory;
        DX::ThrowIfFailed(
            dxgiAdapter->GetParent(IID_PPV_ARGS(&dxgiFactory))
            );

        DX::ThrowIfFailed(
            dxgiFactory->CreateSwapChainForCoreWindow(
                m_d3dDevice.Get(),
                reinterpret_cast<IUnknown*>(m_window.Get()),
                &swapChainDesc,
                nullptr,
                &m_swapChain
                )
            );

        // Ensure that DXGI does not queue more than one frame at a time. This both reduces latency and
        // ensures that the application will only render after each VSync, minimizing power consumption.
        DX::ThrowIfFailed(
            dxgiDevice->SetMaximumFrameLatency(1)
            );
    }

    // Set the proper orientation for the swap chain, and generate 2D and
    // 3D matrix transformations for rendering to the rotated swap chain.
    // Note the rotation angle for the 2D and 3D transforms are different.
    // This is due to the difference in coordinate spaces.  Additionally,
    // the 3D matrix is specified explicitly to avoid rounding errors.

    switch (displayRotation)
    {
    case DXGI_MODE_ROTATION_IDENTITY:
        m_orientationTransform2D = Matrix3x2F::Identity();
        m_orientationTransform3D = ScreenRotation::Rotation0;
        break;

    case DXGI_MODE_ROTATION_ROTATE90:
        m_orientationTransform2D =
            Matrix3x2F::Rotation(90.0f) *
            Matrix3x2F::Translation(m_logicalSize.Height, 0.0f);
        m_orientationTransform3D = ScreenRotation::Rotation270;
        break;

    case DXGI_MODE_ROTATION_ROTATE180:
        m_orientationTransform2D =
            Matrix3x2F::Rotation(180.0f) *
            Matrix3x2F::Translation(m_logicalSize.Width, m_logicalSize.Height);
        m_orientationTransform3D = ScreenRotation::Rotation180;
        break;

    case DXGI_MODE_ROTATION_ROTATE270:
        m_orientationTransform2D =
            Matrix3x2F::Rotation(270.0f) *
            Matrix3x2F::Translation(0.0f, m_logicalSize.Width);
        m_orientationTransform3D = ScreenRotation::Rotation90;
        break;

    default:
        throw ref new FailureException();
    }


    //SDM: only instance of SetRotation
    DX::ThrowIfFailed(
        m_swapChain->SetRotation(displayRotation)
        );

    // Create a render target view of the swap chain back buffer.
    ComPtr<ID3D11Texture2D> backBuffer;
    DX::ThrowIfFailed(
        m_swapChain->GetBuffer(0, IID_PPV_ARGS(&backBuffer))
        );

    DX::ThrowIfFailed(
        m_d3dDevice->CreateRenderTargetView(
            backBuffer.Get(),
            nullptr,
            &m_d3dRenderTargetView
            )
        );

    // Create a depth stencil view for use with 3D rendering if needed.
    CD3D11_TEXTURE2D_DESC depthStencilDesc(
        DXGI_FORMAT_D24_UNORM_S8_UINT,
        lround(m_d3dRenderTargetSize.Width),
        lround(m_d3dRenderTargetSize.Height),
        1, // This depth stencil view has only one texture.
        1, // Use a single mipmap level.
        D3D11_BIND_DEPTH_STENCIL
        );

    ComPtr<ID3D11Texture2D> depthStencil;
    DX::ThrowIfFailed(
        m_d3dDevice->CreateTexture2D(
            &depthStencilDesc,
            nullptr,
            &depthStencil
            )
        );

    CD3D11_DEPTH_STENCIL_VIEW_DESC depthStencilViewDesc(D3D11_DSV_DIMENSION_TEXTURE2D);
    DX::ThrowIfFailed(
        m_d3dDevice->CreateDepthStencilView(
            depthStencil.Get(),
            &depthStencilViewDesc,
            &m_d3dDepthStencilView
            )
        );

    // Set the 3D rendering viewport to target the entire window.
    m_screenViewport = CD3D11_VIEWPORT(
        0.0f,
        0.0f,
        m_d3dRenderTargetSize.Width,
        m_d3dRenderTargetSize.Height
        );

    m_d3dContext->RSSetViewports(1, &m_screenViewport);

    // Create a Direct2D target bitmap associated with the
    // swap chain back buffer and set it as the current target.
    D2D1_BITMAP_PROPERTIES1 bitmapProperties =
        D2D1::BitmapProperties1(
            D2D1_BITMAP_OPTIONS_TARGET | D2D1_BITMAP_OPTIONS_CANNOT_DRAW,
            D2D1::PixelFormat(DXGI_FORMAT_B8G8R8A8_UNORM, D2D1_ALPHA_MODE_PREMULTIPLIED),
            m_dpi,
            m_dpi
            );

    ComPtr<IDXGISurface2> dxgiBackBuffer;
    DX::ThrowIfFailed(
        m_swapChain->GetBuffer(0, IID_PPV_ARGS(&dxgiBackBuffer))
        );

    DX::ThrowIfFailed(
        m_d2dContext->CreateBitmapFromDxgiSurface(
            dxgiBackBuffer.Get(),
            &bitmapProperties,
            &m_d2dTargetBitmap
            )
        );

    m_d2dContext->SetTarget(m_d2dTargetBitmap.Get());

    // Grayscale text anti-aliasing is recommended for all UWP apps.
    m_d2dContext->SetTextAntialiasMode(D2D1_TEXT_ANTIALIAS_MODE_GRAYSCALE);

}
下次调用此方法时保存窗口的当前高度和宽度值后,将显示边界的设备独立像素(DIP)值转换为像素。 在示例中,调用 ConvertDipsToPixels,这是运行此代码的简单函数:
floor((dips * dpi / 96.0f) + 0.5f);
添加 0.5f 以确保舍入到最接近的整数值。
除了这一点, CoreWindow 坐标始终在 DIP 中定义。 对于 Windows 10 和早期版本的 Windows,DIP 定义为一英寸的 1/96,并与操作系统的上一定义保持一致。 当显示方向旋转到纵向模式时,应用将翻转 CoreWindow 的宽度和高度,并且呈现目标大小(边界)必须相应地更改。 由于 Direct3D 的坐标始终为物理像素,因此必须先从 CoreWindow 的 DIP 值转换为整数像素值,然后再将这些值传递给 Direct3D 以设置交换链。
从流程上讲,只需调整交换链的大小,就会做一些工作:在组合图像进行演示之前,你实际上正在旋转图像的 Direct2D 和 Direct3D 组件,并且你告诉交换链你已以新方向呈现结果。 有关此过程的更多详细信息,如 DX::D eviceResources::CreateWindowSizeDependentResources 的代码示例所示:
确定显示的新方向。 如果显示器已从横向翻转到纵向,反之亦然,则为显示边界交换高度和宽度值(从 DIP 值更改为像素)。
然后,检查是否已创建交换链。 如果尚未创建,请通过调用 IDXGIFactory2::CreateSwapChainForCoreWindow 来创建它。 否则,通过调用 IDXGISwapchain:ResizeBuffers,将现有交换链的缓冲区调整为新的显示维度。 尽管无需调整旋转事件的交换链大小(毕竟呈现管道已旋转的内容)还有其他大小更改事件,如对齐和填充事件,需要调整大小。
之后,在将像素或顶点(分别)呈现到交换链时,设置相应的二维或三维矩阵转换,以应用于图形管道中的像素或顶点。 我们有 4 个可能的旋转矩阵:
- 横向 (DXGI_MODE_ROTATION_IDENTITY)
- 纵向 (DXGI_MODE_ROTATION_ROTATE270)
- 横向(翻转)(DXGI_MODE_ROTATION_ROTATE180)
- 纵向(翻转) (DXGI_MODE_ROTATION_ROTATE90)
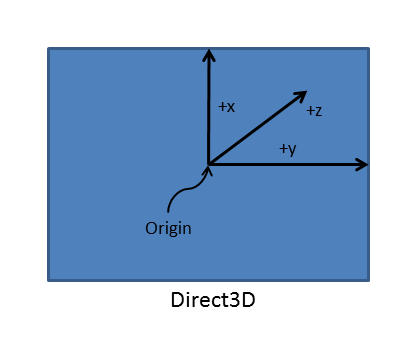
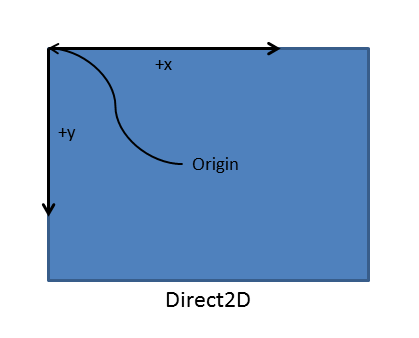
根据 Windows 10 提供的数据(例如 DisplayInformation::OrientationChanged 的结果)选择正确的矩阵,以确定显示方向,并且它将乘以场景中每个像素(Direct2D)或顶点(Direct3D)的坐标,从而有效地旋转它们以对齐屏幕的方向。 (请注意,在 Direct2D 中,屏幕原点定义为左上角,而在 Direct3D 中,原点定义为窗口的逻辑中心。
注意有关用于旋转的二维转换以及如何定义它们的详细信息,请参阅为屏幕旋转定义矩阵(2-D)。 有关用于旋转的三维转换的详细信息,请参阅为屏幕旋转定义矩阵(3-D)。
现在,下面是重要位:调用 IDXGISwapChain1::SetRotation ,并为其提供更新的旋转矩阵,如下所示:
m_swapChain->SetRotation(rotation);
还可以存储所选旋转矩阵,呈现方法在计算新投影时可以获取该矩阵。 呈现最终三维投影或复合最终二维布局时,你将使用此矩阵。 (它不会自动为你应用它。
之后,为旋转的三维视图创建新的呈现目标,并为视图创建新的深度模具缓冲区。 通过调用 ID3D11DeviceContext:RSSetViewports 设置旋转场景的三维呈现视区。
最后,如果你有 2D 图像旋转或布局,请使用 ID2D1DeviceContext::CreateBitmapFromDxgiSurface 为新布局为更新的方向创建二维呈现目标作为重设交换链的可写位图。 在呈现目标上设置所需的任何属性,例如抗锯齿模式(如代码示例所示)。
现在,提供交换链。
使用 CoreWindowResizeManager 减少旋转延迟
默认情况下,无论应用模型或语言如何,Windows 10 都会提供一个简短但明显的时间窗口,以完成图像的旋转。 但是,当应用使用此处所述的技术之一执行旋转计算时,在关闭此时间范围之前,它将会很好地完成。 你想让时间回来并完成旋转动画,对吧? 这就是 CoreWindowResizeManager 进来的地方。
下面介绍如何使用 CoreWindowResizeManager::当引发 DisplayInformation::OrientationChanged 事件时,在事件的处理程序中调用 CoreWindowResizeManager::GetForCurrentView 以获取 CoreWindowResizeManager 的实例,并在新方向的布局完成并呈现时,调用 NotifyLayoutCompleted让 Windows 知道它可以完成旋转动画并显示应用屏幕。
下面是 DisplayInformation::OrientationChanged 事件处理程序中的代码可能如下所示:
CoreWindowResizeManager^ resizeManager = Windows::UI::Core::CoreWindowResizeManager::GetForCurrentView();

// ... build the layout for the new display orientation ...

resizeManager->NotifyLayoutCompleted();
当用户旋转显示方向时,Windows 10 会向用户显示独立于应用的动画作为反馈。 该动画按以下顺序发生三个部分:
- Windows 10 会收缩原始映像。
- Windows 10 保存映像,以便重新生成新布局所需的时间。 这是你想要减少的时间窗口,因为你的应用可能不需要所有这些时间。
- 当布局窗口过期或收到布局完成通知时,Windows 将旋转图像,然后交叉淡化缩放到新的方向。
如第三个项目符号中所示,当应用调用 NotifyLayoutCompleted 时,Windows 10 将停止超时窗口,完成旋转动画并将控件返回到应用,该控件现在以新的显示方向绘制。 整体效果是,你的应用现在感觉更流畅且响应迅速,并更高效地工作!
附录 A:为屏幕旋转应用矩阵 (2-D)
在调整交换链大小并预旋转其内容(在 DXGI 交换链旋转示例中)的示例代码中,你可能已注意到,我们针对 Direct2D 输出和 Direct3D 输出具有单独的旋转矩阵。 让我们先看一下二维矩阵。
有两个原因无法对 Direct2D 和 Direct3D 内容应用相同的旋转矩阵:
一是使用不同的笛卡尔坐标模型。 Direct2D 使用右撇子规则,其中正值从原点向上移动的 y 坐标增加。 但是,Direct3D 使用左撇子规则,其中 y 坐标从原点向右增加正值。 结果是屏幕坐标的原点位于 Direct2D 的左上角,而屏幕的原点(投影平面)位于 Direct3D 的左下角。 (有关详细信息,请参阅 三维坐标系 。
二是必须显式指定三维旋转矩阵,以避免舍入错误。
交换链假定原点位于左下角,因此必须执行旋转以将右手 Direct2D 坐标系与交换链使用的左手坐标系对齐。 具体而言,通过将旋转矩阵与旋转坐标系原点的平移矩阵相乘,将图像从 CoreWindow 的坐标空间转换为交换链坐标空间来重新定位左撇子方向下的图像。 当 Direct2D 呈现器目标与交换链连接时,应用还必须一致地应用此转换。 但是,如果你的应用正在绘制到与交换链不直接关联的中间图面,请不要应用此坐标空间转换。
从四种可能的旋转中选择正确矩阵的代码可能如下所示(请注意转换为新的坐标系原点):
// Set the proper orientation for the swap chain, and generate 2D and
// 3D matrix transformations for rendering to the rotated swap chain.
// Note the rotation angle for the 2D and 3D transforms are different.
// This is due to the difference in coordinate spaces.  Additionally,
// the 3D matrix is specified explicitly to avoid rounding errors.

switch (displayRotation)
{
case DXGI_MODE_ROTATION_IDENTITY:
    m_orientationTransform2D = Matrix3x2F::Identity();
    m_orientationTransform3D = ScreenRotation::Rotation0;
    break;

case DXGI_MODE_ROTATION_ROTATE90:
    m_orientationTransform2D =
        Matrix3x2F::Rotation(90.0f) *
        Matrix3x2F::Translation(m_logicalSize.Height, 0.0f);
    m_orientationTransform3D = ScreenRotation::Rotation270;
    break;

case DXGI_MODE_ROTATION_ROTATE180:
    m_orientationTransform2D =
        Matrix3x2F::Rotation(180.0f) *
        Matrix3x2F::Translation(m_logicalSize.Width, m_logicalSize.Height);
    m_orientationTransform3D = ScreenRotation::Rotation180;
    break;

case DXGI_MODE_ROTATION_ROTATE270:
    m_orientationTransform2D =
        Matrix3x2F::Rotation(270.0f) *
        Matrix3x2F::Translation(0.0f, m_logicalSize.Width);
    m_orientationTransform3D = ScreenRotation::Rotation90;
    break;

default:
    throw ref new FailureException();
}
为二维图像设置正确的旋转矩阵和原点后,请在调用 ID2D1DeviceContext::SetTransform 之间调用 ID2D1DeviceContext::BeginDraw 和 ID2D1DeviceContext::EndDraw。
警告 Direct2D 没有转换堆栈。 如果应用还使用 ID2D1DeviceContext::SetTransform 作为其绘图代码的一部分,则此矩阵需要与已应用的任何其他转换相乘。
    ID2D1DeviceContext* context = m_deviceResources->GetD2DDeviceContext();
    Windows::Foundation::Size logicalSize = m_deviceResources->GetLogicalSize();

    context->SaveDrawingState(m_stateBlock.Get());
    context->BeginDraw();

    // Position on the bottom right corner.
    D2D1::Matrix3x2F screenTranslation = D2D1::Matrix3x2F::Translation(
        logicalSize.Width - m_textMetrics.layoutWidth,
        logicalSize.Height - m_textMetrics.height
        );

    context->SetTransform(screenTranslation * m_deviceResources->GetOrientationTransform2D());

    DX::ThrowIfFailed(
        m_textFormat->SetTextAlignment(DWRITE_TEXT_ALIGNMENT_TRAILING)
        );

    context->DrawTextLayout(
        D2D1::Point2F(0.f, 0.f),
        m_textLayout.Get(),
        m_whiteBrush.Get()
        );

    // Ignore D2DERR_RECREATE_TARGET here. This error indicates that the device
    // is lost. It will be handled during the next call to Present.
    HRESULT hr = context->EndDraw();
下次呈现交换链时,将旋转二维图像以匹配新的显示方向。
附录 B:为屏幕旋转应用矩阵 (3-D)
在调整交换链大小并预旋转其内容(并在 DXGI 交换链旋转示例中)的示例代码中,我们为每个可能的屏幕方向定义了一个特定的转换矩阵。 现在,让我们看看旋转三维场景的矩阵。 与之前一样,为 4 个可能的方向中的每个矩阵创建一组矩阵。 若要防止舍入错误并因此轻微的视觉项目,请在代码中显式声明矩阵。
按如下所示设置这些三维旋转矩阵。 以下代码示例中显示的矩阵是用于定义相机三维场景空间中点的 0、90、180 和 270 度旋转的标准旋转矩阵。 在计算场景的 2-D 投影时,会将场景中每个顶点的 [x, y, z] 坐标值与此旋转矩阵相乘。
// 0-degree Z-rotation
static const XMFLOAT4X4 Rotation0(
    1.0f, 0.0f, 0.0f, 0.0f,
    0.0f, 1.0f, 0.0f, 0.0f,
    0.0f, 0.0f, 1.0f, 0.0f,
    0.0f, 0.0f, 0.0f, 1.0f
    );

// 90-degree Z-rotation
static const XMFLOAT4X4 Rotation90(
    0.0f, 1.0f, 0.0f, 0.0f,
    -1.0f, 0.0f, 0.0f, 0.0f,
    0.0f, 0.0f, 1.0f, 0.0f,
    0.0f, 0.0f, 0.0f, 1.0f
    );

// 180-degree Z-rotation
static const XMFLOAT4X4 Rotation180(
    -1.0f, 0.0f, 0.0f, 0.0f,
    0.0f, -1.0f, 0.0f, 0.0f,
    0.0f, 0.0f, 1.0f, 0.0f,
    0.0f, 0.0f, 0.0f, 1.0f
    );

// 270-degree Z-rotation
static const XMFLOAT4X4 Rotation270(
    0.0f, -1.0f, 0.0f, 0.0f,
    1.0f, 0.0f, 0.0f, 0.0f,
    0.0f, 0.0f, 1.0f, 0.0f,
    0.0f, 0.0f, 0.0f, 1.0f
    );
    }
使用对 IDXGISwapChain1::SetRotation 的调用在交换链上设置旋转类型,如下所示:
m_swapChain->SetRotation(rotation);
现在,在呈现方法中,实现类似于下面的一些代码:
struct ConstantBuffer // This struct is provided for illustration.
{
    // Other constant buffer matrices and data are defined here.

    float4x4 projection; // Current matrix for projection
} ;
ConstantBuffer  m_constantBufferData;          // Constant buffer resource data

// ...

// Rotate the projection matrix as it will be used to render to the rotated swap chain.
m_constantBufferData.projection = mul(m_constantBufferData.projection, m_rotationTransform3D);
现在,当你调用你的呈现方法时,它会将当前旋转矩阵(就像类变量 m_orientationTransform3D 所指定的那样)与当前投影矩阵相乘,并将该运算的结果分配作为你的呈现程序的新投影矩阵。 演示交换链,以查看更新后的显示方向中的场景。