教程:与 3D 对象交互
了解如何使用 Babylon.js 为混合现实体验创建 3D 对象和交互。 在本部分中,你将从一些简单的内容开始,例如在选择对象时绘制立方体的外观。
本教程涵盖以下主题:
- 如何添加交互
- 启用 WebXR 沉浸式模式
- 在Windows Mixed Reality模拟器上运行应用
- 在 Android Chrome 上运行和调试应用
开始之前
在上一教程步骤中,已创建包含场景的基本网页。 打开托管网页进行编辑。
<html>
<head>
    <script src="https://cdn.babylonjs.com/babylon.js"></script>
    <style>
        body,#renderCanvas { width: 100%; height: 100%;}
    </style>
</head>
<body>
    <canvas id="renderCanvas"></canvas>
    <script>
        const canvas = document.getElementById("renderCanvas");
        const engine = new BABYLON.Engine(canvas, true);

        const createScene = function() {
            const scene = new BABYLON.Scene(engine);
            scene.clearColor = new BABYLON.Color3.Black;

            const alpha =  Math.PI/4;
            const beta = Math.PI/3;
            const radius = 8;
            const target = new BABYLON.Vector3(0, 0, 0);

            const camera = new BABYLON.ArcRotateCamera("Camera", alpha, beta, radius, target, scene);
            camera.attachControl(canvas, true);

            const light = new BABYLON.HemisphericLight("light", new BABYLON.Vector3(1, 1, 0));

            const box = BABYLON.MeshBuilder.CreateBox("box", {});
            box.position.x = 0.5;
            box.position.y = 1;

            return scene;
        };

        const sceneToRender = createScene();
        engine.runRenderLoop(function(){
            sceneToRender.render();
        });
    </script>
</body>
</html>
添加交互
首先,让我们更新创建多维数据集的代码,以便用随机颜色绘制立方体。 为此,我们将向立方体添加 材料 。 材料允许我们指定颜色和纹理,并可用于覆盖其他对象。 材料如何显示取决于场景中使用的光或光,以及它如何设置反应。 例如,漫射颜色将颜色分散到它所附加到的网格上。 添加以下代码:
const boxMaterial = new BABYLON.StandardMaterial("material", scene);
boxMaterial.diffuseColor = BABYLON.Color3.Random();
box.material = boxMaterial;
现在,已使用随机颜色绘制立方体,接下来添加一个交互:
- 单击立方体时更改颜色
- 更改颜色后移动立方体
若要添加交互,应使用 作。 启动作以响应事件触发器。 例如,当用户单击多维数据集时。 我们需要做的就是实例化巴比伦。ActionManager 并为特定触发器注册作。 巴比伦当有人单击多维数据集时,ExecuteCodeAction 将运行 JavaScript 函数:
box.actionManager = new BABYLON.ActionManager(scene);
box.actionManager.registerAction(new BABYLON.ExecuteCodeAction(
    BABYLON.ActionManager.OnPickTrigger,
    function (evt) {
        const sourceBox = evt.meshUnderPointer;

        //move the box upright
        sourceBox.position.x += 0.1;
        sourceBox.position.y += 0.1;

        //update the color
        boxMaterial.diffuseColor = BABYLON.Color3.Random();
    }));
网页的最终代码如下所示:
<html>
<head>
    <script src="https://cdn.babylonjs.com/babylon.js"></script>
    <style>
        body,#renderCanvas { width: 100%; height: 100%;}
    </style>
</head>
<body>
    <canvas id="renderCanvas"></canvas>
    <script>
        const canvas = document.getElementById("renderCanvas");
        const engine = new BABYLON.Engine(canvas, true);

        const createScene = function() {
            const scene = new BABYLON.Scene(engine);
            scene.clearColor = new BABYLON.Color3.Black;

            const alpha =  Math.PI/4;
            const beta = Math.PI/3;
            const radius = 8;
            const target = new BABYLON.Vector3(0, 0, 0);

            const camera = new BABYLON.ArcRotateCamera("Camera", alpha, beta, radius, target, scene);
            camera.attachControl(canvas, true);

            const light = new BABYLON.HemisphericLight("light", new BABYLON.Vector3(1, 1, 0));

            const box = BABYLON.MeshBuilder.CreateBox("box", {});
            box.position.x = 0.5;
            box.position.y = 1;

            const boxMaterial = new BABYLON.StandardMaterial("material", scene);
            boxMaterial.diffuseColor = BABYLON.Color3.Random();
            box.material = boxMaterial;

            box.actionManager = new BABYLON.ActionManager(scene);
            box.actionManager.registerAction(
                new BABYLON.ExecuteCodeAction(BABYLON.ActionManager.OnPickTrigger,
                function (evt) {
                    const sourceBox = evt.meshUnderPointer;
                    sourceBox.position.x += 0.1;
                    sourceBox.position.y += 0.1;

                    boxMaterial.diffuseColor = BABYLON.Color3.Random();
                }));

            return scene;
        };

        const sceneToRender = createScene();
        engine.runRenderLoop(function(){
            sceneToRender.render();
        });
    </script>
</body>
</html>
启用 WebXR 沉浸式体验
现在,我们的立方体正在更改颜色,我们准备尝试沉浸式体验。
在此步骤中,我们将介绍一个 基础。 立方体将悬挂在空中,我们将在底部看到一个地板。 按如下所示添加地面:
const ground = BABYLON.MeshBuilder.CreateGround("ground", {width: 4, height: 4});这会创建一个简单的 4x4 米底板。
若要添加 WebXR 支持,需要调用 createDefaultXRExperienceAsync,该属性具有 Promise 结果。 在 createScene 函数的末尾添加此代码,而不是 返回场景::
const xrPromise = scene.createDefaultXRExperienceAsync({
    floorMeshes: [ground]
});
return xrPromise.then((xrExperience) => {
    console.log("Done, WebXR is enabled.");
    return scene;
});
由于 createScene 函数现在返回 promise 而不是场景,因此我们需要修改 createScene 和 engine.runRenderLoop 的调用方式。 将这些函数的当前调用替换为以下代码,这些函数位于 /script> 标记之前<:
createScene().then(sceneToRender => {
    engine.runRenderLoop(() => sceneToRender.render());
});
网页的最终代码如下所示:
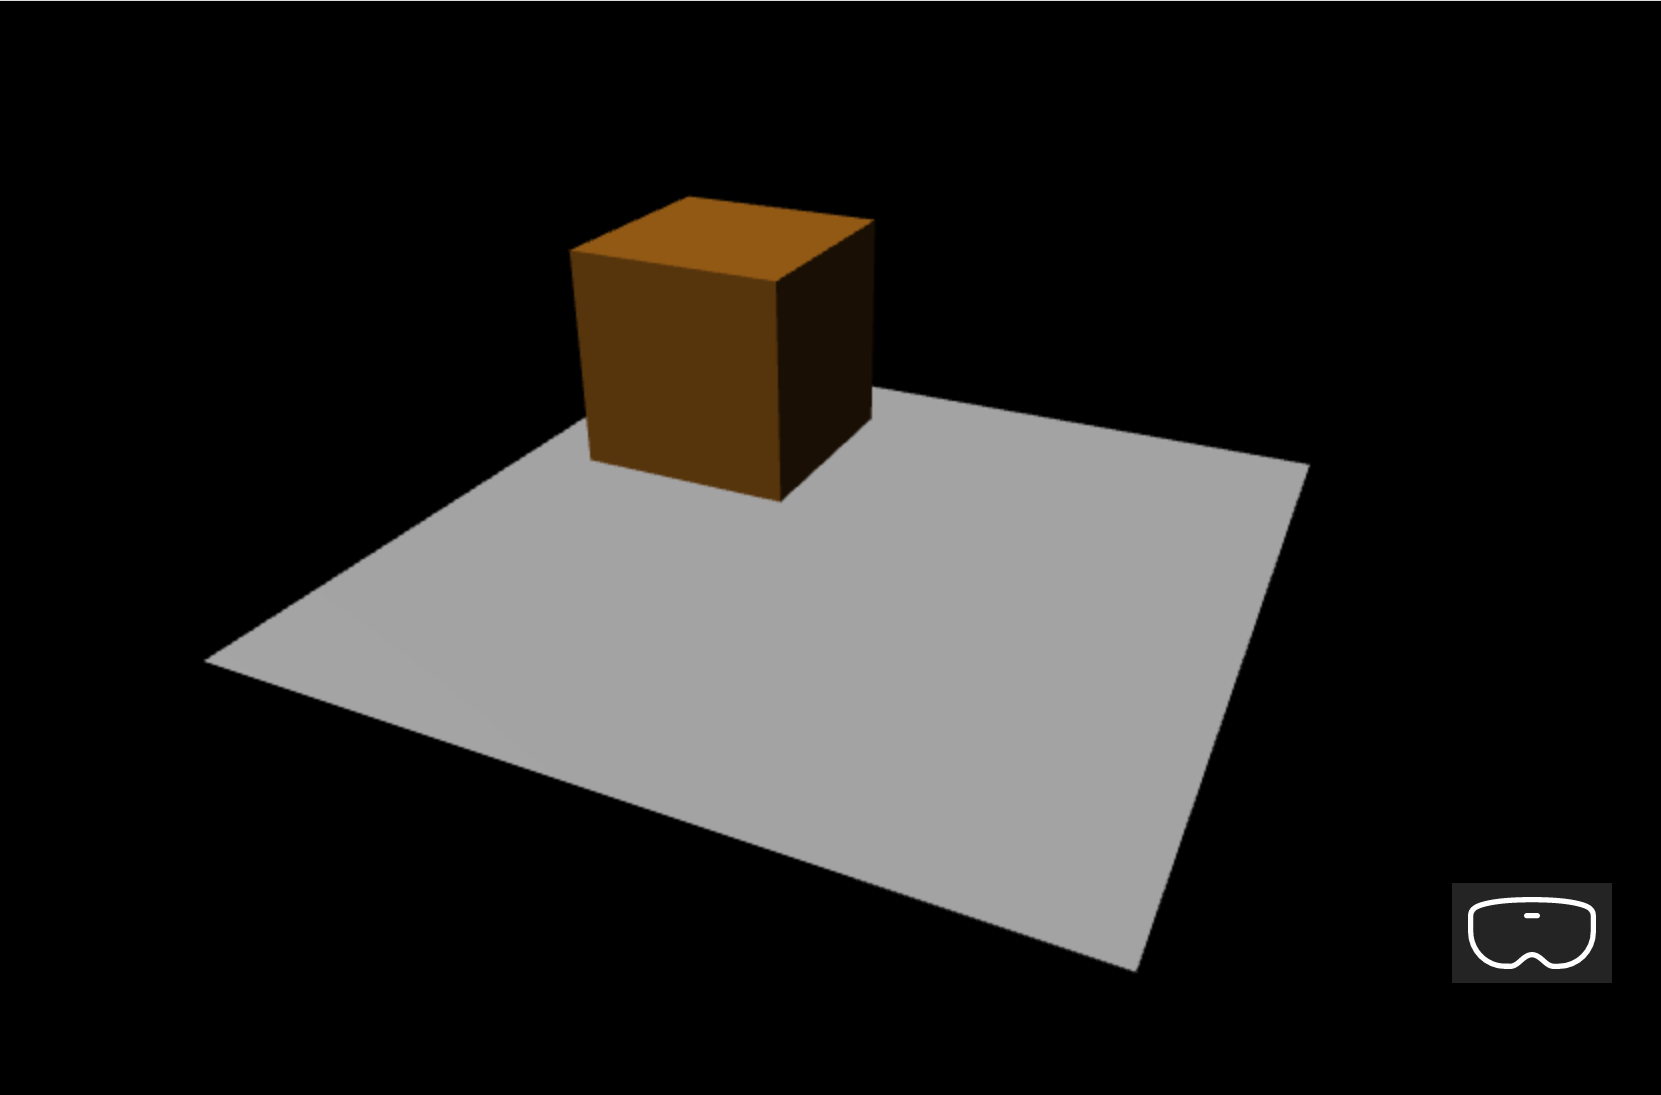
<html>
<head>
    <script src="https://cdn.babylonjs.com/babylon.js"></script>
    <style>
        body,#renderCanvas { width: 100%; height: 100%;}
    </style>
</head>
<body>
    <canvas id="renderCanvas"></canvas>
    <script>
        const canvas = document.getElementById("renderCanvas");
        const engine = new BABYLON.Engine(canvas, true);

        const createScene = function() {
            const scene = new BABYLON.Scene(engine);
            scene.clearColor = new BABYLON.Color3.Black;

            const alpha =  Math.PI/4;
            const beta = Math.PI/3;
            const radius = 8;
            const target = new BABYLON.Vector3(0, 0, 0);

            const camera = new BABYLON.ArcRotateCamera("Camera", alpha, beta, radius, target, scene);
            camera.attachControl(canvas, true);

            const light = new BABYLON.HemisphericLight("light", new BABYLON.Vector3(1, 1, 0));

            const box = BABYLON.MeshBuilder.CreateBox("box", {});
            box.position.x = 0.5;
            box.position.y = 1;

            const boxMaterial = new BABYLON.StandardMaterial("material", scene);
            boxMaterial.diffuseColor = BABYLON.Color3.Random();
            box.material = boxMaterial;

            box.actionManager = new BABYLON.ActionManager(scene);
            box.actionManager.registerAction(
                new BABYLON.ExecuteCodeAction(BABYLON.ActionManager.OnPickTrigger,
                function (evt) {
                    const sourceBox = evt.meshUnderPointer;
                    sourceBox.position.x += 0.1;
                    sourceBox.position.y += 0.1;

                    boxMaterial.diffuseColor = BABYLON.Color3.Random();
                }));

            const ground = BABYLON.MeshBuilder.CreateGround("ground", {width: 4, height: 4});

            const xrPromise = scene.createDefaultXRExperienceAsync({
                floorMeshes: [ground]
            });

            return xrPromise.then((xrExperience) => {
                console.log("Done, WebXR is enabled.");
                return scene;
            });
        };

        createScene().then(sceneToRender => {
            engine.runRenderLoop(() => sceneToRender.render());
        });
    </script>
</body>
</html>
上述代码在浏览器窗口中生成以下输出:
在Windows Mixed Reality模拟器上运行
如果过去未启用Windows Mixed Reality模拟器,请启用该模拟器。
选择右下角的沉浸式 VR 按钮:

此作将启动“Windows Mixed Reality模拟器”窗口,如下所示:
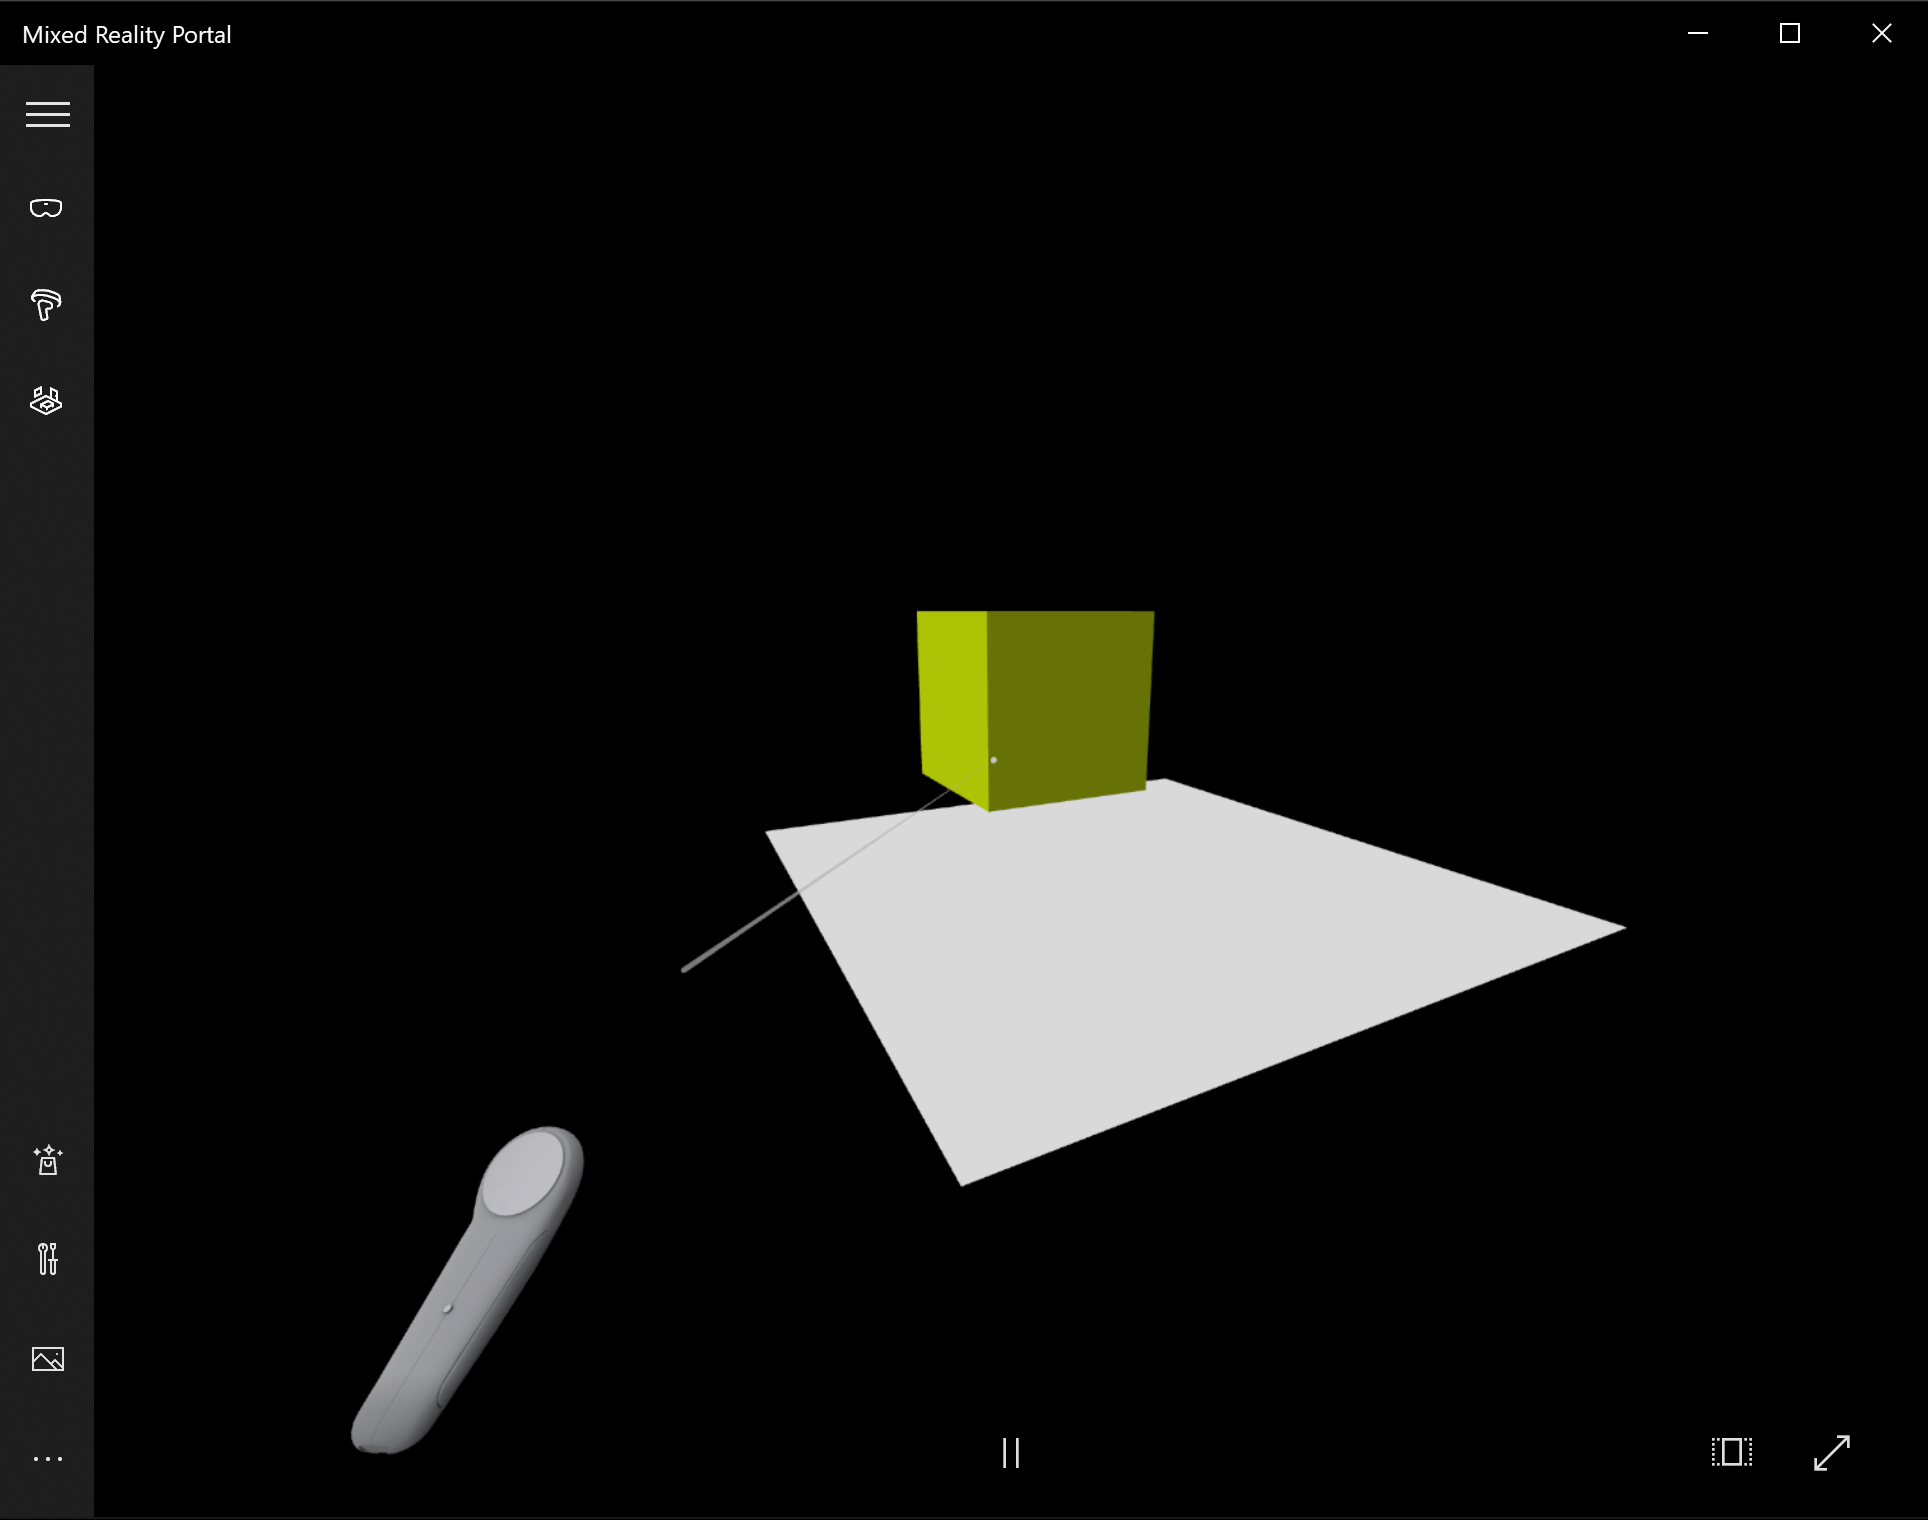
使用键盘上的 W、A、S 和 D 键相应地向前、向后向左和向右走。 使用模拟手定位立方体,然后按键盘上的 Enter 键执行单击作。 立方体将更改其颜色并移动到新位置。
注意
以立方体为目标时,请确保手部射线的末端 (白色圆圈) 与立方体相交,如上图所示。 详细了解 用手点和提交。
在 Android 设备上运行和调试
执行以下步骤,在 Android 设备上启用调试:
先决条件
在安全上下文 (https:// 或通过开发计算机上的 localhost 上的端口转发) 提供静态 html 页的 Web 服务器。 例如,利用 serve npm 包作为提供静态 html 文件的简单轻型 Web 服务器,检查更多 npm 服务
设备最初随 Google Play 商店一起提供,并且必须运行 Android 7.0 或更高版本
开发工作站和设备上最新版本的 Google Chrome
若要验证设备是否已正确配置为运行 WebXR,请浏览到设备上的 示例 WebXR 页 。 应会看到消息,例如:
浏览器支持 WebXR,并且如果你有适当的硬件,则可以运行虚拟现实和增强现实体验。
在 Android 设备上启用开发人员模式和 USB 调试。 请参阅官方文档页配置设备上的开发人员选项,了解如何针对 Android 版本执行此作
接下来,通过 USB 电缆将 Android 设备连接到开发计算机或笔记本电脑
确保开发计算机上的 Web 服务器正在运行。 例如,导航到包含 Web 托管页的根文件夹 (index.html) 并执行以下代码 (假设使用 service npm 包) :
serve在开发计算机上打开 Google Chrome,并在地址栏中输入以下文本:
chrome://inspect#devices
确保已启用“ 发现 USB 设备 ”复选框
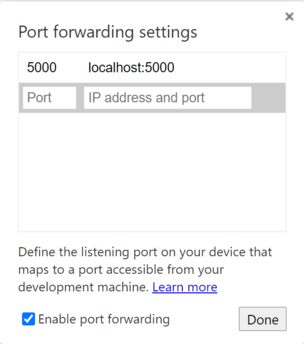
单击“ 端口转发 ”按钮,确保已启用 端口转发 ,并包含一个 条目 localhost:5000 ,如下所示:
在连接的 Android 设备中,打开 Google Chrome 窗口并浏览到 http://localhost:5000 ,你应该会看到立方体
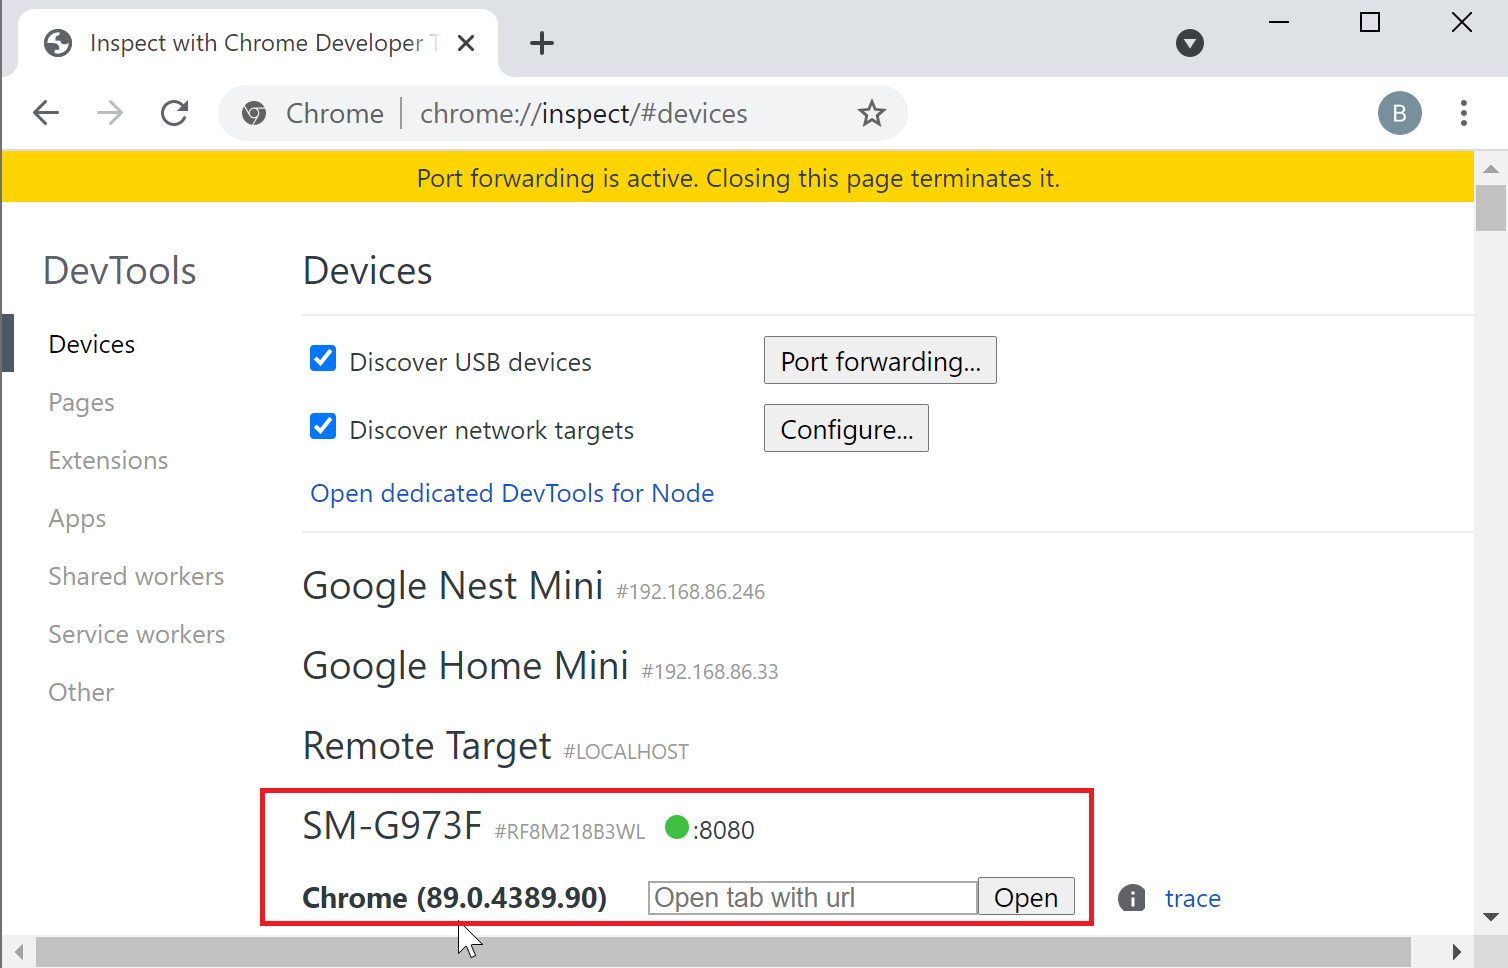
在开发计算机上的 Chrome 中,你将看到你的设备和当前打开的网页列表:
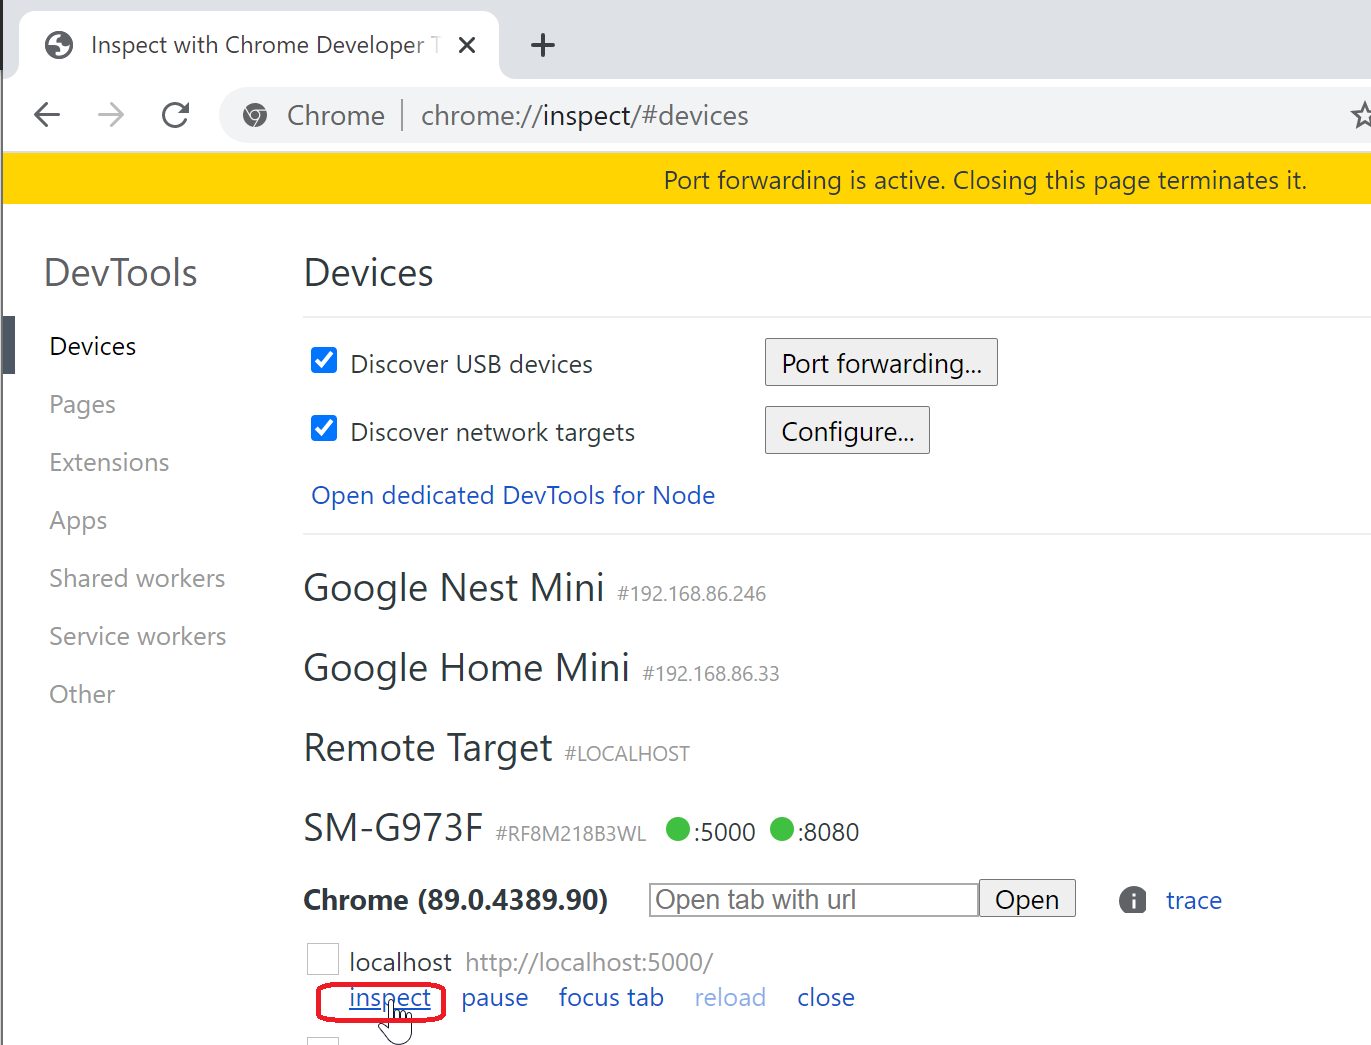
单击条目http://localhost:5000旁边的“检查”按钮:
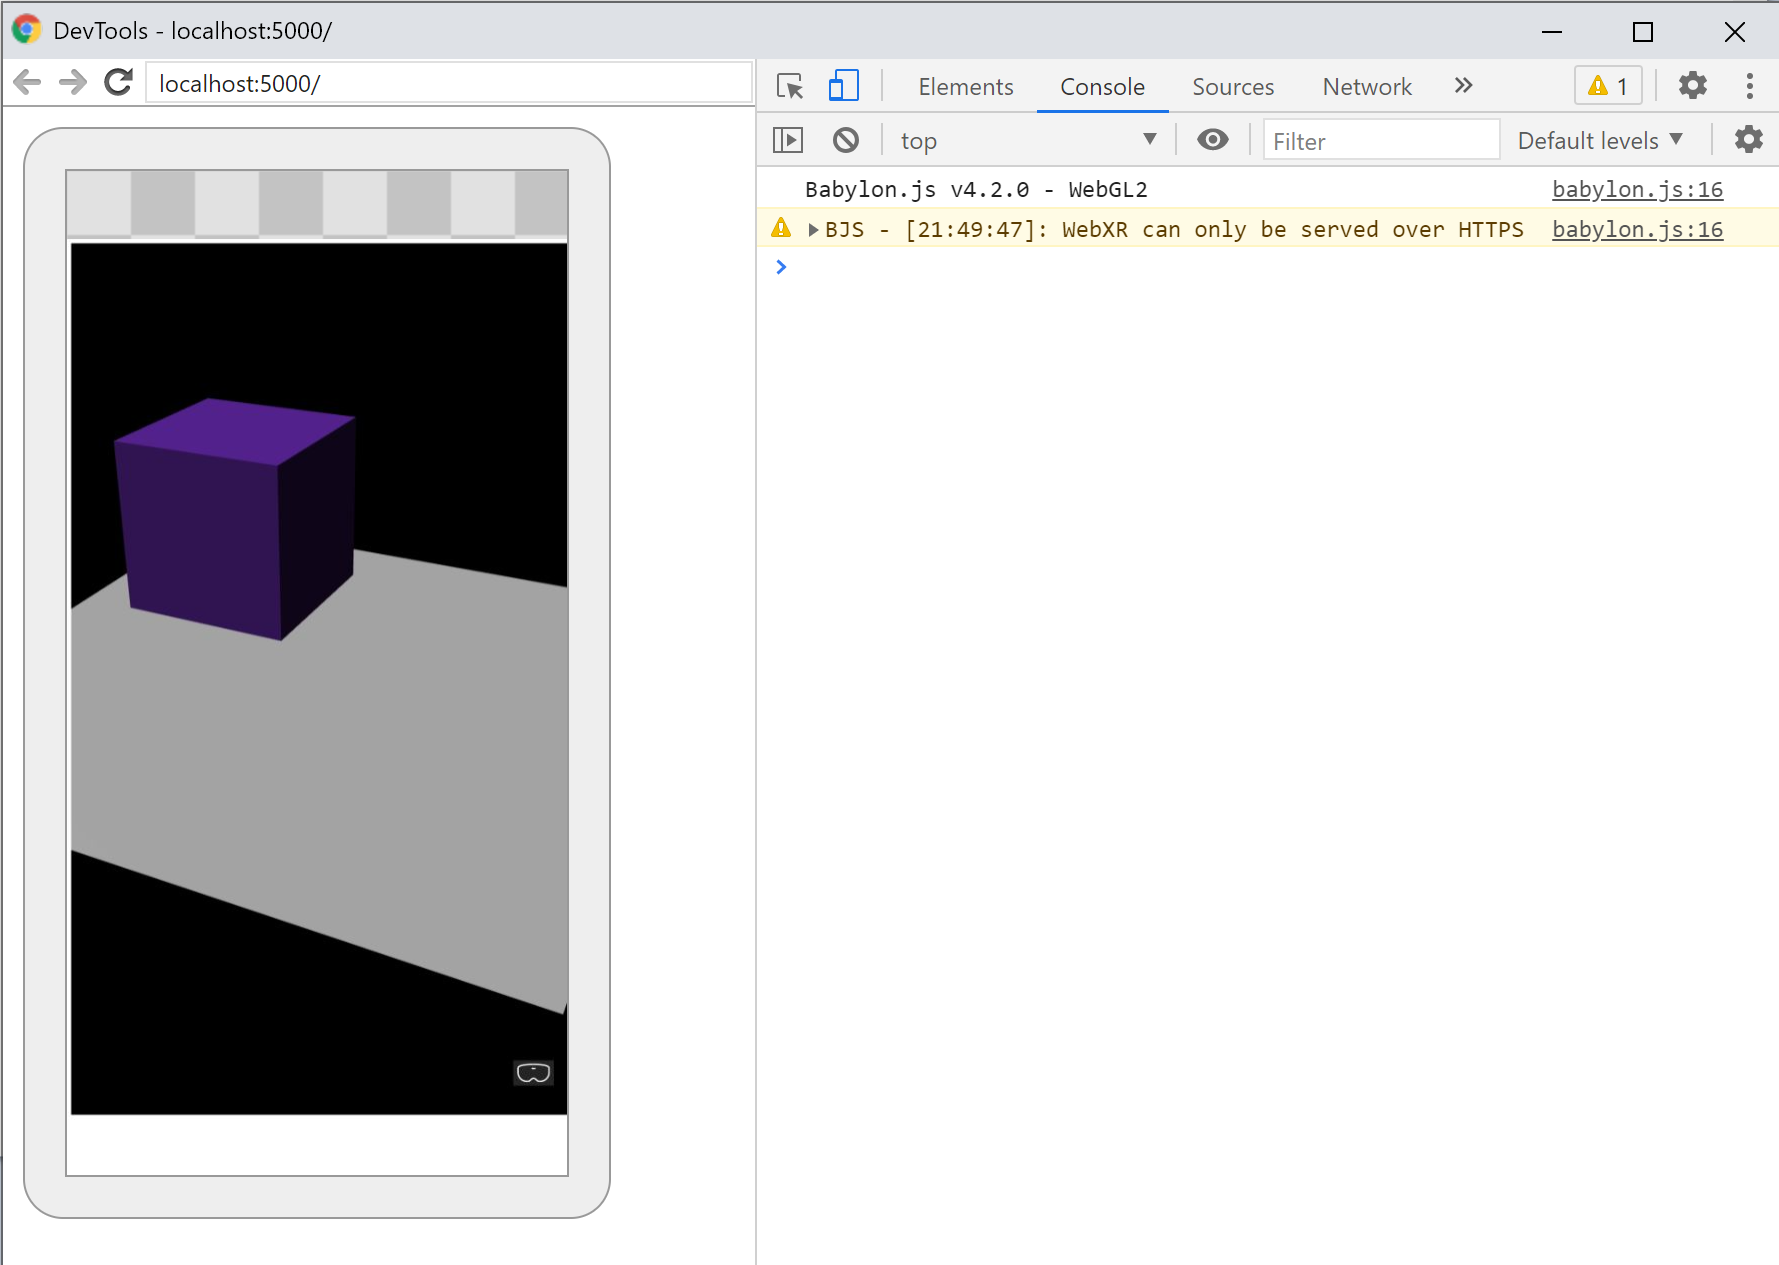
使用 Chrome DevTools 调试页面
外卖
下面是本教程中最重要的要点:
- Babylon.js 可以轻松地使用 JavaScript 创建沉浸式体验
- 若要创建虚拟场景,无需编写低级代码或学习新技术
- 可以使用 WebXR 支持的浏览器生成混合现实应用程序,而无需购买头戴显示设备
后续步骤
恭喜! 你已完成我们的系列 Babylon.js 教程,并了解了如何:
- 设置开发环境
- 创建新网页以显示结果
- 用于创建基本 3D 元素并与之交互的 Babylon.js API
- 在Windows Mixed Reality模拟器中运行并测试应用程序
有关 javaScript 开发混合现实的详细信息,请参阅 JavaScript 开发概述。
如果你正在寻找另一个 Babylon.js 教程,请查看 钢琴构建教程系列 ,了解如何使用 Babylon.js 在 VR 空间中构建钢琴。