绘制形状
了解如何绘制椭圆、矩形、多边形和路径等形状。 Path 类可以将 XAML UI中的复杂向量绘图语言可视化;例如,绘制 Bezier 曲线。
两组类定义 XAML UI 中的空间区域:Shape 类和 Geometry 类。 它们的主要区别是Shape有关联的笔刷,且可以渲染到屏幕,而 Geometry 只定义空间区域,并且只有在为另一个 UI 属性提供信息时被渲染。 可以将 Shape 视为由 Geometry 定义便捷的 UIElement。 本主题主要介绍 Shape 类。
Shape类包括 Line(线)、Ellipse(椭圆)、Rectangle(矩形)、Polygon(多边形)、Polyline(折线)和 Path(路径)。 Path 的有趣之处在于它可以定义任意几何图形,此处涉及 Geometry 类,因为这是定义 Path 部分的一种方法。
UWP 和 WinUI 2
重要
本文中的信息和示例是针对使用 Windows App SDK 和 WinUI 3 的应用优化的,但通常适用于使用 WinUI 2 的 UWP 应用。 有关特定于平台的信息和示例,请查看 UWP API 参考。
本部分包含在 UWP 或 WinUI 2 应用中使用该控件所需的信息。
这些形状的API 在 Windows.UI.Xaml.Shapes 命名空间中。
形状的填充和描边
要将 Shape 渲染到应用画布,必须将其与 Brush 关联。 将Shape 的填充 属性设置为你要的 Brush。 要详细了解笔刷,请参阅使用笔刷。
Shape 还可以有 Stroke,即在形状外围绘制的线条。 还需要用 Brush 为 Stroke 定义外观,并且 StrokeThickness 值不为零。 StrokeThickness 属性用于定义形状边缘周围的外围粗细。 如果未为 Stroke 指定 Brush,或者将 StrokeThickness 设置为 0,则不会绘制形状周围的边框。
椭圆形
Ellipse 是一个具有弯曲周长的形状。 要创建基本的 Ellipse,请为 Fill 指定 Width、Height 和 Brush。
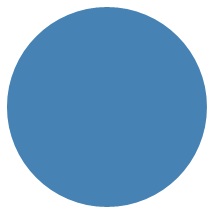
下一个示例创建 Width 为 200,Height为 200 的 Ellipse,并使用 SteelBlue 颜色的 SolidColorBrush 作为 Fill。
<Ellipse Fill="SteelBlue" Height="200" Width="200" />
var ellipse1 = new Ellipse();
ellipse1.Fill = new SolidColorBrush(Colors.SteelBlue);
ellipse1.Width = 200;
ellipse1.Height = 200;

// When you create a XAML element in code, you have to add
// it to the XAML visual tree. This example assumes you have
// a panel named 'layoutRoot' in your XAML file, like this:
// <Grid x:Name="layoutRoot>
layoutRoot.Children.Add(ellipse1);
下面是渲染的 Ellipse。

这样的 Ellipse 会被大多数人认为是圆,但这就是在 XAML 中声明圆形的方式:使用具有相同Width 和 Height 的 Ellipse。
Ellipse 位于 UI 布局中时,其大小应与具有相同Width 和 Height 的矩形相同;周长外的区域没有渲染,但仍包含在其布局槽大小中。
6 个一组的 Ellipse 元素是 ProgressRing 控件模板的一部分,2 个同心 Ellipse 元素是 RadioButton 的一部分。
Rectangle
Rectangle 是一个四边形,对边相等。 要创建基本 Rectangle,请指定 Width、Height 和 Fill。
可以为 Rectangle 设置圆角。 要设置圆角,请指定 RadiusX 和 RadiusY 属性值。 这些属性指定一个椭圆的 x 轴和 y 轴,作为矩形角的弧度。 RadiusX 允许的最大值为 Width 除以 2,RadiusY 的最大允许值为 Height 除以 2。
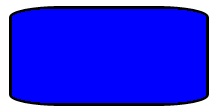
下一个示例创建宽度为 200 且高度为 100 的矩形。 它将 SolidColorBrush 的 Blue 值用于其 Fill,并将 SolidColorBrush 的 Black 值用于其 Stroke。 我们将 StrokeThickness 设置为 3。 我们将 RadiusX 属性设置为 50,Radius属性设置为 10,该属性为 Rectangle 提供圆角。
<Rectangle Fill="Blue"
           Width="200"
           Height="100"
           Stroke="Black"
           StrokeThickness="3"
           RadiusX="50"
           RadiusY="10" />
var rectangle1 = new Rectangle();
rectangle1.Fill = new SolidColorBrush(Colors.Blue);
rectangle1.Width = 200;
rectangle1.Height = 100;
rectangle1.Stroke = new SolidColorBrush(Colors.Black);
rectangle1.StrokeThickness = 3;
rectangle1.RadiusX = 50;
rectangle1.RadiusY = 10;

// When you create a XAML element in code, you have to add
// it to the XAML visual tree. This example assumes you have
// a panel named 'layoutRoot' in your XAML file, like this:
// <Grid x:Name="layoutRoot>
layoutRoot.Children.Add(rectangle1);
下面是渲染的Rectangle。

提示对于 UI 定义来说,在某些情况下,不使用 Rectangle,而是使用 Border 可能更合理。 如果希望围绕其他内容创建矩形形状,最好使用 Border,它可以包含子内容,并且会自动调整该内容的大小,而不会像 Rectangle 一样使用固定尺寸的高度和宽度。 如果设置了 CornerRadius 属性,也可以为 边框 设置选择圆角。
另一方面, 矩形 可能更适用于控件组合。 许多控件模板中都可以看到 Rectangle 形状,因为它用作可聚焦控件的“FocusVisual”部件。 矩形在控件处于“焦点”视觉状态时矩形可见,在其他状态中隐藏。
Polygon
多边形是一个形状,其边界由任意数目的点定义。 边界是通过将一条线从一个点连接到下一个点来创建的,最后一个点连接到第一个点。 Points 属性定义多个构成边界的点。 在 XAML 中,使用逗号分隔的列表定义点。 在代码隐藏中,用 PointCollection 定义点,并将每个点作为 Point 值添加到点集合中。
无需显式声明点,以便起点和终点都指定为相同的 Point 值。 多边形的呈现逻辑假定你正在定义封闭的形状,并将终点隐式连接到起点。
下一个示例创建一个多边形,其中 4 个点设置为(10,200), (60,140), (130,140)以及(180,200)。 并使用了SolidColorBrush 的 LightBlue 值作为 Fill,未使用 Stroke 值,因此它没有外围轮廓。
<Polygon Fill="LightBlue"
         Points="10,200,60,140,130,140,180,200" />
var polygon1 = new Polygon();
polygon1.Fill = new SolidColorBrush(Colors.LightBlue);

var points = new PointCollection();
points.Add(new Windows.Foundation.Point(10, 200));
points.Add(new Windows.Foundation.Point(60, 140));
points.Add(new Windows.Foundation.Point(130, 140));
points.Add(new Windows.Foundation.Point(180, 200));
polygon1.Points = points;

// When you create a XAML element in code, you have to add
// it to the XAML visual tree. This example assumes you have
// a panel named 'layoutRoot' in your XAML file, like this:
// <Grid x:Name="layoutRoot>
layoutRoot.Children.Add(polygon1);
下面是渲染的多边形。

提示
提示在除了声明形状顶点的其他方案的 XAML 中,Point 值通常用作类型。 例如, Point 是触摸事件事件事件数据的一部分,因此可以确切地知道触摸操作在坐标空间中发生的位置。 有关 Point 以及如何在 XAML 或代码中使用 Point 的详细信息,请参阅 Point 的 API 参考主题。
线条
Line 是在坐标空间中的两个点之间绘制的线条。 ll将忽略为 Fill 提供的任何值,因为它没有内部空间。 对于 Line,请确保为 Stroke 和 StrokeThickness 属性指定值,否则线条不会呈现。
不使用点值来指定线条形状,而是对 X1、Y1、X2 和 Y2 使用离散的 Double 值。 这为水平线或垂直线启用最小标记。 例如, <Line Stroke="Red" X2="400"/> 定义长度为 400 像素的水平线。 其他 X,Y 属性默认为 0,因此就点而言,此 XAML 将从中(400,0)绘制一条线条(0,0)。 然后,如果希望它从 (0,0) 以外的某个点开始,则可以使用 TranslateTransform 移动整个线条。
<Line Stroke="Red" X2="400"/>
var line1 = new Line();
line1.Stroke = new SolidColorBrush(Colors.Red);
line1.X2 = 400;

// When you create a XAML element in code, you have to add
// it to the XAML visual tree. This example assumes you have
// a panel named 'layoutRoot' in your XAML file, like this:
// <Grid x:Name="layoutRoot>
layoutRoot.Children.Add(line1);
Polyline
折线类似于多边形,该多边形的边界由一组点定义,但折线中的最后一个点未连接到第一个点。
如果你指定 Polyline 的 Fill,则 Fill 会绘制形状的内部空间,即使为 Polyline 设置的 Points 的起点和终点不相交也是如此。 如果你没有指定 Fill,则 Polyline 与指定了多个单独的、其连续直线的起点和终点相交的 Line 元素时所呈现的内容相似。
与 Polygon 一样,Points 属性定义多个构成边界的点。 在 XAML 中,使用逗号分隔的列表定义点。 在代码隐藏中,用 PointCollection 定义点,并将每个点作为 Point 值添加到点集合中。
本示例创建一个折线,其中四个点设置为(10,200)、(60,140)和(130,140)(180,200)。 已定义笔划,但未定义填充。
<Polyline Stroke="Black"
          StrokeThickness="4"
          Points="10,200,60,140,130,140,180,200" />
var polyline1 = new Polyline();
polyline1.Stroke = new SolidColorBrush(Colors.Black);
polyline1.StrokeThickness = 4;

var points = new PointCollection();
points.Add(new Windows.Foundation.Point(10, 200));
points.Add(new Windows.Foundation.Point(60, 140));
points.Add(new Windows.Foundation.Point(130, 140));
points.Add(new Windows.Foundation.Point(180, 200));
polyline1.Points = points;

// When you create a XAML element in code, you have to add
// it to the XAML visual tree. This example assumes you have
// a panel named 'layoutRoot' in your XAML file, like this:
// <Grid x:Name="layoutRoot>
layoutRoot.Children.Add(polyline1);
下面是呈现 的折线。 请注意,第一个和最后一个点不是由笔划轮廓连接的,因为它们位于多边形中。

路径
路径是最通用的形状,因为你可以使用它来定义任意几何图形。 但随着这种多功能性,复杂性也随之而来。 现在让我们看看如何在 XAML 中创建基本 路径 。
使用 Data 属性定义路径的几何图形。 设置数据有两种方法:
- 可以在 XAML 中为 数据 设置字符串值。 在此窗体中 ,Path.Data 值使用图形的序列化格式。 在首次建立此值后,通常不会在字符串窗体中文本编辑此值。 而是使用设计工具,使你能够在设计或绘制图面上的隐喻中工作。 然后保存或导出输出,这为你提供了 带有 Path.Data 信息的 XAML 文件或 XAML 字符串片段。
- 可以将 Data 属性设置为单独的 Geometry 对象。 这可以在代码或 XAML 中完成。 单独的 Geometry 通常是一个 GeometryGroup,它充当一个容器,可将多个几何定义组合到单个对象中,以用于对象模型。 执行此操作的最常见原因是,你想要使用一个或多个曲线和复杂形状,这些曲线和复杂形状可以定义为 PathFigure 的段值,例如 BezierSegment。
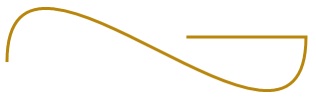
此示例演示了一个 路径,该路径 可能是使用 Blend for Visual Studio 生成几个矢量形状,然后将结果保存为 XAML。 总 路径 由贝塞尔曲线段和线段组成。 该示例主要用于提供 Path.Data 序列化格式中存在哪些元素以及数字所表示的内容的一些示例。
此 数据 以移动命令开头,由“M”指示,该命令为路径建立绝对起点。
第一段是一条三次方贝塞尔曲线,它从两 (100,200) 个控制点开始和结束 (400,175),使用两个控制点 (100,25) 和 (400,350)绘制。 这一段由数据属性字符串中的“C”命令指示。
第二段以绝对水平“lineto”命令 H 开头,它指定绘制一条从前面的子路径的终点 (400,175) (400,175) 到新终点 (280,175)(280,175) 的直线。 由于它是一个水平“lineto”命令,因此指定的值是 x 坐标。
<Path Stroke="DarkGoldenRod"
      StrokeThickness="3"
      Data="M 100,200 C 100,25 400,350 400,175 H 280" />
下面是已渲染的 路径。

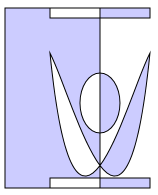
下一个示例演示了我们讨论的其他技术的用法:具有 PathGeometry 的 GeometryGroup。 本示例练习了一些可用作 PathGeometry 的一部分的参与几何类型:PathFigure 和可成为 PathFigure.Segment 中的段的各种元素。
<Path Stroke="Black" StrokeThickness="1" Fill="#CCCCFF">
    <Path.Data>
        <GeometryGroup>
            <RectangleGeometry Rect="50,5 100,10" />
            <RectangleGeometry Rect="5,5 95,180" />
            <EllipseGeometry Center="100, 100" RadiusX="20" RadiusY="30"/>
            <RectangleGeometry Rect="50,175 100,10" />
            <PathGeometry>
                <PathGeometry.Figures>
                    <PathFigureCollection>
                        <PathFigure IsClosed="true" StartPoint="50,50">
                            <PathFigure.Segments>
                                <PathSegmentCollection>
                                    <BezierSegment Point1="75,300" Point2="125,100" Point3="150,50"/>
                                    <BezierSegment Point1="125,300" Point2="75,100"  Point3="50,50"/>
                                </PathSegmentCollection>
                            </PathFigure.Segments>
                        </PathFigure>
                    </PathFigureCollection>
                </PathGeometry.Figures>
            </PathGeometry>
        </GeometryGroup>
    </Path.Data>
</Path>
var path1 = new Microsoft.UI.Xaml.Shapes.Path();
path1.Fill = new SolidColorBrush(Windows.UI.Color.FromArgb(255, 204, 204, 255));
path1.Stroke = new SolidColorBrush(Colors.Black);
path1.StrokeThickness = 1;

var geometryGroup1 = new GeometryGroup();
var rectangleGeometry1 = new RectangleGeometry();
rectangleGeometry1.Rect = new Rect(50, 5, 100, 10);
var rectangleGeometry2 = new RectangleGeometry();
rectangleGeometry2.Rect = new Rect(5, 5, 95, 180);
geometryGroup1.Children.Add(rectangleGeometry1);
geometryGroup1.Children.Add(rectangleGeometry2);

var ellipseGeometry1 = new EllipseGeometry();
ellipseGeometry1.Center = new Point(100, 100);
ellipseGeometry1.RadiusX = 20;
ellipseGeometry1.RadiusY = 30;
geometryGroup1.Children.Add(ellipseGeometry1);

var pathGeometry1 = new PathGeometry();
var pathFigureCollection1 = new PathFigureCollection();
var pathFigure1 = new PathFigure();
pathFigure1.IsClosed = true;
pathFigure1.StartPoint = new Windows.Foundation.Point(50, 50);
pathFigureCollection1.Add(pathFigure1);
pathGeometry1.Figures = pathFigureCollection1;

var pathSegmentCollection1 = new PathSegmentCollection();
var pathSegment1 = new BezierSegment();
pathSegment1.Point1 = new Point(75, 300);
pathSegment1.Point2 = new Point(125, 100);
pathSegment1.Point3 = new Point(150, 50);
pathSegmentCollection1.Add(pathSegment1);

var pathSegment2 = new BezierSegment();
pathSegment2.Point1 = new Point(125, 300);
pathSegment2.Point2 = new Point(75, 100);
pathSegment2.Point3 = new Point(50, 50);
pathSegmentCollection1.Add(pathSegment2);
pathFigure1.Segments = pathSegmentCollection1;

geometryGroup1.Children.Add(pathGeometry1);
path1.Data = geometryGroup1;

// When you create a XAML element in code, you have to add
// it to the XAML visual tree. This example assumes you have
// a panel named 'layoutRoot' in your XAML file, like this:
// <Grid x:Name="layoutRoot">
layoutRoot.Children.Add(path1);
下面是已渲染的 路径。

使用 PathGeometry 可能比填充 Path.Data 字符串更具可读性。 另一方面,Path.Data 使用与可扩展矢量图形 (SVG) 图像路径定义兼容的语法,因此它适用于从 SVG 移植图形或作为 Blend 等工具的输出。
