在 Visual Studio 中创建 React 应用
在本教程中,你将使用 JavaScript 和 Visual Studio 2022 为 to-do 列表 Web 应用创建 React 前端。 可在 ToDoJSWebApp找到此应用的代码。
先决条件
请确保安装以下内容:
- Visual Studio 2022 或更高版本。 请转到 Visual Studio 下载页,进行免费安装。
- npm (
https://www.npmjs.com/),随 Node.js 提供。
创建 React ToDo 列表应用
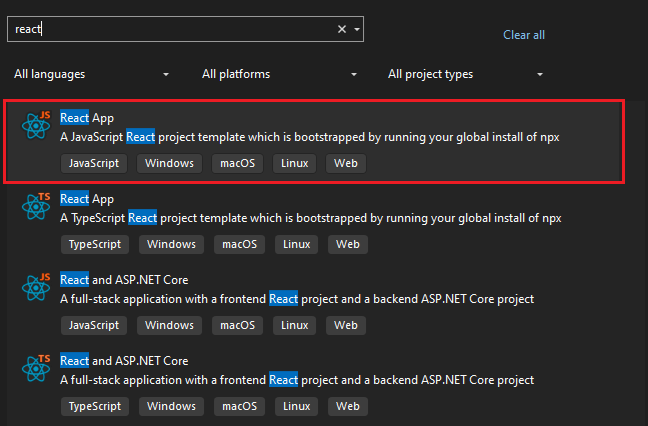
在 Visual Studio 中,选择“文件 > 新建 > 项目 打开”创建新项目“对话框,选择”React 应用 JavaScript 模板,然后选择“下一步”。
** 将项目命名为
TodoWebApp并选择 创建。这将使用 vite 命令行工具创建 JavaScript 项目。
在解决方案资源管理器中,右键单击
src文件夹,然后选择“添加”>“新建文件夹”。 并创建名为components的新文件夹。这是将组件放置在组件文件夹中的常见约定,但这不是必需的。
右键单击新文件夹,选择 添加 > React JSX 组件文件,将其命名为
TodoList,然后单击 添加。显示添加 JSX 组件的
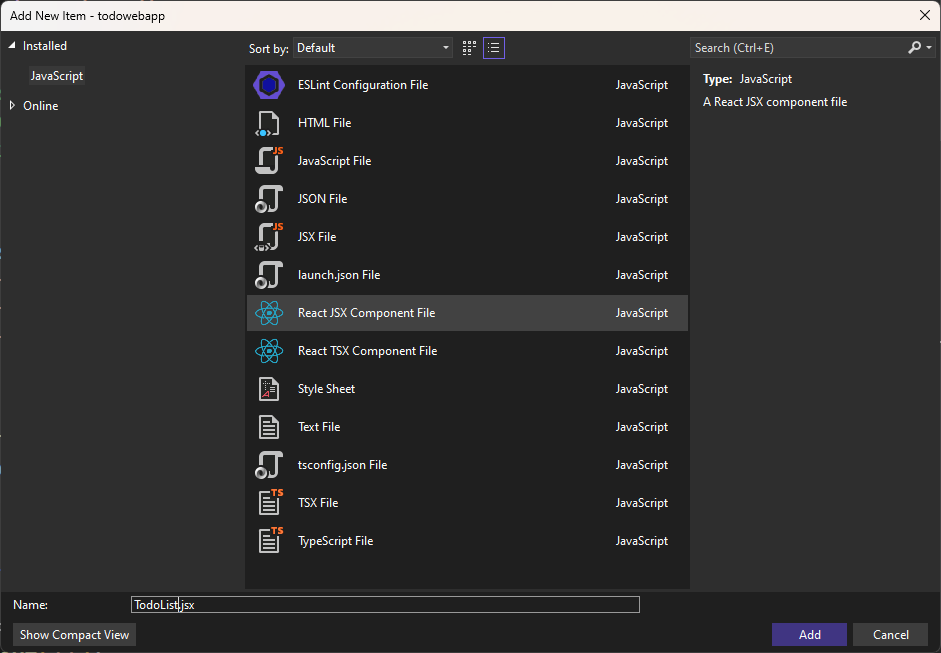
这会在组件文件夹中创建新的 JSX 文件。
打开
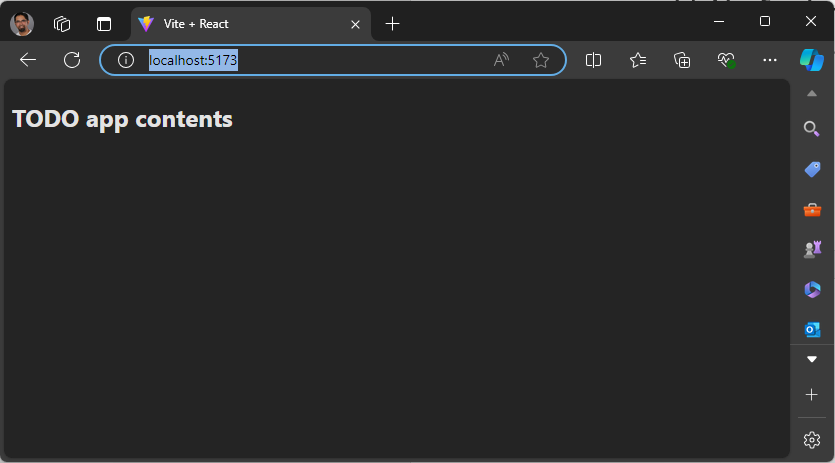
TodoList组件,并将默认内容替换为以下内容:function TodoList() { return ( <h2>TODO app contents</h2> ); }此组件显示一个标头,稍后将替换该标头。
接下来,在应用中连接此组件。
App.jsx是加载的主组件,它表示 to-do 列表应用程序。 此组件用于main.jsx文件中。在解决方案资源管理器中,打开
App.jsx,从顶部移除所有导入,并清除 return 语句的内容。 该文件应如下所示。function App() { return ( <> <TodoList /> </> ); } export default App;若要添加 TodoList 组件,请将光标置于片段中,然后键入
<TodoL RETURN。 这将添加组件和导入语句。显示向应用添加 JSX 组件的屏幕截图
接下来,清除 CSS 文件。
打开
App.css并删除所有内容。打开
Index.css并删除除:root样式以外的所有内容::root { font-family: Inter, system-ui, Avenir, Helvetica, Arial, sans-serif; line-height: 1.5; font-weight: 400; color-scheme: light dark; color: rgba(255, 255, 255, 0.87); background-color: #242424; }
运行应用
从工具栏中选择 “开始调试” 按钮或按 F5 键盘快捷方式。
应用将在浏览器窗口中打开。
向应用添加 to-do 列表函数
可以让应用保持运行状态。 当你进行更改时,应用会使用 Vite 的热模块替换功能,自动刷新以加载最新内容。 某些操作(如添加文件夹或重命名文件)要求停止调试,然后重启应用,但一般情况下,你可以在开发应用时将其保留在后台运行。 打开 TodoList.jsx 组件,以便我们可以开始定义它。
在解决方案资源管理器中,打开
TodoList.jsx并添加显示和管理 to-do 列表条目所需的 UI。 将内容替换为以下代码:function TodoList() { return ( <div> <h1>TODO</h1> <div> <input type="text" placeholder="Enter a task" required aria-label="Task text" /> <button className="add-button" aria-label="Add task">Add</button> </div> <ol id="todo-list"> <p>existing tasks will be shown here</p> </ol> </div> ); } export default TodoList;前面的代码为新的 to-do 任务添加输入框和用于提交输入的按钮。 接下来,关联“添加”按钮。 使用 useState React 挂钩添加两个状态变量,一个用于添加的任务,另一个用于存储现有任务。 对于本教程,任务将存储在内存中,而不是永久性存储。
将以下 import 语句添加到
TodoList.jsx以导入useState。import { useState } from 'react'接下来,使用该挂钩创建状态变量。 在 return 语句上方的
TodoList函数中添加以下代码。const [tasks, setTasks] = useState(["Drink some coffee", "Create a TODO app", "Drink some more coffee"]); const [newTaskText, setNewTaskText] = useState("");这为数据和两个函数设置了两个变量,
tasks和newTaskText,可以调用这些变量来更新这些变量,setTasks和setNewTasks。 更改状态变量的值时,React 会自动重新呈现组件。你已准备好更新 TodoList.jsx,以将 to-do 项显示为列表,但首先需要了解一个重要的 React 概念。
在 React 中,当你显示项列表时,需要添加一个键来唯一标识列表中的每个项。 此功能在 呈现列表的 React 文档中进行了深入介绍,但在这里你将了解基础知识。 你有一个要显示的 to-do 项的列表,并且需要为每个项关联唯一键。 每个项的键不应更改,因此不能将数组中项的索引用作键。 你需要一个 ID,该 ID 在这些值的整个生命周期内都不会更改。 你将使用 randomUUID() 为每个 to-do 项创建唯一 ID。
使用 UUID 作为每个 to-do 项的键创建 TodoList.jsx。 使用以下代码更新 TodoList.jsx。
import React, { useState } from 'react';

const initialTasks = [
    { id: self.crypto.randomUUID(), text: 'Drink some coffee' },
    { id: self.crypto.randomUUID(), text: 'Create a TODO app' },
    { id: self.crypto.randomUUID(), text: 'Drink some more coffee' }
];

function TodoList() {
    const [tasks, setTasks] = useState(initialTasks);
    const [newTaskText, setNewTaskText] = useState("");

    return (
        <article
            className="todo-list"
            aria-label="task list manager">
            <header>
                <h1>TODO</h1>
                <form className="todo-input" aria-controls="todo-list">
                    <input
                        type="text"
                        placeholder="Enter a task"
                        value={newTaskText} />
                    <button
                        className="add-button">
                        Add
                    </button>
                </form>
            </header>
            <ol id="todo-list" aria-live="polite" aria-label="task list">
                {tasks.map((task, index) =>
                    <li key={task.id}>
                        <span className="text">{task.text}</span>
                    </li>
                )}
            </ol>
        </article>
    );
}
export default TodoList;
由于 ID 值是在 TodoList 函数外部分配的,因此,如果重新呈现页面,则可以确保这些值不会更改。 尝试处于此状态的应用时,你会注意到无法键入 todo 输入元素。 这是因为输入元素绑定到已初始化为空白字符串的
newTaskText。 若要允许用户添加新任务,需要处理该控件上的onChange事件。 还需要实现“添加”按钮支持。在 TodoList 函数的 return 语句之前立即添加所需的函数。
function handleInputChange(event) {
    setNewTaskText(event.target.value);
}

function addTask() {
    if (newTaskText.trim() !== "") {
        setTasks(t => [...t, { id: self.crypto.randomUUID(), text: newTaskText }]);
        setNewTaskText("");
    }
    event.preventDefault();
}
在
handleInputChanged函数中,输入字段中的新值通过event.target.value传入,该值用于使用setNewTaskText更新newTaskText变量的值。 在addTask函数中,使用setTasks将新任务添加到现有任务列表中,并将项的 ID 设置为新的 UUID 值。 更新输入元素以包含onChange={handleInputChange}并更新“添加”按钮以包括onClick={addTask}。 此代码将事件连接到处理该事件的函数。 之后,应能够向任务列表添加新任务。 新任务将添加到列表底部。 若要使此应用更有用,需要添加对删除任务的支持,以及向上或向下移动任务。添加函数以支持删除、上移和下移,然后更新标记以显示每个操作的按钮。 在 return 语句上方的 TodoList 函数中添加以下代码。
function deleteTask(id) {
    const updatedTasks = tasks.filter(task => task.id != id);
    setTasks(updatedTasks);
}

function moveTaskUp(index) {
    if (index > 0) {
        const updatedTasks = [...tasks];
        [updatedTasks[index], updatedTasks[index - 1]] = [updatedTasks[index - 1], updatedTasks[index]];
        setTasks(updatedTasks);
    }
}

function moveTaskDown(index) {
    if (index < tasks.length) {
        const updatedTasks = [...tasks];
        [updatedTasks[index], updatedTasks[index + 1]] = [updatedTasks[index + 1], updatedTasks[index]];
        setTasks(updatedTasks);
    }
}
delete 函数接收任务 ID,并从列表中删除对应的任务;然后使用 数组的 filter() 方法创建一个新数组,将被删除的项排除在外,接着调用
setTasks()。 另外两个函数接收项的索引,因为这项工作依赖于项的排序。moveTaskUp()和moveTaskDown()都使用 数组析构分配 来交换所选任务与其邻居。接下来,更新视图以包含这三个按钮。 更新 return 语句以包含以下内容。
return (
    <article
        className="todo-list"
        aria-label="task list manager">
        <header>
            <h1>TODO</h1>
            <form className="todo-input" onSubmit={addTask} aria-controls="todo-list">
                <input
                    type="text"
                    required
                    autoFocus
                    placeholder="Enter a task"
                    value={newTaskText}
                    aria-label="Task text"
                    onChange={handleInputChange} />
                <button
                    className="add-button"
                    aria-label="Add task">
                    Add
                </button>
            </form>
        </header>
        <ol id="todo-list" aria-live="polite">
            {tasks.map((task, index) =>
                <li key={task.id}>
                    <span className="text">{task.text}</span>
                    <button className="delete-button" onClick={() => deleteTask(task.id)}>
                        🗑️
                    </button>
                    <button className="up-button" onClick={() => moveTaskUp(index)}>
                        ⇧
                    </button>
                    <button className="down-button" onClick={() => moveTaskDown(index)}>
                        ⇩
                    </button>
                </li>
            )}
        </ol>
    </article>
);
你已添加执行我们之前讨论的任务所需的按钮。 使用 Unicode 字符作为按钮上的图标。 在标记中,添加了一些属性以支持稍后添加一些 CSS。 你可能还会注意到使用了 aria 属性来提高可访问性,这虽然是可选的,但还是非常推荐使用。 如果运行应用程序,它应如下图所示。
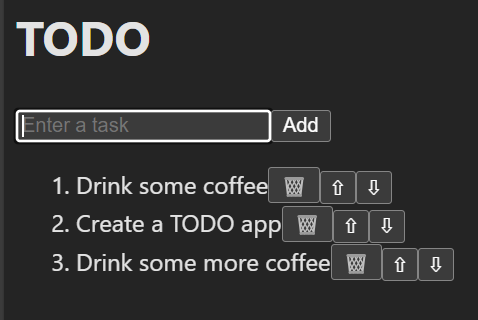
现在,你应该能够在 TODO Web 应用中执行以下操作。
- 添加任务
- 删除任务
- 上移任务
- 向下移动任务
这些函数可以正常工作,但可以重构以生成可重用组件以显示 to-do 项。 to-do 项的标记被包含在新的组件 TodoItem 中。 由于列表的管理保留在 Todo 组件中,因此可以将回调传递给“删除”和“移动”按钮。
若要开始,请在解决方案资源管理器中右键单击 组件 文件夹,然后选择“添加 > 新项。
在打开的对话框中,选择 React JSX 组件文件,为其命名 TodoItem,然后选择 添加。
将以下代码添加到 TodoItem。
在此代码中,将任务和回调作为属性传递到此新组件。
import PropTypes from 'prop-types';

function TodoItem({ task, deleteTaskCallback, moveTaskUpCallback, moveTaskDownCallback }) {
    return (
        <li aria-label="task" >
            <span className="text">{task}</span>
            <button
                type="button"
                aria-label="Delete task"
                className="delete-button"
                onClick={() => deleteTaskCallback()}>
                🗑️
            </button>
            <button
                type="button"
                aria-label="Move task up"
                className="up-button"
                onClick={() => moveTaskUpCallback()}>
                ⇧
            </button>
            <button
                type="button"
                aria-label="Move task down"
                className="down-button"
                onClick={() => moveTaskDownCallback()}>
                ⇩
            </button>
        </li>
    );
}

TodoItem.propTypes = {
    task: PropTypes.string.isRequired,
    deleteTaskCallback: PropTypes.func.isRequired,
    moveTaskUpCallback: PropTypes.func.isRequired,
    moveTaskDownCallback: PropTypes.func.isRequired,
};

export default TodoItem;
前面的代码包含 Todo 组件中的标记,并在其末尾声明
PropTypes。 属性用于将数据从父组件传递到子组件。 关于属性(Props)的更多信息,请参阅 将属性传递给组件 - React。 由于删除和移动函数作为回调传入,因此需要更新onClick处理程序以调用这些回调。添加所需的代码。 此处显示了使用 TodoItem 组件的 TodoList 的完整代码。
import React, { useState } from 'react'
import TodoItem from './TodoItem'

const initialTasks = [
    { id: self.crypto.randomUUID(), text: 'Drink some coffee' },
    { id: self.crypto.randomUUID(), text: 'Create a TODO app' },
    { id: self.crypto.randomUUID(), text: 'Drink some more coffee' }
];

function TodoList() {
    const [tasks, setTasks] = useState(initialTasks);
    const [newTaskText, setNewTaskText] = useState("");
    function handleInputChange(event) {
        setNewTaskText(event.target.value);
    }
    function addTask() {
        if (newTaskText.trim() !== "") {
            setTasks(t => [...t, { id: self.crypto.randomUUID(), text: newTaskText }]);
            setNewTaskText("");
        }
        event.preventDefault();
    }
    function deleteTask(id) {
        const updatedTasks = tasks.filter(task => task.id !== id);
        setTasks(updatedTasks);
    }
    function moveTaskUp(index) {
        if (index > 0) {
            const updatedTasks = [...tasks];
            [updatedTasks[index], updatedTasks[index - 1]] = [updatedTasks[index - 1], updatedTasks[index]];
            setTasks(updatedTasks);
        }
    }
    function moveTaskDown(index) {
        if (index < tasks.length) {
            const updatedTasks = [...tasks];
            [updatedTasks[index], updatedTasks[index + 1]] = [updatedTasks[index + 1], updatedTasks[index]];
            setTasks(updatedTasks);
        }
    }
    return (
        <article
            className="todo-list"
            aria-label="task list manager">
            <header>
                <h1>TODO</h1>
                <form onSubmit={addTask} aria-controls="todo-list">
                    <input
                        type="text"
                        required
                        placeholder="Enter a task"
                        value={newTaskText}
                        aria-label="Task text"
                        onChange={handleInputChange} />
                    <button
                        className="add-button"
                        aria-label="Add task">
                        Add
                    </button>
                </form>
            </header>
            <ol id="todo-list" aria-live="polite">
                {tasks.map((task, index) =>
                    <TodoItem
                        key={task.id}
                        task={task.text}
                        deleteTaskCallback={() => deleteTask(task.id)}
                        moveTaskUpCallback={() => moveTaskUp(index)}
                        moveTaskDownCallback={() => moveTaskDown(index)}
                    />
                )}
            </ol>
        </article>
    );
}

export default TodoList;
现在,TodoItem 组件用于呈现每个 to-do 项。 请注意,该键设置为
task.id,其中包含该任务的 UUID 值。 运行应用时,不应看到对应用的外观或行为所做的任何更改,因为你重构了它以使用 TodoItem。现在,你已实现了所有基本功能,接下来开始添加一些样式,使其看起来更加美观。 首先,在 Index.html 中添加一个字体系列 Inter 的链接,你将在此应用中使用该字体系列。 在 Index.html 中,有一些其他的项需要清理。 具体而言,标题应更新,并且你想要替换当前用作图标的 vite.svg 文件。
使用以下内容更新 Index.html。
<!doctype html>
<html lang="en">
    <head>
        <meta charset="UTF-8" />
        <link rel="icon" type="image/svg+xml" href="/checkmark-square.svg" />
        <meta name="viewport" content="width=device-width, initial-scale=1.0" />
        <title>TODO app</title>
        <link href='https://fonts.googleapis.com/css?family=Inter' rel='stylesheet'>
        <script type="module" defer src="/src/main.jsx"></script>
    </head>
    <body>
    </body>
</html>
编辑 main.jsx 文件,以在调用
createRoot时将root替换为main。此处显示了 main.jsx 的完整代码。
import { StrictMode } from 'react'
import { createRoot } from 'react-dom/client'
import App from './App.jsx'
import './index.css'

createRoot(document.querySelector('main')).render(
    <StrictMode>
        <App />
    </StrictMode>,
)
除了这些更改,文件 checkmark-square.svg 已添加到公用文件夹中。 这是 FluentUI 复选标记方块图像中的 SVG,可以直接下载。 (有一个包可用于更集成的体验,但这超出了本文的范围。
接下来,更新 TodoList 组件的样式。
在组件文件夹中,添加名为 TodoList.css的新 CSS 文件。 可以右键单击项目并选择 “添加 > 新项”,然后选择 样式表。 为文件提供名称 TodoList.css。
将以下代码添加到 TodoList.css。
.todo-list {
    background-color: #1e1e1e;
    padding: 1.25rem;
    border-radius: 0.5rem;
    box-shadow: 0 0.25rem 0.5rem rgba(0, 0, 0, 0.3);
    width: 100%;
    max-width: 25rem;
}

.todo-list h1 {
    text-align: center;
    color: #e0e0e0;
}

.todo-input {
    display: flex;
    justify-content: space-between;
    margin-bottom: 1.25rem;
}

.todo-input input {
    flex: 1;
    padding: 0.625rem;
    border: 0.0625rem solid #333;
    border-radius: 0.25rem;
    margin-right: 0.625rem;
    background-color: #2c2c2c;
    color: #e0e0e0;
}

.todo-input .add-button {
    padding: 0.625rem 1.25rem;
    background-color: #007bff;
    color: #fff;
    border: none;
    border-radius: 0.25rem;
    cursor: pointer;
}

.todo-input .add-button:hover {
    background-color: #0056b3;
}

.todo-list ol {
    list-style-type: none;
    padding: 0;
}

.todo-list li {
    display: flex;
    justify-content: space-between;
    align-items: center;
    padding: 0.625rem;
    border-bottom: 0.0625rem solid #333;
}

.todo-list li:last-child {
    border-bottom: none;
}

.todo-list .text {
    flex: 1;
}

.todo-list li button {
    background: none;
    border: none;
    cursor: pointer;
    font-size: 1rem;
    margin-left: 0.625rem;
    color: #e0e0e0;
}

.todo-list li button:hover {
    color: #007bff;
}

.todo-list li button.delete-button {
    color: #ff4d4d;
}

.todo-list li button.up-button,
.todo-list li button.down-button {
    color: #4caf50;
}
接下来,编辑 TodoList.jsx,在文件顶部添加以下导入。
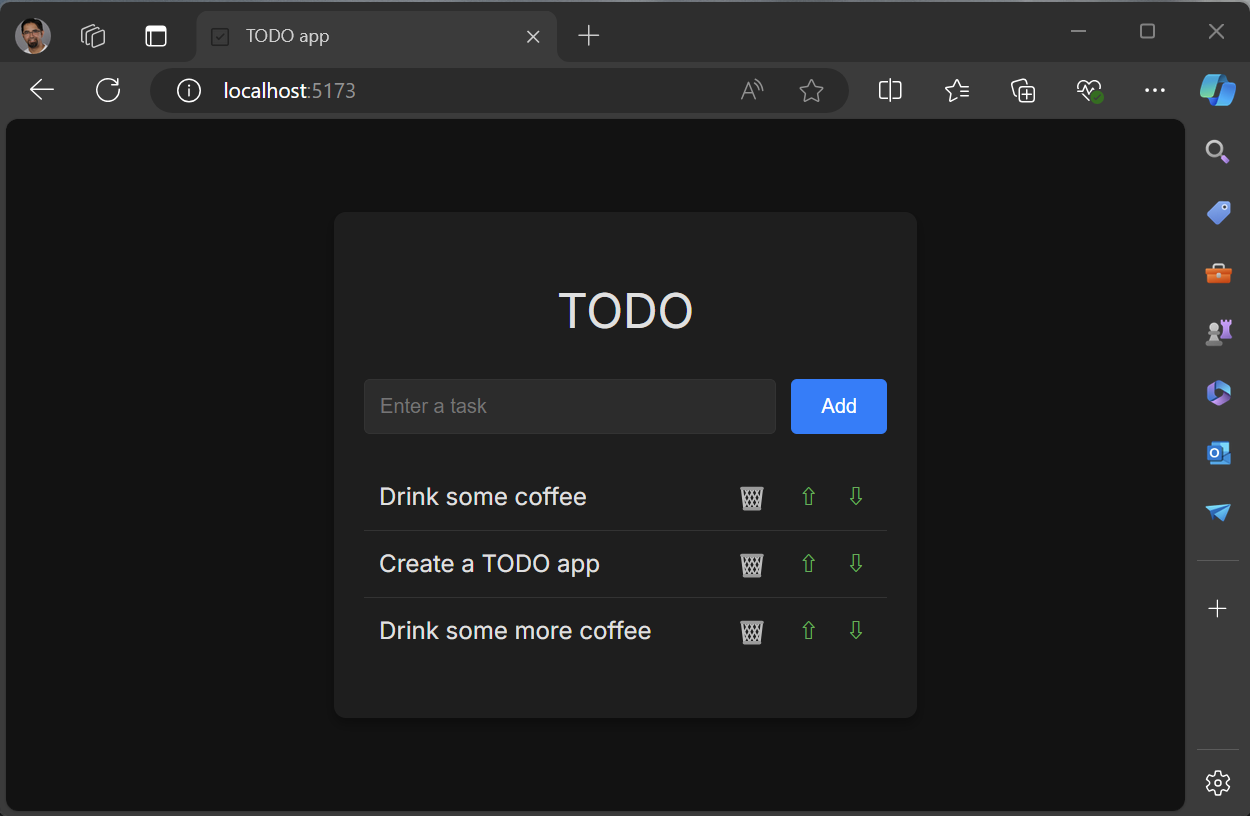
import './TodoList.css';保存更改后刷新浏览器。 这应改进应用的样式。 应用应如下所示。
现在,你已生成一个工作 to-do 列表应用,用于将 to-do 项存储在内存中。 此时,可以更新应用,将 to-do 项存储在 localStorage/IndexedDb中,或者将其与服务器端数据库或其他后端集成,以便进行更永久的存储。
总结
在本教程中,你已使用 Visual Studio 创建新的 React 应用。 该应用包含一个 to-do 列表,其中包括添加任务、删除任务和重新排序的支持。 你创建了两个新的 React 组件,并在本教程中使用了这些组件。