在 Visual Studio 中使用 C# 创建 Windows 窗体应用

在本教程中,你将创建一个具有基于 Windows 的用户界面 (UI) 的简单 C# 应用程序。

如果尚未安装 Visual Studio,请转到 Visual Studio 下载页免费安装。

注意

本教程中的部分屏幕截图使用深色主题。 如果没有深色主题但想要使用,请参阅个性化设置 Visual Studio IDE 和编辑器页面,了解具体方法。

如果尚未安装 Visual Studio,请转到 Visual Studio 2022 下载页免费安装。

创建项目

首先,创建 C# 应用程序项目。 项目类型随附了所需的全部模板文件,无需添加任何内容。

  1. 打开 Visual Studio。

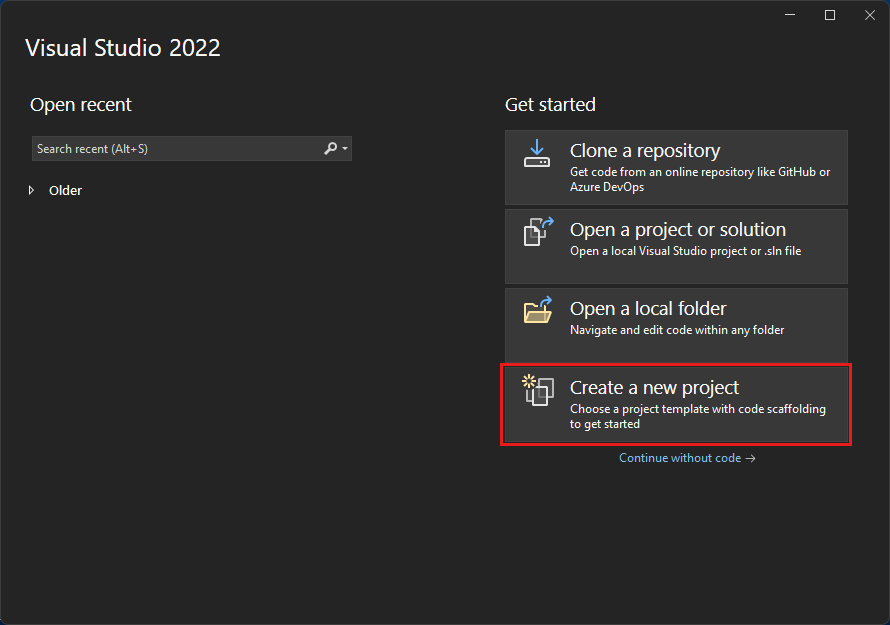
  2. 在“开始”窗口上,选择“创建新项目” 。

    View the 'Create a new project' window

  3. 在“创建新项目” 窗口中,为 C# 选择“Windows 窗体应用(.NET Framework)” 模板。

    (如果愿意,可以优化搜索以快速访问所需的模板。例如,在搜索框中输入或键入“Windows 窗体应用”。接下来,从“语言”列表中选择“C#”,然后从“平台”列表中选择“Windows”。)

    Choose the C# template for the Windows Forms App (.NET Framework)

    注意

    如果未看到“Windows 窗体应用(.NET Framework)” 模板,则可以通过“创建新项目” 窗口安装该模板。 在“找不到所需内容?”消息中,选择“安装更多工具和功能”链接 。

    The 'Install more tools and features' link from the 'Not finding what you're looking for' message in the 'Create new project' window

    接下来,在 Visual Studio 安装程序中,选择“.NET 桌面开发”工作负载。

    .NET Core workload in the Visual Studio Installer

    之后,在 Visual Studio 安装程序中选择“修改”按钮 。 系统可能会提示你保存所有内容;如果出现提示,请按照指示进行操作。 接下来,选择“继续”,以安装工作负载 。 然后,返回到“创建项目”过程中的步骤 2。

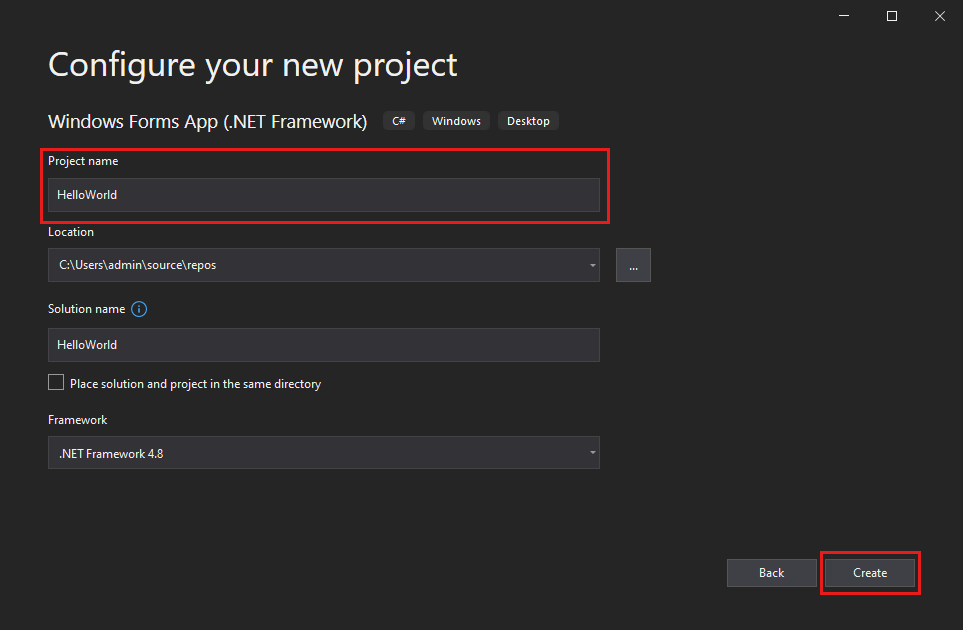
  4. 在“配置新项目”窗口中,在“项目名称”框中键入或输入“HelloWorld” 。 然后,选择“创建” 。

    in the 'Configure your new project' window, name your project 'HelloWorld'

    此时,Visual Studio 将打开新项目。

  1. 打开 Visual Studio。

  2. 在“开始”窗口中,选择“创建新项目”。

    Screenshot to show the Create a new project window.

  3. 在“创建新项目”窗口中,为 C# 选择“Windows 窗体应用(.NET Framework)”模板 。

    (如果愿意,可以优化搜索以快速访问所需的模板。例如,在搜索框中输入或键入“Windows 窗体应用”。接下来,从“语言”列表中选择“C#”,然后从“平台”列表中选择“Windows”。)

    Screenshot to select the C# template for the Windows Forms App (.NET Framework).

    注意

    如果未看到“Windows 窗体应用(.NET Framework)” 模板,则可以通过“创建新项目” 窗口安装该模板。 在“找不到所需内容?”消息中,选择“安装更多工具和功能”链接 。

    Screenshot to show the The 'Install more tools and features' link from the 'Not finding what you're looking for' message in the 'Create a new project' window.

    接下来,在 Visual Studio 安装程序中,选择“.NET 桌面开发”工作负载。

    Screenshot to show the .NET Core workload in the Visual Studio Installer.

    之后,在 Visual Studio 安装程序中选择“修改”按钮。 系统可能会提示你保存所有内容;如果出现提示,请按照指示进行操作。 接下来,选择“继续”以安装工作负载。 然后,返回到“创建项目”过程中的步骤 2。

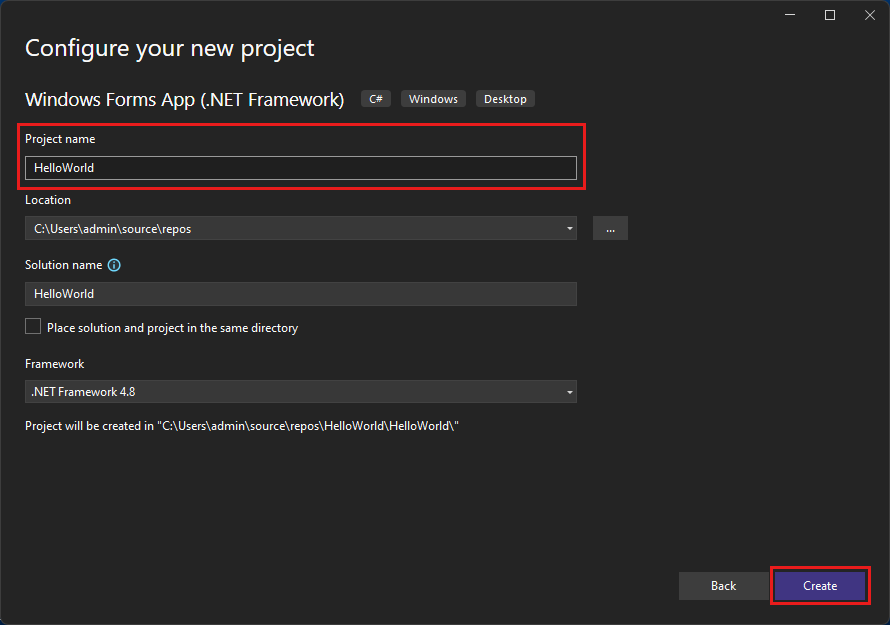
  4. 在“配置新项目”窗口中,在“项目名称”框中键入或输入“HelloWorld” 。 然后选择“创建”。

    Screenshot to show the 'Configure your new project' window and name your project 'HelloWorld'.

    此时,Visual Studio 将打开新项目。

创建应用程序

选择 C# 项目模板并为文件命名后,Visual Studio 会打开一个窗体。 窗体就是 Windows 用户界面。 通过向窗体添加控件创建“Hello World”应用程序,然后运行该应用程序。

向窗体添加按钮

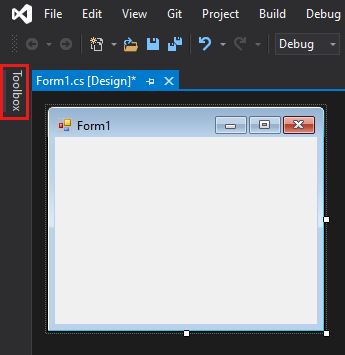
  1. 选择“工具箱”,打开“工具箱”弹出窗口。

    Screenshot to select the Toolbox to open the Toolbox window.

    (如果没有看到“工具箱”浮出控件选项,可以从菜单栏中打开它。为此,请选择“查看”>“工具箱”。或者,按 Ctrl+Alt+X。)

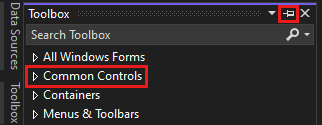
  2. 展开“常见控件”,然后选择“固定”图标以停靠“工具箱”窗口。

    Screenshot to select the Pin icon to pin the Toolbox window to the IDE.

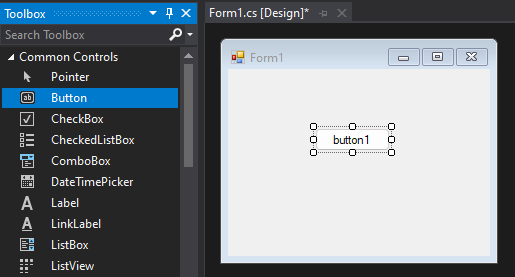
  3. 选择“按钮”控件,然后将其拖到窗体上。

    Screenshot to add a button to the form.

  4. 在属性窗口中,找到“文本”,将名称从“Button1”更改为 Click this然后按 Enter 。

    Screenshot to add text to the button on the form by using the Properties window.

    (如果没有看到“属性”窗口,可以从菜单栏打开它。为此,请选择“查看”>“属性窗口”。或者,按 F4。)

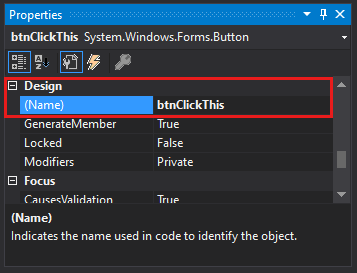
  5. 在属性窗口的“设计”部分,将名称从“Button1”更改为 btnClickThis,然后按 Enter 。

    Screenshot to add a function to the button on the form by using the Properties window.

    注意

    如果按字母顺序排列了属性窗口列表,则 button1 会显示在 (DataBindings) 部分中 。

向窗体添加标签

添加创建操作的按钮控件后,我们来添加发送文本的标签控件。

  1. 从“工具箱”窗口选择“标签”控件,然后将其拖到窗体上,并放到“单击此处”按钮下方 。

  2. 在属性窗口的“设计”部分或“(DataBindings)”部分,将 label1 的名称更改为 lblHelloWorld,然后按 Enter 。

向窗体添加代码

  1. 在“Form1.cs [设计]”窗口中,双击“单击此处”按钮,打开“Form1.cs”窗口。

    (或者,可在“解决方案资源管理器” 中展开“Form1.cs” ,然后选择“Form1” 。)

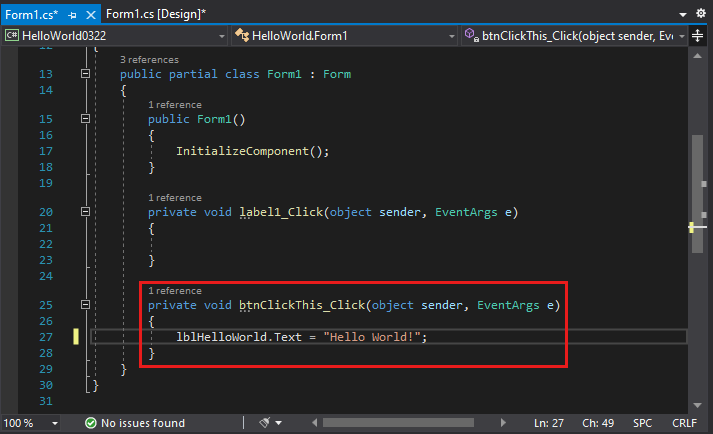
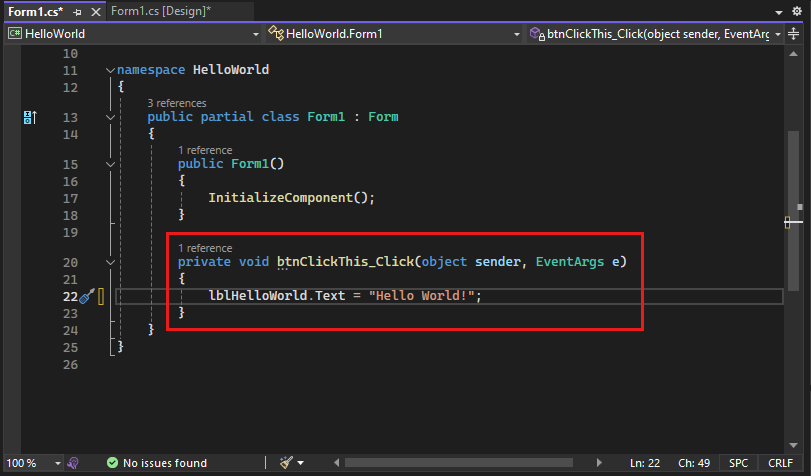
  2. 在“Form1.cs” 窗口中,在“private void” 行后,键入或输入 lblHelloWorld.Text = "Hello World!";,如以下屏幕截图所示:

    Screenshot to add code to the form

运行应用程序

  1. 选择“启动”按钮运行应用程序。

    Screenshot to select Start to debug and run the app.

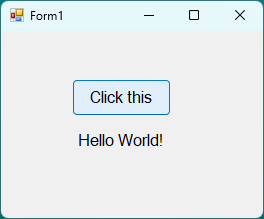
    将出现以下几种情况。 在 Visual Studio IDE 中,“诊断工具”窗口打开,同时还会打开一个“输出”窗口 。 在 IDE 外部,会出现一个“Form1”对话框 。 其中包含“单击此处”按钮和显示“label1”的文本 。

  2. 选择“Form1”对话框中的“单击此处”按钮 。 请注意,“label1”文本会更改为“Hello World!” 。

    Screenshot to show a Form1 dialog box that includes label1 text.

  3. 关闭“Form1” 对话框以停止运行应用。

创建应用程序

选择 C# 项目模板并为文件命名后,Visual Studio 会打开一个窗体。 窗体就是 Windows 用户界面。 通过向窗体添加控件创建“Hello World”应用程序,然后运行该应用程序。

向窗体添加按钮

  1. 选择“工具箱”,打开“工具箱”弹出窗口 。

    Choose the Toolbox to open the Toolbox window

    (如果没有看到“工具箱”浮出控件选项,可以从菜单栏中打开它。为此,请选择“查看”>“工具箱”。或者,按 Ctrl+Alt+X。)

  2. 选择“固定” 图标,固定“工具箱” 窗口。

    Choose the Pin icon to pin the Toolbox window to the IDE

  3. 选择“按钮” 控件,然后将其拖到窗体上。

    Add a button to the form

  4. 在“属性” 窗口中,找到“文本” ,将名称从“Button1” 更改为 Click this然后按 Enter 。

    Add text to the button on the form

    (如果没有看到“属性”窗口,可以从菜单栏打开它。为此,请选择“查看”>“属性窗口”。或者,按 F4。)

  5. 在“属性”窗口的“设计”部分,将名称从“Button1”更改为 btnClickThis,然后按 Enter 。

    Add a function to the button on the form

    注意

    如果按字母顺序排列了“属性” 窗口列表,则 Button1 会显示在 (DataBindings) 部分中。

向窗体添加标签

添加创建操作的按钮控件后,我们来添加发送文本的标签控件。

  1. 从“工具箱”窗口选择“标签”控件,然后将其拖到窗体上,并放到“单击此处”按钮下方 。

  2. 在“属性” 窗口的“设计” 部分或“(DataBindings)” 部分,将“Label1” 的名称更改为 lblHelloWorld,然后按 Enter 。

向窗体添加代码

  1. 在“Form1.cs [设计]”窗口中,双击“单击此处”按钮,打开“Form1.cs”窗口。

    (或者,可以在“解决方案资源管理器”中展开“Form1.cs”,然后从“Form1.cs”上的右键菜单中选择“查看代码”(或按 F7)。)

  2. 在“Form1.cs” 窗口中,在“private void” 行后,键入或输入 lblHelloWorld.Text = "Hello World!";,如以下屏幕截图所示:

    Add code to the form

运行应用程序

  1. 选择“启动” 按钮运行应用程序。

    Choose Start to debug and run the app

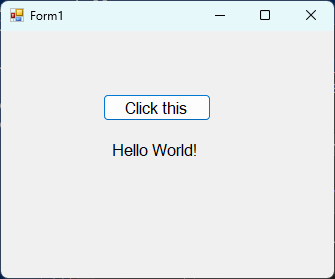
    将出现以下几种情况。 在 Visual Studio IDE 中,“诊断工具”窗口打开,同时还会打开一个“输出”窗口 。 在 IDE 外部,会出现一个“Form1”对话框 。 其中包含“单击此处”按钮和显示“Label1”的文本 。

  2. 选择“Form1” 对话框中的“单击此处” 按钮。 请注意,“Label1”文本会更改为“Hello World!” 。

    A Form1 dialog box that includes Label1 text

  3. 关闭“Form1” 对话框以停止运行应用。

后续步骤

恭喜你完成本教程。 要更加深入地了解,请继续学习下面的教程:

请参阅