如何使用 Azure DevOps 发布云服务(扩展支持)
本文提供有关如何使用 Azure 资源管理器 (ARM) 模板创建或更新 Azure 云服务(扩展支持)部署的指导。
背景
Azure 云服务(扩展支持)是适用于 Azure 云服务的新基于 ARM 的部署模型。 云服务(外延支持)的主要优势是,提供区域复原能力,功能与使用 Azure 服务管理器部署的 Azure 云服务相当。 它还提供一些 ARM 功能,例如基于角色的访问控制(RBAC)、标记、策略和支持部署模板。
对于经典云服务,Azure DevOps 内置管道任务AzureCloudPowerShellDeployment@1可帮助轻松管理 CI/CD 进度。 但云服务(扩展支持)的任务尚未准备就绪。
发布云服务的要点(扩展支持)
- 为存储帐户定义一些变量,以便为 ARM 模板部署做好准备。
- 使用 VSBuild@1 - Visual Studio 生成 v1 任务生成云服务项目并输出云服务包文件或配置文件。
- 使用内置 AzureFileCopy@5 - Azure 文件复制 v5 任务 将生成目录上传到 Blob 存储。
- 使用存储引用(包括访问密钥)通过 AzurePowerShell@5 - Azure PowerShell v5 任务生成 SAS 令牌,并将令牌输出到将在下一个任务中使用的变量。
- 使用上一个任务的输出和 AzureResourceManagerTemplateDeployment@3 - ARM 模板部署 v3 任务的值。

发布云服务的步骤(扩展支持)
创建初学者管道并准备上传到存储帐户。 这些变量有助于执行以下进一步操作。
- <stg_account存储帐户的名称>
- <stg_key存储帐户的访问密钥>
- <stg_container存储帐户的容器名称>
- stg_prefix $[format('{0:yyyyMMddHHmm}', pipeline.startTime)]
- stg_url
https://$(stg_account).blob.core.windows.net/$(stg_container) - <cscfg_name配置文件的名称>
- cspkg_name <包文件的名称>
- url_cscfg $(stg_url)/$(stg_prefix)/$(cscfg_name)
- url_cspkg $(stg_url)/$(stg_prefix)/$(cspkg_name)

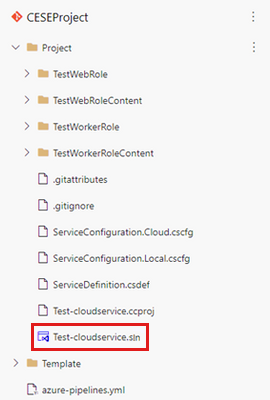
使用 Visual Studio 生成任务基于云服务项目解决方案文件生成任务,并将其输出到代理上的本地路径。 有关详细信息,请参阅 MSBuild。

下面是用于生成项目的 YAML 文件:
# Build your project under your repository.
# 1. Restore the NuGet dependency.

- task: NuGetCommand@2
  inputs:
    command: 'restore'
    restoreSolution: '**/*.sln'
    feedsToUse: 'select'
    vstsFeed: xxx

# 2. Use MS build to output the cloud service project configuration and package to the temporary location of the local agent.

- task: VSBuild@1
  inputs:
    solution: '**\*.sln'
    msbuildArgs: '/t:Publish /p:DeployOnBuild=true /p:AutomatedBuild=True /p:configuration=release /p:TargetProfile=Cloud /p:PublishDir=%SYSTEM_DEFAULTWORKINGDIRECTORY%/Debug/publish'

# 3. Copy the configuration and package files to the local path on the agent where any artifacts locate.

- task: CopyFiles@2
  inputs:
    SourceFolder: 'Debug/publish'
    Contents: '**'
    TargetFolder: '$(Build.ArtifactStagingDirectory)'

# 4. Copy the definition file to the local path on the agent where any artifacts locate.

- task: CopyFiles@2
  inputs:
    SourceFolder: 'Project'
    Contents: '*.csdef'
    TargetFolder: '$(Build.ArtifactStagingDirectory)'
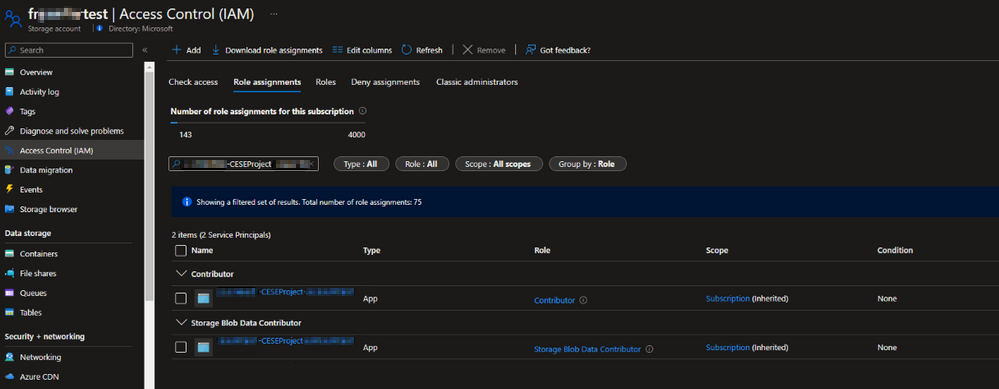
使用管道任务 AzureFileCopy@4 - Azure 文件复制 v4 任务 上传云服务的配置、定义和包文件。 该任务支持基于 Microsoft Entra ID 进行身份验证。 可以使用服务主体和托管标识完成身份验证。 可以分配权限参与者和存储 Blob 数据参与者,以允许访问 服务连接。
在项目设置中查找服务原则:
文件复制的 YAML 版本:
# Upload the cloud service via Azure File Copy
- task: AzureFileCopy@5
  inputs:
    SourcePath: '$(Build.ArtifactsStagingDirectory) /*'        # you can set $(Build.ArtifactsStagingDirectory) as Build part for output of the MSBuild.
    azureSubscription: xxx                                     # the name of service connector
    Destination: 'AzureBlob'
    storage: $(stg_account)                                    # variable stg_account
    ContainerName: $(stg_container)                            # variable stg_container
    BlobPrefix: $(stg_prefix)                                  # variable stg prefix is $[format('{0:yyyyMMddHHmm}', pipeline.startTime)]
    AdditionalArgumentsForBlobCopy: '--recursive'              # recursively copy the files in this directory
复制文件后,你将在存储中看到复制的云服务包。
使用 Azure PowerShell 管道任务在 5 分钟内生成临时 SAS 令牌。
# Generate temp SAS token for 5 mins
- task: AzurePowerShell@5                                                     # please make sure the Azure PowerShell contains the module of Az and AzureRm.
  name: GenerateSasToken
  inputs:
    azureSubscription: xxx                                                    # the name of service connector
    ScriptType: 'InlineScript'
    Inline: |
      $account_name = ${env:STG_ACCOUNT}
      $account_key = ${env:STG_KEY}
      $context = New-AzStorageContext -StorageAccountName $account_name -StorageAccountKey $account_key
      $sas = New-AzStorageAccountSASToken -Service Blob -ResourceType Service,Container,Object -Permission "rl" -ExpiryTime (Get-Date).AddMinutes(5) -Context $context
      $cspkg = ${env:URL_CSPKG} + $sas
      $cscfg = ${env:URL_CSCFG} + $sas
      Write-Host ("##vso[task.setvariable variable=cspkg]$cspkg")             # output $cspkg in PowerShell to global variable cspkg
      Write-Host ("##vso[task.setvariable variable=cscfg]$cscfg")             # output $cscfg in PowerShell to global variable cscfg
    azurePowerShellVersion: 'LatestVersion'
使用 ARM 模板管道任务部署云服务(扩展支持)部署。 若要获取示例模板,请参阅 101-cses-multirole-rdp。
#Azure Resource Manager template deployment
- task: AzureResourceManagerTemplateDeployment@3
  inputs:
    deploymentScope: 'Resource Group'                                           # resource group level deployment
    azureResourceManagerConnection: xxx                                         # the name of service connector
    subscriptionId: xxx                                                         # subscription id of the service connector
    action: 'Create Or Update Resource Group'
    resourceGroupName: 'rg-002'
    location: 'Australia Central'
    templateLocation: 'Linked artifact'
    csmFile: 'Template/CSES.template.json'
    csmParametersFile: 'Template/CSES.parameter.json'
    overrideParameters: '-packageSasUri $(cspkg) -configurationSasUri $(cscfg) -cloudServiceName cses4test002 -deploymentLabel deploy$(stg_prefix)' # overwrite some parameters of template.
    deploymentMode: 'Incremental'
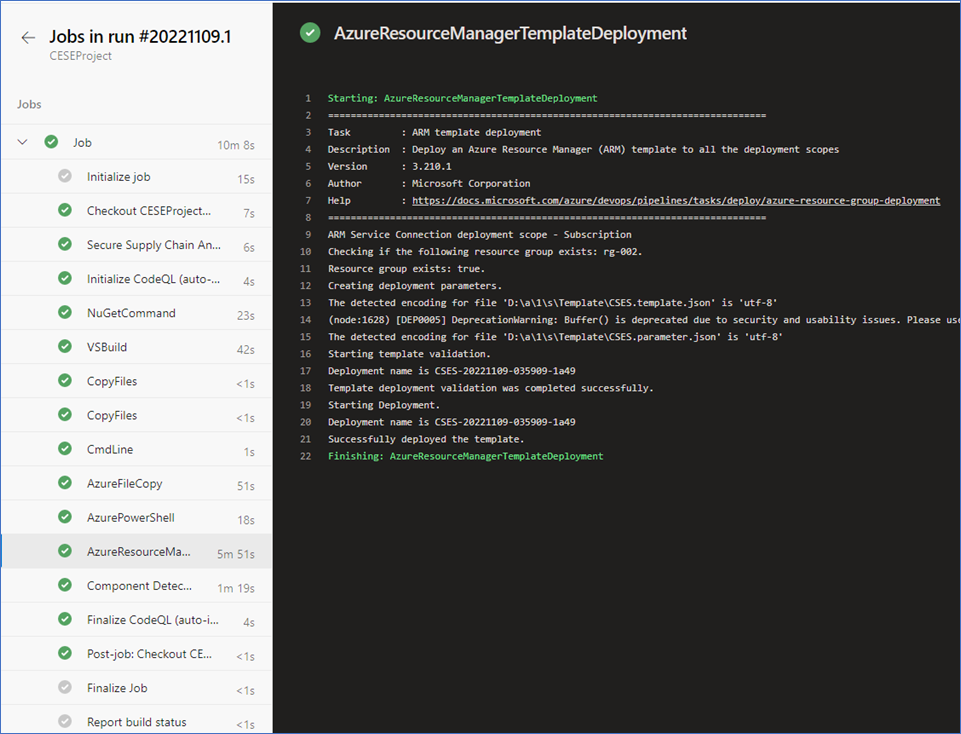
部署完成后,应会看到以下任务结果以及带有标记的云服务。 可以更改代码和配置以更新当前部署。
在Azure 门户中,可以在云服务资源组中找到部署结果。
部署标签应与定义的时间戳相同。
联系我们寻求帮助
如果你有任何疑问或需要帮助,请创建支持请求或联系 Azure 社区支持。 你还可以将产品反馈提交到 Azure 反馈社区。


