练习 - 向管道添加测试阶段
你的玩具公司的安全团队要求你验证是否只能通过 HTTPS 访问你的网站。 在本练习中,将配置管道,以运行版本验收测试来检查安全团队的要求。
在此过程中,你将:
- 将测试脚本添加到存储库。
- 更新管道定义以添加测试阶段。
- 运行管道并观察到测试失败。
- 修复 Bicep 文件并观察到管道运行成功。
添加测试脚本
在此处,添加一个测试脚本,确保在使用 HTTPS 时可访问网站,而在使用不安全的 HTTP 协议时不能访问。
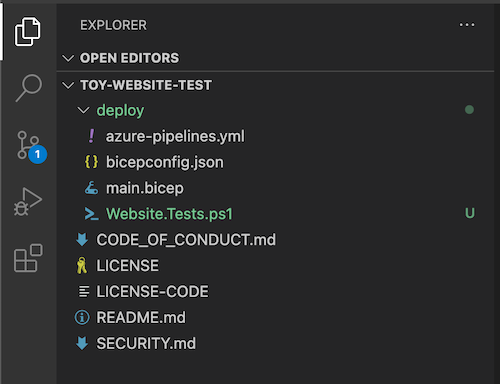
在 Visual Studio Code 中,在 deploy 文件夹中创建一个名为 Website.Tests.ps1 的新文件。

将以下测试代码粘贴到文件中:
param(
  [Parameter(Mandatory)]
  [ValidateNotNullOrEmpty()]
  [string] $HostName
)

Describe 'Toy Website' {

    It 'Serves pages over HTTPS' {
      $request = [System.Net.WebRequest]::Create("https://$HostName/")
      $request.AllowAutoRedirect = $false
      $request.GetResponse().StatusCode |
        Should -Be 200 -Because "the website requires HTTPS"
    }

    It 'Does not serves pages over HTTP' {
      $request = [System.Net.WebRequest]::Create("http://$HostName/")
      $request.AllowAutoRedirect = $false
      $request.GetResponse().StatusCode |
        Should -BeGreaterOrEqual 300 -Because "HTTP is not secure"
    }

}
此代码是一个 Pester 测试文件。 它需要一个名为
$HostName的参数。 它针对主机名运行两个测试:- 尝试通过 HTTPS 连接到网站。 如果服务器以介于 200 到 299 之间的 HTTP 响应状态代码进行响应,则测试通过,这表明连接成功。
- 尝试通过 HTTP 连接到网站。 如果服务器以 300 或更高的 HTTP 响应状态代码进行响应,则测试通过。
就本练习而言,了解测试文件的详细信息及其工作原理并不重要。 我们在总结中提供了多个链接,以便你在感兴趣时可了解更多信息。
将 Bicep 文件的输出发布为阶段输出变量
前面步骤中创建的测试脚本需要一个主机名来进行测试。 Bicep 文件已包含一个输出,但需要将其发布为阶段输出变量,才能在冒烟测试中使用它。
在 Visual Studio Code 中,打开 deploy 文件夹中的 azure-pipelines.yml 文件。
在“部署”阶段,更新部署步骤,将输出发布到变量:
- task: AzureResourceManagerTemplateDeployment@3
  name: DeployBicepFile
  displayName: Deploy Bicep file
  inputs:
    connectedServiceName: $(ServiceConnectionName)
    deploymentName: $(Build.BuildNumber)
    location: $(deploymentDefaultLocation)
    resourceGroupName: $(ResourceGroupName)
    csmFile: deploy/main.bicep
    overrideParameters: >
      -environmentType $(EnvironmentType)
    deploymentOutputs: deploymentOutputs
现在,部署过程仍使用与以前执行的相同任务,但部署的输出存储在名为
deploymentOutputs的管道变量中。 输出变量的格式为 JSON。若要将 JSON 格式的输出转换为管道变量,请在部署步骤下方添加以下脚本步骤:
- bash: |
    echo "##vso[task.setvariable variable=appServiceAppHostName;isOutput=true]$(echo $DEPLOYMENT_OUTPUTS | jq -r '.appServiceAppHostName.value')"
  name: SaveDeploymentOutputs
  displayName: Save deployment outputs into variables
  env:
    DEPLOYMENT_OUTPUTS: $(deploymentOutputs)
如果部署成功完成,则该脚本将访问来自 Bicep 部署的每个输出值。 该脚本使用
jq工具访问 JSON 输出的相关部分。 然后,该值被发布到与 Bicep 部署输出同名的阶段输出变量。注意
Pester 和 jq 都预安装在 Azure Pipelines 的 Microsoft 托管代理上。 无需执行任何特殊操作,即可在脚本步骤中使用它们。
保存文件。
向管道添加冒烟测试阶段
现在,可以添加运行测试的冒烟测试阶段。
在文件底部,为“SmokeTest”阶段添加以下定义:
- stage: SmokeTest
  jobs:
  - job: SmokeTest
    displayName: Smoke test
    variables:
      appServiceAppHostName: $[ stageDependencies.Deploy.DeployWebsite.outputs['DeployWebsite.SaveDeploymentOutputs.appServiceAppHostName'] ]
此代码定义阶段和作业。 它还会在作业中创建一个名为
appServiceAppHostName的变量。 此变量从你在上一部分中创建的输出变量中获取其值。在文件底部,向“SmokeTest”阶段添加以下步骤定义:
steps:
  - task: PowerShell@2
    name: RunSmokeTests
    displayName: Run smoke tests
    inputs:
      targetType: inline
      script: |
        $container = New-PesterContainer `
          -Path 'deploy/Website.Tests.ps1' `
          -Data @{ HostName = '$(appServiceAppHostName)' }
        Invoke-Pester `
          -Container $container `
          -CI
此步骤会运行一个 PowerShell 脚本,来运行之前使用 Pester 测试工具编写的测试脚本。
在文件底部,向“SmokeTest”阶段添加以下步骤定义:
- task: PublishTestResults@2
  name: PublishTestResults
  displayName: Publish test results
  condition: always()
  inputs:
    testResultsFormat: NUnit
    testResultsFiles: 'testResults.xml'
此步骤使用 Pester 创建的测试结果文件,并将其发布为管道测试结果。 你稍后将看到结果的显示方式。
请注意,步骤定义包括
condition: always()。 该状况指示 Azure Pipelines 应始终发布测试结果,即使前面的步骤失败也是如此。 这一条件很重要,因为任何失败的测试都将导致测试步骤失败,并且在步骤失败后,管道通常将停止运行。保存文件。
验证并提交管道定义
验证 azure-pipelines.yml 文件是否如下代码所示:
trigger:
  batch: true
  branches:
    include:
    - main

pool:
  vmImage: ubuntu-latest

variables:
  - name: deploymentDefaultLocation
    value: westus3

stages:

- stage: Lint
  jobs:
  - job: LintCode
    displayName: Lint code
    steps:
      - script: |
          az bicep build --file deploy/main.bicep
        name: LintBicepCode
        displayName: Run Bicep linter

- stage: Validate
  jobs:
  - job: ValidateBicepCode
    displayName: Validate Bicep code
    steps:
      - task: AzureResourceManagerTemplateDeployment@3
        name: RunPreflightValidation
        displayName: Run preflight validation
        inputs:
          connectedServiceName: $(ServiceConnectionName)
          location: $(deploymentDefaultLocation)
          deploymentMode: Validation
          resourceGroupName: $(ResourceGroupName)
          csmFile: deploy/main.bicep
          overrideParameters: >
            -environmentType $(EnvironmentType)

- stage: Preview
  jobs:
  - job: PreviewAzureChanges
    displayName: Preview Azure changes
    steps:
      - task: AzureCLI@2
        name: RunWhatIf
        displayName: Run what-if
        inputs:
          azureSubscription: $(ServiceConnectionName)
          scriptType: 'bash'
          scriptLocation: 'inlineScript'
          inlineScript: |
            az deployment group what-if \
              --resource-group $(ResourceGroupName) \
              --template-file deploy/main.bicep \
              --parameters environmentType=$(EnvironmentType)

- stage: Deploy
  jobs:
  - deployment: DeployWebsite
    displayName: Deploy website
    environment: Website
    strategy:
      runOnce:
        deploy:
          steps:
            - checkout: self
            - task: AzureResourceManagerTemplateDeployment@3
              name: DeployBicepFile
              displayName: Deploy Bicep file
              inputs:
                connectedServiceName: $(ServiceConnectionName)
                deploymentName: $(Build.BuildNumber)
                location: $(deploymentDefaultLocation)
                resourceGroupName: $(ResourceGroupName)
                csmFile: deploy/main.bicep
                overrideParameters: >
                  -environmentType $(EnvironmentType)
                deploymentOutputs: deploymentOutputs

            - bash: |
                echo "##vso[task.setvariable variable=appServiceAppHostName;isOutput=true]$(echo $DEPLOYMENT_OUTPUTS | jq -r '.appServiceAppHostName.value')"
              name: SaveDeploymentOutputs
              displayName: Save deployment outputs into variables
              env:
                DEPLOYMENT_OUTPUTS: $(deploymentOutputs)

- stage: SmokeTest
  jobs:
  - job: SmokeTest
    displayName: Smoke test
    variables:
      appServiceAppHostName: $[ stageDependencies.Deploy.DeployWebsite.outputs['DeployWebsite.SaveDeploymentOutputs.appServiceAppHostName'] ]
    steps:
      - task: PowerShell@2
        name: RunSmokeTests
        displayName: Run smoke tests
        inputs:
          targetType: inline
          script: |
            $container = New-PesterContainer `
              -Path 'deploy/Website.Tests.ps1' `
              -Data @{ HostName = '$(appServiceAppHostName)' }
            Invoke-Pester `
              -Container $container `
              -CI

      - task: PublishTestResults@2
        name: PublishTestResults
        displayName: Publish test results
        condition: always()
        inputs:
          testResultsFormat: NUnit
          testResultsFiles: 'testResults.xml'
如果不是,请更新它以匹配此示例,然后保存。
通过在 Visual Studio Code 终端中运行以下命令来提交更改并将其推送到 Git 存储库:
git add .
git commit -m "Add test stage"
git push
运行管道并审阅测试结果
在浏览器中,转到你的管道。
选择管道的最新运行。
等待管道完成“Lint 分析”、“验证”和“预览”阶段。 虽然 Azure Pipelines 会使用最新状态自动更新页面,但仍建议偶尔刷新页面。
选择“审阅”按钮,然后选择“批准”。
等待管道运行完成。
请注意,“部署”阶段成功完成。 “SmokeTest”阶段已完成,但出现错误。

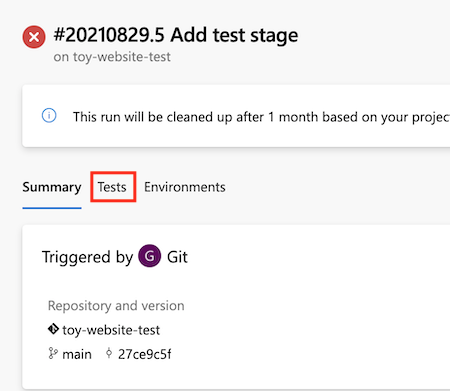
选择“测试”选项卡。

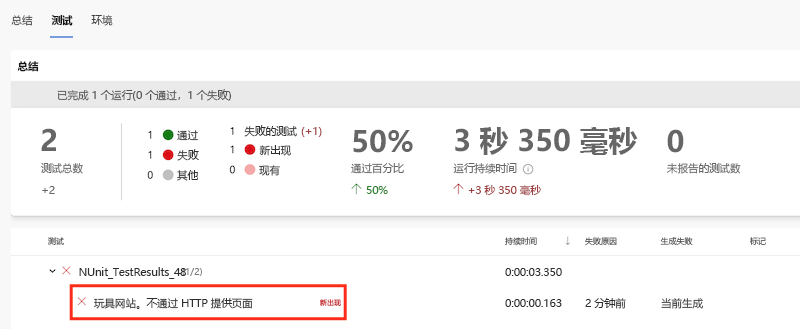
请注意,测试摘要显示运行了两个测试。 一个通过,一个失败了。 失败的测试被列为“玩具网站。不通过 HTTP 提供页面”。

此文本表明该网站未正确配置,无法满足安全团队的要求。
更新 Bicep 文件
现在,你已确定你的 Bicep 定义不符合安全团队的要求,接下来,需要对其进行修复。
在 Visual Studio Code 中,打开 deploy 文件夹中的 main.bicep 文件。
找到 Azure 应用服务应用的定义,并更新它,在其
properties区域中包含httpsOnly属性:resource appServiceApp 'Microsoft.Web/sites@2022-03-01' = { name: appServiceAppName location: location properties: { serverFarmId: appServicePlan.id httpsOnly: true siteConfig: { appSettings: [ { name: 'APPINSIGHTS_INSTRUMENTATIONKEY' value: applicationInsights.properties.InstrumentationKey } { name: 'APPLICATIONINSIGHTS_CONNECTION_STRING' value: applicationInsights.properties.ConnectionString } ] } } }保存文件。
通过在 Visual Studio Code 终端中运行以下命令来提交更改并将其推送到 Git 存储库:
git add .
git commit -m "Configure HTTPS on website"
git push
再次运行管道
在浏览器中,转到你的管道。
选择最近的运行。
等待管道完成“Lint 分析”、“验证”和“预览”阶段。 虽然 Azure Pipelines 会使用最新状态自动更新页面,但仍建议偶尔刷新页面。
选择“预览”阶段,然后再次查看 What-if 结果。
请注意,What-if 命令已检测到
httpsOnly属性值发生了更改:Resource and property changes are indicated with these symbols: + Create ~ Modify = Nochange The deployment will update the following scope: Scope: /subscriptions/f0750bbe-ea75-4ae5-b24d-a92ca601da2c/resourceGroups/ToyWebsiteTest ~ Microsoft.Web/sites/toy-website-nbfnedv766snk [2021-01-15] + properties.siteConfig.localMySqlEnabled: false + properties.siteConfig.netFrameworkVersion: "v4.6" ~ properties.httpsOnly: false => true = Microsoft.Insights/components/toywebsite [2020-02-02] = Microsoft.Storage/storageAccounts/mystoragenbfnedv766snk [2021-04-01] = Microsoft.Web/serverfarms/toy-website [2021-01-15] Resource changes: 1 to modify, 3 no change.返回到管道运行。
选择“查看”按钮,然后选择“批准”。
等待管道运行完成。
请注意,整个管道成功完成,包括“SmokeTest”阶段。 这一成功表明两个测试都已通过。

清理资源
完成练习后,可以删除资源,以便不再为这些资源付费。
在 Visual Studio Code 终端中,运行以下命令:
az group delete --resource-group ToyWebsiteTest --yes --no-wait
资源组将在后台删除。
Remove-AzResourceGroup -Name ToyWebsiteTest -Force