练习 - 使用注册表中的模块
在上一练习中,你将 CDN 和网站模块发布到玩具公司的注册表中。 现在,你想要向玩具狗开发团队展示如何使用模块来实现自己的部署。
通过学习本练习,你将能够:
- 创建包含专用注册表中的模块的 Bicep 文件。
- 添加对注册表中的模块的引用。
- 生成并检查 Bicep 文件,了解模块还原过程的工作原理。
- 切换到使用注册表别名。
- 将 Bicep 文件部署到 Azure。
创建 Bicep 文件
在 Visual Studio Code 中,创建名为 main.bicep 的新文件。
保存空文件,以便 Visual Studio Code 加载 Bicep 工具。
你可以选择“文件”>“另存为”,也可以在 Windows 上选择 Ctrl+S(在 macOS 上则选择 ⌘+S)。 请务必记住保存文件的位置。 例如,你需要创建一个“模板”文件夹来将其存储在其中。
将模块添加到 Bicep 文件
在 main.bicep 文件中,添加以下参数和变量:
@description('The Azure region into which the resources should be deployed.')
param location string = 'westus3'

@description('The name of the App Service app.')
param appServiceAppName string = 'toy-${uniqueString(resourceGroup().id)}'

@description('The name of the App Service plan SKU.')
param appServicePlanSkuName string = 'F1'

var appServicePlanName = 'toy-dog-plan'
在参数和变量下,使用以下代码添加注册表中的网站模块。 将
YOUR_CONTAINER_REGISTRY_NAME替换为专用注册表的名称。module website 'br:YOUR_CONTAINER_REGISTRY_NAME.azurecr.io/website:v1' = { name: 'toy-dog-website' params: { appServiceAppName: appServiceAppName appServicePlanName: appServicePlanName appServicePlanSkuName: appServicePlanSkuName location: location } }请注意,当你开始键入时,Bicep 会在模块标识符下显示红色波浪线,这些波浪线随后会消失。 发生此行为的原因是,用于 Visual Studio Code 的 Bicep 扩展读取注册表中的模块,并将其保存到本地文件系统。
在创建的模块下,使用以下代码添加注册表中的 CDN 模块。 将
YOUR_CONTAINER_REGISTRY_NAME替换为专用注册表的名称。module cdn 'br:YOUR_CONTAINER_REGISTRY_NAME.azurecr.io/cdn:v1' = { name: 'toy-dog-cdn' params: { httpsOnly: true originHostName: website.outputs.appServiceAppHostName } }保存文件。
生成并检查 Bicep 文件
此处,将 Bicep 文件生成为 JSON ARM 模板。 通常不需要进行生成,但当你了解模块的工作方式时,这会很有帮助。
在 Visual Studio Code 终端中运行以下命令,将 Bicep 文件生成为 JSON 文件:
az bicep build --file main.bicepBicep 在 main.bicep 文件所在的文件夹中创建名为 main.json 的文件。
打开 main.json 文件。
请注意,在 JSON ARM 模板的
resources部分中,从第 134 行开始,有些资源的类型为Microsoft.Resources/deployments。 这些资源表示在从注册表添加的模块中定义的模块部署。
在 Visual Studio Code 终端中运行以下命令,将 Bicep 文件生成为 JSON 文件:
bicep build main.bicepBicep 在 main.bicep 文件所在的文件夹中创建名为 main.json 的文件。
打开 main.json 文件。
请注意,在 JSON ARM 模板的
resources部分中,从第 134 行开始,有些资源的类型为Microsoft.Resources/deployments。 这些资源表示在从注册表添加的模块中定义的模块部署。
创建注册表别名
你决定创建注册表别名,而不是将注册表 URL 嵌入到 Bicep 文件中。 此方法使 Bicep 文件更易于读取。
在 Visual Studio Code 中,创建名为 bicepconfig.json 的新文件。 在 main.bicep 文件所在的文件夹中创建该文件。
将以下代码粘贴到 bicepconfig.json 文件中。 将
YOUR_CONTAINER_REGISTRY_NAME替换为专用注册表的名称。{ "moduleAliases": { "br": { "ToyCompanyRegistry": { "registry": "YOUR_CONTAINER_REGISTRY_NAME.azurecr.io" } } } }保存文件。
使用注册表别名
此处,将 Bicep 文件更新为使用注册表别名,而不是直接引用注册表。
打开 main.bicep 文件。
找到
website模块的定义,并更改定义以包括注册表别名:module website 'br/ToyCompanyRegistry:website:v1' = { name: 'toy-dog-website' params: { appServiceAppName: appServiceAppName appServicePlanName: appServicePlanName appServicePlanSkuName: appServicePlanSkuName location: location } }提示
务必将模块路径的开头从
br:更改为br/。 此外,在ToyCompanyRegistry之后,将斜杠 (/) 字符更改为冒号 (:)。对
cdn模块进行类似的更改:module cdn 'br/ToyCompanyRegistry:cdn:v1' = { name: 'toy-dog-cdn' params: { httpsOnly: true originHostName: website.outputs.appServiceAppHostName } }保存文件。
验证 Bicep 文件
完成上述所有更改后,main.bicep 文件应如以下示例所示:
@description('The Azure region into which the resources should be deployed.')
param location string = 'westus3'
@description('The name of the App Service app.')
param appServiceAppName string = 'toy-${uniqueString(resourceGroup().id)}'
@description('The name of the App Service plan SKU.')
param appServicePlanSkuName string = 'F1'
var appServicePlanName = 'toy-dog-plan'
module website 'br/ToyCompanyRegistry:website:v1' = {
  name: 'toy-dog-website'
  params: {
    appServiceAppName: appServiceAppName
    appServicePlanName: appServicePlanName
    appServicePlanSkuName: appServicePlanSkuName
    location: location
  }
}
module cdn 'br/ToyCompanyRegistry:cdn:v1' = {
  name: 'toy-dog-cdn'
  params: {
    httpsOnly: true
    originHostName: website.outputs.appServiceAppHostName
  }
}
如果文件不匹配,请复制示例或调整模板以匹配示例。
部署到 Azure
在 Visual Studio Code 终端中,运行以下代码,将模板部署到 Azure。 此过程可能需要几分钟才能成功完成部署。
az deployment group create \
   --template-file main.bicep
New-AzResourceGroupDeployment -TemplateFile main.bicep
验证部署
转到 Azure 门户并确保你位于沙盒订阅中:
- 选择页面右上角的头像。
- 选择“切换目录”。 在列表中,选择“Microsoft Learn 沙盒”目录。
在左侧面板上,选择“资源组”。
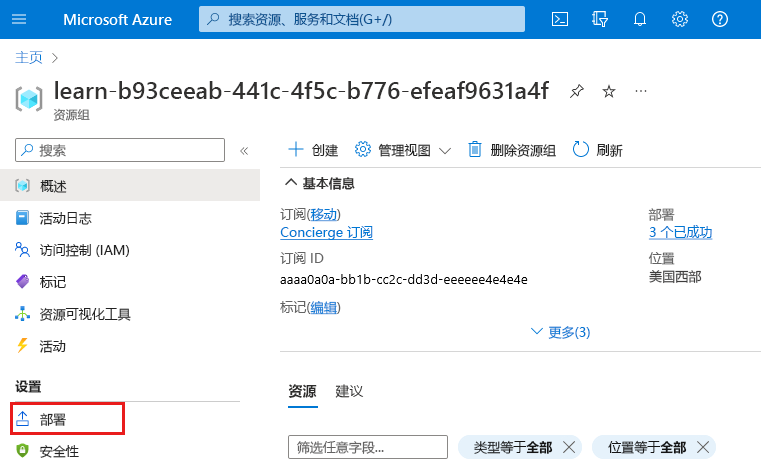
选择
沙盒资源组名称 。在左侧菜单中,选择“部署”。

请注意,列出了三个部署:
- main 表示父级 Bicep 文件的部署。
- toy-dog-cdn 和 toy-dog-website 表示你在 main.bicep 文件中包含的模块。
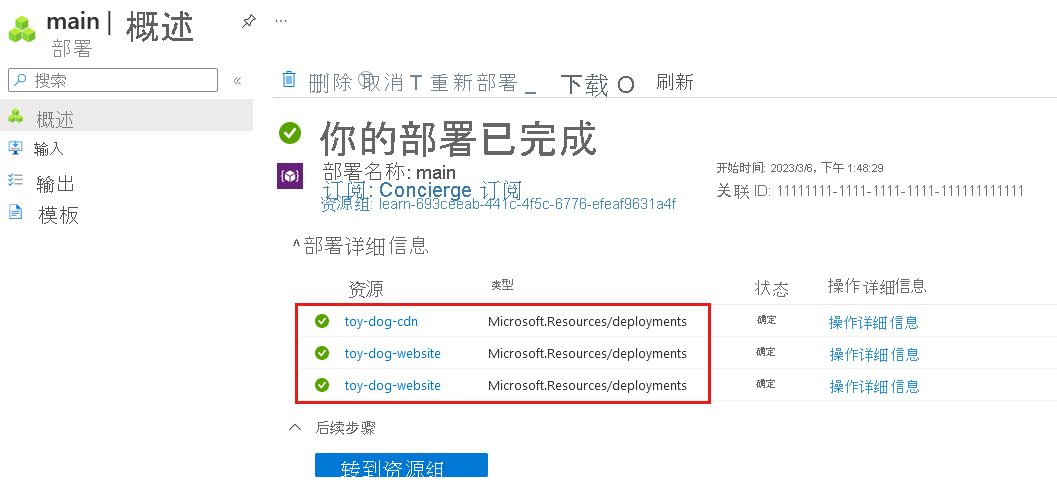
选择“main”部署并展开“部署详细信息”。
请注意,这两个模块都将列出,它们的类型显示为
Microsoft.Resources/deployments。toy-dog-website模块被列出了两次,因为它的输出也在模板中被引用。
选择“toy-dog-cdn”和“toy-dog-website”部署,然后查看每个部署中部署的资源。 请注意,它们对应于各自模块中定义的资源。