练习 - 修复失败的测试
此时,你有方法在更改通过生成管道时运行单元测试。 你还有方法来测量测试所覆盖的代码量。
将更改提交到管道之前在本地运行测试始终是一个好方法。 但如果有人忘记,还提交了会中断生成的更改,会怎么样呢?
在本单元中,你将修复因单元测试失败而导致中断的生成。 此处你将:
- 从 GitHub 中获取起始代码。
- 向项目添加代码覆盖率工具。
- 将代码推送到存储库。
- 观看管道自动运行和单元测试失败的情况。
- 在本地重现失败。
- 分析并修复失败。
- 推送修复并观看生成成功。
查看新的单元测试
团队的最新功能涉及到排行榜。 我们需要获取排行榜的分数,因此我们决定编写单元测试以验证 IDocumentDBRepository<T>.GetItemsAsync 方法。
测试如下所示。 你目前无需添加任何代码。
[TestCase(0, ExpectedResult=0)]
[TestCase(1, ExpectedResult=1)]
[TestCase(10, ExpectedResult=10)]
public int ReturnRequestedCount(int count)
{
    const int PAGE = 0; // take the first page of results

    // Fetch the scores.
    Task<IEnumerable<Score>> scoresTask = _scoreRepository.GetItemsAsync(
        score => true, // return all scores
        score => 1, // we don't care about the order
        PAGE,
        count // fetch this number of results
    );
    IEnumerable<Score> scores = scoresTask.Result;

    // Verify that we received the specified number of items.
    return scores.Count();
}
回顾一下,在 NUnit 测试中,TestCase 提供了用于测试此方法的内联数据。 NUnit 会调用 ReturnRequestedCount 单元测试方法,如下所示:
ReturnRequestedCount(0);
ReturnRequestedCount(1);
ReturnRequestedCount(10);
此测试还会使用 ExpectedResult 属性来简化测试代码,并使其意图更清晰。 NUnit 会自动将返回值与该属性的值进行比较,无需显式调用断言。
我们将选择几个表示典型查询的值。 我们还包括 0 来涵盖边缘情况。
从 GitHub 中提取分支
就如你早前做的那样,从 GitHub 提取 failed-test 分支,签出(或切换到)该分支。
在 Visual Studio Code 中打开集成终端。
运行以下
git fetch和git checkout命令,从 Microsoft 的存储库中下载名为failed-test的分支,并切换到该分支:git fetch upstream failed-test git checkout -B failed-test upstream/failed-test为便于学习,我们将分支命名为了
failed-test。 在实际操作中,你会以分支的目的或功能来命名它。运行以下命令来创建本地工具清单文件、安装
ReportGenerator工具,然后将coverlet.msbuild包添加到测试项目:dotnet new tool-manifest dotnet tool install dotnet-reportgenerator-globaltool dotnet add Tailspin.SpaceGame.Web.Tests package coverlet.msbuild需要执行此步骤,因为
failed-test分支不包含你添加到unit-tests分支中的工作。将测试项目文件和工具清单文件添加到临时索引,并提交更改。
git add Tailspin.SpaceGame.Web.Tests/Tailspin.SpaceGame.Web.Tests.csproj
git add .config/dotnet-tools.json
git commit -m "Configure code coverage tests"
运行以下
git push命令,将failed-test分支上传到 GitHub 存储库:git push origin failed-test
查看管道中的测试失败情况
假设你比较匆忙,没有运行最后一次测试就继续进行了下一项工作。 幸运的是,当有单元测试时,管道可以帮助你提早发现问题。 你可以在这里看到。
在 Azure Pipelines 中,在生成通过管道运行时对其进行跟踪。
当“运行单元测试 - 发布”任务运行时将其展开。
你会看到
ReturnRequestedCount测试方法失败。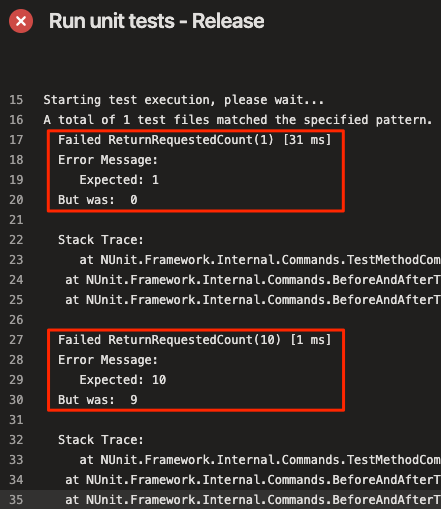
当输入值为 0 时,测试通过;当输入值为 1 或 10 时,测试失败。
只有当之前的任务成功时,生成才会发布到管道中。 在这里,由于单元测试失败,生成未发布。 这样可以防止其他人意外地获得损坏的生成。
实际上,你不会在生成运行时手动跟踪它。 以下是你可能发现失败的几种方法:
来自 Azure DevOps 的电子邮件通知
你可配置 Azure DevOps,使其在生成完成时向你发送电子邮件通知。 生成失败时,主题行以“[Build failed]”开头。

Azure Test Plans
在 Azure DevOps 中,选择“Test Plans”,然后选择“Runs”。 你会看到最近的测试运行,包括刚刚运行的测试运行。 选择最近完成的测试。 你会看到 8 个测试中有 2 个失败了。
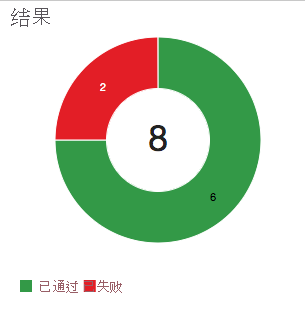
仪表板
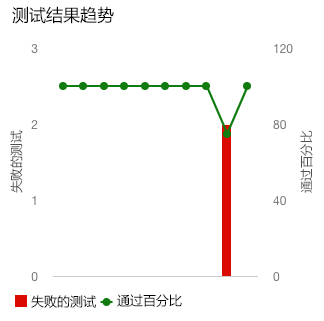
在 Azure DevOps 中,选择“Overview”,然后选择“Dashboards”。 你将看到“Test Results Trend”小组件中显示失败。 “Code Coverage”小组件为空白,这表示代码覆盖率未运行。
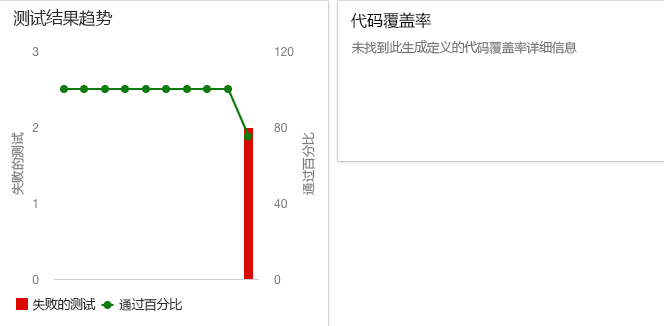
生成锁屏提醒
虽然
failed-test分支在 README.md 文件中不包括生成锁屏提醒,但当生成失败时,你可在 GitHub 上看到如下内容:
分析测试失败情况
当单元测试失败时,通常会有两个选项,具体取决于失败的性质:
- 如果测试显示代码存在缺陷,则修复代码并重新运行测试。
- 如果功能发生更改,请调整测试以符合新的要求。
在本地重现失败
在本部分中,你将在本地重现失败。
在 Visual Studio Code 中打开集成终端。
在终端中,运行此
dotnet build命令以生成应用程序:dotnet build --configuration Release在终端中,运行此
dotnet test命令以运行单元测试:dotnet test --no-build --configuration Release你应看到在管道中出现相同错误。 下面是输出的部分内容:
Starting test execution, please wait...
A total of 1 test files matched the specified pattern.
  Failed ReturnRequestedCount(1) [33 ms]
  Error Message:
     Expected: 1
  But was:  0

  Stack Trace:
     at NUnit.Framework.Internal.Commands.TestMethodCommand.Execute(TestExecutionContext context)
   at NUnit.Framework.Internal.Commands.BeforeAndAfterTestCommand.<>c__DisplayClass1_0.<Execute>b__0()
   at NUnit.Framework.Internal.Commands.BeforeAndAfterTestCommand.RunTestMethodInThreadAbortSafeZone(TestExecutionContext context, Action action)

  Failed ReturnRequestedCount(10) [1 ms]
  Error Message:
     Expected: 10
  But was:  9

  Stack Trace:
     at NUnit.Framework.Internal.Commands.TestMethodCommand.Execute(TestExecutionContext context)
   at NUnit.Framework.Internal.Commands.BeforeAndAfterTestCommand.<>c__DisplayClass1_0.<Execute>b__0()
   at NUnit.Framework.Internal.Commands.BeforeAndAfterTestCommand.RunTestMethodInThreadAbortSafeZone(TestExecutionContext context, Action action)


Failed!  - Failed:     2, Passed:     6, Skipped:     0, Total:     8, Duration: 98 ms
找出错误的原因
你注意到每个失败的测试都生成一个比正确值小 1 的结果。 例如,预计为 10 时,测试返回 9。
查看正在测试的方法的源代码 LocalDocumentDBRepository<T>.GetItemsAsync。 您应该看到如下内容:
public Task<IEnumerable<T>> GetItemsAsync(
    Func<T, bool> queryPredicate,
    Func<T, int> orderDescendingPredicate,
    int page = 1, int pageSize = 10
)
{
    var result = _items
        .Where(queryPredicate) // filter
        .OrderByDescending(orderDescendingPredicate) // sort
        .Skip(page * pageSize) // find page
        .Take(pageSize - 1); // take items

    return Task<IEnumerable<T>>.FromResult(result);
}
在此场景中,可以检查 GitHub,查看文件最近是否已更改。

你怀疑 pageSize - 1 少返回一个结果,本应该就是 pageSize。 在我们的场景中,你在未经测试就继续进行下一项工作时出错,但在实际场景中,你可以与在 GitHub 上更改文件的开发人员共同检查,以确定更改的原因。
提示
也可在 GitHub 上进行讨论和协作。 你可对拉取请求发表评论或提出问题。
修复错误
在本部分,通过将代码更改回原始状态并运行测试来验证修复,从而修复错误。
在 Visual Studio Code 中,从文件资源管理器打开 Tailspin.SpaceGame.Web/LocalDocumentDBRepository.cs。
修改
GetItemsAsync方法,如下所示:public Task<IEnumerable<T>> GetItemsAsync( Func<T, bool> queryPredicate, Func<T, int> orderDescendingPredicate, int page = 1, int pageSize = 10 ) { var result = _items .Where(queryPredicate) // filter .OrderByDescending(orderDescendingPredicate) // sort .Skip(page * pageSize) // find page .Take(pageSize); // take items return Task<IEnumerable<T>>.FromResult(result); }此版本将
pageSize - 1更改为pageSize。保存该文件。
在集成终端中,生成应用程序。
dotnet build --configuration Release你应看到生成成功了。
实际上,你可运行应用并短暂地尝试一下。为便于学习,我们将暂时跳过它。
在终端中,运行单元测试。
dotnet test --no-build --configuration Release你会看到测试通过。
Starting test execution, please wait...
A total of 1 test files matched the specified pattern.

Passed!  - Failed:     0, Passed:     8, Skipped:     0, Total:     8, Duration: 69 ms
在集成终端中,将每个修改过的文件添加到索引、提交更改,然后将分支推送到 GitHub。
git add .
git commit -m "Return correct number of items"
git push origin failed-test
提示
在此
git add示例中,点 (.) 为通配符字符。 它与当前目录和所有子目录中的所有未暂存的文件匹配。在使用此通配符字符之前,最好在提交前运行
git status来确保你正在暂存打算暂存的文件。返回到 Azure Pipelines。 观察更改通过管道。 测试通过,整个生成成功。
(可选)若要验证测试结果,可选择在生成完成时选择“Tests”和“Code Coverage”选项卡。
你还参阅仪表板来查看更新的结果趋势。
很好! 你已修复生成。 接下来,你将了解如何清理 Azure DevOps 环境。