练习 - 使用 mgt-get 组件优化 Microsoft Graph 查询
在本练习中,你将学习如何使用 Microsoft Graph 工具包的 Get 组件。 这使你能够为登录用户显示 OneNote 中的笔记本。
准备工作
作为本练习的先决条件,请确保你已完成本模块中的上一个练习:“第 3 单元:练习 - 缓存组件加载的数据”。
使用 Get 组件
按照以下步骤使用 Get 组件,以在应用中显示用户的笔记本。
打开 index.html 文件。 在
<body>标记中添加 Get 组件,就在 Login 组件<mgt-login></mgt-login>之后。<!DOCTYPE html> <html> <head> <script src="https://unpkg.com/@microsoft/mgt@3/dist/bundle/mgt-loader.js"></script> </head> <body> <mgt-msal2-provider client-id="YOUR-CLIENT-ID-HERE"></mgt-msal2-provider> <mgt-login></mgt-login> <mgt-get></mgt-get> </body> </html>将
resource和scopes属性添加到 Get 组件,如下所示:<mgt-get resource="me/onenote/notebooks" scopes="Notes.Read, Notes.Read.All"> </mgt-get>若要获取 OneNote 笔记本列表并将其显示在应用中,请执行以下任务:
- 在
<mgt-get></mgt-get>个标记之间添加<template></template>。 - 在
<template></template>个标记之间添加<div></div>。 - 在
<div>上添加data-for属性,以循环访问笔记本列表中的每个笔记本。 将data-for属性设置为note in value。
<mgt-get resource="me/onenote/notebooks" scopes="Notes.Read, Notes.Read.All"> <template> <div class="note" data-for="note in value"> </div> </template> </mgt-get>- 在
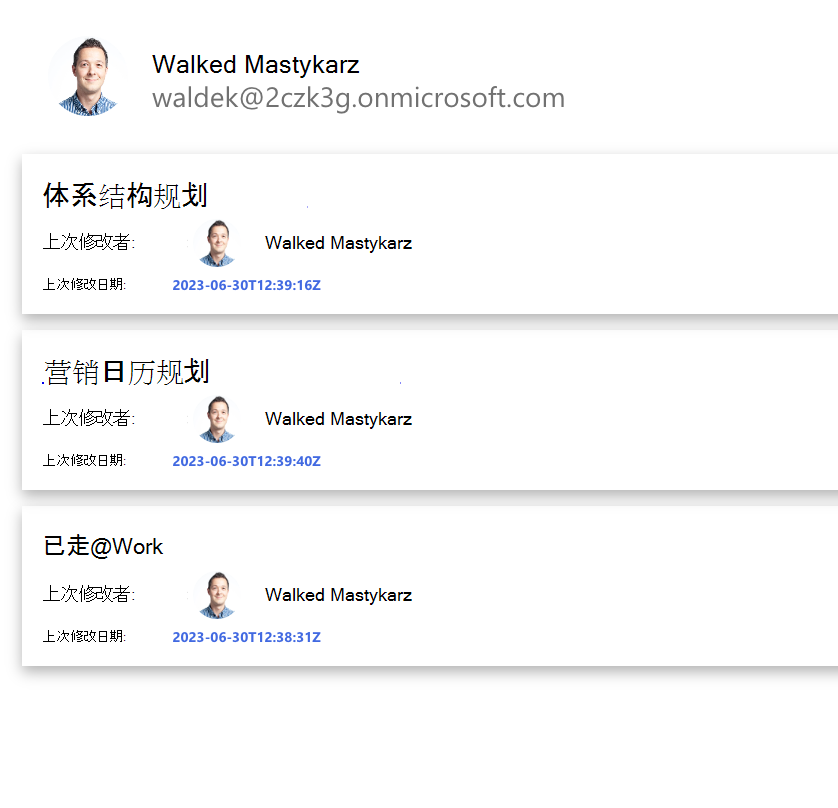
你的应用中现在有一个笔记本数据列表。 若要显示带有关联 URL 的笔记本名称列表,请在
<div></div>标签内添加以下行:<a href="{{ note.links.oneNoteWebUrl.href}}"> {{ note.displayName }} </a>若要显示上次修改笔记本的人员的个人资料以及上次修改笔记本的日期和时间,请在
<div></div>标签内添加以下代码片段。 将其添加到<a></a>标签之后。<h4> Last modified by: <mgt-person person-query="{{note.lastModifiedBy.user.displayName}}" view="oneline" person-card="hover"></mgt-person> </h4> <h5>Last modified date: {{note.lastModifiedDateTime}}</h5>要使 Get 组件看起来更专业,请在 performance-mgt 文件夹中创建 index.css 文件。
将以下 CSS 代码段添加到 index.css 中:
.note {
  box-shadow: 0 3px 7px rgba(0, 0, 0, 0.3);
  padding: 10px;
  margin: 8px 4px;
  font-family: Segoe UI, Frutiger, Frutiger Linotype, Dejavu Sans, Helvetica Neue, Arial, sans-serif;
}

.note a {
  font-size: 14px;
  margin-top: 8px;
}

.note h4 {
  font-size: 9px;
  font-family: 'Segoe UI', Tahoma, Geneva, Verdana, sans-serif;
  color: gray;
  margin-top: 4px;
  margin-bottom: 0px;
}
.note h5 {
  font-size: 7px;
  font-family: 'Segoe UI', Tahoma, Geneva, Verdana, sans-serif;
  color: royalblue;
  margin-top: 4px;
  margin-bottom: 0px;
}

.note mgt-person {
  --person-line1-font-size: 10px;
  --avatar-size-s: 12px;
  display: inline-block;
  vertical-align: middle;
}
在 index.html 文件中的
<head></head>个标签之间添加以下行:<link rel='stylesheet' href='index.css'>完成后 index.html 文件应如下所示:
<!DOCTYPE html>
<html>
<head>
  <script src="https://unpkg.com/@microsoft/mgt@3/dist/bundle/mgt-loader.js"></script>
  <link rel='stylesheet' href='index.css'>
</head>

<body>
  <mgt-msal2-provider client-id="YOUR-CLIENT-ID-HERE"></mgt-msal2-provider>
  <mgt-login></mgt-login>
  <mgt-get resource="/me/onenote/notebooks" scopes="Notes.Read, Notes.Read.All">
    <template>
      <div class="note" data-for="note in value">
        <a href="{{note.links.oneNoteWebUrl.href}}">{{ note.displayName }} </a>
        <h4> Last modified by:
          <mgt-person person-query="{{note.lastModifiedBy.user.displayName}}" view="oneline" person-card="hover">
          </mgt-person>
        </h4>
        <h5>Last modified date: {{note.lastModifiedDateTime}}</h5>
      </div>
    </template>
  </mgt-get>
</body>
</html>
在浏览器中测试应用
如果是首次使用 Microsoft 365 开发人员租户,则在 Microsoft 365 开发人员租户帐户的 OneNote 中可能没有任何笔记本。 开始测试应用之前,请访问
https://www.office.com/launch/onenote,然后使用 Microsoft 365 开发人员租户帐户登录。 在 OneNote 中创建新笔记本。在 Visual Studio Code 中,选择以下 Visual Studio Code 中的组合键,然后搜索 Live Server:
- Windows: CTRL+SHIFT+P
- macOS: COMMAND+SHIFT+P
运行 Live Server 以测试应用。
打开浏览器并转到
http://localhost:3000。使用 Microsoft 365 开发人员帐户登录。 同意所需权限,然后选择“接受”。
应用中将显示一个文件列表,其中包含与你共享文件的人员以及上次修改时间的信息。
