练习 - 将资源添加到部署堆栈
你正处于新存款应用程序开发的第三个冲刺阶段。 最近,存款团队请求对正在使用的一些 Azure 服务进行更改。 他们还请求创建为该应用程序提供支持所需的其他服务。
在本练习中,你将创建一个范围限定为引用 Bicep 文件的资源组的部署堆栈。 该文件定义应用服务计划、应用服务和 Azure SQL 数据库。 你随后修改应用服务计划的 SKU 并更新部署堆栈。 最后,你添加现有的 Log Analytics 工作区和新的 Application Insights 实例来支持对应用程序进行的监视。
在此过程中,你将:
- 创建定义初始体系结构的 Bicep 文件
- 使用 Bicep 文件创建限定为资源组的部署堆栈。
- 修改现有受管理资源的属性
- 更新 Bicep 文件以包含现有 Log Analytics 工作区和新的 Application Insights 实例
- 更新部署堆栈以部署受管理资源
- 验证部署堆栈的托管资源。
本练习使用适用于 Visual Studio Code 的 Bicep 扩展。 请务必在 Visual Studio Code 中安装此扩展。
创建 Bicep 文件
第一步是创建一个 Bicep 文件,该文件定义了要用于部署堆栈的资源。
打开 Visual Studio Code。
新建一个名为 main.bicep 的文件。
保存空文件,以便 Visual Studio Code 加载 Bicep 工具。
你可以选择“文件”>“另存为”,也可以在 Windows 中选择Ctrl+S(在 macOS 上选择 ⌘+S)。 请务必记住文件的保存位置。 例如,你需要创建一个“模板”文件夹来存储文件。
将以下 Bicep 代码添加到文件中。 你很快就会部署模板。
// Parameters
@description('The location for all resources.')
param location string = 'eastus'

@description('The name of the SQL database.')
param sqlDatabaseName string = 'sqldb-${uniqueString(resourceGroup().id)}'

@description('The password of the admin user.')
param sqlServerAdminUserName string

@description('The name of the admin user.')
@secure()
param sqlServerAdminPassword string

@description('The name of the SQL server.')
param sqlServerName string = 'sql-${uniqueString(resourceGroup().id)}'

@description('The name of the web application.')
param webApplicationName string = 'webapp-${uniqueString(resourceGroup().id)}'

// Variables
@description('The name of the app service plan.')
var appServicePlanName = 'plan-deposits'

// Resource - App Service Plan
resource appServicePlan 'Microsoft.Web/serverfarms@2023-12-01' = {
  name: appServicePlanName
  location: location
  sku: {
    name: 'F1'
    capacity: 1
  }
}

// Resource - Web App
resource webApplication 'Microsoft.Web/sites@2023-12-01' = {
  name: webApplicationName
  location: location
  properties: {
    serverFarmId: appServicePlan.id
  }
}

// Resource - SQL Server
resource sqlServer 'Microsoft.Sql/servers@2021-11-01' ={
  name: sqlServerName
  location: location
  properties: {
    administratorLogin: sqlServerAdminUserName
    administratorLoginPassword: sqlServerAdminPassword
  }
}

// Resource - SQL Database
resource sqlServerDatabase 'Microsoft.Sql/servers/databases@2021-11-01' = {
  parent: sqlServer
  name: sqlDatabaseName
  location: location
  sku: {
    name: 'Standard'
    tier: 'Standard'
  }
}
请注意,你使用的是包含字符串内插和
uniqueString()函数的表达式来定义默认参数值。 部署此模板的用户可以通过在部署时指定值来覆盖默认参数值,但不能覆盖变量值。另请注意,你是使用变量作为应用服务计划名称,但将参数用于其他名称。 存储帐户和应用服务应用需要全局唯一的名称,但应用服务计划名称仅需在其资源组中唯一。 这种差异意味着,只要部署都进入不同的资源组,那么在不同部署中使用相同的应用服务计划名称就不是问题。
保存对文件所做的更改。
创建部署堆栈并将资源部署到 Azure
若要将此模板部署到 Azure,你需要从 Visual Studio Code 终端登录到 Azure 帐户。 请确保已安装 Azure CLI 工具。
在“终端”菜单中,选择“新终端”。 终端窗口通常在屏幕的下半部分打开。
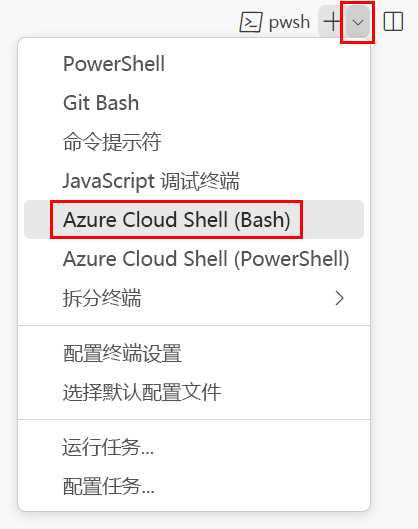
如果终端窗口在右侧显示 bash,则表示已打开正确的 shell。 或者,如果你在右侧看到 bash shell 图标,则可以选择它来启动 shell。

如果出现“bash”以外的 shell,请选择 shell 下拉箭头,然后选择“Git Bash”。

在终端中,转到保存模板的目录。 例如,如果将模板保存到 templates 文件夹,则可以使用以下命令:
cd templates
安装 Bicep
运行以下命令以确保具有最新版本的 Bicep:
az bicep install && az bicep upgrade
使用 Azure CLI 登录到 Azure
在 Visual Studio Code 终端中,运行以下命令登录到 Azure:
az login在打开的浏览器中,登录到 Azure 帐户。
Visual Studio Code 终端显示与此帐户关联的订阅列表。
在列表中,找到要用于本次练习的订阅。
如果你在登录时错过了列表,则可以使用以下代码片段再次列出订阅。
az account list --output table为在此会话中运行的所有 Azure CLI 命令设置默认订阅。
az account set --subscription "Your Subscription Name or ID"
创建资源组
我们需要为部署堆栈和受管理资源创建资源组。 若要创建资源组,请从 Visual Studio Code 中的终端运行以下命令。
az group create \
    --name rg-depositsApplication \
    --location eastus
若要将此模板部署到 Azure,需要从 Visual Studio Code 终端登录到 Azure 帐户。 确保已安装 Azure PowerShell。
在“终端”菜单中,选择“新终端”。 终端窗口通常在屏幕的下半部分打开。
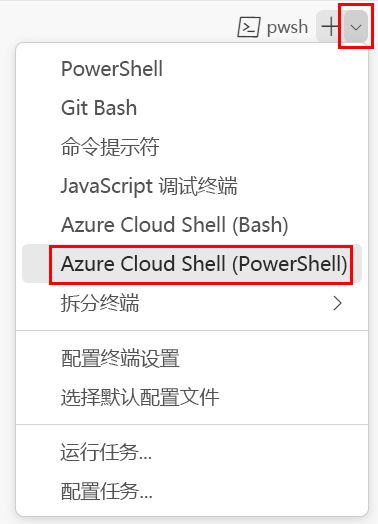
如果终端窗口在右侧显示 pwsh 或 powershell,则表示已打开正确的 shell。 或者,如果你在右侧看到 PowerShell shell 图标,则可以选择它来启动 shell。

如果出现“pwsh”和“powershell”以外的 shell,请选择 shell 下拉箭头,然后选择“PowerShell”。

在终端中,转到保存模板的目录。 例如,如果将模板保存到 templates 文件夹,则可以使用以下命令:
Set-Location -Path templates
安装 Bicep CLI
若要从 Azure PowerShell 中使用 Bicep,请安装 Bicep CLI。
使用 Azure PowerShell 登录到 Azure
在 Visual Studio Code 终端中,运行以下命令登录到 Azure:
Connect-AzAccount在打开的浏览器中,登录到 Azure 帐户。
通过运行以下命令获取要用于此练习的订阅的 ID:
Get-AzSubscription订阅 ID 位于第二列。 复制第二列。 它类似于 aaaa0a0a-bb1b-cc2c-dd3d-eeeeee4e4e4e。
为在此会话中运行的所有 Azure PowerShell 命令设置默认订阅。
Set-AzContext -SubscriptionId {Your subscription ID}
创建资源组
我们需要为部署堆栈和受管理资源创建资源组。 若要创建资源组,请从 Visual Studio Code 中的终端运行以下命令。
New-AzResourceGroup `
    -Name rg-depositsApplication `
    -Location eastus
创建部署堆栈
接下来,我们需要创建范围限定为最近创建的资源组的部署堆栈。 若要创建部署堆栈,请从 Visual Studio Code 中的终端运行以下命令。
若要创建部署堆栈,请从 Visual Studio Code 中的终端运行以下命令。
az stack group create \
    --name stack-deposits \
    --resource-group rg-depositsApplication \
    --template-file ./main.bicep \
    --action-on-unmanage detachAll \
    --deny-settings-mode none
它会提示输入
sqlServerAdminUserName的值。 为 SQL 服务器管理员创建一个名称,然后按 Enter。
它会提示输入
sqlServerAdminPassword的值。 为 SQL 服务器管理员创建一个复杂密码,然后按 Enter。
等待更新操作完成,然后继续执行下一个任务。
若要创建部署堆栈,请从 Visual Studio Code 中的终端运行以下命令。
New-AzResourceGroupDeploymentStack `
    -Name stack-deposits `
    -ResourceGroupName rg-depositsApplication `
    -TemplateFile ./main.bicep `
    -ActionOnUnmanage DetachAll `
    -DenySettingsMode None
它会提示输入
sqlServerAdminUserName的值。 为 SQL 服务器管理员创建一个名称,然后按 Enter。
它会提示输入
sqlServerAdminPassword的值。 为 SQL 服务器管理员创建一个复杂密码,然后按 Enter。
等待更新操作完成,然后继续执行下一个任务。
修改 Bicep 文件以添加现有 Log Analytics 工作区和新的 Application Insights 实例
打开 Visual Studio Code 中的 main.bicep 文件。
将突出显示的代码添加到文件的 variables 节:
// Variables
@description('The name of the Application Insights instance.')
var applicationInsightsName = 'appinsights-deposits'

@description('The name of the app service plan.')
var appServicePlanName = 'plan-deposits'

@description('The name of the Log Analytics Workspace.')
var logAnalyticsWorkspaceName = 'log-deposits'
将以下代码添加到文件底部:
// Resource - Log Analytics Workspace
resource logAnalyticsWorkspace 'Microsoft.OperationalInsights/workspaces@2023-09-01' = {
  name: logAnalyticsWorkspaceName
  location: location
  properties: {
    retentionInDays: 30
    sku: {
      name: 'PerGB2018'
    }
  }
}

// Resource - Application Insights
resource applicationInsights 'Microsoft.Insights/components@2020-02-02' = {
  name: applicationInsightsName
  location: location
  kind: 'web'
  properties: {
    Application_Type: 'web'
    WorkspaceResourceId: logAnalyticsWorkspace.id
  }
}
保存对文件所做的更改。
修改 Bicep 文件以修改应用服务计划和应用服务
打开 Visual Studio Code 中的 main.bicep 文件。
将应用服务计划的 SKU 名称从
F1更改为S1:// Resource - App Service Plan resource appServicePlan 'Microsoft.Web/serverfarms@2023-12-01' = { name: appServicePlanName location: location sku: { name: 'S1' capacity: 1 } }将突出显示的用于连接的代码添加到 Application Insights 实例中:
// Resource - Web App
resource webApplication 'Microsoft.Web/sites@2023-12-01' = {
  name: webApplicationName
  location: location
  properties: {
    serverFarmId: appServicePlan.id
    siteConfig: {
      appSettings: [
        {
          name: 'APPINSIGHTS_INSTRUMENTATIONKEY'
          value: applicationInsights.properties.InstrumentationKey
        }
      ]
    }
  }
}
保存对文件所做的更改。
更新部署堆栈
修改 Bicep 文件后,我们需要更新部署堆栈,以便实施对 Bicep 文件中资源所做的更改。
若要更新部署堆栈,请从 Visual Studio Code 中的终端运行以下命令。
az stack group create \
    --name stack-deposits \
    --resource-group rg-depositsApplication \
    --template-file ./main.bicep \
    --action-on-unmanage detachAll \
    --deny-settings-mode none
你会收到一条消息,指出该堆栈已存在于当前订阅中。 如果 action on unmanage 参数的值发生更改,则会出现警告,提醒你注意新值。 依次按
y、Enter 键。
它会提示输入
sqlServerAdminUserName的值。 为 SQL 服务器管理员创建一个名称,然后按 Enter。
它会提示输入
sqlServerAdminPassword的值。 为 SQL 服务器管理员创建一个复杂密码,然后按 Enter。
等待更新操作完成,然后继续执行下一个任务。
修改 Bicep 文件后,我们需要更新部署堆栈,以便实施对应用服务计划所做的更改。
若要更新部署堆栈,请从 Visual Studio Code 中的终端运行以下命令。
Set-AzResourceGroupDeploymentStack `
    -Name stack-deposits `
    -ResourceGroupName rg-depositsApplication `
    -TemplateFile ./main.bicep `
    -ActionOnUnmanage DetachAll `
    -DenySettingsMode none
它会提示输入
sqlServerAdminUserName的值。 为 SQL 服务器管理员创建一个名称,然后按 Enter。
它会提示输入
sqlServerAdminPassword的值。 为 SQL 服务器管理员创建一个复杂密码,然后按 Enter。
等待更新操作完成,然后继续执行下一个任务。
验证对部署堆栈和托管资源的更新
更新完成后,我们需要验证应用服务计划的 SKU 是否已更新,以及部署堆栈是否正在管理现有的 Log Analytics 工作区和新的 Application Insights 实例。
若要查看应用服务计划的配置,请从 Visual Studio Code 中的终端运行以下命令。
az appservice plan show \
    --name plan-deposits
    --resource-group rg-depositsApplication
请注意输出的 SKU 部分。 应用服务计划现在位于 S1 SKU 上。 它应类似于以下输出:
"sku": {
    "capacity": 1,
    "family": "S",
    "name": "S1",
    "size": "S1",
    "tier": "Standard"
},
若要查看部署堆栈的配置,请从 Visual Studio Code 中的终端运行以下命令。
az stack group show \
    --resource-group rg-depositsApplication \
    --name stack-deposits
请注意输出的资源部分。 我们现在看到现有的 Log Analytics 工作区和新的 Application Insights 实例被列为受管理资源。 结果应与以下输出类似:
"resources": [
  {
    "denyStatus": "none",
    "id": "/subscriptions/./resourceGroups/rg-depositsApplication/././servers/sql-brpdm7iotbwjm",
    "resourceGroup": "rg-depositsApplication",
    "status": "managed"
  },
  {
    "denyStatus": "none",
    "id": "/subscriptions/./resourceGroups/rg-depositsApplication/././servers/sql-brpdm7iotbwjm/databases/sqldb-brpdm7iotbwjm",
    "resourceGroup": "rg-depositsApplication",
    "status": "managed"
  },
  {
    "denyStatus": "none",
    "id": "/subscriptions/./resourceGroups/rg-depositsApplication/././serverfarms/plan-deposits",
    "resourceGroup": "rg-depositsApplication",
    "status": "managed"
  },
  {
    "denyStatus": "none",
    "id": "/subscriptions/./resourceGroups/rg-depositsApplication/././sites/webapp-brpdm7iotbwjm",
    "resourceGroup": "rg-depositsApplication",
    "status": "managed"
  },
  {
    "denyStatus": "none",
    "id": "/subscriptions/./resourceGroups/rg-depositsApplication/././components/appinsights-deposits",
    "resourceGroup": "rg-depositsApplication",
    "status": "managed"
  },
  {
    "denyStatus": "none",
    "id": "/subscriptions/./resourceGroups/rg-depositsApplication/././workspaces/log-deposits",
    "resourceGroup": "rg-depositsApplication",
    "status": "managed"
  }
],
若要查看应用服务计划的配置,请从 Visual Studio Code 中的终端运行以下命令。
$plan = Get-AzAppServicePlan `
    -ResourceGroupName rg-depositsApplication `
    -Name plan-deposits
$sku = $plan.Sku
$sku
请记下输出。 应用服务计划现在位于 S1 SKU 上。 输出应如下所示:
Name         : S1
Tier         : Standard
Size         : S1
Family       : S
Capacity     : 1
若要查看部署堆栈的配置,请从 Visual Studio Code 中的终端运行以下命令。
Get-AzResourceGroupDeploymentStack `
    -ResourceGroupName rg-depositsApplication `
    -Name stack-deposits
请注意输出的资源部分。 我们现在看到现有的 Log Analytics 工作区和新的 Application Insights 实例被列为受管理资源。 结果应与以下输出类似:
Resources                     : /subscriptions/./resourceGroups/rg-depositsApplication/././servers/                        sql-brpdm7iotbwjm
                                /subscriptions/./resourceGroups/rg-depositsApplication/././servers/sql-brpdm7iotbwjm/databases/sqldb-brpdm7iotbwjm
                                /subscriptions/./resourceGroups/rg-depositsApplication/././serverfarms/plan-deposits
                                /subscriptions/./resourceGroups/rg-depositsApplication/././sites/webapp-brpdm7iotbwjm
                                /subscriptions/./resourceGroups/rg-depositsApplication/././components/appinsights-deposits
                                /subscriptions/./resourceGroups/rg-depositsApplication/././workspaces/log-deposits