练习 - 为存储帐户和数据库设定种子
对工作流进行更新以生成网站的应用程序,并将其部署到 Bicep 文件中定义的 Azure 应用服务应用,但冒烟测试作业失败,因为数据库尚不起作用。 在此单元中,你将部署新的 Azure SQL 逻辑服务器和数据库,并将配置工作流以生成和部署数据库的架构。 此外,你将更新工作流,为测试环境添加一些示例产品数据,以便团队可以试用该网站。
在此过程中,你将:
- 将 Blob 容器添加到 Azure 存储帐户。
- 添加 Azure SQL 逻辑服务器和数据库。
- 更新生成作业以将数据库项目生成到 DACPAC 文件中。
- 为 Azure SQL 逻辑服务器和数据库添加新的变量和机密。
- 更新工作流以使用新的变量和机密。
- 添加新的工作流步骤以部署 DACPAC 文件。
- 运行工作流并查看网站。
添加存储容器
Bicep 文件已经定义了一个存储帐户,但没有定义 Blob 容器。 将在此处将 Blob 容器添加到 Bicep 文件。 还需使用应用程序的配置设置为应用程序提供存储帐户和 Blob 容器的名称。 这样,应用便知道要访问哪个存储帐户。
在 Visual Studio Code 中,打开 deploy 文件夹中的 main.bicep 文件。
在定义资源名称的变量下方(第 27 行附近),为 Blob 存储容器的名称添加新的变量定义:
var storageAccountImagesBlobContainerName = 'toyimages'更新
storageAccount资源以定义 Blob 容器:resource storageAccount 'Microsoft.Storage/storageAccounts@2022-09-01' = { name: storageAccountName location: location kind: 'StorageV2' sku: environmentConfigurationMap[environmentType].storageAccount.sku resource blobService 'blobServices' = { name: 'default' resource storageAccountImagesBlobContainer 'containers' = { name: storageAccountImagesBlobContainerName properties: { publicAccess: 'Blob' } } } }更新应用的
appSettings属性以添加两个新的应用程序设置,一个用于存储帐户名称,一个用于 Blob 容器名称:resource appServiceApp 'Microsoft.Web/sites@2022-03-01' = { name: appServiceAppName location: location properties: { serverFarmId: appServicePlan.id httpsOnly: true siteConfig: { appSettings: [ { name: 'APPINSIGHTS_INSTRUMENTATIONKEY' value: applicationInsights.properties.InstrumentationKey } { name: 'APPLICATIONINSIGHTS_CONNECTION_STRING' value: applicationInsights.properties.ConnectionString } { name: 'ReviewApiUrl' value: reviewApiUrl } { name: 'ReviewApiKey' value: reviewApiKey } { name: 'StorageAccountName' value: storageAccount.name } { name: 'StorageAccountBlobEndpoint' value: storageAccount.properties.primaryEndpoints.blob } { name: 'StorageAccountImagesContainerName' value: storageAccount::blobService::storageAccountImagesBlobContainer.name } ] } } }在文件内容的末尾,添加新的输出以公开存储帐户和 Blob 容器的名称:
output storageAccountName string = storageAccount.name
output storageAccountImagesBlobContainerName string = storageAccount::blobService::storageAccountImagesBlobContainer.name
保存对该文件所做的更改。
将更改提交到 Git 存储库,但不要对其进行推送。 在 Visual Studio Code 终端中,运行以下命令:
git add .
git commit -m "Add storage container"
添加 Azure SQL 逻辑服务器和数据库
Bicep 文件当前未部署 Azure SQL 逻辑服务器或数据库。 在本部分中,你将这些资源添加到 Bicep 文件。
在 main.bicep 文件中,在靠近文件顶部的
reviewApiKey参数下添加两个新参数:@description('The administrator login username for the SQL server.') param sqlServerAdministratorLogin string @secure() @description('The administrator login password for the SQL server.') param sqlServerAdministratorLoginPassword string在定义资源名称的变量下方,添加新变量以定义 Azure SQL 逻辑服务器和数据库的名称:
var sqlServerName = 'toy-website-${resourceNameSuffix}'
var sqlDatabaseName = 'Toys'
在刚添加的变量下面,定义一个新变量,该变量会创建应用程序用于访问数据库的连接字符串:
// Define the connection string to access Azure SQL.
var sqlDatabaseConnectionString = 'Server=tcp:${sqlServer.properties.fullyQualifiedDomainName},1433;Initial Catalog=${sqlDatabase.name};Persist Security Info=False;User ID=${sqlServerAdministratorLogin};Password=${sqlServerAdministratorLoginPassword};MultipleActiveResultSets=False;Encrypt=True;TrustServerCertificate=False;Connection Timeout=30;'
注意
为简单起见,应用程序将使用管理员登录名和密码来访问数据库。 但对于生产解决方案而言,这并非是很好的做法。 最好使用应用服务托管标识来访问数据库,并向托管标识授予应用程序所需的最小权限。 我们链接到本模块的“摘要”页面中的详细信息。
在文件内容末尾附近的输出上方,添加 Azure SQL 逻辑服务器和数据库资源:
resource sqlServer 'Microsoft.Sql/servers@2022-05-01-preview' = {
  name: sqlServerName
  location: location
  properties: {
    administratorLogin: sqlServerAdministratorLogin
    administratorLoginPassword: sqlServerAdministratorLoginPassword
  }
}

resource sqlServerFirewallRule 'Microsoft.Sql/servers/firewallRules@2022-05-01-preview' = {
  parent: sqlServer
  name: 'AllowAllWindowsAzureIps'
  properties: {
    endIpAddress: '0.0.0.0'
    startIpAddress: '0.0.0.0'
  }
}

resource sqlDatabase 'Microsoft.Sql/servers/databases@2022-05-01-preview' = {
  parent: sqlServer
  name: sqlDatabaseName
  location: location
  sku: environmentConfigurationMap[environmentType].sqlDatabase.sku
}
更新
environmentConfigurationMap变量以定义用于每个环境的数据库的 SKU:var environmentConfigurationMap = { Production: { appServicePlan: { sku: { name: 'S1' capacity: 1 } } storageAccount: { sku: { name: 'Standard_LRS' } } sqlDatabase: { sku: { name: 'Standard' tier: 'Standard' } } } Test: { appServicePlan: { sku: { name: 'F1' } } storageAccount: { sku: { name: 'Standard_GRS' } } sqlDatabase: { sku: { name: 'Standard' tier: 'Standard' } } } }在应用服务应用中为数据库连接字符串添加额外的应用设置:
resource appServiceApp 'Microsoft.Web/sites@2022-03-01' = {
  name: appServiceAppName
  location: location
  properties: {
    serverFarmId: appServicePlan.id
    httpsOnly: true
    siteConfig: {
      appSettings: [
        {
          name: 'APPINSIGHTS_INSTRUMENTATIONKEY'
          value: applicationInsights.properties.InstrumentationKey
        }
        {
          name: 'APPLICATIONINSIGHTS_CONNECTION_STRING'
          value: applicationInsights.properties.ConnectionString
        }
        {
          name: 'ReviewApiUrl'
          value: reviewApiUrl
        }
        {
          name: 'ReviewApiKey'
          value: reviewApiKey
        }
        {
          name: 'StorageAccountName'
          value: storageAccount.name
        }
        {
          name: 'StorageAccountBlobEndpoint'
          value: storageAccount.properties.primaryEndpoints.blob
        }
        {
          name: 'StorageAccountImagesContainerName'
          value: storageAccount::blobService::storageAccountImagesBlobContainer.name
        }
        {
          name: 'SqlDatabaseConnectionString'
          value: sqlDatabaseConnectionString
        }
      ]
    }
  }
}
在文件底部,添加输出以公开 Azure SQL 逻辑服务器的主机名和数据库名称:
output appServiceAppName string = appServiceApp.name
output appServiceAppHostName string = appServiceApp.properties.defaultHostName
output storageAccountName string = storageAccount.name
output storageAccountImagesBlobContainerName string = storageAccount::blobService::storageAccountImagesBlobContainer.name
output sqlServerFullyQualifiedDomainName string = sqlServer.properties.fullyQualifiedDomainName
output sqlDatabaseName string = sqlDatabase.name
保存对该文件所做的更改。
为数据库项目添加新的生成步骤
网站开发人员已准备好 Visual Studio 数据库项目,该项目会部署并配置网站数据库表。 在这里,你将更新工作流“生成”被调用的工作流,以将数据库项目生成到 DACPAC 文件中,并将其作为工作流项目上传。
打开“.github/workflows”文件夹中的“build.yml”文件。
若要生成 Visual Studio 数据库项目并将生成的 DACPAC 文件作为工作流项目上传,请添加 build-database 作业:
name: build-website

on:
  workflow_call:

jobs:
  build-application:
    name: Build application
    runs-on: ubuntu-latest
    steps:
    - uses: actions/checkout@v3

    - name: Install .NET Core
      uses: actions/setup-dotnet@v3
      with:
        dotnet-version: 3.1

    - name: Build publishable website
      run: |
        dotnet publish --configuration Release
      working-directory: ./src/ToyCompany/ToyCompany.Website

    - name: Zip publishable website
      run: |
        zip -r publish.zip .
      working-directory: ./src/ToyCompany/ToyCompany.Website/bin/Release/netcoreapp3.1/publish

    - name: Upload website as workflow artifact
      uses: actions/upload-artifact@v3
      with:
        name: website
        path: ./src/ToyCompany/ToyCompany.Website/bin/Release/netcoreapp3.1/publish/publish.zip

  build-database:
    name: Build database
    runs-on: windows-latest
    steps:
    - uses: actions/checkout@v3

    - name: Prepare MSBuild
      uses: microsoft/setup-msbuild@v1.1

    - name: Build database project
      working-directory: ./src/ToyCompany/ToyCompany.Database
      run: MSBuild.exe ToyCompany.Database.sqlproj -property:Configuration=Release

    - name: Upload website as workflow artifact
      uses: actions/upload-artifact@v3
      with:
        name: database
        path: ./src/ToyCompany/ToyCompany.Database/bin/Release/ToyCompany.Database.dacpac
“生成-数据库”作业使用 Windows 运行器。 目前,Visual Studio 数据库项目必须在 Windows 操作系统上生成。
保存对该文件所做的更改。
定义机密
需要为每个环境安全地存储 Azure SQL 逻辑服务器的管理员密码。 你决定使用 GitHub 机密来保护信息。
在浏览器中,转到“设置”>“机密和变量”>“操作”。
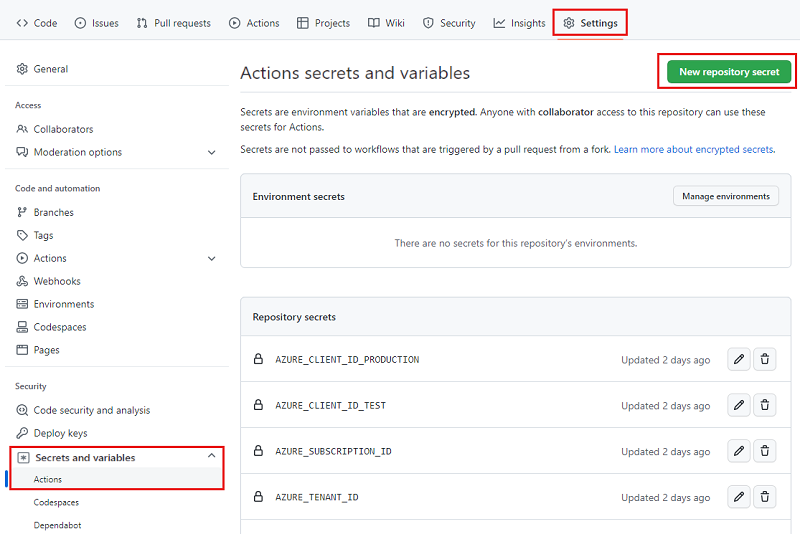
选择“新建存储库机密”按钮。
输入“SQL_SERVER_ADMINISTRATOR_LOGIN_PASSWORD_TEST”作为机密名称,并输入“SecurePassword!111”作为值。
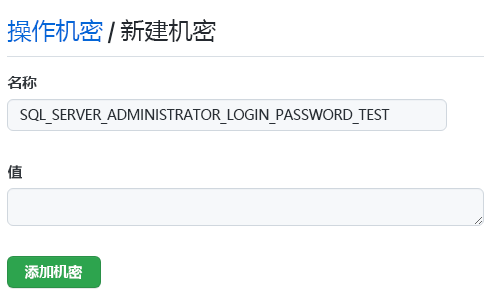
选择“添加机密”。
重复该过程以添加另一个名为 SQL_SERVER_ADMINISTRATOR_LOGIN_PASSWORD_PRODUCTION 的机密作为机密名称,并添加 SecurePassword!999 作为值。 选择“添加机密”。
向工作流添加机密和输入
在 Visual Studio Code 中,打开“.github/workflows”文件夹中的“deploy.yml”文件。
在文件的顶部,定义一个名为
sqlServerAdministratorLogin的新输入和一个名为sqlServerAdministratorLoginPassword的新机密:name: deploy on: workflow_call: inputs: environmentType: required: true type: string resourceGroupName: required: true type: string reviewApiUrl: required: true type: string sqlServerAdministratorLogin: required: true type: string secrets: AZURE_CLIENT_ID: required: true AZURE_TENANT_ID: required: true AZURE_SUBSCRIPTION_ID: required: true reviewApiKey: required: true sqlServerAdministratorLoginPassword: required: true保存对该文件所做的更改。
打开“workflow.yml”文件。
在“部署-测试”定义中,为
sqlServerAdministratorLogin输入定义一个值,并为sqlServerAdministratorLoginPassword机密填充该值:# Deploy to the test environment. deploy-test: uses: ./.github/workflows/deploy.yml needs: [build, lint] with: environmentType: Test resourceGroupName: ToyWebsiteTest reviewApiUrl: https://sandbox.contoso.com/reviews sqlServerAdministratorLogin: TestToyCompanyAdmin secrets: AZURE_CLIENT_ID: ${{ secrets.AZURE_CLIENT_ID_TEST }} AZURE_TENANT_ID: ${{ secrets.AZURE_TENANT_ID }} AZURE_SUBSCRIPTION_ID: ${{ secrets.AZURE_SUBSCRIPTION_ID }} reviewApiKey: ${{ secrets.REVIEW_API_KEY_TEST }} sqlServerAdministratorLoginPassword: ${{ secrets.SQL_SERVER_ADMINISTRATOR_LOGIN_PASSWORD_TEST }}使用生产环境的值在“部署-生产”定义中重复这一过程:
# Deploy to the production environment. deploy-production: uses: ./.github/workflows/deploy.yml needs: - lint - build - deploy-test with: environmentType: Production resourceGroupName: ToyWebsiteProduction reviewApiUrl: https://api.contoso.com/reviews sqlServerAdministratorLogin: ToyCompanyAdmin secrets: AZURE_CLIENT_ID: ${{ secrets.AZURE_CLIENT_ID_PRODUCTION }} AZURE_TENANT_ID: ${{ secrets.AZURE_TENANT_ID }} AZURE_SUBSCRIPTION_ID: ${{ secrets.AZURE_SUBSCRIPTION_ID }} reviewApiKey: ${{ secrets.REVIEW_API_KEY_PRODUCTION }} sqlServerAdministratorLoginPassword: ${{ secrets.SQL_SERVER_ADMINISTRATOR_LOGIN_PASSWORD_PRODUCTION }}保存对该文件所做的更改。
添加参数值和输出
Bicep 文件现在具有两个新的必需参数:sqlServerAdministratorLogin 和 sqlServerAdministratorLoginPassword。 在这里,你从工作流输入和机密中传播这些参数值,用于“验证”和“部署”作业。 你还将 Bicep 部署的输出传播到作业的输出。
打开 deploy.yml 文件。
更新“验证”作业的“运行预检验证”步骤以添加新参数:
jobs: validate: runs-on: ubuntu-latest steps: - uses: actions/checkout@v3 - uses: azure/login@v1 name: Sign in to Azure with: client-id: ${{ secrets.AZURE_CLIENT_ID }} tenant-id: ${{ secrets.AZURE_TENANT_ID }} subscription-id: ${{ secrets.AZURE_SUBSCRIPTION_ID }} - if: inputs.environmentType != 'Production' uses: azure/arm-deploy@v1 name: Run preflight validation with: deploymentName: ${{ github.run_number }} resourceGroupName: ${{ inputs.resourceGroupName }} template: ./deploy/main.bicep parameters: > environmentType=${{ inputs.environmentType }} reviewApiUrl=${{ inputs.reviewApiUrl }} reviewApiKey=${{ secrets.reviewApiKey }} sqlServerAdministratorLogin=${{ inputs.sqlServerAdministratorLogin }} sqlServerAdministratorLoginPassword=${{ secrets.sqlServerAdministratorLoginPassword }} deploymentMode: Validate更新“运行 What-if”步骤以添加新参数:
- if: inputs.environmentType == 'Production' uses: azure/arm-deploy@v1 name: Run what-if with: failOnStdErr: false resourceGroupName: ${{ inputs.resourceGroupName }} template: ./deploy/main.bicep parameters: > environmentType=${{ inputs.environmentType }} reviewApiUrl=${{ inputs.reviewApiUrl }} reviewApiKey=${{ secrets.reviewApiKey }} sqlServerAdministratorLogin=${{ inputs.sqlServerAdministratorLogin }} sqlServerAdministratorLoginPassword=${{ secrets.sqlServerAdministratorLoginPassword }} additionalArguments: --what-if更新“部署”作业的“部署 Bicep 文件”步骤以添加新参数:
deploy: needs: validate environment: ${{ inputs.environmentType }} runs-on: ubuntu-latest outputs: appServiceAppName: ${{ steps.deploy.outputs.appServiceAppName }} appServiceAppHostName: ${{ steps.deploy.outputs.appServiceAppHostName }} steps: - uses: actions/checkout@v3 - uses: azure/login@v1 name: Sign in to Azure with: client-id: ${{ secrets.AZURE_CLIENT_ID }} tenant-id: ${{ secrets.AZURE_TENANT_ID }} subscription-id: ${{ secrets.AZURE_SUBSCRIPTION_ID }} - uses: azure/arm-deploy@v1 id: deploy name: Deploy Bicep file with: failOnStdErr: false deploymentName: ${{ github.run_number }} resourceGroupName: ${{ inputs.resourceGroupName }} template: ./deploy/main.bicep parameters: > environmentType=${{ inputs.environmentType }} reviewApiUrl=${{ inputs.reviewApiUrl }} reviewApiKey=${{ secrets.reviewApiKey }} sqlServerAdministratorLogin=${{ inputs.sqlServerAdministratorLogin }} sqlServerAdministratorLoginPassword=${{ secrets.sqlServerAdministratorLoginPassword }}在“部署”作业定义中,为 Bicep 文件的输出添加新输出:
deploy: needs: validate environment: ${{ inputs.environmentType }} runs-on: ubuntu-latest outputs: appServiceAppName: ${{ steps.deploy.outputs.appServiceAppName }} appServiceAppHostName: ${{ steps.deploy.outputs.appServiceAppHostName }} storageAccountName: ${{ steps.deploy.outputs.storageAccountName }} storageAccountImagesBlobContainerName: ${{ steps.deploy.outputs.storageAccountImagesBlobContainerName }} sqlServerFullyQualifiedDomainName: ${{ steps.deploy.outputs.sqlServerFullyQualifiedDomainName }} sqlDatabaseName: ${{ steps.deploy.outputs.sqlDatabaseName }}
添加数据库和数据种子作业
在本部分中,将定义部署网站的数据库组件所需的步骤。 首先,添加一个步骤来部署工作流先前生成的 DACPAC 文件。 然后,将示例数据添加到数据库和存储帐户,但仅适用于非生产性环境。
在“部署-网站”作业下方,添加一个新作业以部署 DACPAC 文件:
deploy-database: needs: deploy environment: ${{ inputs.environmentType }} runs-on: ubuntu-latest steps: - uses: actions/download-artifact@v3 - uses: azure/login@v1 name: Sign in to Azure with: client-id: ${{ secrets.AZURE_CLIENT_ID }} tenant-id: ${{ secrets.AZURE_TENANT_ID }} subscription-id: ${{ secrets.AZURE_SUBSCRIPTION_ID }} - uses: azure/sql-action@v1.2 name: Deploy DACPAC to database with: server-name: ${{ needs.deploy.outputs.sqlServerFullyQualifiedDomainName }} connection-string: ${{ format('Server={0};Initial Catalog={1};User Id={2};Password={3};', needs.deploy.outputs.sqlServerFullyQualifiedDomainName, needs.deploy.outputs.sqlDatabaseName, inputs.sqlServerAdministratorLogin, secrets.sqlServerAdministratorLoginPassword) }} dacpac-package: database/ToyCompany.Database.dacpac在刚添加的作业下方和“版本验收-测试”作业上方,定义一个新作业,以使用示例数据为数据库设定种子。
seed-database: needs: - deploy - deploy-database environment: ${{ inputs.environmentType }} runs-on: ubuntu-latest steps: - uses: actions/checkout@v3 - uses: azure/login@v1 name: Sign in to Azure with: client-id: ${{ secrets.AZURE_CLIENT_ID }} tenant-id: ${{ secrets.AZURE_TENANT_ID }} subscription-id: ${{ secrets.AZURE_SUBSCRIPTION_ID }} - if: inputs.environmentType != 'Production' uses: azure/sql-action@v1.2 name: Add test data to database with: server-name: ${{ needs.deploy.outputs.sqlServerFullyQualifiedDomainName }} connection-string: ${{ format('Server={0};Initial Catalog={1};User Id={2};Password={3};', needs.deploy.outputs.sqlServerFullyQualifiedDomainName, needs.deploy.outputs.sqlDatabaseName, inputs.sqlServerAdministratorLogin, secrets.sqlServerAdministratorLoginPassword) }} sql-file: 'deploy/sample-data/Toys.sql'请注意,“将测试数据添加到数据库”步骤应用了一个条件。 也就是说,它仅在非生产环境中运行。 该条件应用于此步骤,而不是整个作业,以便后续作业可以依赖于该作业,而不管环境类型如何。
在刚添加的作业下方和“版本验收-测试”作业上方,定义另一个作业以使用 Azure CLI 将一些示例玩具图像上传到 Blob 容器:
seed-storage-account: needs: deploy environment: ${{ inputs.environmentType }} runs-on: ubuntu-latest steps: - uses: actions/checkout@v3 - uses: azure/login@v1 name: Sign in to Azure with: client-id: ${{ secrets.AZURE_CLIENT_ID }} tenant-id: ${{ secrets.AZURE_TENANT_ID }} subscription-id: ${{ secrets.AZURE_SUBSCRIPTION_ID }} - if: inputs.environmentType != 'Production' uses: azure/CLI@v1 name: Upload sample images with: inlineScript: | az storage blob upload-batch \ --account-name ${{ needs.deploy.outputs.storageAccountName }} \ --destination ${{ needs.deploy.outputs.storageAccountImagesBlobContainerName }} \ --source 'deploy/sample-data/toyimages'请注意,此作业使用 Ubuntu 运行器,因为
azure/cli操作需要用 Linux 运行,但之前定义的build-database作业使用 Windows 运行器来生成数据库项目。 此工作流是使用各种操作系统来满足你的要求的一个很好的示例。
更新版本验收测试作业的依赖项
更新“版本验收-测试”作业的依赖项以确保它在所有部署步骤完成后运行:
smoke-test: runs-on: ubuntu-latest needs: - deploy - deploy-website - deploy-database - seed-database - seed-storage-account steps: - uses: actions/checkout@v3 - run: | $container = New-PesterContainer ` -Path 'deploy/Website.Tests.ps1' ` -Data @{ HostName = '${{needs.deploy.outputs.appServiceAppHostName}}' } Invoke-Pester ` -Container $container ` -CI name: Run smoke tests shell: pwsh保存对该文件所做的更改。
验证文件并提交更改
验证 main.bicep 文件是否如下所示:
@description('The location into which your Azure resources should be deployed.') param location string = resourceGroup().location @description('Select the type of environment you want to provision. Allowed values are Production and Test.') @allowed([ 'Production' 'Test' ]) param environmentType string @description('A unique suffix to add to resource names that need to be globally unique.') @maxLength(13) param resourceNameSuffix string = uniqueString(resourceGroup().id) @description('The URL to the product review API.') param reviewApiUrl string @secure() @description('The API key to use when accessing the product review API.') param reviewApiKey string @description('The administrator login username for the SQL server.') param sqlServerAdministratorLogin string @secure() @description('The administrator login password for the SQL server.') param sqlServerAdministratorLoginPassword string // Define the names for resources. var appServiceAppName = 'toy-website-${resourceNameSuffix}' var appServicePlanName = 'toy-website' var logAnalyticsWorkspaceName = 'workspace-${resourceNameSuffix}' var applicationInsightsName = 'toywebsite' var storageAccountName = 'mystorage${resourceNameSuffix}' var storageAccountImagesBlobContainerName = 'toyimages' var sqlServerName = 'toy-website-${resourceNameSuffix}' var sqlDatabaseName = 'Toys' // Define the connection string to access Azure SQL. var sqlDatabaseConnectionString = 'Server=tcp:${sqlServer.properties.fullyQualifiedDomainName},1433;Initial Catalog=${sqlDatabase.name};Persist Security Info=False;User ID=${sqlServerAdministratorLogin};Password=${sqlServerAdministratorLoginPassword};MultipleActiveResultSets=False;Encrypt=True;TrustServerCertificate=False;Connection Timeout=30;' // Define the SKUs for each component based on the environment type. var environmentConfigurationMap = { Production: { appServicePlan: { sku: { name: 'S1' capacity: 1 } } storageAccount: { sku: { name: 'Standard_LRS' } } sqlDatabase: { sku: { name: 'Standard' tier: 'Standard' } } } Test: { appServicePlan: { sku: { name: 'F1' } } storageAccount: { sku: { name: 'Standard_GRS' } } sqlDatabase: { sku: { name: 'Standard' tier: 'Standard' } } } } resource appServicePlan 'Microsoft.Web/serverfarms@2022-03-01' = { name: appServicePlanName location: location sku: environmentConfigurationMap[environmentType].appServicePlan.sku } resource appServiceApp 'Microsoft.Web/sites@2022-03-01' = { name: appServiceAppName location: location properties: { serverFarmId: appServicePlan.id httpsOnly: true siteConfig: { appSettings: [ { name: 'APPINSIGHTS_INSTRUMENTATIONKEY' value: applicationInsights.properties.InstrumentationKey } { name: 'APPLICATIONINSIGHTS_CONNECTION_STRING' value: applicationInsights.properties.ConnectionString } { name: 'ReviewApiUrl' value: reviewApiUrl } { name: 'ReviewApiKey' value: reviewApiKey } { name: 'StorageAccountName' value: storageAccount.name } { name: 'StorageAccountBlobEndpoint' value: storageAccount.properties.primaryEndpoints.blob } { name: 'StorageAccountImagesContainerName' value: storageAccount::blobService::storageAccountImagesBlobContainer.name } { name: 'SqlDatabaseConnectionString' value: sqlDatabaseConnectionString } ] } } } resource logAnalyticsWorkspace 'Microsoft.OperationalInsights/workspaces@2022-10-01' = { name: logAnalyticsWorkspaceName location: location } resource applicationInsights 'Microsoft.Insights/components@2020-02-02' = { name: applicationInsightsName location: location kind: 'web' properties: { Application_Type: 'web' Request_Source: 'rest' Flow_Type: 'Bluefield' WorkspaceResourceId: logAnalyticsWorkspace.id } } resource storageAccount 'Microsoft.Storage/storageAccounts@2022-09-01' = { name: storageAccountName location: location kind: 'StorageV2' sku: environmentConfigurationMap[environmentType].storageAccount.sku resource blobService 'blobServices' = { name: 'default' resource storageAccountImagesBlobContainer 'containers' = { name: storageAccountImagesBlobContainerName properties: { publicAccess: 'Blob' } } } } resource sqlServer 'Microsoft.Sql/servers@2022-05-01-preview' = { name: sqlServerName location: location properties: { administratorLogin: sqlServerAdministratorLogin administratorLoginPassword: sqlServerAdministratorLoginPassword } } resource sqlServerFirewallRule 'Microsoft.Sql/servers/firewallRules@2022-05-01-preview' = { parent: sqlServer name: 'AllowAllWindowsAzureIps' properties: { endIpAddress: '0.0.0.0' startIpAddress: '0.0.0.0' } } resource sqlDatabase 'Microsoft.Sql/servers/databases@2022-05-01-preview' = { parent: sqlServer name: sqlDatabaseName location: location sku: environmentConfigurationMap[environmentType].sqlDatabase.sku } output appServiceAppName string = appServiceApp.name output appServiceAppHostName string = appServiceApp.properties.defaultHostName output storageAccountName string = storageAccount.name output storageAccountImagesBlobContainerName string = storageAccount::blobService::storageAccountImagesBlobContainer.name output sqlServerFullyQualifiedDomainName string = sqlServer.properties.fullyQualifiedDomainName output sqlDatabaseName string = sqlDatabase.name如果不是,则对其进行更新以匹配文件内容。
验证 deploy.yml 文件是否如下所示:
name: deploy on: workflow_call: inputs: environmentType: required: true type: string resourceGroupName: required: true type: string reviewApiUrl: required: true type: string sqlServerAdministratorLogin: required: true type: string secrets: AZURE_CLIENT_ID: required: true AZURE_TENANT_ID: required: true AZURE_SUBSCRIPTION_ID: required: true reviewApiKey: required: true sqlServerAdministratorLoginPassword: required: true jobs: validate: runs-on: ubuntu-latest steps: - uses: actions/checkout@v3 - uses: azure/login@v1 name: Sign in to Azure with: client-id: ${{ secrets.AZURE_CLIENT_ID }} tenant-id: ${{ secrets.AZURE_TENANT_ID }} subscription-id: ${{ secrets.AZURE_SUBSCRIPTION_ID }} - if: inputs.environmentType != 'Production' uses: azure/arm-deploy@v1 name: Run preflight validation with: deploymentName: ${{ github.run_number }} resourceGroupName: ${{ inputs.resourceGroupName }} template: ./deploy/main.bicep parameters: > environmentType=${{ inputs.environmentType }} reviewApiUrl=${{ inputs.reviewApiUrl }} reviewApiKey=${{ secrets.reviewApiKey }} sqlServerAdministratorLogin=${{ inputs.sqlServerAdministratorLogin }} sqlServerAdministratorLoginPassword=${{ secrets.sqlServerAdministratorLoginPassword }} deploymentMode: Validate - if: inputs.environmentType == 'Production' uses: azure/arm-deploy@v1 name: Run what-if with: failOnStdErr: false resourceGroupName: ${{ inputs.resourceGroupName }} template: ./deploy/main.bicep parameters: > environmentType=${{ inputs.environmentType }} reviewApiUrl=${{ inputs.reviewApiUrl }} reviewApiKey=${{ secrets.reviewApiKey }} sqlServerAdministratorLogin=${{ inputs.sqlServerAdministratorLogin }} sqlServerAdministratorLoginPassword=${{ secrets.sqlServerAdministratorLoginPassword }} additionalArguments: --what-if deploy: needs: validate environment: ${{ inputs.environmentType }} runs-on: ubuntu-latest outputs: appServiceAppName: ${{ steps.deploy.outputs.appServiceAppName }} appServiceAppHostName: ${{ steps.deploy.outputs.appServiceAppHostName }} storageAccountName: ${{ steps.deploy.outputs.storageAccountName }} storageAccountImagesBlobContainerName: ${{ steps.deploy.outputs.storageAccountImagesBlobContainerName }} sqlServerFullyQualifiedDomainName: ${{ steps.deploy.outputs.sqlServerFullyQualifiedDomainName }} sqlDatabaseName: ${{ steps.deploy.outputs.sqlDatabaseName }} steps: - uses: actions/checkout@v3 - uses: azure/login@v1 name: Sign in to Azure with: client-id: ${{ secrets.AZURE_CLIENT_ID }} tenant-id: ${{ secrets.AZURE_TENANT_ID }} subscription-id: ${{ secrets.AZURE_SUBSCRIPTION_ID }} - uses: azure/arm-deploy@v1 id: deploy name: Deploy Bicep file with: failOnStdErr: false deploymentName: ${{ github.run_number }} resourceGroupName: ${{ inputs.resourceGroupName }} template: ./deploy/main.bicep parameters: > environmentType=${{ inputs.environmentType }} reviewApiUrl=${{ inputs.reviewApiUrl }} reviewApiKey=${{ secrets.reviewApiKey }} sqlServerAdministratorLogin=${{ inputs.sqlServerAdministratorLogin }} sqlServerAdministratorLoginPassword=${{ secrets.sqlServerAdministratorLoginPassword }} deploy-website: needs: deploy environment: ${{ inputs.environmentType }} runs-on: ubuntu-latest steps: - uses: actions/download-artifact@v3 - uses: azure/login@v1 name: Sign in to Azure with: client-id: ${{ secrets.AZURE_CLIENT_ID }} tenant-id: ${{ secrets.AZURE_TENANT_ID }} subscription-id: ${{ secrets.AZURE_SUBSCRIPTION_ID }} - uses: azure/webapps-deploy@v2 name: Deploy website with: app-name: ${{ needs.deploy.outputs.appServiceAppName }} package: website/publish.zip deploy-database: needs: deploy environment: ${{ inputs.environmentType }} runs-on: ubuntu-latest steps: - uses: actions/download-artifact@v3 - uses: azure/login@v1 name: Sign in to Azure with: client-id: ${{ secrets.AZURE_CLIENT_ID }} tenant-id: ${{ secrets.AZURE_TENANT_ID }} subscription-id: ${{ secrets.AZURE_SUBSCRIPTION_ID }} - uses: azure/sql-action@v1.2 name: Deploy DACPAC to database with: server-name: ${{ needs.deploy.outputs.sqlServerFullyQualifiedDomainName }} connection-string: ${{ format('Server={0};Initial Catalog={1};User Id={2};Password={3};', needs.deploy.outputs.sqlServerFullyQualifiedDomainName, needs.deploy.outputs.sqlDatabaseName, inputs.sqlServerAdministratorLogin, secrets.sqlServerAdministratorLoginPassword) }} dacpac-package: database/ToyCompany.Database.dacpac seed-database: needs: - deploy - deploy-database environment: ${{ inputs.environmentType }} runs-on: ubuntu-latest steps: - uses: actions/checkout@v3 - uses: azure/login@v1 name: Sign in to Azure with: client-id: ${{ secrets.AZURE_CLIENT_ID }} tenant-id: ${{ secrets.AZURE_TENANT_ID }} subscription-id: ${{ secrets.AZURE_SUBSCRIPTION_ID }} - if: inputs.environmentType != 'Production' uses: azure/sql-action@v1.2 name: Add test data to database with: server-name: ${{ needs.deploy.outputs.sqlServerFullyQualifiedDomainName }} connection-string: ${{ format('Server={0};Initial Catalog={1};User Id={2};Password={3};', needs.deploy.outputs.sqlServerFullyQualifiedDomainName, needs.deploy.outputs.sqlDatabaseName, inputs.sqlServerAdministratorLogin, secrets.sqlServerAdministratorLoginPassword) }} sql-file: 'deploy/sample-data/Toys.sql' seed-storage-account: needs: deploy environment: ${{ inputs.environmentType }} runs-on: ubuntu-latest steps: - uses: actions/checkout@v3 - uses: azure/login@v1 name: Sign in to Azure with: client-id: ${{ secrets.AZURE_CLIENT_ID }} tenant-id: ${{ secrets.AZURE_TENANT_ID }} subscription-id: ${{ secrets.AZURE_SUBSCRIPTION_ID }} - if: inputs.environmentType != 'Production' uses: azure/CLI@v1 name: Upload sample images with: inlineScript: | az storage blob upload-batch \ --account-name ${{ needs.deploy.outputs.storageAccountName }} \ --destination ${{ needs.deploy.outputs.storageAccountImagesBlobContainerName }} \ --source 'deploy/sample-data/toyimages' smoke-test: runs-on: ubuntu-latest needs: - deploy - deploy-website - deploy-database - seed-database - seed-storage-account steps: - uses: actions/checkout@v3 - run: | $container = New-PesterContainer ` -Path 'deploy/Website.Tests.ps1' ` -Data @{ HostName = '${{needs.deploy.outputs.appServiceAppHostName}}' } Invoke-Pester ` -Container $container ` -CI name: Run smoke tests shell: pwsh如果不是,则对其进行更新以匹配文件内容。
保存对该文件所做的更改。
提交所做的更改并将其推送到 Git 存储库。 在 Visual Studio Code 终端中,运行以下命令:
git add .
git commit -m "Add SQL database"
git push
运行工作流
在浏览器中,转到你的工作流运行。
选择最近的运行。
等待测试环境的所有作业都成功完成。 请注意,版本验收测试现在也成功了。
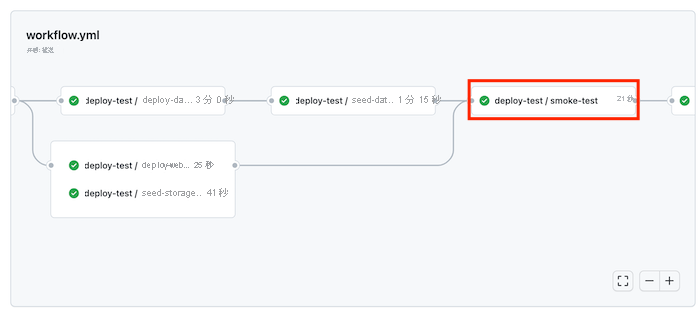
等待工作流成功完成,包括生产部署。
查看网站
选择“部署-测试/部署-网站”作业以打开工作流日志。
选择“部署网站”步骤。
按住 Ctrl 键(在 macOS 上为 ⌘),并选择应用服务应用的 URL 以在新的浏览器标签页中打开它。
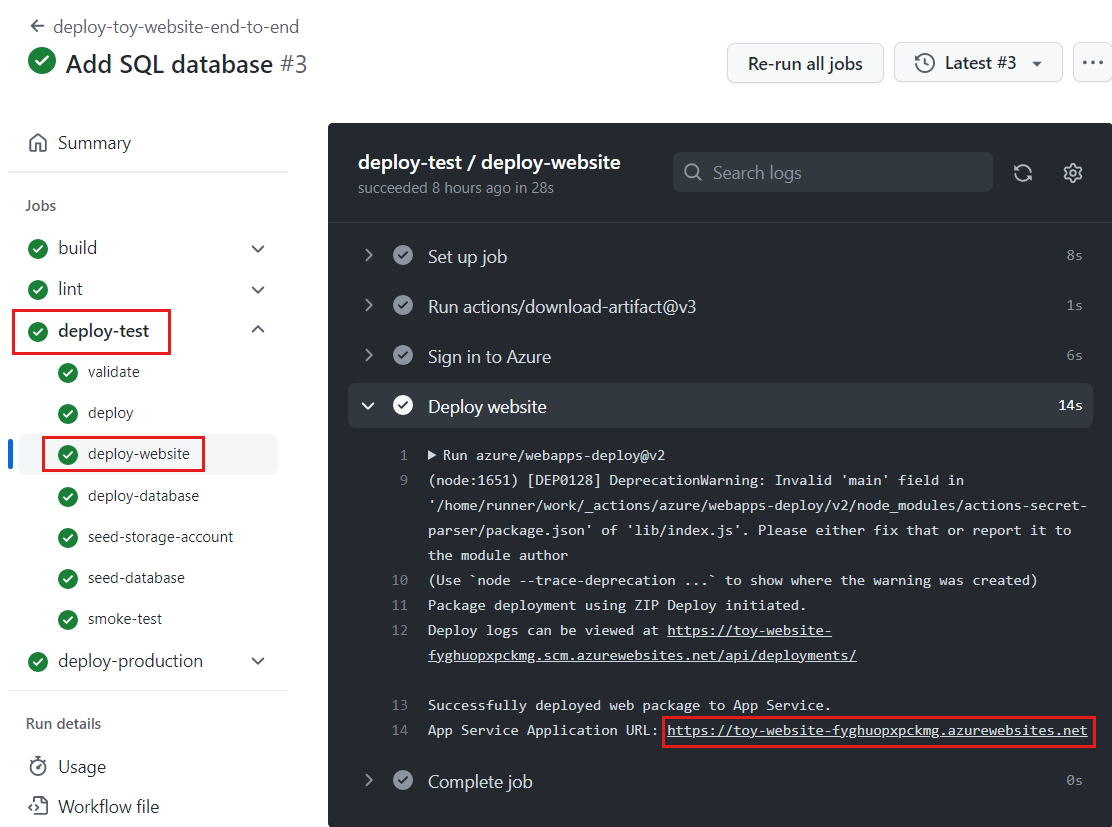
选择“玩具”。

请注意,示例数据显示在测试环境中。
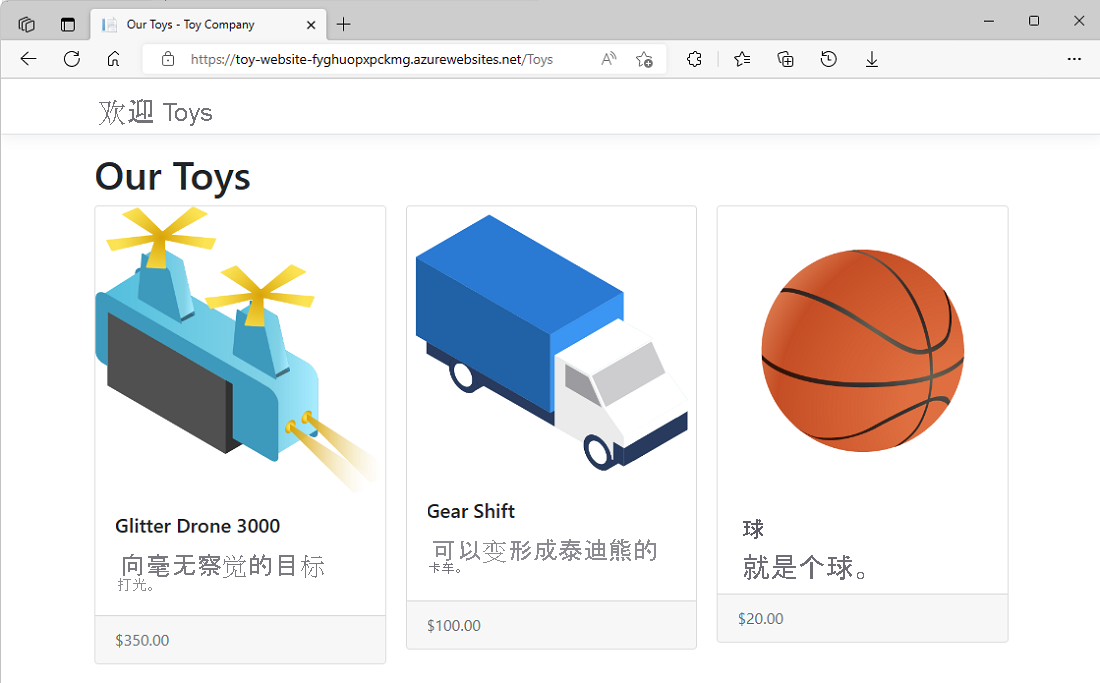
对“部署-生产/部署-网站”作业的应用重复上述过程。
请注意,生产环境中未显示任何示例数据。

清理资源
现在你已完成练习,可以删除 Azure 资源,以便不再为这些资源付费。
在 Visual Studio Code 终端中,运行以下命令:
az group delete --resource-group ToyWebsiteTest --yes --no-wait
az group delete --resource-group ToyWebsiteProduction --yes --no-wait
资源组将在后台删除。
Remove-AzResourceGroup -Name ToyWebsiteTest -Force
Remove-AzResourceGroup -Name ToyWebsiteProduction -Force