练习 - 将文件提交到存储库并查看其历史记录
在上一练习中,你为玩具公司的网站初始化了 Git 存储库。 你添加了 Bicep 文件,但没有提交该文件。
通过学习本练习,你将能够:
- 提交在上一练习中创建的文件。
- 添加新的 Bicep 模块,然后使用 Git 比较 Bicep 代码中的差异。
- 提交更新后的 Bicep 代码。
- 查看提交历史记录和主 Bicep 文件的历史记录。
对 Bicep 代码进行更多更改的过程将展示 Git 和 Visual Studio Code 如何帮助你跟踪和管理更改。
使用 Git CLI 提交 Bicep 文件
使用 Visual Studio Code 终端,运行以下命令来暂存“main.bicep”文件:
git add deploy/main.bicep运行以下命令来提交暂存更改并提供提交消息:
git commit --message "Add first version of Bicep template"
添加 Bicep 模块
在这里,你需要添加 Bicep 模块,然后从 main.bicep 文件引用它。
在“deploy”文件夹中 ,创建名为“modules”的子文件夹。
在“modules”文件夹中,创建一个名为“app-service.bicep”的新文件。
打开并保存空白的 app-service.bicep 文件,以便 Visual Studio Code 加载 Bicep 工具。
将以下代码复制到 app-service.bicep 中:
@description('The Azure region into which the resources should be deployed.')
param location string

@description('The type of environment. This must be nonprod or prod.')
@allowed([
  'nonprod'
  'prod'
])
param environmentType string

@description('The name of the App Service app. This name must be globally unique.')
param appServiceAppName string

var appServicePlanName = 'toy-website-plan'
var appServicePlanSkuName = (environmentType == 'prod') ? 'P2v3' : 'F1'
var appServicePlanTierName = (environmentType == 'prod') ? 'PremiumV3' : 'Free'

resource appServicePlan 'Microsoft.Web/serverfarms@2024-04-01' = {
  name: appServicePlanName
  location: location
  sku: {
    name: appServicePlanSkuName
    tier: appServicePlanTierName
  }
}

resource appServiceApp 'Microsoft.Web/sites@2024-04-01' = {
  name: appServiceAppName
  location: location
  properties: {
    serverFarmId: appServicePlan.id
    httpsOnly: true
  }
}
保存并关闭 app-service.bicep 文件。
打开 main.bicep 文件。
在参数声明下方,添加以下参数声明和模块定义:
@description('The name of the App Service app. This name must be globally unique.')
param appServiceAppName string = 'toyweb-${uniqueString(resourceGroup().id)}'

module appService 'modules/app-service.bicep' = {
  name: 'app-service'
  params: {
    location: location
    environmentType: environmentType
    appServiceAppName: appServiceAppName
  }
}
保存并关闭 main.bicep 文件。
比较差异
现在,你已对 main.bicep 文件进行了更改,接下来我们来检查差异。 建议查看要暂存和提交的每个文件中的差异。 进行查看以验证更改是否正确。
在 Visual Studio Code 中,选择“查看”>“源代码管理”,或在键盘上选择 Ctrl+Shift+G。
在打开的“源代码管理”面板上,选择 main.bicep 文件。
显示文件差异的视图随即打开。
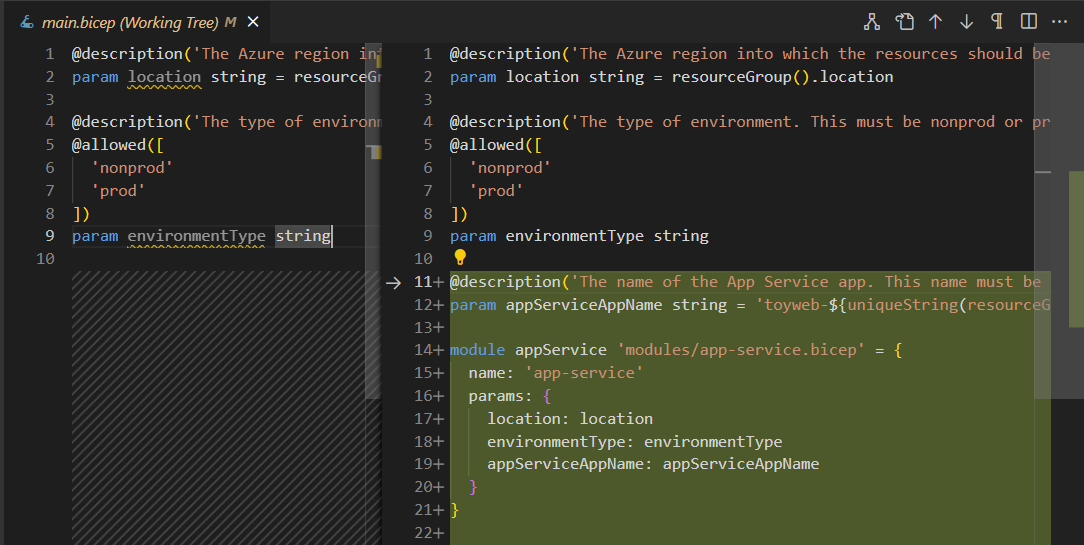
请注意,Visual Studio Code 会显示所做的更改。 原始文件位于左侧,更改后的文件位于右侧。 向文件添加的内容以绿色显示。 当编辑文件和删除内容时,删除内容以红色显示。
打开 app-service.bicep 文件的差异。
请注意,差异视图左侧没有显示任何内容,因为此文件是新建的,并且未添加到存储库中。
使用 Visual Studio Code 提交更新后的 Bicep 代码
查看更改并感到满意后,便可将更新提交到文件中。 这一次,你将使用 Visual Studio Code。
打开“源代码管理”。
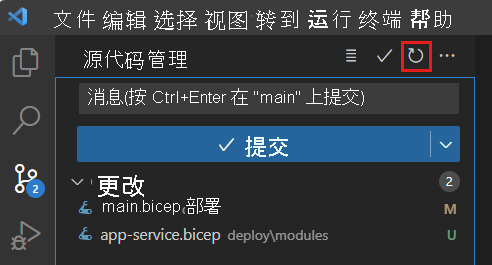
应会显示两个已更改的文件。 如果没有看到它们,请选择“刷新”按钮,以便 Visual Studio Code 扫描更改。
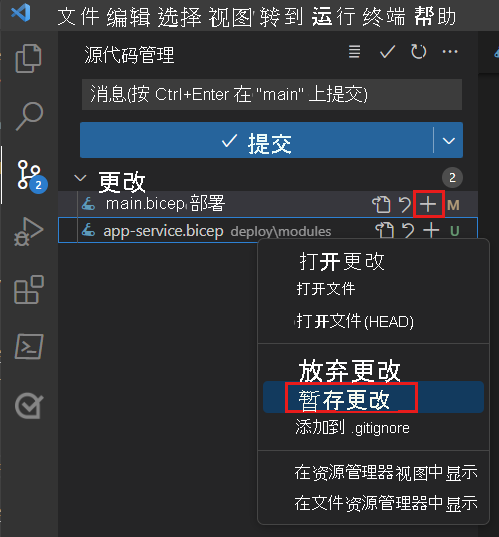
选择这两个已更改文件中的每个文件,然后进行暂存。 可以选择每个文件上的加号 (+) 图标,也可以选择并按住(或右键单击)每个文件,然后选择“暂存更改”。
在“源代码管理”顶部,输入描述性的提交消息,如下所示:
Add App Service module选择提交消息文本框上方的复选标记图标。 你也可以选择“提交”。
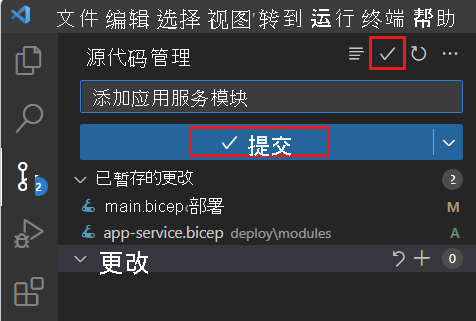
Visual Studio Code 会提交两项更改。
使用 Git CLI 查看提交历史记录
在 Visual Studio Code 终端中,输入以下命令以查看存储库的提交历史记录:
git log --pretty=oneline输出与以下示例类似:
238b0867f533e14bcaabbade31b9d9e1bda6123b (HEAD -> main) Add App Service module
9e41f816bf0f5c590cee88590aacc977f1361124 Add first version of Bicep template
检查输出。 请注意,这两个提交都会显示在提交历史记录中。
使用 Visual Studio Code 查看文件的历史记录
你还可以查看单个文件的历史记录、提交后文件的状态以及提交应用的更改。
在 Visual Studio Code 中,打开“资源管理器”。
选择并按住(或右键单击)main.bicep 文件,然后选择“打开时间线”。
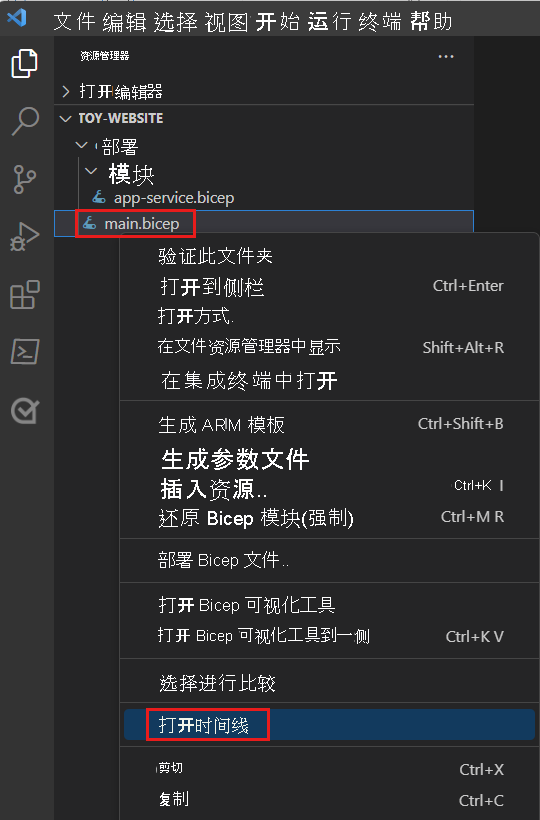
此时将打开时间线并显示这两个提交。

在列表中选择每个提交,以查看该时间点文件的状态。