使用 Azure Cosmos DB for MongoDB 创建帐户、数据库和集合
Azure Cosmos DB 是完全托管的平台即服务 (PaaS)。 若要使用此服务,首先需要在订阅下创建 Azure Cosmos DB 帐户。 创建帐户后,我们就可以在其中添加数据库、集合和文档。
我们将介绍几种创建不同 Azure Cosmos DB for MongoDB 模型元素的方法。
使用 Azure 门户为 Azure Cosmos DB for MongoDB 创建帐户、数据库和容器
创建 Azure Cosmos DB 帐户及其元素的一种方法是使用Azure 门户。 在此示例中,将使用 Azure Cosmos DB for MongoDB 通过 Azure 门户创建 Azure Cosmos DB 帐户。 然后,将添加数据库和集合。 目前,不用考虑填写更高级的设置,将在后面的模块中详细介绍这些设置。 对于此示例,只需查看“基本信息”选项卡。让我们创建帐户及其元素。
为 Azure Cosmos DB for MongoDB 创建帐户
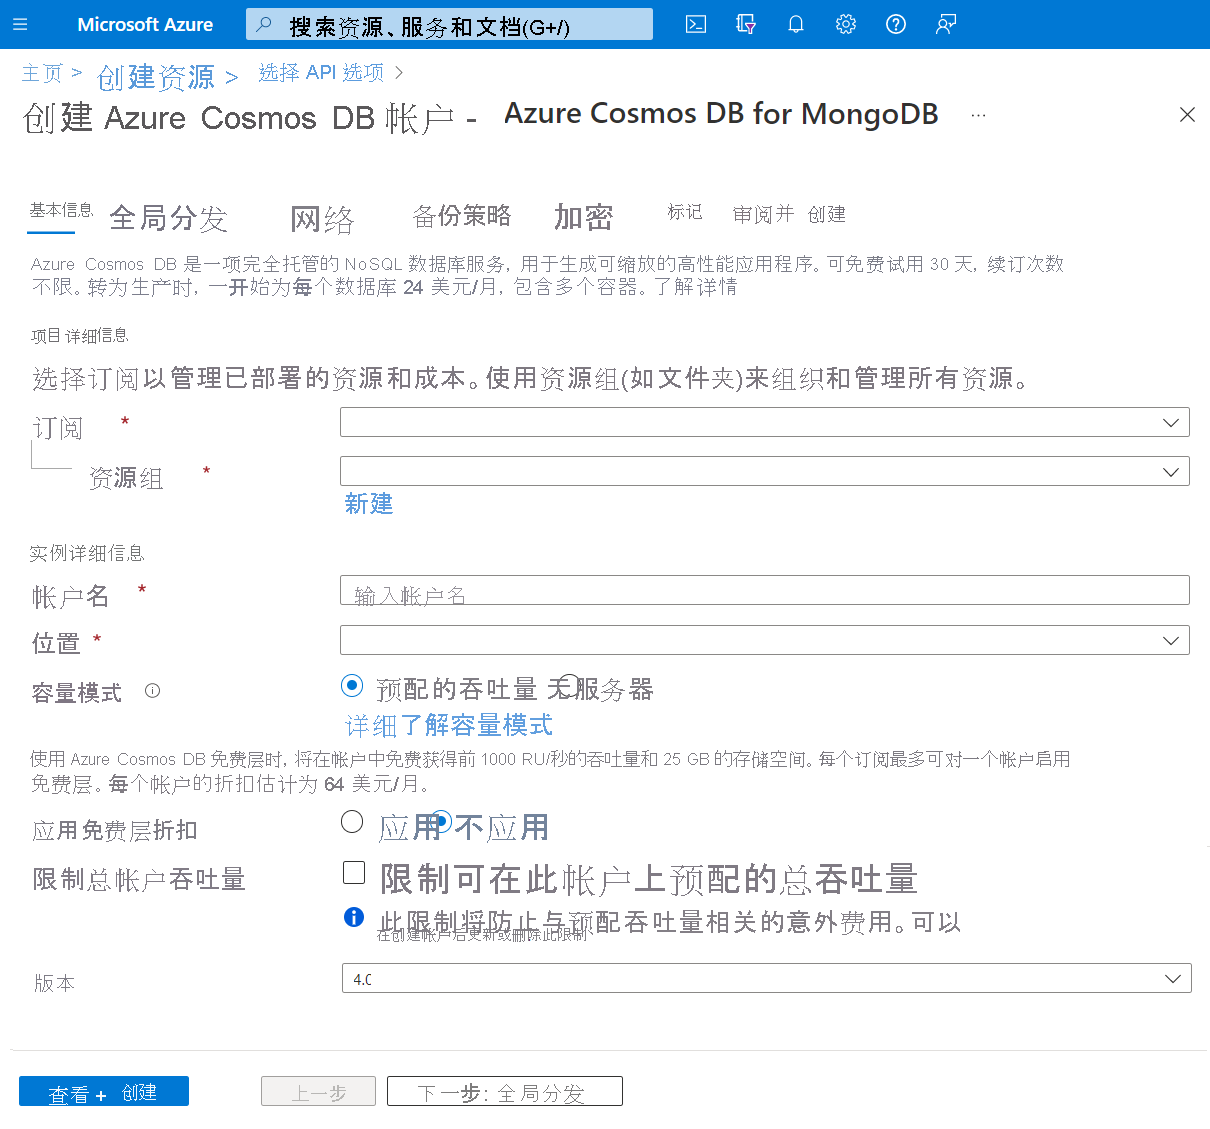
在 Azure 门户中,依次选择“+ 创建资源”、“Azure Cosmos DB”和“创建”。
选择“Azure Cosmos DB for MongoDB”。
输入以下参数。
- 订阅 - 目前的 Azure 订阅。
- 资源组 - 用于创建 Azure Cosmos DB 帐户的新 Azure 资源组或现有 Azure 资源组。
- 帐户名称 - Azure Cosmos DB 帐户的唯一名称。 该名称在整个 Azure 中必须唯一。 帐户 URI 已将 mongo.cosmos.azure.com 追加到帐户名称。
- 位置 - 用于托管 Azure Cosmos DB 帐户的地理位置。 通常应选择靠近用户或应用程序的位置。
- 容量模式 - 如上一单元中所述,可以为帐户选择使用“预配的吞吐量”或“无服务器”。 对于此示例,选择“预配的吞吐量”。
- 应用免费分级折扣 - 对于此示例,选择“不应用”。
- 限制帐户总吞吐量 - 对于此示例,保留“未选中”状态。
- 版本 - 选择 4.0。
注意
为了更好地利用支持的功能,建议尽可能使用 3.6+ 版本。
选择“查看 + 创建”,并在成功验证时选择“创建”。
注意
创建 Azure Cosmos DB 帐户可能需要几分钟的时间。
为 Azure Cosmos DB for MongoDB 创建数据库和容器
在 Azure 门户中创建数据库和容器非常简单,首先创建一个数据库。
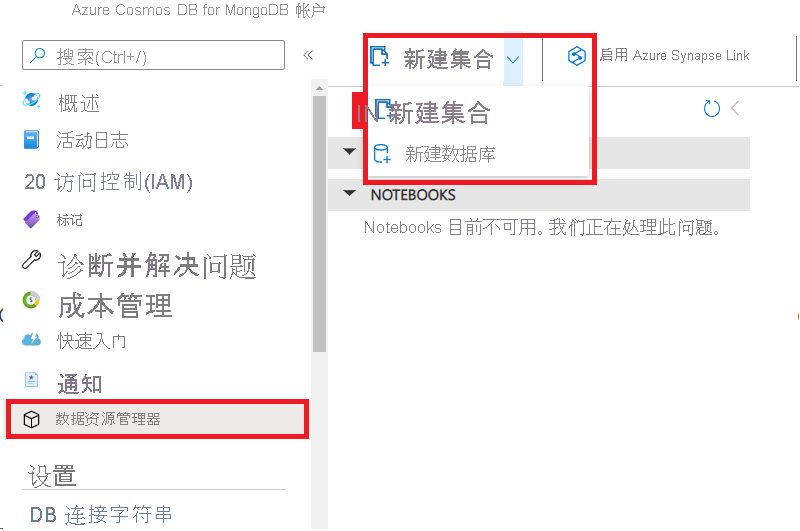
在 Azure Cosmos DB for MongoDB 帐户左侧菜单中,选择“数据资源管理器”。
选择“新建集合”图标右侧的下拉菜单,然后选择“新建数据库”。
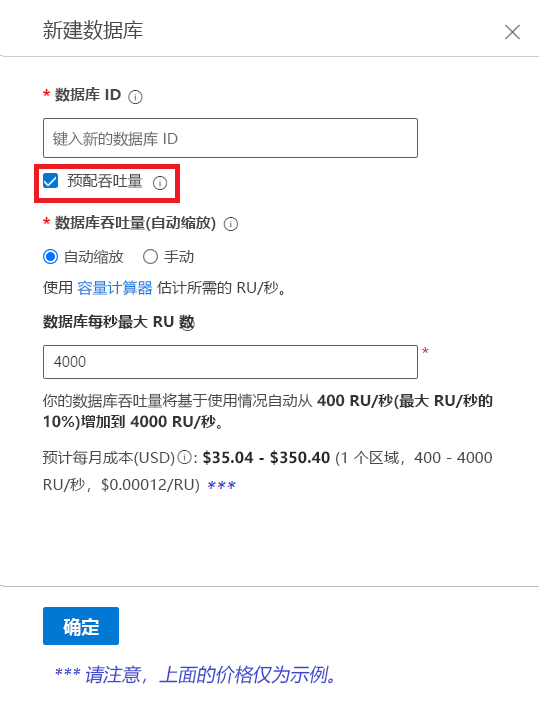
在“数据库 ID”文本框中为数据库提供新名称。
虽然我们可以在“新建数据库”对话框中定义“预配吞吐量”,但在大多数情况下会在容器级别选择预配吞吐量。 在本例中,取消选中“预配吞吐量”复选框,然后选择“确定”。
现在,应可看到 MONGO API 部分下的新数据库。 现在可以创建新集合了。
选择“新建集合”图标。
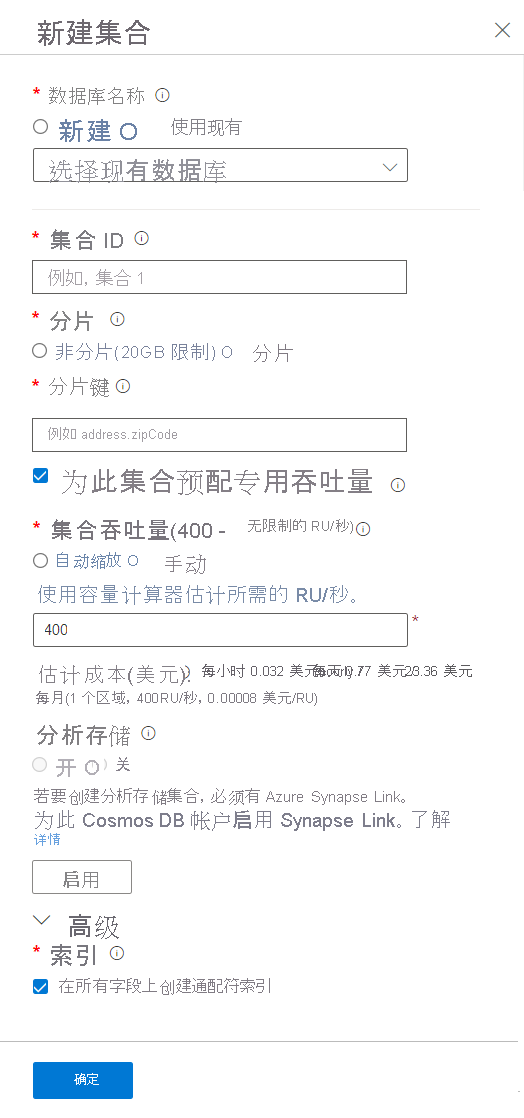
在“新建集合”对话框下输入以下参数。
- 数据库名称 - 你将注意到此处有两个选项:“新建”或“使用现有”。 使用此选项,可以在创建新集合时创建新数据库。 由于我们在前面的步骤中创建了一个新数据库,因此请选择“使用现有”,并从下拉选项中选择数据库名称。
- 集合 ID - 此参数是你为集合提供的名称。
- 分片 - 通常都会选择“分片”。 此选项支持 Azure Cosmos DB 基于“分片键”创建跨多个租户分片的容器。 利用大型容器,Azure Cosmos DB 可将租户分散在多个物理节点上,以实现高度缩放。 我们将在“设计”模块下更详细地讨论分片。 选择“分片”。
- 分片键 - 选择“分片”将需要添加“分片键”。 此键是定义分区策略的分区键。 例如,在 IOT(物联网)集合中,它可能是 /deviceid,也可能是 /region,具体取决于所选的分区策略。 我们将在“设计”模块下更详细地讨论分区策略。
- “为此集合预配专用吞吐量”复选框 - 通常需要将集合的吞吐量预配为“自动缩放”或“手动”。 通过此设置,可以更好地控制单个集合的成本。 我们将在“设计”模块中更详细地讨论吞吐量。 现在,选中复选框并选择“自动缩放”。
- “集合吞吐量”或“集合最大 RU/秒”- 根据是选择“手动”还是“自动缩放”,需要分别输入“集合吞吐量”或“集合最大 RU/秒”,换句话说就是吞吐量模式。 主要区别在于,手动模式将收取你所选择的 RU/秒的费用,无论是否使用它们。 自动缩放只收取你所选择的最大 RU/秒的费用。 无论哪种情况,集合都在吞吐量达到选定值时启动限制。 保留此示例的预定义值。
- 分析存储 - Azure Cosmos DB 分析存储超出了这些课程的范围。 有关该主题的详细信息,请查看什么是 Azure Cosmos DB 分析存储一文。
- 高级/索引 - 我们将在“设计”模块下更详细地讨论索引。 将该复选框保留为选中状态。
现在,我们应有了一个数据库和一个要连接到的集合。 在下一单元中,我们将详细介绍如何连接到 Azure Cosmos DB for MongoDB 帐户。 在此之前,来看一看创建 Azure Cosmos DB for MongoDB 数据库和集合的另一种方法。
创建或连接到 Azure Cosmos DB for MongoDB 数据库和集合
你应该能够使用 Java、Python、Node.js、.NET 或其他附带 MongoDB 驱动程序的编程语言创建或连接到 Azure Cosmos DB for MongoDB 帐户。 现在介绍一些用于使用不同语言创建这些元素的函数。 在本模块的开头,我们阐述了开发人员可以继续使用他们熟悉的 MongoDB 驱动程序、SDK 和工具来连接到 Azure Cosmos DB 并创建应用。我们使用这些驱动程序及其属性和方法,针对 Azure Cosmos DB for MongoDB 帐户对访问和操作进行编程。
创建或连接到 Azure Cosmos DB for MongoDB 的数据库
你可以使用最喜欢的开发工具创建 Azure Cosmos DB for MongoDB 应用程序。 我们使用每种编程语言的 MongoDB 驱动程序来创建数据库和集合。 现在查看用于连接到 Azure Cosmos DB for MongoDB 帐户并连接到“产品”数据库的代码。
Node.js
import { DefaultAzureCredential, ClientSecretCredential } from "@azure/identity";
const { MongoClient, ObjectId } = require('mongodb');
import axios from "axios";

async function main() {
  // Environment variables
  const endpoint = process.env.AZURE_COSMOS_RESOURCEENDPOINT;
  const listConnectionStringUrl = process.env.AZURE_COSMOS_LISTCONNECTIONSTRINGURL;
  const scope = process.env.AZURE_COSMOS_SCOPE;

  // Uncomment the corresponding lines for the authentication type you want to use.
  // For system-assigned managed identity.
  // const credential = new DefaultAzureCredential();

  // For user-assigned managed identity.
  // const clientId = process.env.AZURE_COSMOS_CLIENTID;
  // const credential = new DefaultAzureCredential({
  //     managedIdentityClientId: clientId
  // });

  // For service principal.
  // const tenantId = process.env.AZURE_COSMOS_TENANTID;
  // const clientId = process.env.AZURE_COSMOS_CLIENTID;
  // const clientSecret = process.env.AZURE_COSMOS_CLIENTSECRET;
  // const credential = new ClientSecretCredential(tenantId, clientId, clientSecret);

  // Acquire the access token
  const accessToken = await credential.getToken(scope);

  // Get the connection string
  const config = {
    method: 'post',
    url: listConnectionStringUrl,
    headers: {
        'Authorization': 'Bearer ${accessToken.token}'
    }
  };
  const response = await axios(config);
  const keysDict = response.data;
  const connectionString = keysDict['connectionStrings'][0]['connectionString'];

  // Connect to Azure Cosmos DB for MongoDB
  const client = new MongoClient(connectionString);

  try {
    // Open the connection
    await client.connect();

    // Connect to the database "products"
    const ProductDatabase = client.db('products');

    // Add code to connect to a collection and add an entry here
  } catch (err) {
    console.error("An error occurred:", err);
  } finally {
    // Close the connection
    await client.close();
  }
}

main().catch((err) => console.error("Unhandled error:", err));
Java
package com.fabrikam;

import com.mongodb.MongoClient;
import com.mongodb.MongoClientURI;
import com.mongodb.client.MongoCollection;
import com.mongodb.client.MongoDatabase;
import com.mongodb.client.model.Filters;
import javax.net.ssl.*;
import java.net.InetSocketAddress;
import com.azure.identity.*;
import com.azure.core.credential.*;
import java.net.http.*;
import java.net.URI;

public class App {
  public static void main(String[] args) {
    // Environment variables
    String endpoint = System.getenv("AZURE_COSMOS_RESOURCEENDPOINT");
    String listConnectionStringUrl = System.getenv("AZURE_COSMOS_LISTCONNECTIONSTRINGURL");
    String scope = System.getenv("AZURE_COSMOS_SCOPE");

    // Uncomment the corresponding lines for the authentication type you want to use.
    // For system-assigned managed identity.
    // DefaultAzureCredential defaultCredential = new DefaultAzureCredentialBuilder().build();

    // For user-assigned managed identity.
    // DefaultAzureCredential defaultCredential = new DefaultAzureCredentialBuilder()
    //     .managedIdentityClientId(System.getenv("AZURE_COSMOS_CLIENTID"))
    //     .build();

    // For service principal.
    // ClientSecretCredential defaultCredential = new ClientSecretCredentialBuilder()
    //     .clientId(System.getenv("AZURE_COSMOS_CLIENTID"))
    //     .clientSecret(System.getenv("AZURE_COSMOS_CLIENTSECRET"))
    //     .tenantId(System.getenv("AZURE_COSMOS_TENANTID"))
    //     .build();

    MongoClient mongoClient = null;

    try {
      // Acquire the access token
      AccessToken accessToken = defaultCredential
          .getToken(new TokenRequestContext().addScopes(scope))
          .block();
      String token = accessToken.getToken();

      // Retrieve the connection string
      HttpClient client = HttpClient.newBuilder().build();
      HttpRequest request = HttpRequest.newBuilder()
          .uri(new URI(listConnectionStringUrl))
          .header("Authorization", "Bearer " + token)
          .POST(HttpRequest.BodyPublishers.noBody())
          .build();
      HttpResponse<String> response = client.send(request, HttpResponse.BodyHandlers.ofString());

      JSONParser parser = new JSONParser();
      JSONObject responseBody = parser.parse(response.body());
      List<Map<String, String>> connectionStrings = responseBody.get("connectionStrings");
      String connectionString = connectionStrings.get(0).get("connectionString");

      // Connect to Azure Cosmos DB for MongoDB
      MongoClientURI uri = new MongoClientURI(connectionString);
      mongoClient = new MongoClient(uri);

      // Connect to the database
      MongoDatabase ProductDatabase = mongoClient.getDatabase("products");

      // Add code to connect to a collection and add an entry here

    } catch (Exception e) {
      e.printStackTrace();
    } finally {
      if (mongoClient != null) {
        mongoClient.close();
      }
    }
  }
}
Python
import os
import pymongo
import requests
from azure.identity import ManagedIdentityCredential, ClientSecretCredential

# Environment variables
endpoint = os.getenv('AZURE_COSMOS_RESOURCEENDPOINT')
listConnectionStringUrl = os.getenv('AZURE_COSMOS_LISTCONNECTIONSTRINGURL')
scope = os.getenv('AZURE_COSMOS_SCOPE')

# Uncomment the following lines corresponding to the authentication type you want to use.
# For system-assigned managed identity
# cred = ManagedIdentityCredential()

# For user-assigned managed identity
# managed_identity_client_id = os.getenv('AZURE_COSMOS_CLIENTID')
# cred = ManagedIdentityCredential(client_id=managed_identity_client_id)

# For service principal
# tenant_id = os.getenv('AZURE_COSMOS_TENANTID')
# client_id = os.getenv('AZURE_COSMOS_CLIENTID')
# client_secret = os.getenv('AZURE_COSMOS_CLIENTSECRET')
# cred = ClientSecretCredential(tenant_id=tenant_id, client_id=client_id, client_secret=client_secret)

# Get the connection string
session = requests.Session()
token = cred.get_token(scope)
response = session.post(listConnectionStringUrl, headers={"Authorization": "Bearer {}".format(token.token)})
keys_dict = response.json()
conn_str = keys_dict["connectionStrings"][0]["connectionString"]

# Connect to Azure Cosmos DB for MongoDB
client = pymongo.MongoClient(conn_str)

# To connect to the database, use the connection variable ("client" in this case), and the database name
ProductDatabase = client["products"]

# Add code to connect to a collection and add an entry here
C#
using MongoDB.Driver;
using Azure.Identity;
using Azure.Core;
using System;
using System.Net.Http;
using System.Text.Json;
using System.Collections.Generic;
using System.Threading.Tasks;

public class Products
{
  public int ProductId { get; set; }
  public string name { get; set; }
}

class test
{
  public static async Task Main(string[] args)
  {
      // Environment variables
      var endpoint = Environment.GetEnvironmentVariable("AZURE_COSMOS_RESOURCEENDPOINT");
      var listConnectionStringUrl = Environment.GetEnvironmentVariable("AZURE_COSMOS_LISTCONNECTIONSTRINGURL");
      var scope = Environment.GetEnvironmentVariable("AZURE_COSMOS_SCOPE");

      // Uncomment the corresponding lines for the authentication type you want to use.
      // For system-assigned identity.
      // var tokenProvider = new DefaultAzureCredential();

      // For user-assigned identity.
      // var tokenProvider = new DefaultAzureCredential(
      //     new DefaultAzureCredentialOptions
      //     {
      //         ManagedIdentityClientId = Environment.GetEnvironmentVariable("AZURE_COSMOS_CLIENTID")
      //     });

      // For service principal.
      // var tenantId = Environment.GetEnvironmentVariable("AZURE_COSMOS_TENANTID");
      // var clientId = Environment.GetEnvironmentVariable("AZURE_COSMOS_CLIENTID");
      // var clientSecret = Environment.GetEnvironmentVariable("AZURE_COSMOS_CLIENTSECRET");
      // var tokenProvider = new ClientSecretCredential(tenantId, clientId, clientSecret);

      // Acquire the access token.
      AccessToken accessToken = await tokenProvider.GetTokenAsync(
          new TokenRequestContext(scopes: new[] { scope }));

      // Get the connection string.
      using var httpClient = new HttpClient();
      httpClient.DefaultRequestHeaders.Add("Authorization", $"Bearer {accessToken.Token}");
      var response = await httpClient.PostAsync(listConnectionStringUrl, null);
      response.EnsureSuccessStatusCode();
      var responseBody = await response.Content.ReadAsStringAsync();

      // Parse the connection string.
      var connectionStrings = JsonSerializer.Deserialize<Dictionary<string, List<Dictionary<string, string>>>>(responseBody);
      string connectionString = connectionStrings["connectionStrings"][0]["connectionString"];

      // Initialize the MongoClient with the connection string.
      var mongoClient = new MongoClient(connectionString);

      // Connect to the "products" database.
      var ProductDatabase = mongoClient.GetDatabase("products");

      // Add code to connect to a collection and add an entry here.
  }
}
代码很简单,使用驱动程序进行连接后,要么创建新的数据库,要么使用 GetDatabase 或类似方法指向现有数据库,具体取决于语言。 应用程序现在可以使用 ProductDatabase 变量来引用所需的数据库。 创建或连接到集合与创建新数据库一样简单。
创建 Azure Cosmos DB for MongoDB 的集合
若要创建或访问现有集合,我们将根据编程语言使用 get 集合方法或引用。 让我们在前面的示例中添加一些代码,以创建/连接到集合,并在该集合中添加一个条目。
Node.js
          // Add code to connect to a collection and add and find an entry here
          var collection = ProductDatabase.collection('documents');
          var insertResult = await collection.insertOne({ ProductId: 1, name: "bread" });

          // return data where ProductId = 1
          const findProduct = await collection.find({ProductId: 1});
          await findProduct.forEach(console.log);
Java
          // Add code to connect to a collection and add and find an entry here
          MongoCollection collection = ProductDatabase.getCollection("products");

          collection.insertOne(new Document()
                      .append("ProductId", 1)
                      .append("name", "bread"));

          // return data where ProductId = 1
          Document findProduct = (Document) collection.find(eq("ProductId", 1)).first();
          System.out.println(findProduct.toJson());
Python
# Add code to connect to a collection and add an entry here
collection = ProductDatabase["products"]
collection.insert_one({ "ProductId": 1, "name": "bread" })
C#
    // Add code to connect to a collection and add an entry here
    var ProductCollection = ProductDatabase.GetCollection<Products>("products");

    Products Product = new Products {ProductId=1,name="bread"};
    ProductCollection.InsertOne (Product);
在下一单元中,我们将了解如何创建连接字符串。
使用 MongoDB 扩展命令管理 Azure Cosmos DB 的 MongoDB API 中存储的数据
如前文所述,Azure Cosmos DB for MongoDB 使我们能够使用在 MongoDB 服务器中访问和创建 Azure Cosmos DB 帐户的对象时使用的驱动程序和代码。 但是,使用该代码创建数据库和集合将使用默认的 Azure Cosmos DB 创建参数。 若要利用 Azure Cosmos DB 功能,我们需要能够控制数据库和集合创建参数,例如吞吐量、自动缩放、分配分片键和定义索引。 Azure Cosmos DB for MongoDB 使我们能够通过使用扩展命令定义这些参数来实现此目的。 这些命令支持编写有关如何专门为 Azure Cosmos DB 创建或修改数据库和集合的更精确的指令。
Azure Cosmos DB for MongoDB 为以下请求类型提供扩展命令:
- 创建数据库
- 更新数据库
- 获取数据库
- 创建集合
- 更新集合
- 获取集合
MongoDB 驱动程序提供一个针对数据库运行命令的函数,我们将使用此函数向 Azure Cosmos DB 发送扩展命令。 让我们看一下创建吞吐量为 2000 RU(请求单位)以及分片键为 DeviceId 的“IoT 设备”集合的代码。
Node.js
    // create the Devices collection with a throughput of 2000 RUs and with DeviceId as the sharding key
    var result = IOTDatabase.command({customAction: "CreateCollection", collection: "Devices", offerThroughput: 2000, shardKey: "DeviceId"});
Java
      // create the Devices collection with a throughput of 2000 RUs and with DeviceId as the sharding key
      Document DevCollectionDef = new Document();
      DevCollectionDef.append("customAction", "CreateCollection");
      DevCollectionDef.append("collection", "Devices");
      DevCollectionDef.append("offerThroughput", 2000);
      DevCollectionDef.append("shardKey", "DeviceId");

      Document result = IOTDatabase.runCommand(DevCollectionDef);
Python
      # create the Devices collection with a throughput of 2000 RUs and with DeviceId as the sharding key
      IOTDatabase.command({'customAction': "CreateCollection", 'collection': "Devices", 'offerThroughput': 2000, 'shardKey': "DeviceId"})
C#
      // create the Devices collection with a throughput of 1000 RUs and with EmployeeId as the sharding key
      var result = IOTDatabase.RunCommand<BsonDocument>(@"{customAction: ""CreateCollection"", collection: ""Devices"", offerThroughput: 2000, shardKey: ""DeviceId""}");
以类似的方式,我们可以修改集合或创建或修改数据库。 有关详细信息,请查看使用扩展命令管理存储在适用于 MongoDB 的 Azure Cosmos DB API 中的数据一文。


