练习:使用 .NET 从服务总线队列发送和接收消息。
在本练习中,你将学习如何:
- 使用 Azure CLI 创建服务总线命名空间和队列。
- 创建 .NET 控制台应用程序,以从队列发送和接收消息。
先决条件
- 具有活动订阅的 Azure 帐户。 如果你还没有,可在 https://azure.com/free 注册免费试用版。
- 安装在某个受支持的平台上的 Visual Studio Code。
- Visual Studio Code 的 C# 扩展。
- .NET 8 是练习的目标框架。
登录 Azure
在本部分中,你将打开终端并创建一些变量,并在整个练习的其余部分中使用这些变量,以便更轻松地输入命令和创建唯一资源名称。
启动 Azure Cloud Shell 并选择“Bash”和环境。
创建在 Azure CLI 命令中使用的变量。 将
<myLocation>替换为自己附近的区域。myLocation=<myLocation> myNameSpaceName=az204svcbus$RANDOM
创建 Azure 资源
创建资源组以保存将要创建的 Azure 资源。
az group create --name az204-svcbus-rg --location $myLocation创建服务总线消息传递命名空间。 以下命令使用之前创建的变量创建一个命名空间。 此操作需要数分钟才能完成。
az servicebus namespace create \
    --resource-group az204-svcbus-rg \
    --name $myNameSpaceName \
    --location $myLocation
创建“服务总线”队列
az servicebus queue create --resource-group az204-svcbus-rg \
    --namespace-name $myNameSpaceName \
    --name az204-queue
检索服务总线命名空间的连接字符串
打开 Azure 门户,导航到 az204-svcbus-rg 资源组。
选择创建的 az204svcbus 资源。
在“设置”部分,选择“共享访问策略”,然后选择“RootManageSharedAccessKey”策略。
从打开的对话框中复制“主连接字符串”并将其保存到文件中,或让门户保持打开状态并在需要时复制密钥。
创建控制台应用,以将消息发送到队列
打开本地终端,创建并切换到名为 az204svcbus 的目录,然后运行命令以启动 Visual Studio Code。
code .通过在菜单栏中选择“终端”>“新建终端”,在 Visual Studio Code 中打开终端,然后运行以下命令来创建控制台应用并添加 Azure.Messaging.ServiceBus 包。
dotnet new console
dotnet add package Azure.Messaging.ServiceBus
在 Program.cs 中,将以下
using语句添加到文件顶部的现有using语句后面。using Azure.Messaging.ServiceBus;将以下变量添加到代码,并将
connectionString变量设置为之前获得的连接字符串。// connection string to your Service Bus namespace string connectionString = "<CONNECTION STRING>"; // name of your Service Bus topic string queueName = "az204-queue";在刚添加的变量下方添加以下代码。 请参阅代码注释以了解详细信息。
// the client that owns the connection and can be used to create senders and receivers
ServiceBusClient client;

// the sender used to publish messages to the queue
ServiceBusSender sender;

// Create the clients that we'll use for sending and processing messages.
client = new ServiceBusClient(connectionString);
sender = client.CreateSender(queueName);

// create a batch
using ServiceBusMessageBatch messageBatch = await sender.CreateMessageBatchAsync();

for (int i = 1; i <= 3; i++)
{
    // try adding a message to the batch
    if (!messageBatch.TryAddMessage(new ServiceBusMessage($"Message {i}")))
    {
        // if an exception occurs
        throw new Exception($"Exception {i} has occurred.");
    }
}

try
{
    // Use the producer client to send the batch of messages to the Service Bus queue
    await sender.SendMessagesAsync(messageBatch);
    Console.WriteLine($"A batch of three messages has been published to the queue.");
}
finally
{
    // Calling DisposeAsync on client types is required to ensure that network
    // resources and other unmanaged objects are properly cleaned up.
    await sender.DisposeAsync();
    await client.DisposeAsync();
}

Console.WriteLine("Follow the directions in the exercise to review the results in the Azure portal.");
Console.WriteLine("Press any key to continue");
Console.ReadKey();
保存文件并运行
dotnet build命令以确保没有错误。使用
dotnet run命令运行程序,并等待下面的确认消息。 然后按任意键退出程序。A batch of three messages has been published to the queue.
查看结果
登录到 Azure 门户并导航到服务总线命名空间。
从导航窗格的“实体”部分选择“队列”,然后从列表中选择 az204-queue。
在“服务总线队列”导航窗格中选择“Service Bus Explorer”。
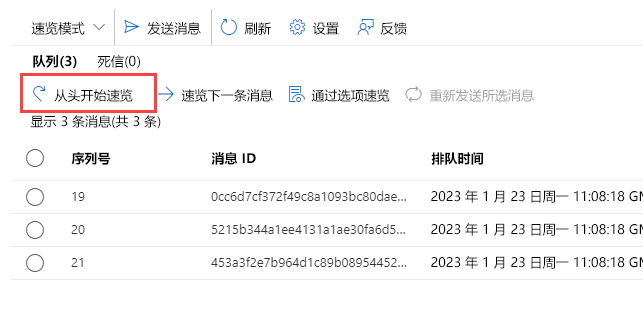
选择“从头开始速览”,将显示已发送的三条消息。

更新项目以接收发送到队列的消息
在本部分,你将更新程序以从队列接收消息。
将下面的代码添加到现有代码末尾。 请参阅代码注释以了解详细信息。
ServiceBusProcessor processor;
client = new ServiceBusClient(connectionString);

// create a processor that we can use to process the messages
processor = client.CreateProcessor(queueName, new ServiceBusProcessorOptions());

try
{
    // add handler to process messages
    processor.ProcessMessageAsync += MessageHandler;

    // add handler to process any errors
    processor.ProcessErrorAsync += ErrorHandler;

    // start processing
    await processor.StartProcessingAsync();

    Console.WriteLine("Wait for a minute and then press any key to end the processing");
    Console.ReadKey();

    // stop processing
    Console.WriteLine("\nStopping the receiver...");
    await processor.StopProcessingAsync();
    Console.WriteLine("Stopped receiving messages");
}
finally
{
    // Calling DisposeAsync on client types is required to ensure that network
    // resources and other unmanaged objects are properly cleaned up.
    await processor.DisposeAsync();
    await client.DisposeAsync();
}

// handle received messages
async Task MessageHandler(ProcessMessageEventArgs args)
{
    string body = args.Message.Body.ToString();
    Console.WriteLine($"Received: {body}");

    // complete the message. messages is deleted from the queue.
    await args.CompleteMessageAsync(args.Message);
}

// handle any errors when receiving messages
Task ErrorHandler(ProcessErrorEventArgs args)
{
    Console.WriteLine(args.Exception.ToString());
    return Task.CompletedTask;
}
使用
dotnet build命令确保没有错误。使用
dotnet run命令运行应用程序。 它将向队列发送另外三条消息,然后检索这六条消息。 按任意键来停止使用接收器和应用程序。Wait for a minute and then press any key to end the processing Received: Message 1 Received: Message 2 Received: Message 3 Received: Message 1 Received: Message 2 Received: Message 3 Stopping the receiver... Stopped receiving messages注意
由于应用程序在检索这些消息之前发送了两批消息,因此你应会在输出中看到两批(各三条)消息。
返回门户并再次选择“从头开始速览”。 请注意,由于我们已经检索了全部消息,因此队列中不显示任何消息。
清理资源
不再需要资源时,可以在 Azure Cloud Shell 中使用 az group delete 命令删除资源组。
az group delete --name az204-svcbus-rg --no-wait