练习 - 使用 Visual Studio Code 创建 Cosmos DB 实例
在本单元中,你将使用数据库扩展在 Visual Studio Code 中操作:
- 安装适用于 Visual Studio Code 的 Azure 数据库扩展。
- 使用扩展连接到 Azure 沙盒帐户。
- 创建 Cosmos DB 帐户。
- 添加数据库和容器。
- 在容器中创建一些测试文档,然后查看和删除它们。
在示例方案中,建议将 Visual Studio Code 用作生成应用程序的开发环境和管理 Azure 数据库的工具。 本练习在台式计算机上运行,并使用免费的 Azure 沙盒订阅。
注意
本练习假设桌面计算机已安装 Visual Studio Code。
安装适用于 Visual Studio Code 的 Azure 数据库扩展
启动 Visual Studio Code。
在顶部的“视图”菜单上,选择“扩展”以打开扩展窗格或使用键盘快捷方式 Ctrl + Shift + X。
在搜索框中输入“Azure 数据库”,然后按 Enter。
在扩展列表中,选择 Microsoft 发布的“Azure 数据库”扩展,然后选择“安装”。
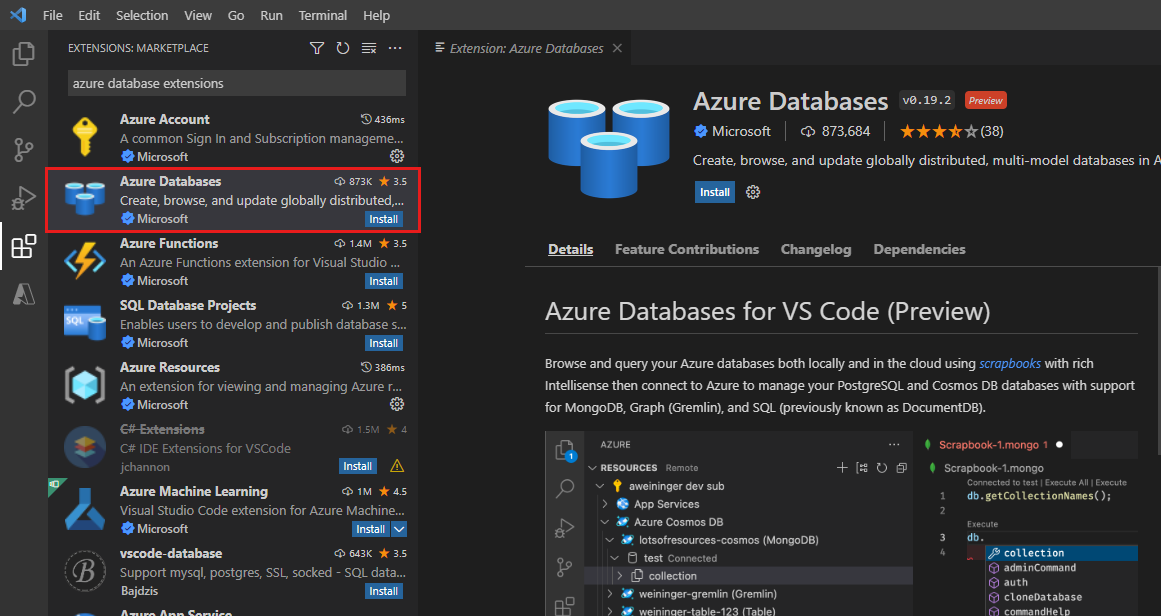
请等待扩展安装完成。
使用沙盒订阅登录到 Azure
选择“视图”菜单中的“命令面板”。
在命令面板中,输入“Azure”,然后选择“Azure: 专注于资源视图”,或使用键盘快捷方式 Shift + Alt + A。
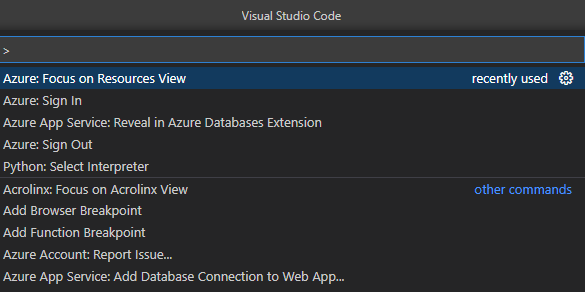
此时将显示 Azure 资源管理器(如果尚未显示)。
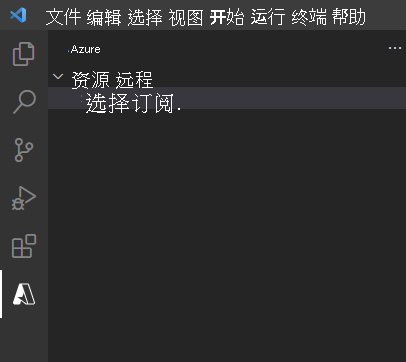
在“视图”菜单中,依次选择“命令面板”和“Azure:登录”。
使用设置沙盒时所用的凭据登录,然后关闭浏览器页面。
在 Azure 资源管理器中,选择“选择订阅...”。Learn 沙盒订阅具有以下名称和租户 ID:
故障排除:如果找不到 Concierge 订阅,可能需要更改租户并再次登录。 使用以下租户 ID 完成登录:
- 租户 ID:604c1504-c6a3-4080-81aa-b33091104187
- 名称:Concierge 订阅
选择“Concierge 订阅”,然后选择“确定”。
在 Azure 资源管理器中,展开“Concierge 订阅”。
在 Visual Studio Code 中创建 Cosmos DB 帐户
右键单击“Azure CosmosDB”,然后选择“创建服务器”。
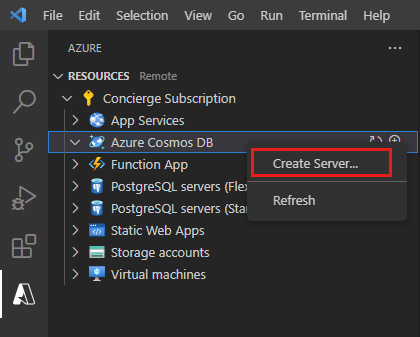
向导将启动并提示你输入新帐户的详细信息。 使用下表,根据提示完成操作:
Prompt Answer 选择 Azure 数据库服务器 Core (SQL) 帐户名称 输入全局唯一帐户名称;建议使用 <你的姓名或姓名首字母>-contoso-retail 之类的名称。 选择容量模型 预配吞吐量 - 为容器设置预配吞吐量是最常用的选项。 可以通过使用请求单位 (RU) 预配任意数量的吞吐量来弹性缩放容器的吞吐量。 选择新资源的资源组 为 Learn 沙盒创建的资源组选择 [沙盒资源组] 。选择新资源的位置 选择附近的位置。 创建帐户后,在 Azure 资源管理器中,展开“Concierge 订阅”和“Azure CosmosDB”。 验证是否出现新的 Cosmos DB 帐户。
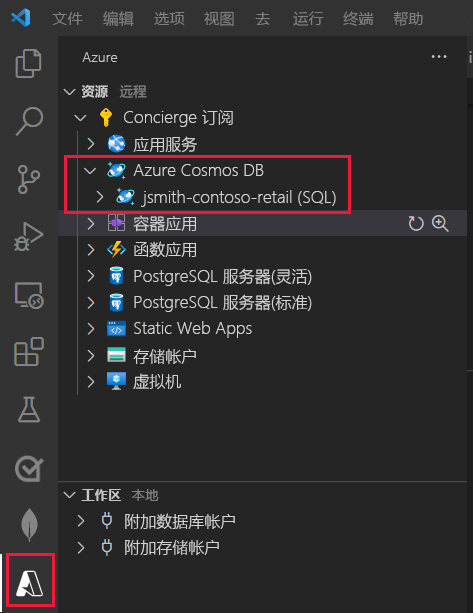
创建数据库和容器
在 Azure 资源管理器中,按 Shift + Alt + A,右键单击创建的数据库帐户,然后选择“创建数据库”。
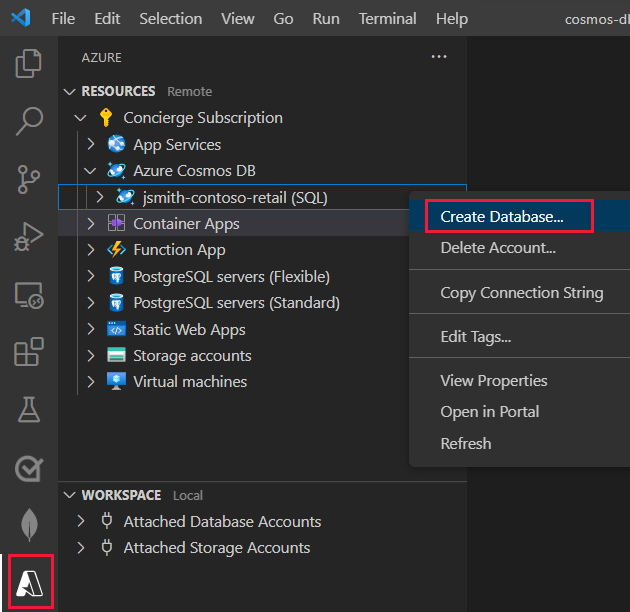
向导将启动并提示你输入详细信息。 使用下表,根据提示完成操作:
Prompt Answer 数据库名称 ContosoRetail 输入集合的 ID 产品 输入集合的分区键,或留出固定大小空白 categoryName 初始吞吐量容量 1000 此容器将保存
Products文档。 标记和清单是包含每个产品的子文档的数组。 以下文档是产品的示例。{ "id": "08225A9E-F2B3-4FA3-AB08-8C70ADD6C3C2", "categoryId": "75BF1ACB-168D-469C-9AA3-1FD26BB4EA4C", "categoryName": "Bikes, Touring Bikes", "sku": "BK-T79U-50", "name": "Touring-1000 Blue, 50", "description": "The product called \"Touring-1000 Blue, 50\"", "price": 2384.0700000000002, "tags": [ { "_id": "27B7F8D5-1009-45B8-88F5-41008A0F0393", "name": "Tag-61" } ], "inventory": [ { "location": "Dallas", "inventory": 42 }, { "location": "Seattle", "inventory": 3 }, { "location": "Boston", "inventory": 15 }, { "location": "Miami", "inventory": 89 }, { "location": "San Diego", "inventory": 19 } ] }在 Azure 资源管理器中,验证是否出现包含“Products”容器的“ContosoRetail”数据库。
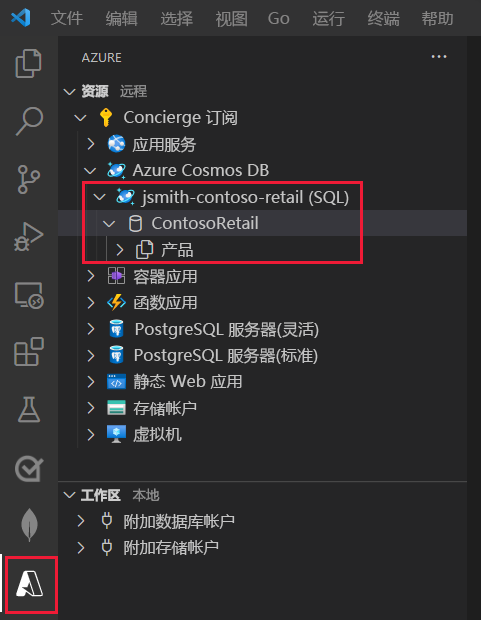
创建和查看文档
在 Azure 资源管理器中,展开“Products”容器。 此时应显示两个子文件夹,分别名为“Documents”和“Stored Procedures”。
右键单击 Documents 文件夹,然后选择“创建文档”。
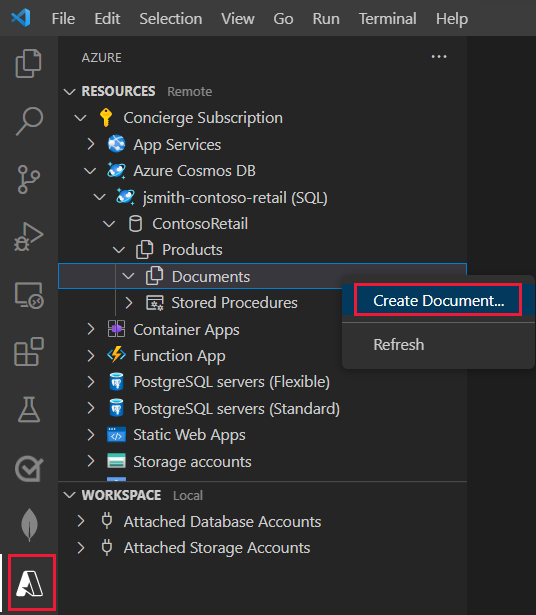
向导将启动并提示你输入详细信息。 使用下表,根据提示完成操作:
Prompt Answer 输入文档 ID 08225A9E-F2B3-4FA3-AB08-8C70ADD6C3C2 分区键 Bikes, Touring Bikes 将以 JSON 格式在 Visual Studio Code 中创建并显示文档。 “id”和“categoryName”字段将填充指定的值。
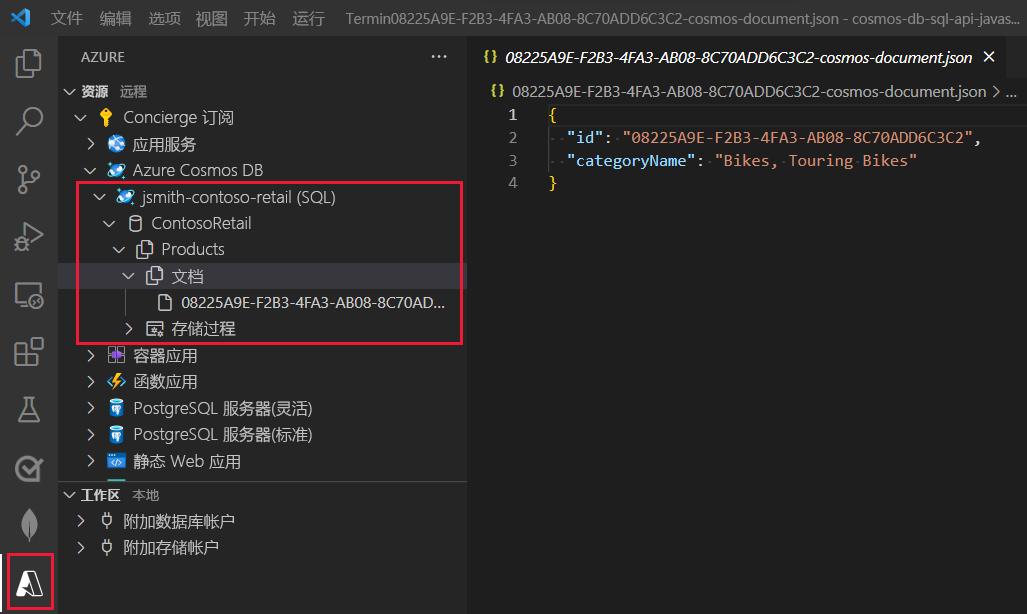
添加第二个文档。 在 Azure 资源管理器中,再次右键单击“Documents”文件夹,然后选择“创建文档”。
向导将启动并提示你输入详细信息。 使用下表,根据提示完成操作:
Prompt Answer 输入文档 ID 0F124781-C991-48A9-ACF2-249771D44029 分区键 Bikes, Mountain Bikes 此时将显示新文档。
编辑文档
在“Documents”列表中,选择“08225A9E-F2B3-4FA3-AB08-8C70ADD6C3C2”文档。
在出现的 JSON 文档中,移动到 id 行的末尾,然后按 Enter。
向文档添加以下字段。
"categoryId": "75BF1ACB-168D-469C-9AA3-1FD26BB4EA4C",
"sku": "BK-T79U-50",
"name": "Touring-1000 Blue, 50",
"description": "The product called \"Touring-1000 Blue, 50\"",
"price": 2384.0700000000002,
"tags": [
    {
        "_id": "27B7F8D5-1009-45B8-88F5-41008A0F0393",
        "name": "Tag-61"
    }
],
"inventory": []
“tags”属性是一个数组字段,其中包含与产品关联的标记。 使用数组可以使产品具有多个标记。
在“文件”菜单上,选择“保存” 。
当系统提示将实体更新到云时,请选择“始终上传”。
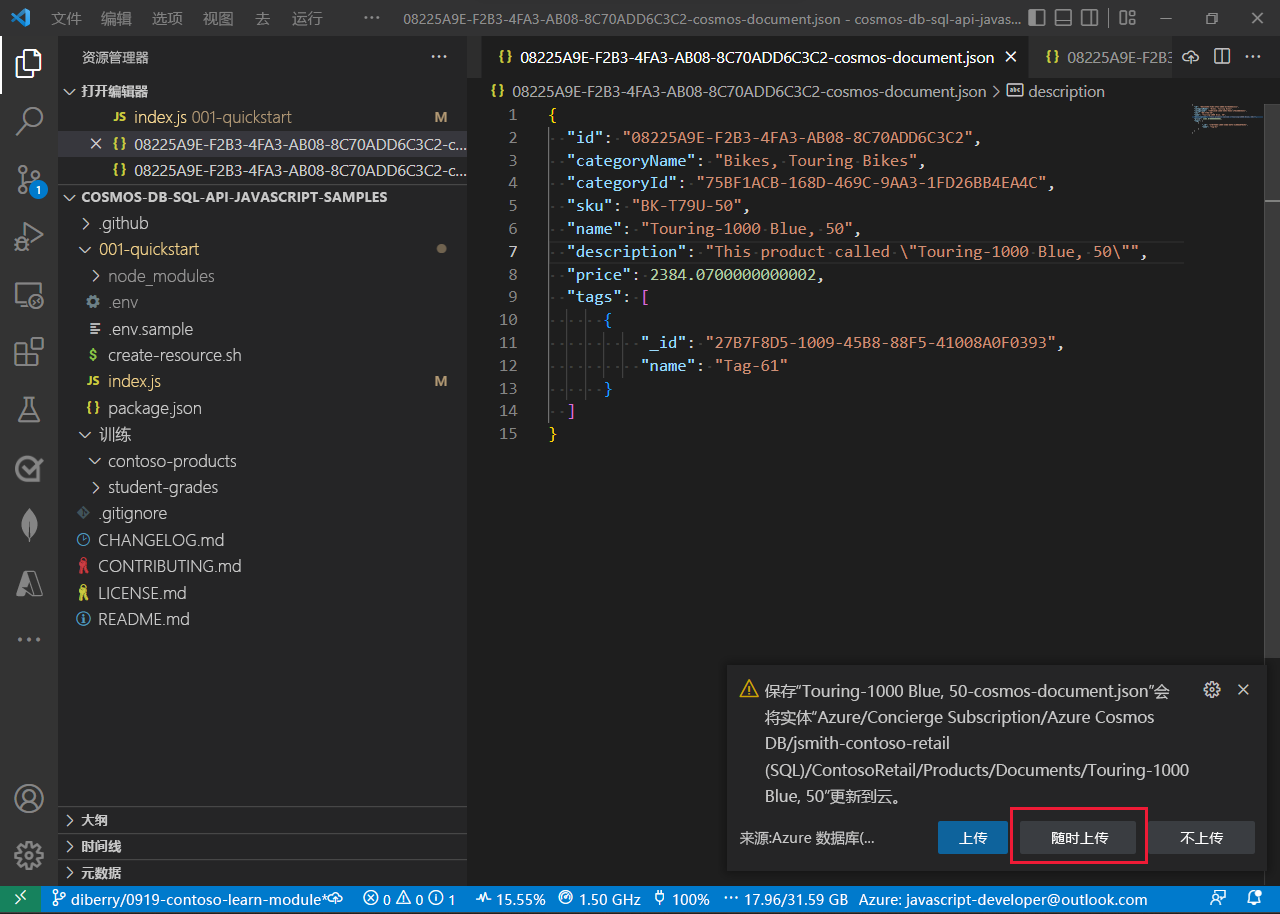
文档将在云中更新。 产品容器下的节点将更改为文档的“name”属性。
在“Documents”列表中,选择名为“0F124781-C991-48A9-ACF2-249771D44029”的其他文档。
将以下字段添加到文档中,放在 id 字段后面。
"categoryId": "56400CF3-446D-4C3F-B9B2-68286DA3BB99",
"sku": "BK-M68B-42",
"name": "Mountain-200 Black, 42",
"description": "The product called \"Mountain-200 Black, 42\"",
"price": 2294.9899999999998,
"tags": [
    {
        "_id": "4F67013C-3B5E-4A3D-B4B0-8C597A491EB6",
        "name": "Tag-82"
    }
]
在“文件”菜单上,选择“保存” 。
已添加和编辑 Cosmos DB 文档。
“Documents”列表现使用每个对象的
name字段显示可读名称。 在本地处理文档时,如果文档使用name属性,则查找文档会很有帮助。
检查你的工作
- 在 Visual Studio Code 的 Azure 数据库扩展中,可以看到 Cosmos DB 帐户、数据库和容器。
- 展开容器节点时,会看到两个文档。