练习 - 将 Bicep 部署操作添加到工作流
你已经创建了一个基本工作流,并且已配置 Azure 和 GitHub 环境的连接。 现在可以将网站的 Bicep 文件从工作流部署到 Azure。
通过学习本练习,你将能够:
- 将 Bicep 文件添加到存储库。
- 添加工作流步骤,将存储库源代码下载到运行程序的文件系统。
- 添加工作流步骤以登录到 Azure。
- 添加工作流步骤以部署 Bicep 文件。
- 再次运行工作流并验证其是否成功部署了网站。
将网站的 Bicep 文件添加到 GitHub 存储库
现已准备好网站的 Bicep 文件,可以使用这些文件根据环境和配置来部署不同的网站资源配置。 此处将 Bicep 文件添加到存储库。
打开 Visual Studio Code 资源管理器。
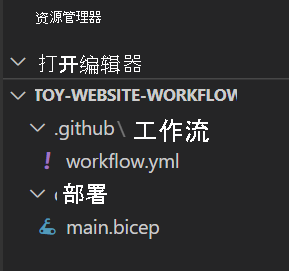
在存储库的根目录中,创建一个“deploy”文件。
在部署文件夹中,创建一个名为 main.bicep 的新文件。 确保在 deploy 文件夹中创建文件:
将以下代码复制到 main.bicep 文件中:
@description('The Azure region into which the resources should be deployed.')
param location string = resourceGroup().location

@description('The type of environment. This must be nonprod or prod.')
@allowed([
  'nonprod'
  'prod'
])
param environmentType string

@description('A unique suffix to add to resource names that need to be globally unique.')
@maxLength(13)
param resourceNameSuffix string = uniqueString(resourceGroup().id)

var appServiceAppName = 'toy-website-${resourceNameSuffix}'
var appServicePlanName = 'toy-website-plan'
var toyManualsStorageAccountName = 'toyweb${resourceNameSuffix}'

// Define the SKUs for each component based on the environment type.
var environmentConfigurationMap = {
  nonprod: {
    appServicePlan: {
      sku: {
        name: 'F1'
        capacity: 1
      }
    }
    toyManualsStorageAccount: {
      sku: {
        name: 'Standard_LRS'
      }
    }
  }
  prod: {
    appServicePlan: {
      sku: {
        name: 'S1'
        capacity: 2
      }
    }
    toyManualsStorageAccount: {
      sku: {
        name: 'Standard_ZRS'
      }
    }
  }
}

var toyManualsStorageAccountConnectionString = 'DefaultEndpointsProtocol=https;AccountName=${toyManualsStorageAccount.name};EndpointSuffix=${environment().suffixes.storage};AccountKey=${toyManualsStorageAccount.listKeys().keys[0].value}'

resource appServicePlan 'Microsoft.Web/serverfarms@2023-12-01' = {
  name: appServicePlanName
  location: location
  sku: environmentConfigurationMap[environmentType].appServicePlan.sku
}

resource appServiceApp 'Microsoft.Web/sites@2023-12-01' = {
  name: appServiceAppName
  location: location
  properties: {
    serverFarmId: appServicePlan.id
    httpsOnly: true
    siteConfig: {
      appSettings: [
        {
          name: 'ToyManualsStorageAccountConnectionString'
          value: toyManualsStorageAccountConnectionString
        }
      ]
    }
  }
}

resource toyManualsStorageAccount 'Microsoft.Storage/storageAccounts@2023-05-01' = {
  name: toyManualsStorageAccountName
  location: location
  kind: 'StorageV2'
  sku: environmentConfigurationMap[environmentType].toyManualsStorageAccount.sku
}
保存对该文件所做的更改。
在 Visual Studio Code 终端中,运行以下代码以暂存更改、提交更改并将更改推送到存储库:
git add deploy/main.bicep
git commit -m 'Add Bicep file'
git push
替换工作流程步骤
接下来,更新工作流定义以将 Bicep 文件部署到 Azure。
在 Visual Studio Code 中,打开 .github/workflows/workflow.yml 文件。
在文件顶部,在
on:与jobs:之间添加一个permissions:节。name: deploy-toy-website on: [workflow_dispatch] permissions: id-token: write contents: read jobs:此更改允许工作流使用工作负载标识。
将
say-hello作业重命名为deploy:jobs: deploy: runs-on: ubuntu-latest steps:通过删除文件的最后两行,从工作流定义中删除
placeholder步骤。首先,你会添加一个任务以将代码签出到运行器的文件系统中。 在文件底部添加一个新步骤:
jobs: deploy: runs-on: ubuntu-latest steps: - uses: actions/checkout@v3备注
最好是自行键入此代码,而不是从本模块中复制粘贴。 请注意文件缩进。 如果缩进不正确,YAML 文件将无效。 Visual Studio Code 通过显示波浪线来指示错误。
在刚添加的步骤下方,添加一个任务以登录到 Azure 环境。 此任务通过工作负载标识使用你先前定义的机密进行登录:
jobs: deploy: runs-on: ubuntu-latest steps: - uses: actions/checkout@v3 - uses: azure/login@v1 with: client-id: ${{ secrets.AZURE_CLIENT_ID }} tenant-id: ${{ secrets.AZURE_TENANT_ID }} subscription-id: ${{ secrets.AZURE_SUBSCRIPTION_ID }}在刚添加的步骤下方,添加另一个步骤以执行 Bicep 部署:
jobs: deploy: runs-on: ubuntu-latest steps: - uses: actions/checkout@v3 - uses: azure/login@v1 with: client-id: ${{ secrets.AZURE_CLIENT_ID }} tenant-id: ${{ secrets.AZURE_TENANT_ID }} subscription-id: ${{ secrets.AZURE_SUBSCRIPTION_ID }} - uses: azure/arm-deploy@v1 with: deploymentName: ${{ github.run_number }} resourceGroupName: ${{ env.AZURE_RESOURCEGROUP_NAME }} template: ./deploy/main.bicep parameters: environmentType=${{ env.ENVIRONMENT }}请注意,此任务使用
github.run_number默认环境变量来命名 Azure 中的部署。 它还对资源组名称和 Bicep 文件中的environmentType参数使用环境变量。将这些变量及其值添加到工作流文件的顶部,具体位于
permissions:与jobs之间:name: deploy-toy-website on: [workflow_dispatch] permissions: id-token: write contents: read env: AZURE_RESOURCEGROUP_NAME: ToyWebsite ENVIRONMENT: nonprod jobs:保存对该文件所做的更改。 文件应如下例所示:
name: deploy-toy-website on: [workflow_dispatch] permissions: id-token: write contents: read env: AZURE_RESOURCEGROUP_NAME: ToyWebsite ENVIRONMENT: nonprod jobs: deploy: runs-on: ubuntu-latest steps: - uses: actions/checkout@v3 - uses: azure/login@v1 with: client-id: ${{ secrets.AZURE_CLIENT_ID }} tenant-id: ${{ secrets.AZURE_TENANT_ID }} subscription-id: ${{ secrets.AZURE_SUBSCRIPTION_ID }} - uses: azure/arm-deploy@v1 with: deploymentName: ${{ github.run_number }} resourceGroupName: ${{ env.AZURE_RESOURCEGROUP_NAME }} template: ./deploy/main.bicep parameters: environmentType=${{ env.ENVIRONMENT }}在 Visual Studio Code 终端中,暂存更改,将更改提交到存储库,然后推送到 Azure Repos:
git add .
git commit -m 'Add Azure CLI tasks to workflow'
git push
运行工作流
现在可以运行工作流了!
在浏览器中,通过选择“操作”>“deploy-toy-website”来打开工作流。
选择“运行工作流”>“运行工作流”。
工作流的新运行将显示在运行列表中。 如果没有显示,请刷新浏览器页面。
选择正在运行的工作流以查看运行的详细信息。
等待运行完成。
选择“部署”作业。
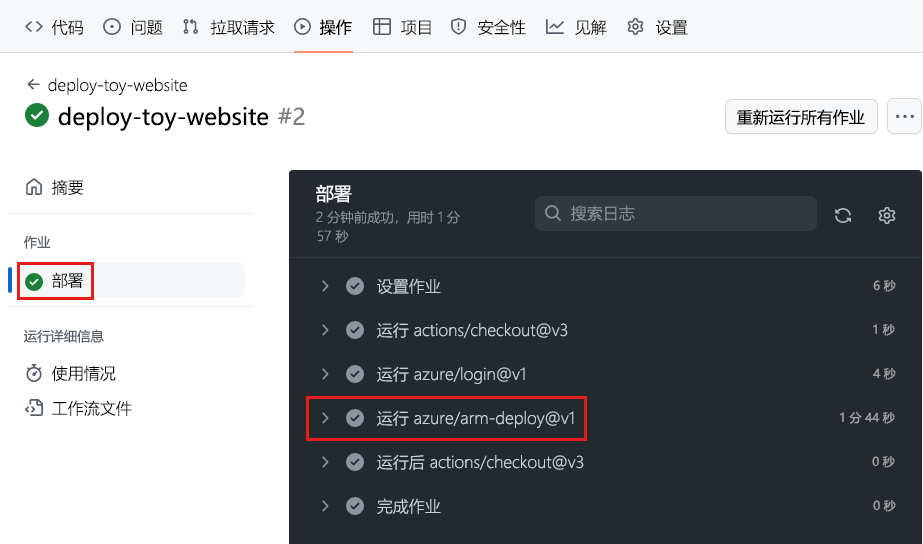
选择“运行 azure/arm-deploy@v1”。 随即显示任务详细信息。
在任务详细信息中选择“运行 azure/arm-deploy@v1”。
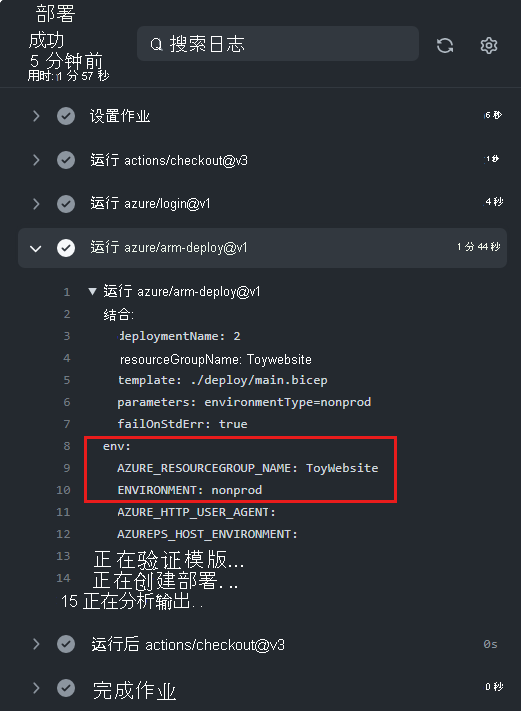
请注意,此步骤使用的是你添加到工作流文件的环境变量。
检查工作流输出的其余部分。
工作流显示成功的部署。
验证部署
转到 Azure 门户。
在左侧菜单中,选择“资源组”。
选择“ToyWebsite”。
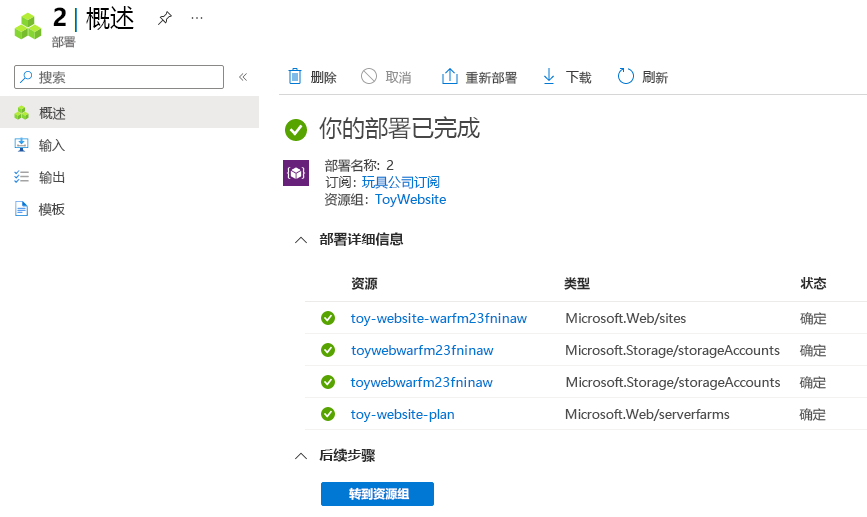
在“概述”中,查看部署状态。 你会看到一个成功的部署。
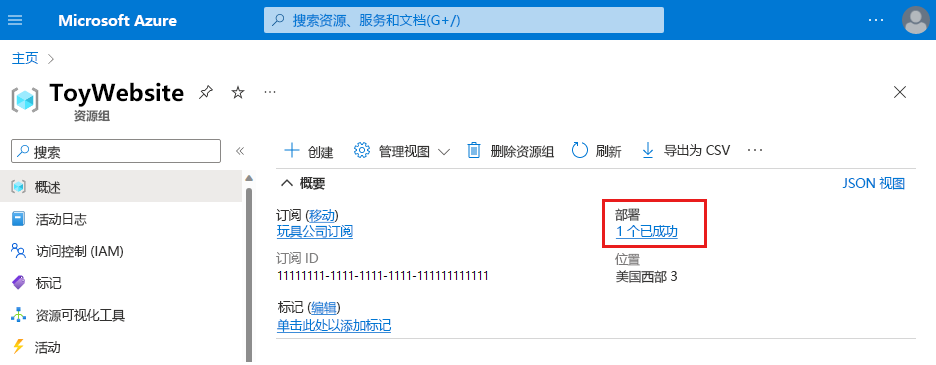
选择“1 个已成功”链接以查看部署的详细信息。

请注意,部署的名称与 GitHub Actions 中工作流的运行编号匹配,因为你使用了
github.run_number环境变量来命名你的部署。若要查看已部署的资源,请选择部署。 若要展开部署并查看更多详细信息,请选择“部署详细信息”。 在本例中,有一个存储帐户、一个 Azure 应用服务计划和一个应用。
