练习 - 创建和部署模板规格
备注
首次激活沙盒并接受这些条款后,你的 Microsoft 帐户将与名为“Microsoft Learn 沙盒”的新 Azure 目录相关联。 还会将你添加到名为“Concierge 订阅”的特殊订阅中。
在你的玩具公司,你的团队已经与 Azure 合作了一段时间,且已创建许多日常使用的模板。 你决定使用一个模板并创建模板规格。从用于创建 Azure Cosmos DB 帐户的模板开始。
你的团队确定,需要在所有 Azure Cosmos DB 帐户上配置连续备份。 因此,需要在通过模板规格预配的 Azure Cosmos DB 帐户默认配置中包括备份。
在此练习中,将 Azure Cosmos DB 模板发布为模板规格。
在此过程中,你将:
- 创建要用作模板规格的模板。
- 更新模板,确保参数是易于理解和使用的。
- 发布模板规格。
- 通过使用 Azure 门户验证模板规格。
- 部署模板规格以对其进行测试。
- 验证部署。
本练习使用适用于 Visual Studio Code 的 Bicep 扩展。 请务必在 Visual Studio Code 中安装此扩展。
创建模板
你将从你的团队已创建的一个模板开始。 该模板部署 Azure Cosmos DB 帐户,并对其进行配置以启用连续备份。
打开 Visual Studio Code。
新建一个名为 main.bicep 的文件。
保存空文件,以便 Visual Studio Code 加载 Bicep 工具。
你可以选择“文件”>“另存为”,也可以在 Windows 中选择Ctrl+S(在 macOS 上选择 ⌘+S)。 请务必记住文件的保存位置。 例如,你可能希望创建脚本文件,并将其存储在其中。
将以下代码复制到 main.bicep 中:
param location string = resourceGroup().location
param cosmosDBAccountName string = 'toy-${uniqueString(resourceGroup().id)}'

resource cosmosDBAccount 'Microsoft.DocumentDB/databaseAccounts@2021-04-15' = {
  name: cosmosDBAccountName
  kind: 'GlobalDocumentDB'
  location: location
  properties: {
    consistencyPolicy: {
      defaultConsistencyLevel: 'Session'
    }
    locations: [
      {
        locationName: location
        failoverPriority: 0
        isZoneRedundant: false
      }
    ]
    databaseAccountOfferType: 'Standard'
    enableAutomaticFailover: false
    enableMultipleWriteLocations: false
    backupPolicy: {
      type: 'Continuous'
    }
  }
}
请注意,将
backupPolicy设置为Continuous。 此值会将 Azure Cosmos DB 配置为连续(而不是周期性地)备份数据。保存文件。
打开 Visual Studio Code。
新建一个名为 azuredeploy.json 的文件。
保存空文件,以便 Visual Studio Code 加载 Azure 资源管理器模板(ARM 模板)工具。
你可以选择“文件”>“另存为”,也可以在 Windows 中选择Ctrl+S(在 macOS 上选择 ⌘+S)。 请务必记住文件的保存位置。 例如,你可能希望创建脚本文件,并将其存储在其中。
将以下代码复制到 azuredeploy.json 中:
{
  "$schema": "https://schema.management.azure.com/schemas/2019-04-01/deploymentTemplate.json#",
  "contentVersion": "1.0.0.0",
  "parameters": {
    "location": {
      "type": "string",
      "defaultValue": "[resourceGroup().location]"
    },
    "cosmosDBAccountName": {
      "type": "string",
      "defaultValue": "[concat('toy-', uniqueString(resourceGroup().id))]"
    }
  },
  "resources": [
    {
      "type": "Microsoft.DocumentDB/databaseAccounts",
      "apiVersion": "2021-04-15",
      "name": "[parameters('cosmosDBAccountName')]",
      "kind": "GlobalDocumentDB",
      "location": "[parameters('location')]",
      "properties": {
        "consistencyPolicy": {
          "defaultConsistencyLevel": "Session"
        },
        "locations": [
          {
            "locationName": "[parameters('location')]",
            "failoverPriority": 0,
            "isZoneRedundant": false
          }
        ],
        "databaseAccountOfferType": "Standard",
        "enableAutomaticFailover": false,
        "enableMultipleWriteLocations": false,
        "backupPolicy": {
          "type": "Continuous"
        }
      }
    }
  ]
}
请注意,将
backupPolicy设置为Continuous。 此值会将 Azure Cosmos DB 配置为连续(而不是周期性地)备份数据。保存文件。
使参数更易于理解
在创建模板规格时,必须考虑其他人会如何使用模板。 此评审对参数而言尤其重要,因为其他人主要是通过参数来与代码进行交互。 团队模板中的参数不包含有关如何使用参数的说明或其他提示,因此请在此处添加此信息。
通过添加说明更新
location参数定义:@description('The Azure region into which the Cosmos DB resources should be deployed.') param location string = resourceGroup().location更新
cosmosDBAccountName参数定义以添加说明,并指定名称的最小和最大长度:@description('The name of the Cosmos DB account. This name must be globally unique, and it must only include lowercase letters, numbers, and hyphens.') @minLength(3) @maxLength(44) param cosmosDBAccountName string = 'toy-${uniqueString(resourceGroup().id)}'保存文件。
通过添加说明更新
location参数定义:"location": { "type": "string", "defaultValue": "[resourceGroup().location]", "metadata": { "description": "The Azure region into which the Cosmos DB resources should be deployed." } },更新
cosmosDBAccountName参数定义以添加说明,并指定名称的最小和最大长度:"cosmosDBAccountName": { "type": "string", "defaultValue": "[concat('toy-', uniqueString(resourceGroup().id))]", "maxLength": 44, "minLength": 3, "metadata": { "description": "The name of the Cosmos DB account. This name must be globally unique, and it must only include lowercase letters, numbers, and hyphens." } }保存文件。
登录 Azure
若要将此模板部署到 Azure,你需要从 Visual Studio Code 终端登录到 Azure 帐户。 请确保安装了 Azure CLI,并记得使用你用于激活沙盒的同一帐户登录。
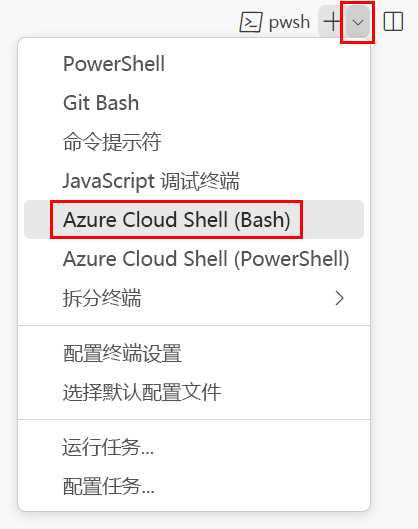
在“终端”菜单中,选择“新终端”。 终端窗口通常在屏幕的下半部分打开。
如果终端窗口在右侧显示 bash,则表示已打开正确的 shell。 或者,如果你在右侧看到 bash shell 图标,则可以选择它来启动 shell。

如果出现“bash”以外的 shell,请选择 shell 下拉箭头,然后选择“Git Bash”。
在终端中,转到保存模板的目录。 例如,如果将模板保存到 templates 文件夹,则可以使用以下命令:
cd templates
安装 Bicep
运行以下命令以确保具有最新版本的 Bicep:
az bicep install && az bicep upgrade
登录 Azure
在 Visual Studio Code 终端中,运行以下命令登录到 Azure:
az login在打开的浏览器中,登录到 Azure 帐户。 Visual Studio Code 终端显示与此帐户关联的订阅列表。 选择名为“Concierge 订阅”的订阅。
如果最近使用了多个沙盒,终端可能会显示多个 Concierge 订阅实例。 在这种情况下,请使用下面的两个步骤来设置一个默认订阅。
获取 Concierge 订阅 ID。
  az account list \
   --refresh \
   --query "[?contains(name, 'Concierge Subscription')].id" \
   --output table
使用订阅 ID 设置默认订阅。 将 {your subscription ID} 替换为最新的 Concierge 订阅 ID。
az account set --subscription {your subscription ID}
设置默认资源组
当你使用 Azure CLI 时,可以设置默认资源组,并忽略本练习中其他 Azure CLI 命令的参数。 将默认值设置为在沙盒环境中为你创建的资源组。
az configure --defaults group="<rgn>[sandbox resource group name]</rgn>"
若要将此模板部署到 Azure,从 Visual Studio Code 终端登录到 Azure 帐户。 请确保已安装 Azure PowerShell,并且登录的帐户与激活了沙盒的帐户相同。
在“终端”菜单中,选择“新终端”。 终端窗口通常在屏幕的下半部分打开。
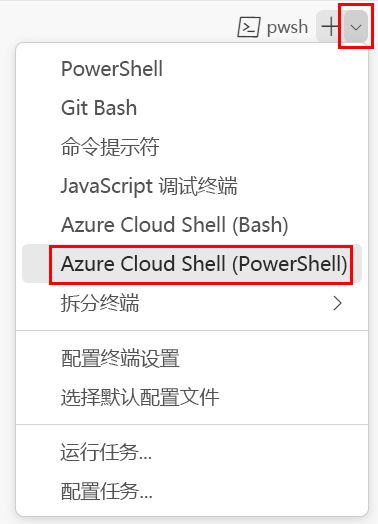
如果终端窗口在右侧显示 pwsh 或 powershell,则表示已打开正确的 shell。 或者,如果你在右侧看到 PowerShell shell 图标,则可以选择它来启动 shell。

如果出现“pwsh”和“powershell”以外的 shell,请选择 shell 下拉箭头,然后选择“PowerShell”。
在终端中,转到保存模板的目录。 例如,如果将模板保存到 templates 文件夹,则可以使用以下命令:
Set-Location -Path templates
安装 Bicep CLI
若要从 Azure PowerShell 中使用 Bicep,请安装 Bicep CLI。
使用 Azure PowerShell 登录到 Azure
在 Visual Studio Code 终端中,运行以下命令:
Connect-AzAccount在打开的浏览器中,登录到 Azure 帐户。 浏览器可能在后台打开。
登录到 Azure 后,终端会显示与此帐户关联的订阅列表。 如果已激活沙盒,则会显示名为“Concierge 订阅”的订阅。 请在本练习的其余部分选择此订阅。
如果最近使用了多个沙盒,终端可能会显示多个 Concierge 订阅实例。 在这种情况下,请使用下面的两个步骤来设置一个默认订阅。
获取订阅 ID。 运行以下命令将列出你的订阅及其 ID。 查看
Concierge Subscription,然后复制第二列中的 ID。 它类似于aaaa0a0a-bb1b-cc2c-dd3d-eeeeee4e4e4e。Get-AzSubscription将处于活动状态的订阅更改为“Concierge 订阅”。 请务必将 {Your subscription ID} 替换为复制的内容。
$context = Get-AzSubscription -SubscriptionId {Your subscription ID}
Set-AzContext $context
设置默认资源组
你可以设置默认资源组,并忽略本练习中其他 Azure PowerShell 命令的参数。 将此默认值设置为在沙盒环境中为你创建的资源组。
Set-AzDefault -ResourceGroupName <rgn>[sandbox resource group name]</rgn>
若要将此模板部署到 Azure,你需要从 Visual Studio Code 终端登录到 Azure 帐户。 请确保安装了 Azure CLI,并记得使用你用于激活沙盒的同一帐户登录。
在“终端”菜单中,选择“新终端”。 终端窗口通常在屏幕的下半部分打开。
如果终端窗口在右侧显示 bash,则表示已打开正确的 shell。 或者,如果你在右侧看到 bash shell 图标,则可以选择它来启动 shell。
如果出现“bash”以外的 shell,请选择 shell 下拉箭头,然后选择“Git Bash”。
在终端中,转到保存模板的目录。 例如,如果将模板保存到 templates 文件夹,则可以使用以下命令:
cd templates
登录 Azure
在 Visual Studio Code 终端中,运行以下命令登录到 Azure:
az login在打开的浏览器中,登录到 Azure 帐户。 Visual Studio Code 终端显示与此帐户关联的订阅列表。 选择名为“Concierge 订阅”的订阅。
如果最近使用了多个沙盒,终端可能会显示多个 Concierge 订阅实例。 在这种情况下,请使用下面的两个步骤来设置一个默认订阅。
获取 Concierge 订阅 ID。
  az account list \
   --refresh \
   --query "[?contains(name, 'Concierge Subscription')].id" \
   --output table
使用订阅 ID 设置默认订阅。 将 {your subscription ID} 替换为最新的 Concierge 订阅 ID。
az account set --subscription {your subscription ID}
设置默认资源组
当你使用 Azure CLI 时,可以设置默认资源组,并忽略本练习中其他 Azure CLI 命令的参数。 将默认值设置为在沙盒环境中为你创建的资源组。
az configure --defaults group="<rgn>[sandbox resource group name]</rgn>"
若要将此模板部署到 Azure,从 Visual Studio Code 终端登录到 Azure 帐户。 请确保已安装 Azure PowerShell,并且登录的帐户与激活了沙盒的帐户相同。
在“终端”菜单中,选择“新终端”。 终端窗口通常在屏幕的下半部分打开。
如果终端窗口在右侧显示 pwsh 或 powershell,则表示已打开正确的 shell。 或者,如果你在右侧看到 PowerShell shell 图标,则可以选择它来启动 shell。
如果出现“pwsh”和“powershell”以外的 shell,请选择 shell 下拉箭头,然后选择“PowerShell”。
在终端中,转到保存模板的目录。 例如,如果将模板保存到 templates 文件夹,则可以使用以下命令:
Set-Location -Path templates
使用 Azure PowerShell 登录到 Azure
在 Visual Studio Code 终端中,运行以下命令:
Connect-AzAccount在打开的浏览器中,登录到 Azure 帐户。 浏览器可能在后台打开。
登录到 Azure 后,终端会显示与此帐户关联的订阅列表。 如果已激活沙盒,则会显示名为“Concierge 订阅”的订阅。 请在本练习的其余部分选择此订阅。
如果最近使用了多个沙盒,终端可能会显示多个 Concierge 订阅实例。 在这种情况下,请使用下面的两个步骤来设置一个默认订阅。
获取订阅 ID。 运行以下命令将列出你的订阅及其 ID。 查看
Concierge Subscription,然后复制第二列中的 ID。 它类似于aaaa0a0a-bb1b-cc2c-dd3d-eeeeee4e4e4e。Get-AzSubscription将处于活动状态的订阅更改为“Concierge 订阅”。 请务必将 {Your subscription ID} 替换为复制的内容。
$context = Get-AzSubscription -SubscriptionId {Your subscription ID}
Set-AzContext $context
设置默认资源组
你可以设置默认资源组,并忽略本练习中其他 Azure PowerShell 命令的参数。 将此默认值设置为在沙盒环境中为你创建的资源组。
Set-AzDefault -ResourceGroupName <rgn>[sandbox resource group name]</rgn>
将模板发布为模板规格
在 Visual Studio Code 终端中使用此 Azure PowerShell cmdlet 发布模板规格:
New-AzTemplateSpec `
  -ResourceGroupName <rgn>[sandbox resource group name]</rgn> `
  -Name ToyCosmosDBAccount `
  -Location westus `
  -DisplayName 'Cosmos DB account' `
  -Description "This template spec creates a Cosmos DB account that meets our company's requirements." `
  -Version '1.0' `
  -TemplateFile main.bicep
New-AzTemplateSpec `
  -ResourceGroupName <rgn>[sandbox resource group name]</rgn> `
  -Name ToyCosmosDBAccount `
  -Location westus `
  -DisplayName 'Cosmos DB account' `
  -Description "This template spec creates a Cosmos DB account that meets our company's requirements." `
  -Version '1.0' `
  -TemplateFile azuredeploy.json
在 Visual Studio Code 终端中使用此 Azure CLI 命令发布模板规格:
az ts create \
  --name ToyCosmosDBAccount \
  --location westus \
  --display-name "Cosmos DB account" \
  --description "This template spec creates a Cosmos DB account that meets our company's requirements." \
  --version 1.0 \
  --template-file main.bicep
az ts create \
  --name ToyCosmosDBAccount \
  --location westus \
  --display-name "Cosmos DB account" \
  --description "This template spec creates a Cosmos DB account that meets our company's requirements." \
  --version 1.0 \
  --template-file azuredeploy.json
使用 Azure 门户验证模板规格
转到 Azure 门户并确保你位于沙盒订阅中:
- 选择页面右上角的头像。
- 选择“切换目录”。 在列表中,选择“Microsoft Learn 沙盒”目录。
在左侧面板上,选择“资源组”。
选择
沙盒资源组名称 。 请注意,模板规格包含在资源列表中: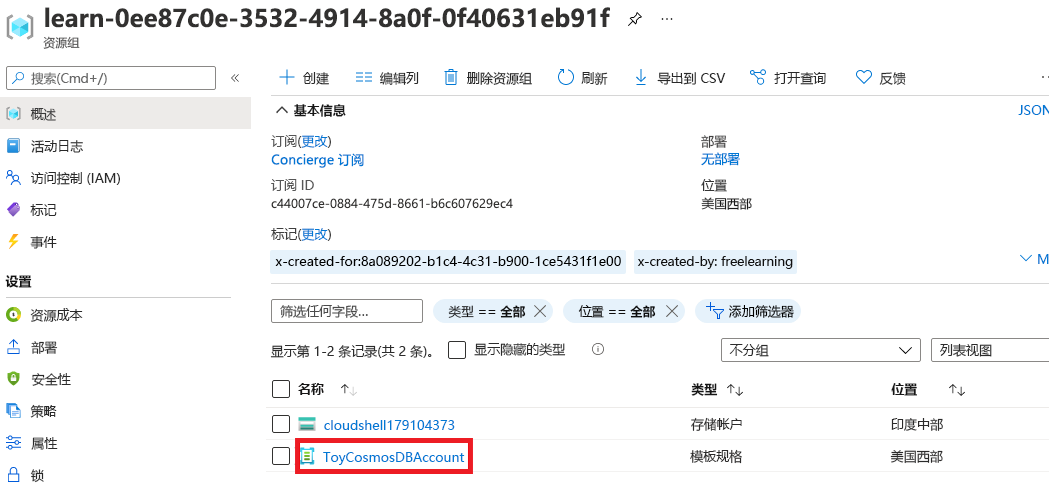
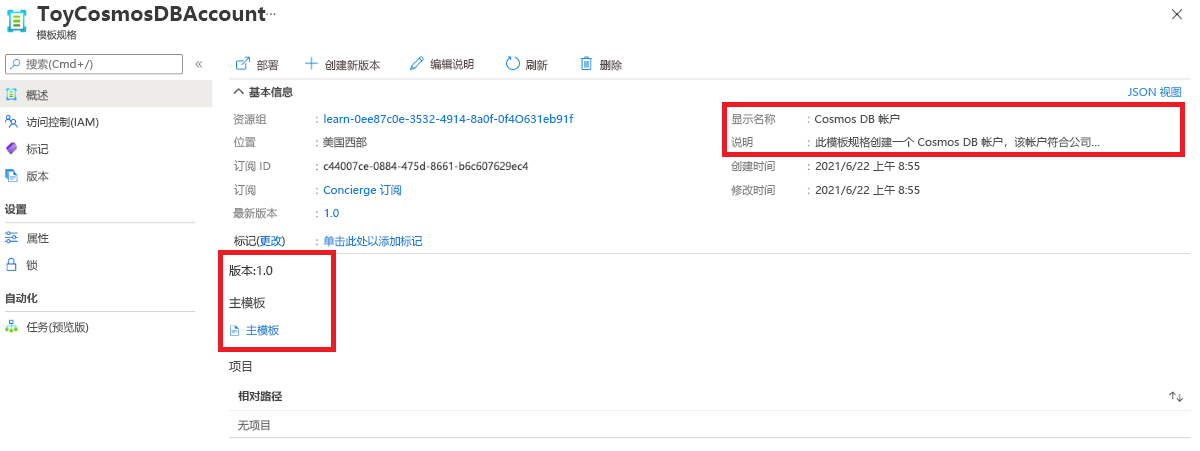
选择“ToyCosmosDBAccount”以打开模板规格。版本和模板文件是可见的。
部署模板规格
为简单起见,请将模板规格部署到模板规格本身所在的同一沙盒资源组中。 模板规格通常位于不同的资源组中。 不过这两种方式所对应的步骤是一样的。
通过运行以下 Azure PowerShell 命令获取模板规格版本的资源 ID:
$templateSpecVersionResourceId = (`
   Get-AzTemplateSpec `
      -ResourceGroupName <rgn>[sandbox resource group name]</rgn> `
      -Name ToyCosmosDBAccount `
      -Version 1.0 `
   ).Versions[0].Id
请注意,使用
Versions属性。 部署模板规格时,需要引用要使用的模板规格的特定版本的资源 ID。在 Visual Studio Code 终端中使用此 Azure PowerShell 命令部署模板规格:
New-AzResourceGroupDeployment -TemplateSpecId $templateSpecVersionResourceId
通过运行以下 Azure CLI 命令获取模板规格版本的资源 ID:
id=$(az ts show \
 --name ToyCosmosDBAccount \
 --resource-group "<rgn>[sandbox resource group name]</rgn>" \
 --version "1.0" \
 --query "id")
在 Visual Studio Code 终端中使用此 Azure CLI 命令部署模板规格:
az deployment group create --template-spec $id
该部署过程可能需要一两分钟才能完成。
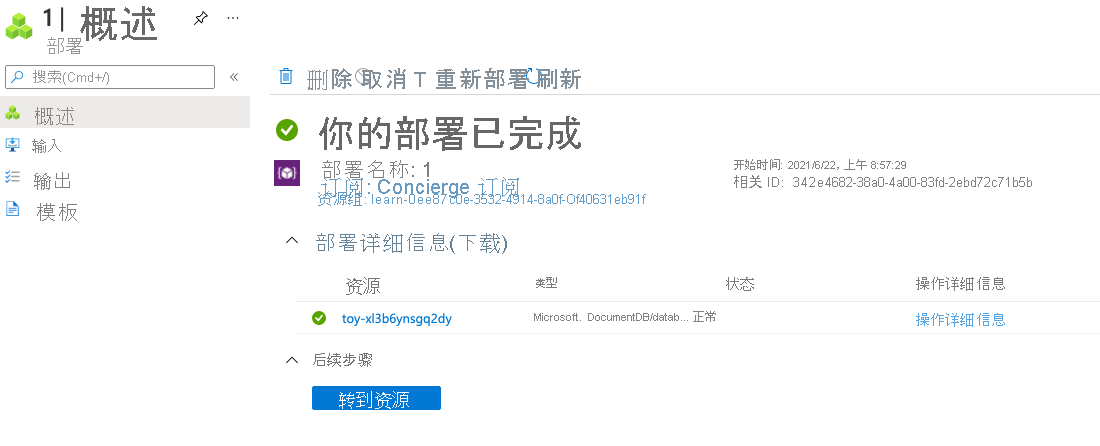
验证部署
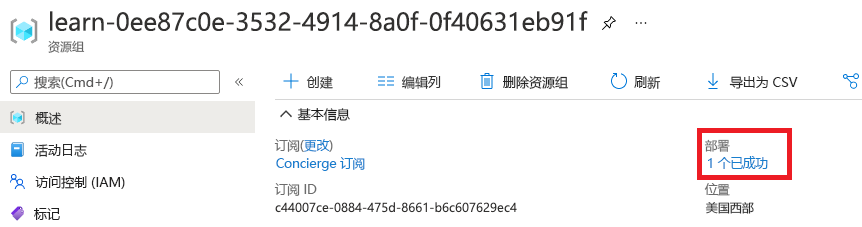
在浏览器中返回到 Azure 门户。 转到你的资源组。
在“部署”旁边,选择“1 个已成功”链接以查看部署的详细信息。
选择部署。
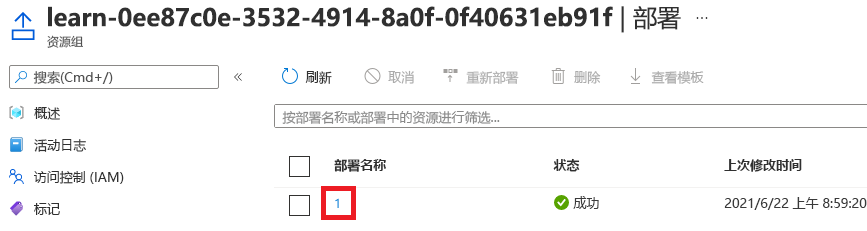
部署的名称可能与示例中的名称不同。
选择“部署详细信息”将其展开。 确认已部署 Azure Cosmos DB 帐户。