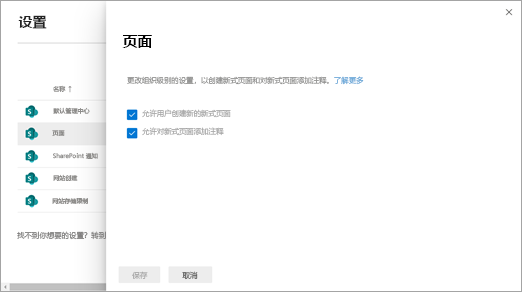
允许用户创建新式页面
在 Microsoft SharePoint 中使用新式页面是使用图像、Office 文件、视频等共享创意的好方法。 用户可以快速轻松地 将页面添加到网站 ,新式页面在任何设备上看起来都很棒。
如果你是 Microsoft 365 中的 SharePoint及更高版本 管理员,则可以允许或阻止用户创建新式页面。 可以通过更改 SharePoint 管理中心中的设置,在组织级别执行此操作。 如果允许将网站页面创建为组织级别,则可以使用 PowerShell 在网站级别打开或关闭它。 网站所有者还可以 在网站级别打开或关闭它。
注意
如果要阻止成员在网站上创建或修改任何 SharePoint 页面,请转到“网站页面”,选择“ 设置 >库设置>对此文档库的权限,然后将“成员”组设置为“读取”。
在组织级别更改页面创建设置
转到 SharePoint 管理中心中的设置,并使用对组织管理员权限的帐户登录。
注意
如果使用的是由世纪互联(中国)运营的 Office 365,请登录 Microsoft 365 管理中心,然后浏览到 SharePoint 管理中心并打开“设置”页面。
选择“页面”。
选择或清除 “允许用户创建新的新式页面”。
注意
阻止用户创建新式页面会隐藏以下选项:
- 在“网站页面”和“网站内容”页上 >,“新建>”页。
-
设置
 >添加页面。
用户仍然可以从“新建”菜单或新式 Web 部件 ((如新闻) )从其他新式页面添加页面。
还可以选择允许或阻止对新式页面进行批注。 如果允许注释,则可以在页面级别打开或关闭注释。

阻止用户使用 PowerShell 在特定网站上创建新式页面
如果允许将网站页面创建为组织级别,则可以使用 PowerShell 在网站级别将其关闭。
-
注意
如果你已安装早期版本的SharePoint Online Management Shell,请进入添加或删除程序并卸载 "SharePoint Online Management Shell"。
在 Microsoft 365 中以 全局管理员或 SharePoint 管理员身份连接到 SharePoint 。 若要了解具体操作步骤,请参阅 SharePoint 在线管理壳入门。
注意
阅读 关于执行策略 ,并确保以管理员身份运行 SharePoint Online 命令行管理程序,以及运行未签名脚本的正确执行策略。
复制以下代码并粘贴到文本编辑器(如记事本)中。
# Load SharePoint Online Client Components SDK Module
Import-Module 'C:\Program Files\Common Files\microsoft shared\Web Server Extensions\16\ISAPI\Microsoft.SharePoint.Client.dll'

# Set script constants
$sitePagesFeatureIdString = 'B6917CB1-93A0-4B97-A84D-7CF49975D4EC'

# Set up client context
$userName = Read-Host "Username"
$password = Read-Host "Password" -AsSecureString
$siteUrl = Read-Host "Site Url"
$webUrl = Read-Host "Server-Relative Web Url"
$context = New-Object Microsoft.SharePoint.Client.ClientContext($siteUrl)
$credentials = New-Object Microsoft.SharePoint.Client.SharePointOnlineCredentials($userName, $password)
$context.Credentials = $credentials

# Get the list of existing features
$web = $context.Site.OpenWeb($webUrl)
$features = $web.Features
$context.Load($features)
$context.ExecuteQuery()

# Verify that the Site Pages feature is present in the web
if(($features | ? { $_.DefinitionId -eq $sitePagesFeatureIdString }).Count -eq 0)
{
    Write-Host "The Site Pages feature is already disabled in this web"
    return
}

# Remove the Site Pages feature from the web
$features.Remove((new-object 'System.Guid' $sitePagesFeatureIdString), $false)
$context.ExecuteQuery()

# Verify that the Site Pages feature is no longer present in the Web
$web = $context.Site.OpenWeb($webUrl)
$features = $web.Features
$context.Load($features)
$context.ExecuteQuery()
if(($features | ? { $_.DefinitionId -eq $sitePagesFeatureIdString }).Count -eq 0)
{
    Write-Host "The Site Pages feature has been successfully disabled"
}
else
{
    throw "The Site Pages feature failed to be disabled"
}
保存文本文件,然后更改其扩展名。 在此示例中,我们将它命名为 SitePagesOut.ps1。
注意
可以使用其他文件名,但是必须将文件保存为扩展名为 .ps1 的 ANSI 编码文本文件。
转到保存该文件的目录。
运行以下命令:
.\SitePagesOut.ps1该脚本将提示你输入 SiteUrl 和 WebUrl。
如果你有一个站点,例如:
https://contoso.sharepoint.com/sites/marketing/northwindcompete对于 SiteUrl ,请输入:
https://contoso.sharepoint.com/sites/marketing对于 WebUrl ,请输入:
sites/marketing/northwindcompete
允许用户使用 PowerShell 在特定网站上创建新式页面
如果阻止用户在网站上创建新式页面,请按照以下步骤再次允许它。
在 Microsoft 365 中以 全局管理员或 SharePoint 管理员身份连接到 SharePoint 。 若要了解具体操作步骤,请参阅 SharePoint 在线管理壳入门。
注意
阅读 关于执行策略 ,并确保以管理员身份运行 SharePoint Online 命令行管理程序,以及运行未签名脚本的正确执行策略。
复制以下代码并粘贴到文本编辑器(如记事本)中。
# Load SharePoint Online Client Components SDK Module
Import-Module 'C:\Program Files\Common Files\microsoft shared\Web Server Extensions\16\ISAPI\Microsoft.SharePoint.Client.dll'

# Set script constants
$sitePagesFeatureIdString = 'B6917CB1-93A0-4B97-A84D-7CF49975D4EC'

# Set up client context
$userName = Read-Host "Username"
$password = Read-Host "Password" -AsSecureString
$siteUrl = Read-Host "Site Url"
$webUrl = Read-Host "Server-Relative Web Url"
$context = New-Object Microsoft.SharePoint.Client.ClientContext($siteUrl)
$credentials = New-Object Microsoft.SharePoint.Client.SharePointOnlineCredentials($userName, $password)
$context.Credentials = $credentials

# Get the list of existing features
$web = $context.Site.OpenWeb($webUrl)
$features = $web.Features
$context.Load($features)
$context.ExecuteQuery()

# Verify that the Site Pages feature is not present in the web
if(($features | ? { $_.DefinitionId -eq $sitePagesFeatureIdString }).Count -gt 0)
{
    Write-Host "The Site Pages feature is already enabled in this web"
    return
}

# Add the Site Pages feature back to the web
$features.Add((new-object 'System.Guid' $sitePagesFeatureIdString), $false, [Microsoft.SharePoint.Client.FeatureDefinitionScope]::None)
$context.ExecuteQuery()

# Verify that the Site Pages feature is now present in the web
$web = $context.Site.OpenWeb($webUrl)
$features = $web.Features
$context.Load($features)
$context.ExecuteQuery()
if(($features | ? { $_.DefinitionId -eq $sitePagesFeatureIdString }).Count -gt 0)
{
    Write-Host "The Site Pages feature has been successfully enabled"
}
else
{
    throw "The Site Pages feature failed to be enabled"
}
保存文本文件,然后更改其扩展名。 在此示例中,我们将它命名为 SitePagesIn.ps1。
注意
可以使用其他文件名,但是必须将文件保存为扩展名为 .ps1 的 ANSI 编码文本文件。
转到保存该文件的目录。
运行以下命令:
.\SitePagesIn.ps1该脚本将提示你输入 SiteUrl 和 WebUrl。
如果你有一个站点,例如:
https://contoso.sharepoint.com/sites/marketing/northwindcompete对于 SiteUrl ,请输入:
https://contoso.sharepoint.com/sites/marketing对于 WebUrl ,请输入:
sites/marketing/northwindcompete