在 SharePoint 框架中使用 Microsoft Graph
常见的企业级业务方案是,在 SharePoint 框架客户端 Web 部件或扩展中访问受 Azure Active Directory (Azure AD) 和 Open Authorization (OAuth 2.0) 保护的 REST API。
SharePoint 框架(从 v.1.4.1 起)可用于使用 Microsoft Graph REST API 或在 Azure AD 中注册的其他任何 REST API。
本文将介绍如何创建 SharePoint 框架解决方案,以通过一组自定义权限访问 Microsoft Graph API。 有关此技术的概念性概述,请参阅在 SharePoint 框架解决方案中连接到受 Azure AD 保护的 API。
重要
可以通过本机 GraphHttpClient 或直接使用 Microsoft 标识 platfomr 身份验证库隐式 OAuth 流,通过 v1.4.1 之前的 SharePoint 框架 版本使用 Microsoft 图形 API。 不过,前一种方法局限于一组预定义的权限范围,带来了一些限制,而后一种方法从开发角度来看则十分复杂。 若要详细了解如何实现隐式 OAuth 流,请参阅连接到受 Azure Active Directory 保护的 API。
解决方案概述
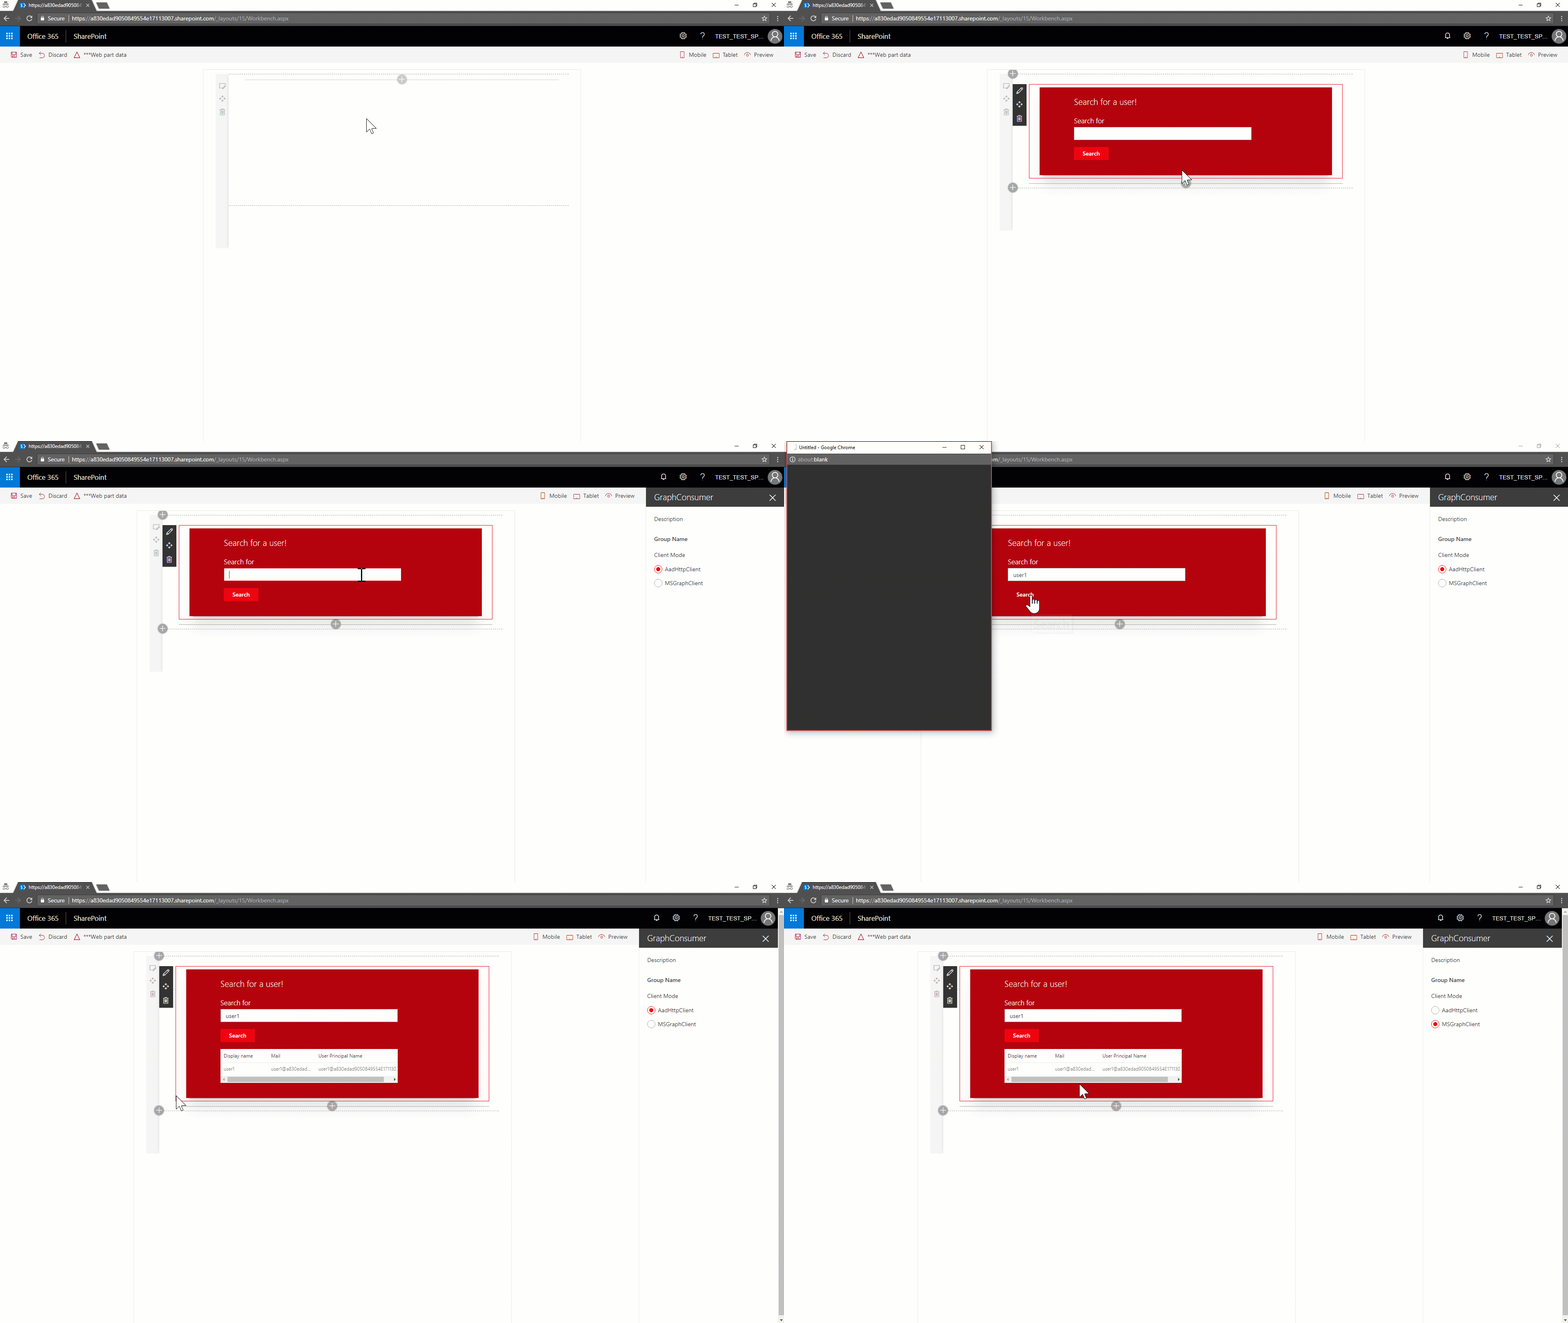
本文逐步介绍了如何生成客户端 Web 部件,以在当前租户中搜索用户,如下面的屏幕截图所示。 搜索以 Microsoft Graph 为依据,且至少必须拥有 User.ReadBasic.All 权限。

使用客户端 Web 部件,能够按用户名搜索用户,并通过 DetailsList Office UI Fabric 组件显示所有匹配用户。 Web 部件的属性窗格中有一个选项,可用于选择如何访问 Microsoft Graph。 自 SharePoint 框架 v.1.4.1 版本起,访问 Microsoft Graph 的方法包括使用本机 graph 客户端(MSGraphClient),或使用低级类型(AadHttpClient)访问任何受 Azure AD 保护的 REST API。
注意
若要获取此解决方案的源代码,请参阅 api-scopes GitHub存储库。
如果已熟悉如何创建 SharePoint 框架解决方案,可以转到配置 API 权限请求。
创建初始解决方案
如果使用的是旧版 SharePoint 框架生成器,需要更新到版本 1.4.1 或更高版本。 为此,请运行下面的命令,全局安装最新版包。
npm install -g @microsoft/generator-sharepoint
接下来,新建 SharePoint 框架解决方案:
在文件系统中创建文件夹。 将存储解决方案的源代码,并将当前路径移到此文件夹。
运行 Yeoman 生成器,以搭建新解决方案的基架。
yo @microsoft/sharepoint出现提示时,请输入以下值(为下面省略的所有提示选择默认选项):
- 你的解决方案名称是什么?:spfx-api-scopes-tutorial
- 你想要为你的组件设定哪些基准包? 仅 SharePoint Online(最新)
- 要创建哪种类型的客户端组件? Web 部件
- Web 部件名称是什么? GraphConsumer
- 要使用哪种框架? React
在当前文件夹上下文中,启动 Visual Studio Code(或常用代码编辑器)。
code .
配置基本 Web 部件元素
接下来,配置客户端 Web 部件的初始元素。
配置自定义属性
在解决方案的 .src/webparts/graphConsumer/components 文件夹下,新建源代码文件。
调用新文件 ClientMode.ts,并用它来声明 TypeScript
enum枚举,其中包含 Web 部件的ClientMode属性的可用选项。export enum ClientMode { aad, graph, }现在,打开解决方案中 .src/webparts/graphConsumer 文件夹内的 GraphConsumerWebPart.ts 文件。
更改
IGraphConsumerWebPartProps接口的定义,接受 ClientMode 类型的值。export interface IGraphConsumerWebPartProps { clientMode: ClientMode; }现在,更新客户端 Web 部件的
getPropertyPaneConfiguration()方法,支持属性窗格中的内容选择。 下面的示例展示了此方法的新操作。protected getPropertyPaneConfiguration(): IPropertyPaneConfiguration { return { pages: [ { header: { description: strings.PropertyPaneDescription }, groups: [ { groupName: strings.BasicGroupName, groupFields: [ PropertyPaneChoiceGroup('clientMode', { label: strings.ClientModeLabel, options: [ { key: ClientMode.aad, text: "AadHttpClient"}, { key: ClientMode.graph, text: "MSGraphClient"}, ] }), ] } ] } ] }; }此外,还必须更新客户端 Web 部件的
render()方法,才能创建正确配置的 React 组件实例以供呈现。 以下代码演示了方法定义的更新。public render(): void { const element: React.ReactElement<IGraphConsumerProps > = React.createElement( GraphConsumer, { clientMode: this.properties.clientMode, context: this.context, } ); ReactDom.render(element, this.domElement); }若要让上面的代码有效,必须在 GraphConsumerWebPart.ts 文件的开头添加一些导入语句,如下面的示例所示。 请注意
PropertyPaneChoiceGroup控件以及ClientMode枚举的导入语句。import * as React from "react"; import * as ReactDom from "react-dom"; import { Version } from "@microsoft/sp-core-library"; import { BaseClientSideWebPart, IPropertyPaneConfiguration, PropertyPaneChoiceGroup, } from "@microsoft/sp-webpart-base"; import * as strings from "GraphConsumerWebPartStrings"; import GraphConsumer from "./components/GraphConsumer"; import { IGraphConsumerProps } from "./components/IGraphConsumerProps"; import { ClientMode } from "./components/ClientMode";
更新资源字符串
必须更新解决方案 .src/webparts/graphConsumer/loc 文件夹下的 mystrings.d.ts 文件,才能编译解决方案。
使用下面的代码重写定义资源字符串的接口。
declare interface IGraphConsumerWebPartStrings {
  PropertyPaneDescription: string;
  BasicGroupName: string;
  ClientModeLabel: string;
  SearchFor: string;
  SearchForValidationErrorMessage: string;
}
现在,更新同一文件夹中的 en-us.js 文件,为新建的资源字符串配置适当值。
define([], function () {
  return {
    PropertyPaneDescription: "Description",
    BasicGroupName: "Group Name",
    ClientModeLabel: "Client Mode",
    SearchFor: "Search for",
    SearchForValidationErrorMessage: "Invalid value for 'Search for' field",
  };
});
更新客户端 Web 部件样式
此外,还需要更新 SCSS 样式文件。
打开解决方案的 .src/webparts/graphConsumer/components 文件夹下的 GraphConsumer.module.scss。 紧跟在 .title 类后面,添加以下样式类:
.form {
  @include ms-font-l;
  @include ms-fontColor-white;
}

label {
  @include ms-fontColor-white;
}
更新呈现 Web 部件的 React 组件
现在,可以更新解决方案的 .src/webparts/graphConsumer/components 文件夹下的 GraphConsumer React 组件。
首先,更新 IGraphConsumerProps.ts 文件,以接受 Web 部件实现所需的自定义属性。 下面的示例展示了 IGraphConsumerProps.ts 文件的更新后内容。 请注意
ClientMode枚举定义和WebPartContext类型的导入语句。 稍后将用到它们。import { WebPartContext } from "@microsoft/sp-webpart-base"; import { ClientMode } from "./ClientMode"; export interface IGraphConsumerProps { clientMode: ClientMode; context: WebPartContext; }新建用于保留 React 组件状态的接口。 在 .src/webparts/graphConsumer/components 文件夹中,新建文件并命名为 IGraphConsumerState.ts。 下面展示了接口定义。
import { IUserItem } from "./IUserItem";

export interface IGraphConsumerState {
  users: Array<IUserItem>;
  searchFor: string;
}
在 .src/webparts/graphConsumer/components 文件夹中存储的 IUserItem.ts 文件内,定义
IUserItem接口。 此接口在状态文件中导入。 此接口用于定义从当前租户中检索到的用户概况,并绑定到 UI 中的DetailsList。export interface IUserItem { displayName: string; mail: string; userPrincipalName: string; }接下来,更新 GraphConsumer.tsx 文件。 首先,添加一些导入语句,以导入先前定义的类型。 请注意以下接口的导入语句:
IGraphConsumerProps、IGraphConsumerState、ClientMode、IUserItem。 此外,对于呈现 React 组件 UI 的 Office UI Fabric 组件,还有一些导入语句。import * as strings from "GraphConsumerWebPartStrings"; import { BaseButton, Button, CheckboxVisibility, DetailsList, DetailsListLayoutMode, PrimaryButton, SelectionMode, TextField, } from "office-ui-fabric-react"; import * as React from "react"; import { AadHttpClient, MSGraphClient } from "@microsoft/sp-http"; import { escape } from "@microsoft/sp-lodash-subset"; import { ClientMode } from "./ClientMode"; import styles from "./GraphConsumer.module.scss"; import { IGraphConsumerProps } from "./IGraphConsumerProps"; import { IGraphConsumerState } from "./IGraphConsumerState"; import { IUserItem } from "./IUserItem";在导入语句后,定义 Office UI Fabric
DetailsList组件的列概况。// Configure the columns for the DetailsList component let _usersListColumns = [ { key: "displayName", name: "Display name", fieldName: "displayName", minWidth: 50, maxWidth: 100, isResizable: true, }, { key: "mail", name: "Mail", fieldName: "mail", minWidth: 50, maxWidth: 100, isResizable: true, }, { key: "userPrincipalName", name: "User Principal Name", fieldName: "userPrincipalName", minWidth: 100, maxWidth: 200, isResizable: true, }, ];此数组将用于
DetailsList组件设置,就像 React 组件的render()方法一样。将此组件替换为以下代码。
public render(): React.ReactElement<IGraphConsumerProps> {
  return (
    <div className={ styles.graphConsumer }>
      <div className={ styles.container }>
        <div className={ styles.row }>
          <div className={ styles.column }>
            <span className={ styles.title }>Search for a user!</span>
            <p className={ styles.form }>
              <TextField
                  label={ strings.SearchFor }
                  required={ true }
                  onChange={ this._onSearchForChanged }
                  onGetErrorMessage={ this._getSearchForErrorMessage }
                  value={ this.state.searchFor }
                />
            </p>
            <p className={ styles.form }>
              <PrimaryButton
                  text='Search'
                  title='Search'
                  onClick={ this._search }
                />
            </p>
            {
              (this.state.users != null && this.state.users.length > 0) ?
                <p className={ styles.form }>
                <DetailsList
                    items={ this.state.users }
                    columns={ _usersListColumns }
                    setKey='set'
                    checkboxVisibility={ CheckboxVisibility.hidden }
                    selectionMode={ SelectionMode.none }
                    layoutMode={ DetailsListLayoutMode.fixedColumns }
                    compact={ true }
                />
              </p>
              : null
            }
          </div>
        </div>
      </div>
    </div>
  );
}
更新 React 组件类型定义,并添加构造函数,如下面的示例所示:
export default class GraphConsumer extends React.Component<IGraphConsumerProps, IGraphConsumerState> {

  constructor(props: IGraphConsumerProps, state: IGraphConsumerState) {
    super(props);

    // Initialize the state of the component
    this.state = {
      users: [],
      searchFor: ""
    };
  }
有一些验证规则和处理事件,可供
TextField组件用来收集搜索条件。 下面展示了方法实现。将这两个方法添加到
GraphConsumer类的末尾:private _onSearchForChanged = (event: React.FormEvent<HTMLInputElement | HTMLTextAreaElement>, newValue?: string): void => { // Update the component state accordingly to the current user's input this.setState({ searchFor: newValue, }); } private _getSearchForErrorMessage = (value: string): string => { // The search for text cannot contain spaces return (value == null || value.length == 0 || value.indexOf(" ") < 0) ? '' : `${strings.SearchForValidationErrorMessage}`; }PrimaryButton触发\_search()函数,以确定要使用哪种客户端技术来使用 Microsoft Graph。 将此方法添加到GraphConsumer类的末尾:private _search = (event: React.MouseEvent<HTMLAnchorElement | HTMLButtonElement | HTMLDivElement | BaseButton | Button, MouseEvent>) : void => { console.log(this.props.clientMode); // Based on the clientMode value search users switch (this.props.clientMode) { case ClientMode.aad: this._searchWithAad(); break; case ClientMode.graph: this._searchWithGraph(); break; } }
DetailsList 组件实例是在 render() 方法中呈现,以防万一组件状态的 users 属性中有项。
配置 API 权限请求
为了能够访问 Microsoft Graph 或其他任何第三方 REST API,必须在解决方案清单中显式声明权限要求(从 OAuth 角度出发)。
为此,在 SharePoint 框架 v.1.4.1 或更高版本中,可以在解决方案的 config 文件夹下的 package-solution.json 中配置 webApiPermissionRequests 属性。 下面展示了当前解决方案的相应文件的示例代码摘录。
复制 webApiPermissionRequests 属性的声明。
{
  "$schema": "https://developer.microsoft.com/json-schemas/spfx-build/package-solution.schema.json",
  "solution": {
    "name": "spfx-api-scopes-tutorial-client-side-solution",
    "id": "841cd609-d821-468d-a6e4-2d207b966cd8",
    "version": "1.0.0.0",
    "includeClientSideAssets": true,
    "skipFeatureDeployment": true,
    "webApiPermissionRequests": [
      {
        "resource": "Microsoft Graph",
        "scope": "User.ReadBasic.All"
      }
    ]
  },
  "paths": {
    "zippedPackage": "solution/spfx-api-scopes-tutorial.sppkg"
  }
}
请注意 webApiPermissionRequests,它是一组 webApiPermissionRequest 项。 每项都定义权限请求的 resource 和 scope。
resource 可以是要为其配置权限请求的资源名称或 ObjectId(在 Azure AD 中)。 对于 Microsoft Graph,名称即“Microsoft Graph”。 ObjectId 并不唯一,因租户而异。
scope 可以是权限的名称,也可以是权限的唯一 ID。 可以从 API 文档获取权限名称。 可以从 API 清单文件获取权限 ID。
注意
有关 Microsoft Graph 支持的权限列表,请参阅 Microsoft Graph 权限参考。
默认情况下,服务主体没有访问 Microsoft Graph 所需的显式权限。 不过,如果请求获取 Microsoft Graph 访问令牌,将获取包含 user_impersonation 权限的令牌,可用于读取用户信息 (User.Read.All)。 可以请求租户管理员授予其他权限。 有关详细信息,请参阅在 SharePoint 框架解决方案中连接到受 Azure AD 保护的 API。
若要搜索用户并获取用户的 displayName、mail 和 userPrincipalName,拥有 User.ReadBasic.All 权限就够了。
打包和部署解决方案时,你(或管理员)需要向解决方案授予请求获取的权限。 有关详细信息,请参阅部署解决方案并授予权限。
访问 Microsoft Graph
现在,可以通过以下方法来访问 Microsoft Graph。 方法有以下两种:
- 使用 AadHttpClient 客户端对象
- 使用 MSGraphClient 客户端对象
AadHttpClient 客户端对象可用于访问任何 REST API。 可用来访问 Microsoft Graph 或其他任何第三方(或第一方)REST API。
MSGraphClient 客户端对象只能访问 Microsoft Graph。 在内部,它使用 AadHttpClient 客户端对象,并支持 Microsoft Graph SDK 的流畅语法。
使用 AadHttpClient
若要使用 AadHttpClient 客户端对象访问任何 REST API,请新建 AadHttpClient 类型的实例,方法是调用 context.aadHttpClientFactory.getClient() 方法并提供目标服务的 URL。
创建的对象提供用于发出下列请求的方法:
get():发出 HTTP GET 请求post():发出 HTTP POST 请求fetch():根据所提供的HttpClientConfiguration和IHttpClientOptions参数,发出其他任何类型的 HTTP 请求。
由于所有这些方法都支持 JavaScript/TypeScript 的异步开发模型,因此可以处理包含承诺的结果。
下面的示例展示了示例解决方案的 \_searchWithAad() 方法。
private _searchWithAad = (): void => {
  // Log the current operation
  console.log("Using _searchWithAad() method");

  // Using Graph here, but any 1st or 3rd party REST API that requires Azure AD auth can be used here.
  this.props.context.aadHttpClientFactory
    .getClient("https://graph.microsoft.com")
    .then((client: AadHttpClient) => {
      // Search for the users with givenName, surname, or displayName equal to the searchFor value
      return client
        .get(
          `https://graph.microsoft.com/v1.0/users?$select=displayName,mail,userPrincipalName&$filter=(givenName%20eq%20'${escape(this.state.searchFor)}')%20or%20(surname%20eq%20'${escape(this.state.searchFor)}')%20or%20(displayName%20eq%20'${escape(this.state.searchFor)}')`,
          AadHttpClient.configurations.v1
        );
    })
    .then(response => {
      return response.json();
    })
    .then(json => {

      // Prepare the output array
      var users: Array<IUserItem> = new Array<IUserItem>();

      // Log the result in the console for testing purposes
      console.log(json);

      // Map the JSON response to the output array
      json.value.map((item: any) => {
        users.push( {
          displayName: item.displayName,
          mail: item.mail,
          userPrincipalName: item.userPrincipalName,
        });
      });

      // Update the component state accordingly to the result
      this.setState(
        {
          users: users,
        }
      );
    })
    .catch(error => {
      console.error(error);
    });
}
get() 方法以输入参数形式获取 OData 请求 URL。 如果成功,请求返回 JSON 对象和响应。
使用 MSGraphClient
如果要定目标到 Microsoft Graph,可以使用 MSGraphClient 客户端对象,它提供更流畅的语法。
下面的示例展示了示例解决方案的 _searchWithGraph() 方法操作。
private _searchWithGraph = () : void => {

  // Log the current operation
  console.log("Using _searchWithGraph() method");

  this.props.context.msGraphClientFactory
    .getClient()
    .then((client: MSGraphClient) => {
      // From https://github.com/microsoftgraph/msgraph-sdk-javascript sample
      client
        .api("users")
        .version("v1.0")
        .select("displayName,mail,userPrincipalName")
        .filter(`(givenName eq '${escape(this.state.searchFor)}') or (surname eq '${escape(this.state.searchFor)}') or (displayName eq '${escape(this.state.searchFor)}')`)
        .get((err, res) => {

          if (err) {
            console.error(err);
            return;
          }

          // Prepare the output array
          var users: Array<IUserItem> = new Array<IUserItem>();

          // Map the JSON response to the output array
          res.value.map((item: any) => {
            users.push( {
              displayName: item.displayName,
              mail: item.mail,
              userPrincipalName: item.userPrincipalName,
            });
          });

          // Update the component state accordingly to the result
          this.setState(
            {
              users: users,
            }
          );
        });
    });
}
可以通过调用 context.msGraphClientFactory.getClient() 方法获取 MSGraphClient 类型的实例。
然后,使用 Microsoft Graph SDK 的 Fluent API,定义对目标 Microsoft Graph 端点运行的 OData 查询。
结果为 JSON 响应,必须进行解码,并将它映射到类型化结果。
注意
可以使用完全类型化方法,即使用 Microsoft Graph TypeScript 类型。
部署解决方案并授予权限
现在可以生成、捆绑、打包和部署解决方案。
运行 Gulp 命令,验证是否已正确生成解决方案。
gulp build运行以下命令,捆绑和打包解决方案。
gulp bundle
gulp package-solution
接下来,转到目标租户的应用程序目录,并上传解决方案包。 可以在解决方案的 sharepoint/solution 文件夹下找到解决方案包。 此为 .sppkg 文件。 上传解决方案包后,应用程序目录会提示如下面屏幕截图中的对话框。

屏幕下方有一条消息,提示解决方案包需要进行权限审批。 这是由于 package-solution.json 文件中的
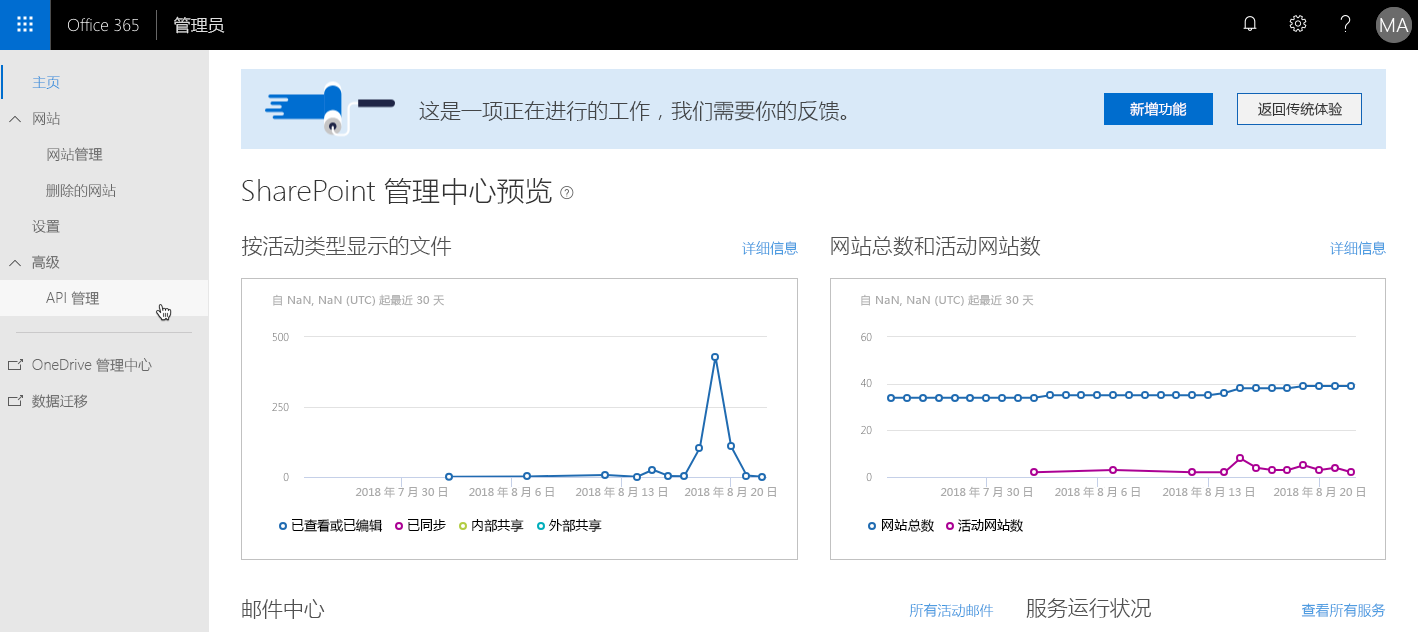
webApiPermissionRequests属性所致。在新的 SharePoint Online 管理中心,在左侧快速启动菜单中,“高级”下,选择“API 访问”菜单项。 你将看到与如下所示相似的页面。

使用此页面,你(或 SharePoint Online 租户的其他任何管理员)可以批准或拒绝任何待定权限请求。 此处不显示哪些解决方案包请求获取哪种权限,因为权限在租户一级针对唯一应用程序进行定义。
注意
若要详细了解租户级权限范围的内部工作原理,可以阅读另请参阅部分中的文章。
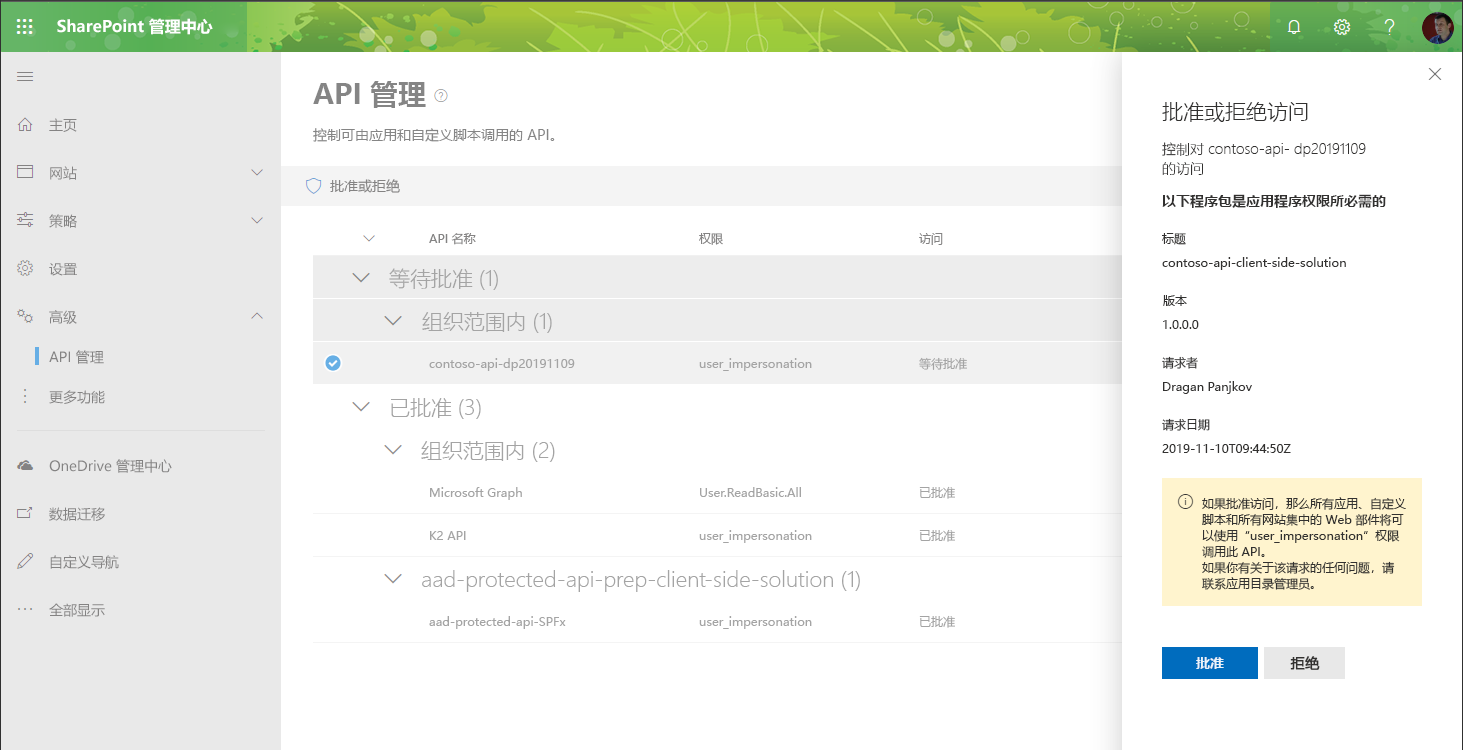
选择在解决方案的 package-solution.json 文件中请求获取的权限,再依次选择 “批准或拒绝访问” 以及 “批准”。 下面的屏幕截图展示了管理 UI 中的面板。

警告
如果在尝试批准权限时意外看到异常 ([HTTP]:400 - [CorrelationId]),更新 package-solution.json 中的 resource 属性,使用值 Microsoft.Azure.AgregatorService,而不是 Microsoft Graph(本教程前面对此进行了说明)。 请拒绝现有请求,并将应用程序目录中的解决方案包更新为更新值。
测试解决方案
若要运行解决方案,请运行下面的 Gulp 命令。
gulp serve --nobrowser打开浏览器并转到以下 URL,以转到“SharePoint 框架工作台”页面:
https://<your-tenant>.sharepoint.com/_layouts/15/Workbench.aspx添加 GraphConsumer 客户端 Web 部件,配置客户端模式,并搜索用户。
发出首个请求后,将看到弹出窗口出现并消失。 这是 ADAL JS 使用的登录窗口,SharePoint 框架在内部用它来从 Azure AD 中获取访问令牌(具体是使用 OAuth 隐式流)。

演示到此结束! 现在可以生成企业级解决方案,以访问受 Azure AD 保护的 REST API。