在 SharePoint 外接程序中使用异步操作
在 SharePoint 外接程序中使用 Microsoft Azure WebJobs 实施异步操作。
适用于:SharePoint 2013 | SharePoint 外接程序 | SharePoint Online
Core.QueueWebJobUsage 示例演示了如何在 Office 365 中使用提供程序托管的外接程序和 Azure WebJobs 创建和运行异步操作。
使用此解决方案可以执行以下操作:
提升远程事件接收器的性能。
迁移到 SharePoint Online,并实施在 SharePoint 本地环境中所享有的相同的计时器作业功能。
实现要针对 SharePoint 环境运行的长时间运行的操作。 例如:
AppInstalled 事件,其运行时间大于 30 秒的超时间隔。 外接程序事件处理程序中存在异步进程。 相关详细信息,请参阅处理 SharePoint 外接程序中的事件和在 SharePoint 外接程序中创建外接程序事件接收器。
自定义网站集设置。
在 Office 365 和本地系统之间同步数据的操作。
执行复杂计算的操作。
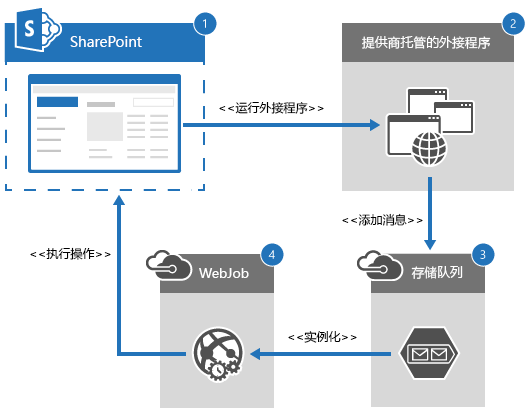
下图显示所需组件的高级体系结构,以及在执行异步操作时这些组件的处理流程。

若要在提供程序托管的外接程序中使用 Azure WebJobs 实现异步操作,请执行以下操作:
用户运行在 SharePoint Online 中部署的外接程序。
提供程序托管的外接程序提供 Azure WebJob 所需的输入参数,然后将新邮件添加到 Azure 存储队列。
Azure 存储队列在连续运行的 Azure WebJob 中触发一个事件,开始处理新邮件。
Azure WebJob 对 SharePoint Online 网站运行自定义业务逻辑。
注意
将邮件添加到 Azure 存储队列使用的不是运行 Azure WebJob 的进程。 因此,加载项可以实现异步操作,具体方法是先使用一个进程将新邮件添加到队列,再使用 Azure WebJob 在另一个进程中处理这些邮件。
准备工作
若要开始,请从 GitHub 的 Office 365 Developer patterns and practices(Office 365 开发人员模式和做法)项目上下载 Core.QueueWebJobUsage 示例外接程序,然后创建 Azure 帐户,将详细信息添加到此帐户,并验证 Azure WebJob 是否正在运行。
若要创建 Azure 存储帐户以访问 Azure 存储队列,请:
登录到 Microsoft Azure 门户。
选择 “新建>Data Services>存储>快速创建”。
在“URL”中,输入您的域名。 例如,输入 contoso。
在“位置/地缘组”中,选择一个合适的位置。
在“复制”中,选择“地域冗余”。
选择“创建存储帐户”。
若要将详细信息添加到您新创建的存储帐户中,请执行以下操作:
创建 Azure 存储帐户后,选择“ 管理访问密钥”。
在 “管理访问密钥”中,复制 “存储帐户名称” 和 “主访问密钥”。
将客户端 ID、客户端密码和你的 Azure 存储帐户信息应用到多个配置文件中。
在 Helper Project\Core.QueueWebJobUsage.Console.SendMessage 中,打开 Program.cs,并将您的网站 URL 输入“siteUrl”框中。
在 Core.QueueWebJobUsage.Job 上的“属性”中,对 Microsoft.SharePoint.Client 和 Microsoft.SharePoint.Client.Runtime 引用将“复制本地”设置为“True”。 将复制本地设置为 True 会将引用的程序集复制到 Azure,从而使 Azure WebJob 可解析对这些程序集的引用。
部署 Azure WebJob。 有关详细信息,请参阅Deploy a WebJobs project(部署 WebJobs 项目)。
若要验证 Azure WebJob 是否运行:
登录到 Azure 门户。
选择 “Web 应用”,然后选择输入的“Microsoft Azure 网站”。
选择“WEBJOBS”。
验证 Azure WebJob 是否显示在列表中,并且 SCHEDULE 是否设置为 “连续运行”。
选择“配置”。
在“外接程序设置”中,为 ClientId 和 ClientSecret 创建新的外接程序设置。 从 Core.QueueWebJobUsage.Job\app.config 文件中复制 ClientId 和 ClientSecret 键值对。
在“连接字符串”中,为 AzureWebJobsDashboard 和 AzureWebJobsStorage 创建新的连接字符串。 从 Core.QueueWebJobUsage.Job\app.config 文件复制 AzureWebJobsDashboard 和 AzureWebJobsStorage 键(名称)值对,然后将类型设置为自定义。
选择“保存”。
应用配置设置
使用下表中的信息将配置设置应用于 Core.QueueWebJobUsage Visual Studio 解决方案。
| 文件位置 | 要更新的密钥 | 要更新的值信息 |
|---|---|---|
| Helper Project\Core.QueueWebJobUsage.Console.SendMessage\app.config | StorageConnectionString | 将 [Your Account name] 替换为从 Azure 门户复制的存储帐户名称。 |
| 将 [Your Account Key] 替换为从 Azure 门户复制的主访问密钥。 | ||
| Core.QueueWebJobUsageWeb\web.config | StorageConnectionString | 将 [YourAccountName] 替换为从 Azure 门户复制的存储帐户名称。 |
| 将 [YourAccountKey] 替换为从 Azure 门户复制的主访问密钥。 | ||
| Core.QueueWebJobUsage.Job\app.config | StorageConnectionString | 将 [YourAccountName] 替换为从 Azure 门户复制的存储帐户名称。 |
| 将 [YourAccountKey] 替换为从 Azure 门户复制的主访问密钥。 | ||
| ClientId | 将 [Your Add-in ID] 替换为从 Core.QueueWebJobUsageWeb\web.config 复制的客户端 ID。 | |
| ClientSecret | 将 [Your Add-in Secret] 替换为从 Core.QueueWebJobUsageWeb\web.config 复制的客户端密码。 | |
| AzureWebJobsDashboard | 将 [YourAccount] 替换为从 Azure 门户复制的存储帐户名称。 | |
| 将 [YourKey] 替换为从 Azure 门户复制的主访问密钥。 | ||
| AzureWebJobsStorage | 将 [YourAccount] 替换为从 Azure 门户复制的存储帐户名称。 | |
| 将 [YourKey] 替换为从 Azure 门户复制的主访问密钥。 |
注意
例如,如果更新了 Core.QueueWebJobUsageWeb 中的 ClientId 和 ClientSecret,当您在 AppManifest.xml 中递增版本号时,请确保更新 Core.QueueWebJobUsage.Job\app.config 中的 ClientId 和 ClientSecret。
使用 Core.QueueWebJobUsage 外接程序
下表介绍了 Core.QueueWebJobUsage 解决方案中的所有 Visual Studio 项目。
| Visual Studio 项目 | 说明 |
|---|---|
| Core.QueueWebJobUsage | 你的 SharePoint 外接程序项目。 需要以下权限:Web 上的
|
| Core.QueueWebJobUsage.Common | 包含此解决方案的业务对象和业务逻辑代码,例如将消息添加到存储队列的方法。 This project is included to share business objects and business logic between different projects. You may not need this in your implementation. |
| Core.QueueWebJobUsage.Job | 在将新邮件添加到 Azure 存储队列时运行的 Azure WebJob。 此项目包含你的自定义业务逻辑代码。 |
| Core.QueueWebJobUsageWeb | 提供程序托管的外接程序,其中包含 Core.QueueWebJobUsage 项目的 UI。 |
| Helper Project\Core.QueueWebJobUsage.Console.SendMessage | 一个帮助程序项目,可用于验证存储帐户信息和队列创建过程,并且可以将邮件发送至队列中进行处理,而无需设置本文中介绍的整个解决方案。 |
运行 Core.QueueWebJobUsage 代码示例时,提供程序托管的外接程序将出现并显示两个按钮: 同步操作 和 异步操作。 当您选择“同步操作”时,Pages\Default.aspx 中的 btnSync_Click 会模拟长时间运行的同步进程。 在此代码示例中,btnSync_Click 会让当前线程休眠 10 秒钟,然后创建一个文档库。 当您选择“异步操作”时,Pages\Default.aspx 中的 btnAsync_Click 将执行以下操作:
获取当前用户。
创建 SiteModifyRequest 业务对象,用于存储要包含在发送到 Azure 存储队列的消息中的数据。 在此代码示例中,要发送的数据包括当前用户的名称和当前网站的 URL。
调用 SiteManager () 。AddAsyncOperationRequestToQueue 将消息添加到 Azure 存储队列。
注意
本文中的代码按原样提供,不提供任何明示或暗示的担保,包括对特定用途适用性、适销性或不侵权的默示担保。
protected void btnAsync_Click(object sender, EventArgs e)
        {

            var spContext = SharePointContextProvider.Current.GetSharePointContext(Context);

            using (var clientContext = spContext.CreateUserClientContextForSPHost())
            {
                // Get the current user.
                var currUser = clientContext.Web.CurrentUser;
                clientContext.Load(currUser);
                clientContext.ExecuteQuery();

                // Create business object, and then add the request to the queue.
                SiteModifyRequest request = new SiteModifyRequest() { RequestorName = currUser.Title, SiteUrl = Page.Request["SPHostUrl"] };
                new SiteManager().AddAsyncOperationRequestToQueue(request,
                                                                  ConfigurationManager.AppSettings["StorageConnectionString"]);

                processViews.ActiveViewIndex = 1;
                lblStatus.Text = "Asynchronous operation to create document library started.";
            }
        }
在 SiteManager.cs 的 Core.QueueWebJobUsage.Common 中,AddAsyncOperationRequestToQueue 执行以下操作:
创建 CloudStorageAccount 对象,方法是在 Core.QueueWebJobUsageWeb\web.config 文件中使用 AccountName 和 AccountKey 配置信息。
通过使用 CloudStorageAccount.CreateCloudQueueClient,创建 Azure 存储队列客户端。
使用 CloudQueueClient.GetQueueReference 获取对 Azure 存储队列的引用,其中该队列的名称与 SiteManager.StorageQueueName 常数的值相同。
如果 Azure 存储队列不存在,可使用 CloudQueue.CreateIfNotExists 创建此队列。
使用 CloudQueue.AddMessage 将新消息添加到 Azure 存储队列。 modifyRequest 业务对象序列化为 CloudQueueMessage 对象,该对象将添加到 Azure 存储队列中。
public void AddAsyncOperationRequestToQueue(SiteModifyRequest modifyRequest,
                                                    string storageConnectionString)
        {
            CloudStorageAccount storageAccount =
                                CloudStorageAccount.Parse(storageConnectionString);

            // Get queue or create a new one if one does not exist.
            CloudQueueClient queueClient = storageAccount.CreateCloudQueueClient();
            CloudQueue queue = queueClient.GetQueueReference(SiteManager.StorageQueueName);
            queue.CreateIfNotExists();

            // Add a message to queue.
            queue.AddMessage(new CloudQueueMessage(JsonConvert.SerializeObject(modifyRequest)));
        }
将消息添加到 Azure 存储队列后,持续运行的 Azure WebJob 将等待并处理新消息。 Azure WebJob 在 Core.QueueWebJobUsage.Job 中定义。 当 Azure WebJob 运行时,Core.QueueWebJobUsage.Job\Program.cs 中的 Main 会创建新的 JobHost,然后调用 RunAndBlock。 JobHost 协调对使用 QueueTrigger 属性标记的方法的调用,并监视特定队列上的消息。 RunAndBlock 可确保 Azure WebJob 持续运行并调用 ProcessQueueMessage,这是在将新消息添加到 Azure 存储队列时触发的方法。 Azure WebJobs SDK 将 主 线程与 ProcessQueueMessage 相关联。 有关详细信息,请参阅 在 Azure 外接程序服务中创建 .NET WebJob。
static void Main()
        {
            var host = new JobHost();
            // The following code ensures that the WebJob will run continuously.
            host.RunAndBlock();
        }
ProcessQueueMessage 处理添加到 Azure 存储队列中的新邮件,方法如下:
使用 QueueTrigger 属性指定在将名称等于 SiteManager.StorageQueueName 值的新消息写入队列时,应触发 ProcessQueueMessage。
使用作为参数传递给 ProcessQueueMessage 的日志变量写入 Azure WebJob 日志。
调用 SiteManager().PerformSiteModification 在网站上执行长时间运行的业务进程。 在此代码示例中,在线程休眠 10 秒钟后创建文档库。
public static void ProcessQueueMessage(
            [QueueTrigger(SiteManager.StorageQueueName)]
            SiteModifyRequest modifyRequest, TextWriter log)
        {
            log.WriteLine(string.Format("{0} '{1}' {2} '{3}'.",
                            "Received new site modification request with URL",
                            modifyRequest.SiteUrl,
                            "from person named as ",
                            modifyRequest.RequestorName));

            try
            {
                Uri targetSite = new Uri(modifyRequest.SiteUrl);

                // Get the realm for the URL.
                string realm = TokenHelper.GetRealmFromTargetUrl(targetSite);

                // Get the access token for the URL.
                // Requires this add-in to be registered with the tenant.
                string accessToken = TokenHelper.GetAppOnlyAccessToken(
                                                    TokenHelper.SharePointPrincipal,
                                                    targetSite.Authority, realm).AccessToken;

                // Get client context with access token.
                using (var ctx =
                    TokenHelper.GetClientContextWithAccessToken(
                                                    targetSite.ToString(), accessToken))
                {
                    // Call business logic code.
                    new SiteManager().PerformSiteModification(ctx, modifyRequest);
                }
            }
            catch (Exception ex)
            {
                log.WriteLine(string.Format("Site modification to URL {0} failed with following details.", modifyRequest.SiteUrl));
                log.WriteLine(ex.ToString());
                throw;
            }
        }