在 Windows Phone 应用中使用多个 SharePoint 列表
创建使用多个 SharePoint 列表中数据的 Windows Phone 应用。
您可以多种方式在应用程序中使用多个 SharePoint 列表。 当您基于 Windows Phone SharePoint 列表应用程序模板创建一个 Windows Phone 应用程序时,您要指定一个单一目标 SharePoint 列表,但是生成的项目的体系结构是可扩展的,足以容纳多个列表的集成。
重要
如果要开发适用于 Windows Phone 8 的应用,则必须使用 Visual Studio Express 2012 而不是 Visual Studio 2010 Express。 除开发环境外,本文中的其他所有信息都适用于创建 Windows Phone 8 和 Windows Phone 7 版应用。 > 有关详细信息,请参阅 如何:设置用于开发 SharePoint 移动应用的环境。
创建涉及基于相同架构的 SharePoint 列表的解决方案
如果您有两个基于相同架构的 SharePoint 列表,您可以利用由 Windows Phone SharePoint 列表应用程序模板实施的类并创建这些特定于每个列表的类的对象。
假设您有两个基于"联系人"列表模板的 SharePoint 列表。 一个列表(例如,名为“营销团队”)包含您组织中的营销团队成员,另一个列表(名为“工程团队”)包含工程团队成员。 如果使用 Windows Phone SharePoint 列表应用程序模板创建项目,并将“营销团队”列表指定为项目基础的目标列表,则默认情况下, (名为 DataProvider 的 ListDataProvider 类的实现中创建 ListDataProvider 类的实例) 项目中的 App.xaml.cs 文件中。 此对象将列表(即"营销团队"列表)作为应用程序的数据源,从而提供了用于访问和处理列表中各项的操作。 还会为创建该应用程序所依据的列表创建一个 ListViewModel 类的实例。 此对象有一个属性成员(怡巧也被命名为 DataProvider),可以将该成员设置为一个给定的 ListDataProvider 类的实例,这样就为 ListViewModel 类实例建立了数据源。
可以在项目中创建 ListDataProvider 类的附加实例, (工程团队) App.xaml.cs文件中充当第二 个 列表的数据源。 该对象在以下代码中称为 SecondaryDataProvider。
private static ListDataProvider m_SecondaryDataProvider;

public static ListDataProvider SecondaryDataProvider
{
    get
    {
        if (m_SecondaryDataProvider != null)
            return m_SecondaryDataProvider;

        m_SecondaryDataProvider = new ListDataProvider();
        m_SecondaryDataProvider.ListTitle = "Engineering Team";
        m_SecondaryDataProvider.SiteUrl = new Uri("http://contoso:2012/sites/samplesite/");

        return m_SecondaryDataProvider;
    }
}
然后您可以实例化 ListViewModel 类的另一个对象(例如,名为 SecondaryViewModel),并将 SecondaryDataProvider 对象分配到它的 DataProvider 属性,如以下代码中所示。
private static ListViewModel m_SecondaryViewModel;

public static ListViewModel SecondaryViewModel
{
    get
    {
        if (m_SecondaryViewModel == null)
            m_SecondaryViewModel = new ListViewModel { DataProvider = App.SecondaryDataProvider };

        return m_SecondaryViewModel;
    }
    set
    {
        m_SecondaryViewModel = value;
    }
}
如果这两个列表的相同字段和视图适合 (目的,并且同样,如果两个列表具有相同的列和字段) ,则无需在ListDataProvider.cs文件中 (ListDataProvider 类) 的实现中进行任何更改。
但是,若要显示或修改您的项目中第二个列表的数据,您需要将视图窗体添加到您的项目,这些视图窗体绑定到了 SecondaryViewModel 并为此进行了配置。 例如,可以将名为“SecondaryViews”的文件夹添加到项目,并使用类似于项目中主列表的模板生成的默认 List.xaml 文件的标记将 SecondaryList.xaml 文件添加到该文件夹中。 请注意,应通过为 x:ClassSecondaryList.xaml 文件中元素的 PhoneApplicationPage 属性指定一个区分值,将辅助列表窗体与应用中的主列表窗体区分开来。
<phone:PhoneApplicationPage
    x:Class="MultipleSPListApp.SecondaryViews.ListForm"
    xmlns="http://schemas.microsoft.com/winfx/2006/xaml/presentation"
    xmlns:x="http://schemas.microsoft.com/winfx/2006/xaml"
    xmlns:phone="clr-namespace:Microsoft.Phone.Controls;assembly=Microsoft.Phone"
    xmlns:shell="clr-namespace:Microsoft.Phone.Shell;assembly=Microsoft.Phone"
    xmlns:d="http://schemas.microsoft.com/expression/blend/2008"
    xmlns:mc="http://schemas.openxmlformats.org/markup-compatibility/2006"
    mc:Ignorable="d" d:DesignWidth="480" d:DesignHeight="696"
    FontFamily="{StaticResource PhoneFontFamilyNormal}"
    FontSize="{StaticResource PhoneFontSizeNormal}"
    Foreground="{StaticResource PhoneForegroundBrush}"
    SupportedOrientations="PortraitOrLandscape" Orientation="Portrait"
    shell:SystemTray.IsVisible="True" x:Name = "ListViewPage">
...
</phone:PhoneApplicationPage>
在关联的代码隐藏文件中, SecondaryList.xaml.cs,将所有引用 App.MainViewModel 替换为对 的 App.SecondaryViewModel引用。 例如,该文件中的构造函数应该如下所示。
public ListForm()
{
    InitializeComponent();
    this.DataContext = App.SecondaryViewModel;
}
此外,将代码隐藏文件 App.DataProvider 中的所有引用替换为对 App.SecondaryDataProvider 的引用,并更新任何导航路径以指向相应的辅助 XAML 页面。 如果还向项目添加名为 (的辅助 New 窗体,例如,项目) 的 SecondaryViews 文件夹中的 SecondaryNewForm.xaml,则 OnNewButtonClick 事件的 SecondaryList.xaml.cs 文件中的处理程序将类似于以下代码。
private void OnNewButtonClick(object sender, EventArgs e)
{
    // Instantiate a new instance of NewItemViewModel and go to NewForm.
    App.SecondaryViewModel.CreateItemViewModelInstance = new NewItemViewModel { DataProvider = App.SecondaryDataProvider };
    NavigationService.Navigate(new Uri("/SecondaryViews/SecondaryNewForm.xaml", UriKind.Relative));
}
最后,可以将按钮添加到 List.xaml 文件中的 ApplicationBar,以显示 SecondaryList.xaml 页面。
<phone:PhoneApplicationPage.ApplicationBar>
    <shell:ApplicationBar IsVisible="True" IsMenuEnabled="True">
        <shell:ApplicationBarIconButton x:Name="btnNew" IconUri="/Images/appbar.new.rest.png" Text="New" Click="OnNewButtonClick"/>
        <shell:ApplicationBarIconButton x:Name="btnRefresh" IconUri="/Images/appbar.refresh.rest.png" Text="Refresh" IsEnabled="True" Click="OnRefreshButtonClick"/>
        <!--Add the following button to navigate to the secondary list (Engineering Team).-->
        <shell:ApplicationBarIconButton x:Name="btnSecondaryList" IconUri="/Images/appbar.upload.rest.png" Text="Engineering" IsEnabled="True" Click="OnSecondaryListButtonClick"/>
    </shell:ApplicationBar>
</phone:PhoneApplicationPage.ApplicationBar>
在相关联的代码隐藏文件 List.xaml.cs 中,请添加一个在 List.xaml 文件中声明的 OnSecondaryListButtonClick 事件的处理程序。
private void OnSecondaryListButtonClick(object sender, EventArgs e)
{
    NavigationService.Navigate(new Uri("/SecondaryViews/SecondaryList.xaml", UriKind.Relative));
}
然后,您的应用程序的用户可以在营销团队列表和工程团队列表之间导航。 由于基础列表架构相同,因此模板生成的默认 DataProvider 和 MainViewModel 对象以及添加的 SecondaryDataProvider 和 SecondaryViewModel 对象无需对 ListDataProvider.cs 文件进行任何修改即可处理所有数据事务。
创建涉及基于不同架构的 SharePoint 列表的解决方案
前一部分中的方法能够运行(也就是说,对于基于相同架构的 SharePoint 列表),但是,开发人员可以使用 Windows Phone SharePoint 列表应用程序模板中的 ListDataProvider 类进行自定义,以处理可能不基于相同架构或者不包含相同的列和字段的多个 SharePoint 列表。
与在前面部分中一样,假设您有一个 SharePoint 列表,即"营销团队"(基于"联系人"列表模板),它包含营销团队成员。 还假设您有另一个列表,称为“订单”(基于“自定义”列表模板),它包含表 1 中所示的列和字段类型。
表 1. “订单”列表的列和字段
| Column | 字段类型 | 必需 |
|---|---|---|
| 产品(例如标题) | 单行文本(文本) | 是 |
| 单位价格 | 货币 | 是 |
| 数量 | 数字 | 编号(默认值为零) |
| 订单价值 | 计算值(单价 * 数量) | 否 |
| 订单日期 | 日期和时间 (Datetime) | 否 |
| 订单状态 | 选项 | 否 |
| 客户 | 单行文本(文本) | 否 |
与前一部分的示例一样,您可以实例化一个单独的 ListDataProvider 对象和另一个 ListViewModel 对象来管理"订单"列表。 假定该实例化的 ListDataProvider 对象命名为 OrdersListDataProvider,如以下代码所示。
private static ListDataProvider m_OrdersListDataProvider;

public static ListDataProvider OrdersListDataProvider
{
    get
    {
        if (m_OrdersListDataProvider != null)
            return m_OrdersListDataProvider;

        m_OrdersListDataProvider = new ListDataProvider();
        m_OrdersListDataProvider.ListTitle = "Orders";
        m_OrdersListDataProvider.SiteUrl = new Uri("http://contoso:2012/sites/samplesite/"); // Specify a URL here for your server.

        return m_OrdersListDataProvider;
    }
}
并假定该"订单"列表的实例化的 ListViewModel 对象命名为 OrdersListViewModel,如以下代码所示。
private static ListViewModel m_OrdersListViewModel;

public static ListViewModel OrdersListViewModel
{
    get
    {
        if (m_OrdersListViewModel == null)
            m_OrdersListViewModel = new ListViewModel { DataProvider = App.OrdersListDataProvider };

        return m_OrdersListViewModel;
    }
    set
    {
        m_OrdersListViewModel = value;
    }
}
"订单"列表的架构不同于"营销团队"列表的架构。 可以通过向 ListDataProvider.cs 文件(特别是 CamlQueryBuilder 类)添加代码来适应差异。
public static class CamlQueryBuilder
{
    static Dictionary<string, string> ViewXmls = new Dictionary<string, string>()
    {
      {"View1",   @"<View><Query><OrderBy><FieldRef Name='Title' />
                    <FieldRef Name='FirstName'  /></OrderBy></Query><RowLimit>30</RowLimit><ViewFields>{0}</ViewFields></View>"},
      {"View2",   @"<View><Query><OrderBy><FieldRef Name='ID' /></OrderBy></Query><RowLimit>30</RowLimit>
     <ViewFields>{0}</ViewFields></View>"}
    };

    static string View1Fields = @"<FieldRef Name='Title'/><FieldRef Name='FirstName'/>
   <FieldRef Name='JobTitle'/><FieldRef Name='Email'/><FieldRef Name='Comments'/>";
    static string View2Fields = @"<FieldRef Name='Title'/><FieldRef Name='Unit_x0020_Price'/><FieldRef Name='Quantity'/>
            <FieldRef Name='Order_x0020_Value'/><FieldRef Name='Order_x0020_Date'/>
            <FieldRef Name='Status'/><FieldRef Name='Customer'/>";

    public static CamlQuery GetCamlQuery(string viewName)
    {
        string viewXml = ViewXmls[viewName];
        // Add ViewFields to the ViewXml depending on the view.
        switch (viewName)
        {
            case "View2":
                viewXml = string.Format(viewXml, View2Fields);
                break;
            case "View1":
            default:
                viewXml = string.Format(viewXml, View1Fields);
                break;
        }
        return new CamlQuery { ViewXml = viewXml };
    }
}
在这里,键值为“View2”的条目被添加到“订单”列表的 ViewXmlsDictionary 对象。 (请记住,添加到 CamlQueryBuilder 类中的 ViewXmlsDictionary 的条目的键值,对于模板中的每个缓存逻辑来说必须是唯一的(在解决方案范围内),才能正常运行。 ( View1Fields 和 View2Fields) 的字符串变量用于存储每个视图的字段列表。 然后,依据传递给 GetCamlQuery 方法的 viewName 参数的值,创建适当的 CAML 查询 XML 字符串。
然后,如上一部分所述,可以为列表创建视图窗体,此时间绑定到 OrdersListViewModel 和 OrdersListDataProvider 对象。 例如,特定于 Orders list 的 List 窗体的 XAML(名为 OrdersList.xaml)与应用中主列表的模板生成的 List.xaml 文件中的标记类似,只是将呈现列表的 PivotItem 控件命名为“View2” (,而不是默认的“View1”) 并为 ListBox的 ItemsSource 属性设置 Binding 声明控件,其中列表项呈现为“View2”,如以下标记 (仅显示页面根网格的标记) 。
    <Grid x:Name="LayoutRoot" Background="Transparent" xmlns:x="http://schemas.microsoft.com/winfx/2006/xaml" xmlns:controls="clr-namespace:Microsoft.Phone.Controls;assembly=Microsoft.Phone.Controls">
        <!--Pivot Control-->
        <ProgressBar x:Name="progressBar" Opacity="1" HorizontalAlignment="Center" VerticalAlignment="Top"
               Height="30" Width="470" IsIndeterminate="{Binding IsBusy}" Visibility="{Binding ShowIfBusy}" />
        <Grid x:Name="ContentPanel" Grid.Row="0" Width="470">
            <controls:Pivot Name="Views" Title="Orders" LoadedPivotItem="OnPivotItemLoaded">
                <!--Pivot item-->
                <controls:PivotItem Name="View2" Header="All Orders">
                    <!--Double line list with text wrapping-->
                    <ListBox x:Name="lstBox1" Margin="0,0,-12,0" SelectionChanged="OnSelectionChanged" ItemsSource="{Binding [View2]}">
                        <ListBox.ItemTemplate>
                            <DataTemplate>
                                <StackPanel Orientation="Vertical" Margin="10">
                                    <TextBlock Name="txtTitle" Text="{Binding [Title]}" TextWrapping="NoWrap"
                                          Style="{StaticResource PhoneTextTitle2Style}" />
                                    <TextBlock Name="txtUnitPrice" Text="{Binding [Unit_x0020_Price]}"
                                         TextWrapping="NoWrap" Style="{StaticResource PhoneTextNormalStyle}" />
                                    <TextBlock Name="txtQuantity" Text="{Binding [Quantity]}"
                                         TextWrapping="NoWrap" Style="{StaticResource PhoneTextNormalStyle}" />
                                </StackPanel>
                            </DataTemplate>
                        </ListBox.ItemTemplate>
                    </ListBox>
                </controls:PivotItem>
            </controls:Pivot>
        </Grid>
    </Grid>
创建合适的 XAML 标记的一种简便方法是:使用 Windows Phone SharePoint 列表应用程序模板来基于"订单"列表生成一个单独的项目,然后将生成的 XAML 从该项目复制到具有多个列表的项目中,注意要将 PivotItem 控件的名称(默认为"View1")更改为"View2"并更改 ListBox 控件的 Binding 声明,如此处所示。 您还需要更改窗体的相关联的代码隐藏文件的所有引用以指定适当的 ListViewModel 和 DataProvider 对象(例如,象 OrdersListViewModel 和 OrdersListDataProvider 一样)。
这种方法奏效,因为在相关联的代码隐藏文件(本例中名为 OrdersList.xaml.cs)中,各种通过调用 ListDataProvider 对象(此处是 OrdersListDataProvider)来访问列表数据的事件处理程序使用 PivotItem 控件的名称来指定要使用的适当视图。 例如, OnPivotItemLoaded 事件处理程序调用从 ListViewModel 类实例化来的 OrdersListViewModel 对象的 LoadData 方法(并且该方法又调用 OrdersListDataProvider 对象的 LoadData 方法),将 PivotItem 控件的名称(这里是"View2")作为 ViewName 参数的值传递给该方法。 在以上所示的 CamlQueryBuilder 类的修改后的实施过程中,此值最终(作为 viewName 参数的值)传递到 GetCamlQuery 方法。
涉及基于不同架构的 SharePoint 列表的解决方案的另一种方法
作为前一部分中的方法的替代方法,您可以使用 Windows Phone SharePoint 列表应用程序模板在 Microsoft Visual Studio 2010 解决方案中基于给定的 SharePoint 列表创建一个 Windows Phone 应用程序项目,然后将基于其他列表构建的项目添加到同一个解决方案中。 这种方法允许您利用模板来生成特定于每个 SharePoint 列表的窗体。 然后,您可以根据需要自定义解决方案来控制用户如何与列表进行交互。 本部分中的步骤说明了该方法。
在以下过程中假定您有一个名为"订单"的 SharePoint 列表(基于"自定义"列表模板),其列和字段类型如上一部分中的表 1 中所示。 另外,假定您有另一个名为“客户”的 SharePoint 列表(同样基于“自定义”列表模板),其列和字段类型如表 2 中所示。
表 2. 客户列表的列和字段
| Column | 字段类型 | 必需 |
|---|---|---|
| 客户名称(即,标题) | 单行文本(文本) | 是 |
| 联系人电话 | 单行文本(文本) | 否 |
| 电子邮件地址 | 单行文本(文本) | 否 |
| 公司 | 单行文本(文本) | 否 |
在下列过程中,您将创建一个使用这两个列表的 Windows Phone 应用程序。 应用程序的主列表是“客户”列表。 当您在显示窗体中显示给定客户的详细信息时,窗体上的一个按钮使用户可以显示所有与该客户关联的订单(从“订单”列表)。
创建解决方案的组成项目的具体步骤
使用 Windows Phone SharePoint 列 表应用模板创建 Windows Phone 应用,同时指定根据表 2 中的列和字段类型定义的 SharePoint 列表。 若要按照此部分的过程操作,需要将项目中的列表命名为“客户”,并将项目命名为“CustomersSPListApp”。 (请参阅 如何:创建 Windows Phone SharePoint 列表应用程序 ,了解有关基于 Windows Phone SharePoint 列表应用程序模板创建应用程序的信息。)
在 Visual Studio 中,依次选择“文件”、“添加”、“新建项目”。
将显示"添加新项目"对话框。
在"添加新项目"对话框中的"Visual C#" 节点下,选择"Silverlight for Windows Phone"节点。
在"模板"窗格中,选择 Windows Phone SharePoint 列表应用程序模板。
为应用程序命名(例如,OrdersSPListApp),然后选择"确定"。
按照 如何:创建 Windows Phone SharePoint 列表应用 中所述的过程创建另一个 Windows Phone 应用项目,指定基于表 1 中显示的列和字段类型定义的 SharePoint 列表作为项目的目标列表。 在您的解决方案中,目前应该有名为“CustomersSPListApp”和“OrdersSPListApp”(如果在此过程中您遵循命名约定)的两个项目。
在"解决方案资源管理器"中,选择 CustomerSPListApp 项目节点。
在"项目"菜单上,选择"添加引用"。
将显示"添加引用"对话框。
在"项目"选项卡上,在解决方案中选择 OrdersSPListApp 项目,然后选择"确定"按钮。 该项目已添加到 CustomersSPListApp 项目的"引用"节点下。
接下来,在解决方案中配置这两个项目。 一般情况下,您将 OrdersSPListApp 项目(基于“订单”列表)配置为 CustomerSPListApp 项目(基于“客户”列表)的“查找”项目方式执行。
配置 OrdersSPListApp 项目
更改 OrdersSPListApp 项目的视图窗体中的导航路径,以包含项目(“OrdersSPListApp”)的主要命名空间和“组件”头衔。 例如,在 OrdersSPListApp 项目的 List.xaml.cs 文件中 OnNewButtonClick 事件的处理程序中,从以下更改对 NavigationService 对象的 Navigate 方法的调用:
NavigationService.Navigate(new Uri("/Views/NewForm.xaml", UriKind.Relative));更改到此处:
NavigationService.Navigate(new Uri("/OrdersSPListApp;component/Views/NewForm.xaml", UriKind.Relative));进行这些更改最简单方法是使用 OrdersSPListApp 项目中的"快速替换"命令。
在"解决方案资源管理器"中选择 OrdersSPListApp 项目节点。
请按 Ctrl + H 以显示"快速替换"对话框。
在"查找内容"文字框中,照此处原样精确地指定以下文本:
Uri("/Views/在"替换为"文字框中,照此处原样精确地指定以下文本:
Uri("/OrdersSPListApp;component/Views/确保在"查找范围"下拉列表中选择了"当前项目"。
选择"全部替换"。
保存项目中所有更改过的文件。
将成员属性添加到 OrdersSPListApp 项目的 App.xaml.cs 文件。 在 “解决方案资源管理器”的“OrdersSPListApp”项目节点下,选择 “App.xaml ”文件。
按 F7 打开其关联的代码隐藏文件 (App.xaml.cs)进行编辑。
在实现 App 分部类的代码块(由左括号和右括号标明界线)中,添加以下代码。
public static string CustomerName { get; set; }在 “解决方案资源管理器”的“OrdersSPListApp”项目节点下,选择 List.xaml 文件。
按 F7 打开其关联的代码隐藏文件 (List.xaml.cs)进行编辑。
修改文件中的 OnNavigatedTo 事件处理程序以便分析 NavigationContext 对象的 QueryString 属性来设置步骤 4 中声明的 CustomerName 变量的值。 为了方便用户,您还可以设置列表窗体中的 PivotItem 控件的 Header 属性以匹配客户名称。 修改后的处理程序应如下所示。
protected override void OnNavigatedTo(System.Windows.Navigation.NavigationEventArgs e)
{
    base.OnNavigatedTo(e);

    if (this.NavigationContext.QueryString.ContainsKey("CustomerName"))
    {
        App.CustomerName = NavigationContext.QueryString["CustomerName"];
    }

    // Also set the value of the Header property for the PivotItem to match the customer name.
    if (!string.IsNullOrWhiteSpace(App.CustomerName))
    {
        this.View1.Header = App.CustomerName;
    }

    App.MainViewModel.ViewDataLoaded += new EventHandler<ViewDataLoadedEventArgs>(OnViewDataLoaded);
    App.MainViewModel.InitializationCompleted += new EventHandler<InitializationCompletedEventArgs>(OnViewModelInitialization);
}
在调用 List.xaml.cs 文件中OnPivotItemLoaded 事件处理程序中的 LoadData 方法时,添加 CustomerName 变量作为参数。 OnPivotItemLoaded 事件处理程序的实施应如下所示。
private void OnPivotItemLoaded(object sender, PivotItemEventArgs e)
{
    if (!App.MainViewModel.IsInitialized)
    {
        //Initialize ViewModel and Load Data for PivotItem upon initialization.
        App.MainViewModel.Initialize();
    }
    else
    {
        //Load Data for the currently loaded PivotItem.
        App.MainViewModel.LoadData(e.Item.Name, App.CustomerName);
    }
}
请定义模板中的 ListViewModel 类的 LoadData 方法,以便能够接受可选参数。
也将 CustomerName 变量作为调用参数添加到 OnViewModelInitialization 事件处理程序的 LoadData 方法。 OnViewModelInitialization 事件处理程序实施应如下所示。
private void OnViewModelInitialization(object sender, InitializationCompletedEventArgs e)
{
    this.Dispatcher.BeginInvoke(() =>
    {
        //If initialization has failed, show error message and return.
        if (e.Error != null)
        {
            MessageBox.Show(e.Error.Message, e.Error.GetType().Name, MessageBoxButton.OK);
            return;
        }
        App.MainViewModel.LoadData(((PivotItem)Views.SelectedItem).Name, App.CustomerName);
        this.DataContext = (sender as ListViewModel);
    });
}
在调用 List.xaml.cs 文件中OnRefreshButtonClick 事件处理程序中的 RefreshData 方法时,将 CustomerName 变量添加为参数。 OnRefreshButtonClick 事件处理程序的实施应如下所示。
private void OnRefreshButtonClick(object sender, EventArgs e)
{
    if (Views.SelectedItem == null)
        return;

    if (!App.MainViewModel.IsInitialized)
    {
        //Initialize ViewModel and Load Data for PivotItem upon completion.
        App.MainViewModel.Initialize();
    }
    else
    {   //Refresh Data for the currently loaded PivotItem.
        App.MainViewModel.RefreshData(((PivotItem)Views.SelectedItem).Name, App.CustomerName);
    }
}
至于 LoadData 方法,也定义 RefreshData 方法以便能够接受可选参数。 请注意在前面的三个步骤中,对由模板生成的事件处理程序所作的唯一更改是将 CustomerName 变量作为调用参数添加到 LoadData 或 RefreshData 方法。
When users choose the New button on the List form for the Orders list in your app, the Customer field in the New form should already contain the name of the customer, because the list of orders displayed to the user has been filtered based on the customer name. 通过此筛选过的列表添加的新订单应与此列表作为筛选依据的客户名称相关联。 若要将 CustomerName 变量值传递给“新建”表单,请将“OnNewButtonClick”事件修改为,以查询字符串的形式将变量值添加到“新建”表单的导航路径中,如下面的代码所示。
private void OnNewButtonClick(object sender, EventArgs e) { //Instantiate a new instance of NewItemViewModel and go to NewForm. App.MainViewModel.CreateItemViewModelInstance = new NewItemViewModel { DataProvider = App.DataProvider }; if (!string.IsNullOrWhiteSpace(App.CustomerName)) { NavigationService.Navigate(new Uri("/OrdersSPListApp;component/Views/NewForm.xaml?CustomerName=" + App.CustomerName, UriKind.Relative)); } else { NavigationService.Navigate(new Uri("/OrdersSPListApp;component/Views/NewForm.xaml", UriKind.Relative)); } }在“新建”表单的“OnNavigatedTo”事件处理程序中,请检查是否有客户名称的查询字符串。若有,请将它分配到表单的 ViewModel 的“客户”字段。 在 “解决方案资源管理器”的“OrdersSPListApp”项目下,选择 NewForm.xaml 文件,然后按 F7 打开其关联的代码隐藏文件 (NewForm.xaml.cs)进行编辑。
将文件中的“OnNavigatedTo”事件处理程序修改为,与下面的代码一致。
protected override void OnNavigatedTo(System.Windows.Navigation.NavigationEventArgs e)
{
    base.OnNavigatedTo(e);

    if (this.NavigationContext.QueryString.ContainsKey("CustomerName"))
    {
        this.viewModel["Customer"] = NavigationContext.QueryString["CustomerName"];
    }

    viewModel.ItemCreated += new EventHandler<ItemCreatedEventArgs>(OnItemCreated);
}
在 OrdersSPListApp 项目的 ListDataProvider.cs 文件中的 CamlQueryBuilder 类中,将 WHERE 子句添加到 CAML 查询中的 Customer 字段,用于从“订单”列表中获取项,以便根据给定客户名称筛选列表, (从 CustomerName 变量) 。 为了传递客户名称,添加一个参数到该类的 GetCamlQuery 方法。 修改过的 CamlQueryBuilder 类应如下所示。
public static class CamlQueryBuilder
{
    static Dictionary<string, string> ViewXmls = new Dictionary<string, string>()
    {
        {"View1", @"<View><Query>{0}</Query><RowLimit>30</RowLimit><ViewFields>{1}</ViewFields></View>"}
    };

    static string ViewFields = @"<FieldRef Name='Title'/><FieldRef Name='Unit_x0020_Price'/><FieldRef Name='Quantity'/><FieldRef Name='Order_x0020_Value'/><FieldRef Name='Order_x0020_Date'/><FieldRef Name='Status'/><FieldRef Name='Customer'/>";

    public static CamlQuery GetCamlQuery(string viewName, string customerName)
    {
        string queryClause = string.Empty;

        // Create appropriate Query Clause, depending on customerName parameter.
        if (string.IsNullOrWhiteSpace(customerName))
        {
            queryClause = "<OrderBy><FieldRef Name='ID' /></OrderBy>";
        }
        else
        {
            queryClause = string.Format("<Where><Eq><FieldRef Name='Customer' /><Value Type='Text'>{0}</Value></Eq></Where>", customerName);
        }

        // Add Query Clause and ViewFields to ViewXml.
        string viewXml = ViewXmls[viewName];
        viewXml = string.Format(viewXml, queryClause, ViewFields);

        return new CamlQuery { ViewXml = viewXml };
    }
}
修改 ListDataProvider.cs 文件中的 LoadDataFromServer 方法,以检查 CustomerName 参数并将参数传递给 GetCamlQuery 方法。 修改过的方法应如下所示。
private void LoadDataFromServer(string ViewName, Action<LoadViewCompletedEventArgs>
                                              loadItemCompletedCallback, params object[] filterParameters)
{
    string customerName = string.Empty;
    string cacheKey = ViewName;

    // Parse the optional parameters:
    if (filterParameters.Length > 0)
    {
        customerName = filterParameters[0].ToString();
        cacheKey += "-" + customerName;
    }

    CamlQuery query = CamlQueryBuilder.GetCamlQuery(ViewName, customerName);
    ListItemCollection items = Context.Web.Lists.GetByTitle(ListTitle).GetItems(query);
    Context.Load(items);
    Context.Load(items, listItems => listItems.Include(item => item.FieldValuesAsText));

    Context.ExecuteQueryAsync(
        delegate(object sender, ClientRequestSucceededEventArgs args)
        {
            base.CacheView(cacheKey, items);
            loadItemCompletedCallback(new LoadViewCompletedEventArgs { ViewName = ViewName, Items = base.GetCachedView(cacheKey) });
        },
        delegate(object sender, ClientRequestFailedEventArgs args)
        {
            loadItemCompletedCallback(new LoadViewCompletedEventArgs { Error = args.Exception });
        });
}
同样,修改 ListDataProvider.cs 文件中的 LoadData 方法以处理 CustomerName 参数。
public override void LoadData(string ViewName, Action<LoadViewCompletedEventArgs> loadViewCompletedCallback, params object[] filterParameters) { string customerName = string.Empty; string cacheKey = ViewName; // Parse the optional parameters: if (filterParameters.Length > 0) { customerName = filterParameters[0].ToString(); cacheKey += "-" + customerName; } List<ListItem> CachedItems = GetCachedView(cacheKey); if (CachedItems != null) { loadViewCompletedCallback(new LoadViewCompletedEventArgs { ViewName = ViewName, Items = CachedItems }); return; } LoadDataFromServer(ViewName, loadViewCompletedCallback, filterParameters); }在“OrdersSPListApp”项目中,将“取消”按钮添加到“List.xaml”文件中的“ApplicationBar”元素内。 在“解决方案资源管理器”中的“OrdersSPListApp”节点下,选择“List.xaml”文件,再按 SHIFT + F7 打开文件,以供在设计器中进行编辑。
添加 XAML,在
<phone:PhoneApplicationPage.ApplicationBar>标记中声明“取消”按钮,如下面的标记所示。<phone:PhoneApplicationPage.ApplicationBar> <shell:ApplicationBar IsVisible="True" IsMenuEnabled="True"> <shell:ApplicationBarIconButton x:Name="btnNew" IconUri="/Images/appbar.new.rest.png" Text="New" Click="OnNewButtonClick"/> <shell:ApplicationBarIconButton x:Name="btnRefresh" IconUri="/Images/appbar.refresh.rest.png" Text="Refresh" IsEnabled="True" Click="OnRefreshButtonClick"/> <shell:ApplicationBarIconButton x:Name="btnCancel" IconUri="/Images/appbar.cancel.rest.png" Text="Cancel" IsEnabled="True" Click="OnCancelButtonClick" /> </shell:ApplicationBar> </phone:PhoneApplicationPage.ApplicationBar>对于"解决方案资源管理器"中选定的 List.xaml 的文件,请按 F7 打开相关联的代码隐藏文件 List.xaml.cs 以供编辑。
在实现 ListForm 分部类的代码块(由左括号和右括号标明界线)中,为 OnCancelButtonClick 事件添加以下处理程序。
private void OnCancelButtonClick(object sender, EventArgs e)
{
    NavigationService.Navigate(new Uri("/CustomersSPListApp;component/Views/DisplayForm.xaml", UriKind.Relative));
}
在项目中保存此文件。
现在,尚待添加一个按钮到 CustomersSPListApp 项目中的"显示"窗体来显示与给定的客户相关联的订单。
配置 CustomersSPListApp 项目
在"解决方案资源管理器"中的 CustomersSPListApp 项目节点下,选择的 DisplayForm.xaml 文件。
按 Shift + F7 (或者双击该文件)打开文件在设计器中以供编辑。
为该列表项的最后一个字段,在最终 StackPanel 控件后的 StackPanel 包含控件里中,添加一个 Button 控件的 XAML 声明。如以下标记所示。
<Grid x:Name="LayoutRoot" Background="Transparent" xmlns:x="http://schemas.microsoft.com/winfx/2006/xaml" xmlns:controls="clr-namespace:Microsoft.Phone.Controls;assembly=Microsoft.Phone.Controls">
    <StackPanel>
        <ProgressBar Background="Red" x:Name="progressBar" Opacity="1" HorizontalAlignment="Center"
          VerticalAlignment="Top" Height="15" Width="470" IsIndeterminate="{Binding IsBusy}"
            Visibility="{Binding ShowIfBusy}" />
        <ScrollViewer HorizontalScrollBarVisibility="Auto" Height="700">
            <Grid x:Name="ContentPanel" Width="470">
                <StackPanel Margin="0,5,0,5">
                    <StackPanel HorizontalAlignment="Left" Orientation="Horizontal" Margin="0,5,0,5">
                        <TextBlock TextWrapping="Wrap" Width="150" HorizontalAlignment="Left"
                                        Style="{StaticResource PhoneTextNormalStyle}">Title :</TextBlock>
                        <TextBlock Width="310" HorizontalAlignment="Left" Name="txtTitle"
                                Text="{Binding [Title]}" TextWrapping="Wrap" Style="{StaticResource PhoneTextSubtleStyle}" />
                                </StackPanel>
                    <StackPanel HorizontalAlignment="Left" Orientation="Horizontal" Margin="0,5,0,5">
                        <TextBlock TextWrapping="Wrap" Width="150" HorizontalAlignment="Left"
                                    Style="{StaticResource PhoneTextNormalStyle}">Contact Number :</TextBlock>
                        <TextBlock Width="310" HorizontalAlignment="Left" Name="txtContact_x0020_Number"
                                    Text="{Binding [Contact_x0020_Number]}" TextWrapping="Wrap"
                                    Style="{StaticResource PhoneTextSubtleStyle}" />
                    </StackPanel>
                    <StackPanel HorizontalAlignment="Left" Orientation="Horizontal" Margin="0,5,0,5">
                        <TextBlock TextWrapping="Wrap" Width="150" HorizontalAlignment="Left"
                                  Style="{StaticResource PhoneTextNormalStyle}">E-mail Address :</TextBlock>
                        <TextBlock Width="310" HorizontalAlignment="Left" Name="txtE_x002d_mail_x0020_Address"
                              Text="{Binding [E_x002d_mail_x0020_Address]}" TextWrapping="Wrap"
                                          Style="{StaticResource PhoneTextSubtleStyle}" />
                    </StackPanel>
                    <StackPanel HorizontalAlignment="Left" Orientation="Horizontal" Margin="0,5,0,5">
                        <TextBlock TextWrapping="Wrap" Width="150" HorizontalAlignment="Left"
                                  Style="{StaticResource PhoneTextNormalStyle}">Company :</TextBlock>
                        <TextBlock Width="310" HorizontalAlignment="Left" Name="txtCompany"
                                  Text="{Binding [Company]}" TextWrapping="Wrap" Style="{StaticResource PhoneTextSubtleStyle}" />
                    </StackPanel>
                    <StackPanel Margin="0,60,0,5"><Button Content="Get Orders" Height="70" Name="OrdersButton" Width="400" Click="OnButtonOrdersClick" /></StackPanel>
                </StackPanel>
            </Grid>
        </ScrollViewer>
    </StackPanel>
</Grid>
对于在"解决方案资源管理器"中选择的 DisplayForm.xaml 的文件,请按 F7 打开相关联的代码隐藏文件 DisplayForm.xaml.cs 以供编辑。
在实现 DisplayForm 分部类的代码块(由左括号和右括号标明界线)中,为 OnButtonOrdersClick 事件添加以下处理程序。
private void OnOrdersButtonClick(object sender, RoutedEventArgs e)
{
    this.NavigationService.Navigate(new Uri("/OrdersSPListApp;component/Views/List.xaml?CustomerName=" +
                                                                 viewModel["Title"], UriKind.Relative));
}
保存文件。
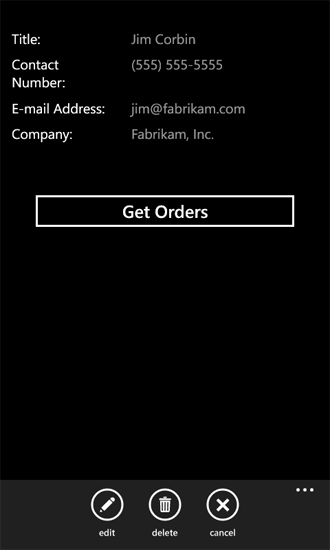
如果您构建解决方案并将其部署到 Windows Phone Emulator 中,将显示"客户"列表的"列表"窗体。 如果您在列表中选择一个项目来为某个给定客户显示“显示”窗体,您将看到一个用于检索与该客户相关联的订单的按钮(图 1)。
图 1. 客户显示窗体

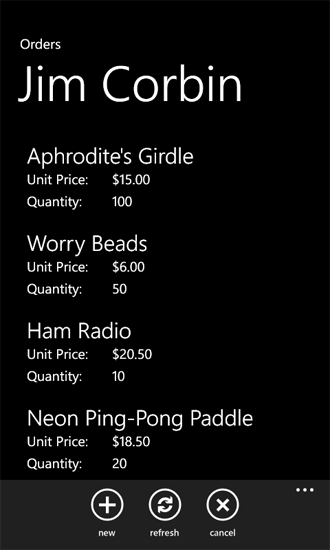
当您选择"显示"窗体上的"获得订单"按钮时,该客户的订单将显示在解决方案中的 OrdersSPListApp 项目的列表窗体中(图 2)。
图 2. 订单列表窗体

在此窗体(订单列表的列表表单)中,您可以添加、编辑或删除客户订单。 如果您选择“取消”按钮,您将返回客户列表的列表窗体。 在单个移动应用程序中,您可以管理两个 SharePoint 列表的列表项。