自定义 Windows Phone SharePoint 列表应用的用户界面
自定义由 Windows Phone SharePoint 列表应用模板生成的 Windows Phone 用户界面。
使用 Windows Phone SharePoint 列表应用程序模板创建的 SharePoint 列表应用程序基于 Windows Phone 框架的 Silverlight。 Windows Phone 上的 Silverlight 平台提供的所有功能都可供开发人员用来为针对 Windows Phone 设计的 SharePoint 列表应用程序自定义用户界面 (UI)。
重要
如果要开发适用于 Windows Phone 8 的应用,则必须使用 Visual Studio Express 2012 而不是 Visual Studio 2010 Express。 除开发环境外,本文中的其他所有信息都适用于创建 Windows Phone 8 和 Windows Phone 7 版应用。 > 有关详细信息,请参阅 如何:设置用于开发 SharePoint 移动应用的环境。
创建 SharePoint 列表应用以实现用户界面自定义
对于以下过程,假设运行 SharePoint Server 的服务器具有从自定义列表模板创建的产品订单列表,类似于 如何:在适用于 SharePoint 的 Windows Phone 应用中实现业务逻辑和数据验证中使用的示例产品订单列表。 对于本主题中使用的 Windows Phone 应用程序示例,应用程序所基于的"产品订单数"列表已修改以包含其他字段。 用于本主题中示例的修改过的"产品订单数"列表已使用表 1 中所示的列和字段类型创建。
表 1. 修改过的“产品订单数”列表
| Column | 类型 | 必需 |
|---|---|---|
| 产品(例如标题) | 单行文本(文本) | 是 |
| 说明 | 单行文本(文本) | 否 |
| 产品类别 | 选项 | 否 |
| 数量 | 数字 | 是 |
| 订单日期 | 日期和时间 (Datetime) | 否 |
| 完成时间 | 日期和时间 (Datetime) | 否 |
| Rush | 布尔值 | 否 |
| 联系人电话 | 单行文本(文本) | 否 |
按照 如何:创建 Windows Phone SharePoint 列表应用 中的过程,使用 Windows Phone SharePoint 列表应用程序模板生成 SharePoint 列表应用程序作为以下 UI 自定义项的起点。 为应用程序列表指定目标 SharePoint 列表,该列表的架构与表 1 所示的架构类似。
用 DatePicker 控件替换 TextBox 控件
列表中的字段是基于模板生成的,并且默认情况下将这些字段指定为 DateTime 字段(例如示例“产品订单数”列表中的 Order Date 字段)绑定到应用程序中的编辑窗体 (EditForm.xaml) 和新窗体 (NewForm.xaml) 中的 TextBox 控件上。 对用户界面所做的第一项改进是,通过将这些字段的关联 TextBox 控件替换为适用于 Windows Phone 工具包的 Silverlight 中的 DatePicker 控件,从而便于输入这些字段的日期值。 可以从 CodePlex 网站(开源软件项目的托管网站)安装 Silverlight for Windows Phone 工具包。
将 TextBox 控件替换为 DatePicker 控件
在 Microsoft Visual Studio 2010 中,如果项目尚未打开,打开您在上一节中创建的项目,该项目基于 Windows Phone SharePoint 列表应用程序模板并使用 SharePoint 列表,其中该列表类似于表 1 中所示的"产品订单数"列表。
在 Visual Studio 的“ 项目 ”菜单上,单击“ 添加引用”。 将显示"添加引用"对话框。
在“浏览”选项卡中,转到由 Silverlight for Windows Phone Toolkit 安装的 Microsoft.Phone.Controls.Toolkit.dll 程序集。
注意
Microsoft.Phone.Controls.Toolkit.dll 程序集可以在 %PROGRAMFILES% (x86) \Microsoft SDKs\Windows Phone\v7.1\Toolkit\<MonthYear>\Bin 的标准安装中找到,其中 <MonthYear> 可能类似于“Oct11”,具体取决于安装的工具包版本。 (也可以单击“开始”按钮,指向“所有程序”,展开“程序”菜单中的“Microsoft Silverlight for Windows Phone Toolkit”项,再单击“二进制文件”,从而查找由 Toolkit 安装的程序集。)
在“解决方案资源管理器”中,选择“视图”节点下的“EditForm.xaml”文件。
按 SHIFT + F7 (或双击文件) 以在设计器中打开该文件。
在设计器的 XAML 窗格中,添加命名空间声明,用于将工具包程序集中的控件区分到
<phone:PhoneApplicationPage>标记。<phone:PhoneApplicationPage x:Class="ContosoSPListApp.EditForm" xmlns="http://schemas.microsoft.com/winfx/2006/xaml/presentation" xmlns:x="http://schemas.microsoft.com/winfx/2006/xaml" xmlns:phone="clr-namespace:Microsoft.Phone.Controls;assembly=Microsoft.Phone" xmlns:toolkit="clr-namespace:Microsoft.Phone.Controls;assembly=Microsoft.Phone.Controls.Toolkit" xmlns:shell="clr-namespace:Microsoft.Phone.Shell;assembly=Microsoft.Phone" xmlns:d="http://schemas.microsoft.com/expression/blend/2008" xmlns:mc="http://schemas.openxmlformats.org/markup-compatibility/2006" mc:Ignorable="d" d:DesignWidth="480" d:DesignHeight="696" FontFamily="{StaticResource PhoneFontFamilyNormal}" FontSize="{StaticResource PhoneFontSizeNormal}" Foreground="{StaticResource PhoneForegroundBrush}" SupportedOrientations="Portrait" Orientation="Portrait" shell:SystemTray.IsVisible="True" x:Name = "EditPage">对由模板生成的默认标记的唯一更改是增加"xmlns:toolkit"命名空间指定。 此外,请注意此处 Class 的属性值取决于您的项目名称。 "ContosoSPListApp"是此示例项目的名称。 您的项目中此属性的值与此处由您的项目名称决定的值有所不同。
在 EditForm.xaml 文件中,找到包含与 Order Date 字段(此字段在 XML 架构中被指定为"Order_x0020_Date")相关联的控件的标记中的 StackPanel 控件。 默认情况下,该模板为 DateTime 字段生成一个 TextBox 控件和两个 TextBlock 控件。 用于 StackPanel 控件以及它所包含的控件的标记应类似于以下标记。
<StackPanel Orientation="Vertical" Margin="0,5,0,5">
    <TextBlock TextWrapping="Wrap" HorizontalAlignment="Left"
             Style="{StaticResource PhoneTextNormalStyle}">Order Date</TextBlock>
    <TextBox Height="Auto" Style="{StaticResource TextValidationTemplate}"
                FontSize="{StaticResource PhoneFontSizeNormal}" Width="470"
                HorizontalAlignment="Left" Name="txtOrder_x0020_Date"
                Text="{Binding [Order_x0020_Date], Mode=TwoWay, ValidatesOnNotifyDataErrors=True,
                NotifyOnValidationError=True}" TextWrapping="Wrap" />
    <TextBlock FontSize="16" TextWrapping="Wrap" HorizontalAlignment="Left" Style="{StaticResource PhoneTextSubtleStyle}" Text="{Binding DateTimeFormat}" />
</StackPanel>
将 StackPanel 控件和它包含的控件替换为以下标记。
<StackPanel Orientation="Vertical" Margin="0,5,0,5">
    <toolkit:DatePicker Header="Order Date" Value="{Binding [Order_x0020_Date], Mode=TwoWay}">
              </toolkit:DatePicker>
</StackPanel>
接下来(仍在 EditForm.xaml 中),在包含与 Fulfillment Date 字段(在此字段的架构中被指定为"Fulfillment_x0020_Date")相关联的控件的标记中找到 StackPanel 控件。 用于 StackPanel 和它包含的控件的标记应类似于以下标记。
<StackPanel Orientation="Vertical" Margin="0,5,0,5">
    <TextBlock TextWrapping="Wrap" HorizontalAlignment="Left" Style="{StaticResource PhoneTextNormalStyle}">Fulfillment Date</TextBlock>
    <TextBox Height="Auto" Style="{StaticResource TextValidationTemplate}"
           FontSize="{StaticResource PhoneFontSizeNormal}" Width="470" HorizontalAlignment="Left"
           Name="txtFulfillment_x0020_Date" Text="{Binding [Fulfillment_x0020_Date],
           Mode=TwoWay, ValidatesOnNotifyDataErrors=True, NotifyOnValidationError=True}"
           TextWrapping="Wrap" />
    <TextBlock FontSize="16" TextWrapping="Wrap" HorizontalAlignment="Left"
          Style="{StaticResource PhoneTextSubtleStyle}" Text="{Binding DateTimeFormat}" />
</StackPanel>
将 StackPanel 控件和它包含的控件替换为以下标记。
<StackPanel Orientation="Vertical" Margin="0,5,0,5">
    <toolkit:DatePicker Header="Fulfillment Date" Value="{Binding [Fulfillment_x0020_Date], Mode=TwoWay}"></toolkit:DatePicker>
</StackPanel>
最后,您可以将 Silverlight for Windows Phone Toolkit 的用户界面图标图像添加到您的项目。 在"解决方案资源管理器"中,选择表示该项目的节点(例如,名为"ContosoSPListApp"的节点)。
在 Visual Studio 中的"项目"菜单中,单击"新建文件夹"。 在项目节点下会添加一个新文件夹。 将该文件夹命名为"Toolkit.Content"。
在"解决方案资源管理器"中,选择您在前面步骤中创建的文件夹。
在“ 项目 ”菜单上,单击“ 添加现有项”。 此时会打开 “文件浏览器 ”窗口。
转到一个文件夹,其中有 Silverlight for Windows Phone Toolkit 安装的支持图标图像 ApplicationBar.Cancel.png 和 ApplicationBar.Check.png。
注意
映像位于 %PROGRAMFILES% (x86) \Microsoft SDKs\Windows Phone\v7.1\Toolkit\<MonthYear>\Bin\Icons 中,其中 <MonthYear> 可能类似于“Oct11”,具体取决于安装的工具包版本。
选择这两个图像,然后单击"添加"。 图像文件会添加到项目中的"Toolkit.Content"[###Toolkit.Content]文件夹节点下。
重要
为了使 Silverlight for Windows Phone Toolkit 的组件能够使用图标图像,必须将它们放置在前面步骤中指定的您的项目中的位置。
在“解决方案资源管理器”中,选择“Toolkit.Content”[###Toolkit.Content]文件夹下的两个图像文件。
在“属性窗口”中,将图像的生成操作 属性设置为“Content”,将“复制到输出目录”属性设置为“如果较新则复制”。
注意
如果“属性窗口”不可见,请先按 CTRL + W,再按 P,在 Visual Studio 中调出窗口。
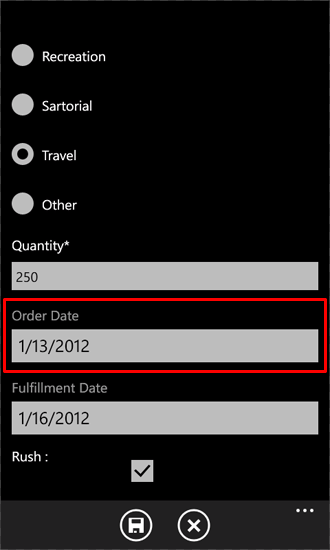
如果启动项目(按 F5)以便将它部署到 Windows Phone Emulator,可以转到项的“编辑”表单(具体方法为,单击主要“列表视图”页面中的项,再单击应用中“应用栏”上的“编辑”按钮)。 此时,表单中的“DateTime”字段与“DatePicker”控件相关联,如图 1 所示。
图 1. 具有 DatePicker 控件的编辑窗体

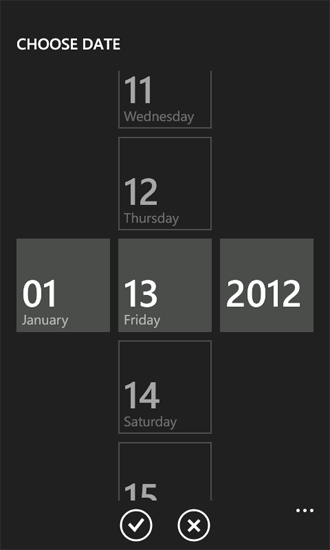
DatePicker 控件(在图 1 中为 Order Date 字段突出显示)的外观与使用相关联的 TextBlock 作为标签的 TextBox 控件极为相似,区别只在于当单击 DatePicker 控件(或在 Windows Phone 上点击它)时,该控件显示一个单独的页面,其中带有用手势选择日期的控件,如图 2 所示。
图 2. 日期选取器页面

单击“完成”按钮,将选定日期传输到“编辑”表单上的“DatePicker”控件。 然后,如果单击此表单上的“保存”按钮,与“DatePicker”控件相关联的“DateTime”字段值将在服务器上的 SharePoint 列表中进行更新,因为在上述过程中控件的“Value”属性已绑定到 EditForm.xaml 文件中的相应字段。 若还要在“新建”表单中将“TextBox”控件替换为“DatePicker”控件,请对项目中的 NewForm.xaml 文件重复执行上述过程中的第 4 步到第 10 步。
添加支持“选项”字段的自定义填充选项的控件
除了在服务器上定义时可将声明过的选择值指定给选项字段以外,还可以在 SharePoint 服务器上将使用 SharePoint 列表中的选项字段类型指定的字段配置为允许用户为字段指定自定义(或"填充")选项值。 在使用 Windows Phone SharePoint 列表应用程序模板创建的项目中,默认情况下,呈现的选项字段不包含对输入"填充"选项的 UI 支持。 在本节的过程中,您要将 UI 控件和代码添加到应用程序以支持为"产品类别"字段输入自定义选项值。
在下列过程中,您将能够:
- 添加一个具有转换逻辑的类 ( ContosoConverter),来处理要保存到"产品类别"字段中的数据。
- 向 EditItemViewModel 类添加一个属性成员 ( OtherCategoryValue),其中提供了对代表选项字段的"填充"值的字符串的访问。 该属性成员将用作"编辑"窗体上添加的 TextBox 控件的 Binding 声明的源。
- 向"编辑"窗体添加一个 RadioButton 控件和一个 TextBox 控件,以便用户能够指定"产品类别"字段的"填充"选项值。
- 修改与"编辑"窗体相关联的代码隐藏文件 EditForm.xaml.cs,以便为选项字段注册一个编辑字段值转换器 set 函数,并为添加到"编辑"窗体的控件实现处理程序。
注意
有关字段值转换器的详细信息,请参阅 如何:支持和转换 Windows Phone 应用的 SharePoint 字段类型。
添加支持对“选项”字段进行数据转换的类的具体步骤
在"解决方案资源管理器"中,选择代表项目的节点(例如,名为 ContosoSPListApp 的节点)。
在 Visual Studio(或 Visual Studio Express for Windows Phone)下的"项目"菜单中,单击"添加类"。 将打开"添加新项"对话框,其中 C#"类"模板已选中。
对类文件(如 ContosoConverter.cs)进行命名,然后单击"添加"。 该项目将添加到类文件中,并处于打开状态以供编辑。
用以下代码替换文件的内容。
using System;
using System.Net;
using System.Windows;
using System.Collections.ObjectModel;
using Microsoft.SharePoint.Phone.Application;
using Microsoft.SharePoint.Client;

namespace SPListAppUICustomization
{
    public class ContosoConverter
    {
        // Edit Field Value Converter SET function for Choice fields.
        public static void SetConvertedChoiceEditFieldValue(string fieldName, object fieldValue,
                                        ListItem item, ConversionContext context, string customCategory)
        {
            ObservableCollection<ChoiceFieldViewModel> choices = fieldValue as
                                                   ObservableCollection<ChoiceFieldViewModel>;
               bool isCustomValue = true;

            string specifiedChoice = string.Empty;

            if (choices != null)
            {
                foreach (ChoiceFieldViewModel choiceItem in choices)
                {
                    if ((choiceItem.IsChecked == true) || (choiceItem.Name.Equals(customCategory,
                                                             StringComparison.CurrentCultureIgnoreCase)))
                    {
                        specifiedChoice = choiceItem.Name;
                        isCustomValue = false;
                        break;
                    }
                }

                if (isCustomValue == true)
                {
                    specifiedChoice = customCategory;
                }
            }
            else
            {
                specifiedChoice = customCategory;
            }

            item[fieldName] = specifiedChoice;
        }
    }
}
保存文件。
此处 SetConvertedChoiceEditFieldValue 函数用来实现为应用程序中的选项字段注册的编辑字段值转换器 set 函数代理。 该函数会遍历 ChoiceFieldViewModel 对象集,其中的对象是作为 fieldValue 参数进行传递的。 ChoiceFieldViewModel 对象用来代表项目中选项字段的单个值,其中该项目是基于 Windows Phone SharePoint 列表应用程序模板开发的。 每个对象都有一个 Name 属性,用来表示一个给定的选项,还有一个布尔属性 ( IsChecked),用以表明给定的选项值(这些值可用于定义的字段)是否为对该字段指定的值。 SetConvertedChoiceEditFieldValue 函数确定集合中的 ChoiceFieldViewModel 对象是否选中,或者对象的 Name 属性与"产品类别"字段的指定自定义值是否匹配。 如果是,则 ChoiceFieldViewModel 的 Name 属性用于为字段赋值。 否则,将一个指定的自定义值(来自于 customCategory 参数)设置为该字段的值。
接着,将一个属性成员添加到 EditItemViewModel 类,该类提供了对选项字段的"填充"值的访问(当选项字段的指定值是服务器上为该字段定义的可用选项之一时,该值为一个空字符串)。
向 EditItemViewModel 类添加属性成员
在"解决方案资源管理器"中的"视图模板"文件夹节点下,选择 EditItemViewModel.cs 文件。
按 F7 (或双击该文件)打开文件以供编辑。
在文件中的默认 using 指令后,添加以下指令。
using System.Collections.ObjectModel;在实现 EditItemViewModel 类的代码块(由成对的括号限定)中,将属性成员(即 OtherCategoryValue)的以下实现添加到文件中。
public string OtherCategoryValue { get { string specifiedCategory = string.Empty; // See if specified Choice field value is one of the available values // from the List ViewModel. If it is, return an empty string. ObservableCollection<ChoiceFieldViewModel> choicesCollection = this["Product_x0020_Category"] as ObservableCollection<ChoiceFieldViewModel>; if (choicesCollection != null && choicesCollection.Any(choice => choice.IsChecked)) { return specifiedCategory; } // If Choice field value is not one of the values from the List ViewModel, // get the value from the underlying list item and return value as string. specifiedCategory = SharePointListItem.FieldValuesAsText["Product_x0020_Category"]; return specifiedCategory; } }保存文件。
接着,您需要向"编辑"窗体添加并配置控件,以支持输入"产品类别"字段的自定义值。
添加和配置 UI 控件以输入自定义选项字段值
在"解决方案资源管理器"中,选择"视图"文件夹节点下的 EditForm.xaml 文件。
按 SHIFT + F7(或双击文件),在设计器中打开文件。
找到包含控件(“TextBlock”控件和“ListBox”控件)的“StackPanel”控件,用于呈现“产品订单”SharePoint 列表中的“产品类别”字段。 向“StackPanel”容器添加和配置“RadioButton”控件和另一个“TextBox”控件,如下面的下代码所示。
<StackPanel Orientation="Vertical" Margin="0,5,0,5"> <TextBlock TextWrapping="Wrap" HorizontalAlignment="Left" Style="{StaticResource PhoneTextNormalStyle}"> Product Category</TextBlock> <ListBox MaxHeight="400" Width="Auto" x:Name="lstBoxProduct_x0020_Category" ItemsSource="{Binding [Product_x0020_Category]}"> <ListBox.ItemTemplate> <DataTemplate> <RadioButton FontSize="{StaticResource PhoneFontSizeNormal}" HorizontalAlignment="Left" GroupName="Product_x0020_Category" Content="{Binding Name}" IsChecked="{Binding IsChecked, Mode=TwoWay}" /> </DataTemplate> </ListBox.ItemTemplate> </ListBox> <!-- The following two controls added to support UI Customization for Choice field. --> <RadioButton x:Name="rbOtherCategory" FontSize="{StaticResource PhoneFontSizeNormal}" HorizontalAlignment="Left" GroupName="Product_x0020_Category" Content="Other:" IsChecked ="True" /><TextBox x:Name="txtOtherCategory" Text="{Binding OtherCategoryValue}" FontSize="{StaticResource PhoneFontSizeNormal}" Width="470" HorizontalAlignment="Left" TextWrapping="Wrap" Visibility="Visible" /> </StackPanel>在“解决方案资源管理器”中选择“EditForm.xaml”文件后,按 F7 打开与之相关联的代码隐藏文件 EditForm.xaml.cs 进行编辑。
修改文件中的构造函数以便为 Loaded 事件添加处理程序 EditForm_Loaded。 修改后的构造函数应与以下代码中的构造函数匹配。
public EditForm()
{
    InitializeComponent();

    viewModel = App.MainViewModel.SelectedItemEditViewModelInstance;
    if (!viewModel.IsInitialized)
    {
        viewModel.InitializationCompleted += new
                       EventHandler<InitializationCompletedEventArgs>(OnViewModelInitialization);
        viewModel.Initialize();
    }
    else
    {
        this.DataContext = viewModel;
    }

    // Adding handler for Loaded event.
    this.Loaded += new RoutedEventHandler(EditForm_Loaded);
}
在实现 EditForm 分部类的代码块(由成对的括号限定)中,将 EditForm_Loaded 事件处理程序的以下实现添加到文件中。
private void EditForm_Loaded(object sender, RoutedEventArgs e)
{
    // Register EditFieldValueConverter SET function on Choice fields.
    Converter.RegisterEditFieldValueConverter(FieldType.Choice,
                            (string fieldName, object fieldValue, ListItem item,
                                               ConversionContext context) =>
    {
        string otherCategoryValue = string.Empty;
        if (this.rbOtherCategory.IsChecked == true)
        {
            otherCategoryValue = this.txtOtherCategory.Text.Trim();
            if (string.IsNullOrWhiteSpace(OtherCategoryValue))
            {
                otherCategoryValue = "(Unspecified)";
            }
        }

        ContosoConverter.SetConvertedChoiceEditFieldValue(fieldName,
                                         fieldValue, item, context, otherCategoryValue);
    });

    // Adding RadioButton event handlers here because the
    // txtOtherCategory TextBox will be loaded and available at this point.
    this.rbOtherCategory.Checked += new RoutedEventHandler(rbOtherCategory_Checked);
    this.rbOtherCategory.Unchecked += new RoutedEventHandler(rbOtherCategory_Unchecked);
}
在此代码中,在对 Converter 类的 RegisterEditFieldValueConverter 方法的调用中使用的 lambda 语句确定是否检查在步骤 3) 中添加的 rbOtherCategoryRadioButton 控件 (。 如果是这样,则 txtOtherCategoryTextBox 控件的 Text 属性中的值将传递给 SetConvertedChoiceEditFieldValue 函数。 如果 rbOtherCategory 未选中,则会传递一个空字符串。 如果 rbOtherCategory 已选中,但实际上用户在 txtOtherCategory 的 TextBox 中并未指定值,则会传递值"(Unspecified)"。
最后,为 rbOtherCategoryRadioButton 的 Checked 和 Unchecked 事件添加处理程序,以显示或隐藏用于提供自定义产品类别值的 TextBox 控件。 仍在 EditForm 分部类的实现代码块中,将这些处理程序的下列实现放到 EditForm.xaml.cs 文件中。
private void rbOtherCategory_Checked(object sender, RoutedEventArgs e)
{
    this.txtOtherCategory.Visibility = System.Windows.Visibility.Visible;
    this.txtOtherCategory.Focus();
}

private void rbOtherCategory_Unchecked(object sender, RoutedEventArgs e)
{
    this.txtOtherCategory.Visibility = System.Windows.Visibility.Collapsed;
}
保存文件。
如果生成该项目并将它部署到一个 Windows Phone Emulator 中(按 F5),您可以看到,在"编辑"窗体中,按照选项字段的默认 UI 呈现逻辑,为每个"产品类别"字段定义中指定的选项值添加了一个 RadioButton 控件。 此外,还包含另一个 RadioButton 控件(在 UI 中标记为"其他:"),以使用户能够指定自定义选项值。 当选中其他 RadioButton 控件时,会显示一个 TextBox 控件以输入需要的值。
对于"产品订单数"列表中已经与自定义"产品类别"值相关联并在应用程序中编辑过的项目,呈现的"编辑"窗体具有附加的 RadioButton 控件且已选中,并具有显示可见的自定义值的 TextBox 控件。