SharePoint Webhook 入门
本文介绍如何生成添加和处理 SharePoint webhook 请求的应用程序。 你将学习如何使用 Postman 客户端来快速构造和执行 SharePoint webhook 请求,同时与作为 webhook 接收器的简单 ASP.NET Web API 进行交互。
将使用普通 HTTP 请求,这对于了解 Webhook 的工作原理很有帮助。
若要完成本文中的分步说明,请下载并安装以下工具:
- Google Chrome 浏览器
- Postman
- Visual Studio Community Edition
- ngrok(若要安装 ngrok,请参阅下载和安装)
- 包含 SharePoint Online 的 Office 365 开发人员订阅。 如果刚开始接触 Office 365,也可以通过 Office 365 开发人员计划注册 Office 365 开发人员订阅。 请参阅 Office 365 开发人员计划文档,逐步了解如何加入 Office 365 开发人员计划并注册和配置订阅。
第 1 步:为 Postman 客户端注册 Azure AD 应用程序
为了使 Postman 客户端与 SharePoint 进行通信,需要在与 Office 365 租户关联的 Azure AD 租户中注册 Microsoft Azure Active Directory (Azure AD) 应用。
请确保将该应用程序注册为 Web 应用程序。
若要访问 SharePoint Online,务必授予 Azure AD 应用对 Office 365 SharePoint Online 应用程序的权限,并选择“读取和写入所有网站集中的项和列表”权限。
注意
有关添加 AD Azure 应用程序并向应用程序授予权限的详细信息,请参阅添加应用程序。
输入以下端点,作为应用的作为回复(重定向)URL。 这是身份验证成功时 Azure AD 将向其发送身份验证响应(包括访问令牌)的终结点。
https://www.getpostman.com/oauth2/callback生成一个密钥,这将是客户端密码。
后续步骤需要以下属性,请将它们复制到一个安全的位置:
- 客户端 ID
- 客户端密码
步骤 2:生成一个 webhook 接收器
对于此项目,使用 Visual Studio Web API 项目生成 webhook 接收器。
创建新的 ASP.NET Web API 项目
- 打开 Visual Studio。
- 选择“文件”>“新建”>“项目”。
- 在“模板”窗格中,选择“已安装的模板”,并展开“Visual C#”节点。
- 在“Visual C#”下,选择“Web”。
- 在项目模板列表中,选择“ASP.NET Web 应用程序”。
- 将项目命名为 SPWebhooksReceiver,然后选择“确定”。
- 在“新建 ASP.NET 项目”对话框中,从“ASP.NET 4.5.”组中选择“Web API”模板。
- 通过选择“更改身份验证”按钮,将身份验证更改为“无身份验证”。
- 选择“确定”以创建 Web API 项目。
注意
可以清除“在云中托管”复选框,因为此项目不会部署到云中。
Visual Studio 创建项目。
生成 Webhook 接收器
安装 NuGet 包
使用 ASP.NET Web API 跟踪记录来自 SharePoint 的请求。 以下步骤安装跟踪程序包:
- 转到 Visual Studio 中的“解决方案资源管理器”。
- 打开项目的上下文菜单(右键单击),然后选择“管理 NuGet 包”。
- 在搜索框中,输入 Microsoft.AspNet.WebApi.Tracing。
- 在搜索结果中,选择 Microsoft.AspNet.WebApi.Tracing 程序包,然后选择“安装”以安装该程序包。
生成 SPWebhookNotification 模型
此服务生成的所有通知都被序列化为 webhookNotification 实例。 需要生成一个表示此通知实例的简单模型。
转到 Visual Studio 中的“解决方案资源管理器”。
打开 Models 文件夹的上下文菜单(右键单击),然后选择“添加”>“类”。
输入 SPWebhookNotification 作为类名称,然后选择“添加”将该类添加到项目中。
将以下代码添加到 SPWebhookNotification 类的正文:
public string SubscriptionId { get; set; }
public string ClientState { get; set; }
public string ExpirationDateTime { get; set; }
public string Resource { get; set; }
public string TenantId { get; set; }
public string SiteUrl { get; set; }
public string WebId { get; set; }
生成 SPWebhookContent 模型
由于可以在单个请求中将多个通知提交到 Webhook 接收方,因此它们将组合在具有单个数组值的 对象中。 生成表示数组的简单模型。
转到 Visual Studio 中的“解决方案资源管理器”。
打开 Models 文件夹的上下文菜单(右键单击),然后选择“添加”>“类”。
输入 SPWebhookContent 作为类名称,然后选择“添加”将该类添加到项目中。
将以下代码添加到 SPWebhookContent 类的正文:
public List<SPWebhookNotification> Value { get; set; }
添加 SharePoint Webhook 客户端状态
Webhook 提供使用重新传入订阅的通知消息中的可选字符串值功能。 该功能可用于验证该请求确实来自受信任的源,在这种情况下是 SharePoint。
添加应用程序可用于验证传入请求的客户端状态值。
转到 Visual Studio 中的“解决方案资源管理器”。
打开 web.config 文件,然后将以下密钥作为客户端状态添加到
<appSettings>部分中:<add key="webhookclientstate" value="A0A354EC-97D4-4D83-9DDB-144077ADB449"/>
启用跟踪
在 web.config 文件中,通过在 <configuration> 部分的 <system.web> 元素中添加以下密钥来启用跟踪:
<trace enabled="true"/>
需要跟踪编写器,因此必须将跟踪编写器添加到控制器配置(在此例中使用 System.Diagnostics 中的跟踪编写器)。
转到 Visual Studio 中的“解决方案资源管理器”。
打开 App_Start 文件夹中的 WebApiConfig.cs。
在 Register 方法中添加以下行:
config.EnableSystemDiagnosticsTracing();
生成 SharePoint Webhook 控制器
现在生成 Webhook 接收器控制器,用于处理来自 SharePoint 的传入请求并采取相应操作。
转到 Visual Studio 中的“解决方案资源管理器”。
打开 Controllers 文件夹的上下文菜单(右键单击),然后选择“添加”>“控制器”。
在“添加基架”对话框中,选择“Web API 2 控制器 - 空”。
选择“添加”。
将该控制器命名为 SPWebhookController,然后选择“添加”将该 API 控制器添加到项目中。
使用以下代码替换
using语句:using Newtonsoft.Json; using SPWebhooksReceiver.Models; using System.Collections.Generic; using System.Configuration; using System.Linq; using System.Net; using System.Net.Http; using System.Threading.Tasks; using System.Web; using System.Web.Http; using System.Web.Http.Tracing;使用以下代码替换 SPWebhookController 类中的代码:
[HttpPost]
public HttpResponseMessage HandleRequest()
{
    HttpResponseMessage httpResponse = new HttpResponseMessage(HttpStatusCode.BadRequest);
    var traceWriter = Configuration.Services.GetTraceWriter();
    string validationToken = string.Empty;
    IEnumerable<string> clientStateHeader = new List<string>();
    string webhookClientState = ConfigurationManager.AppSettings["webhookclientstate"].ToString();

    if (Request.Headers.TryGetValues("ClientState", out clientStateHeader))
    {
        string clientStateHeaderValue = clientStateHeader.FirstOrDefault() ?? string.Empty;

        if (!string.IsNullOrEmpty(clientStateHeaderValue) && clientStateHeaderValue.Equals(webhookClientState))
        {
            traceWriter.Trace(Request, "SPWebhooks",
                TraceLevel.Info,
                string.Format("Received client state: {0}", clientStateHeaderValue));

            var queryStringParams = HttpUtility.ParseQueryString(Request.RequestUri.Query);

            if (queryStringParams.AllKeys.Contains("validationtoken"))
            {
                httpResponse = new HttpResponseMessage(HttpStatusCode.OK);
                validationToken = queryStringParams.GetValues("validationtoken")[0].ToString();
                httpResponse.Content = new StringContent(validationToken);

                traceWriter.Trace(Request, "SPWebhooks",
                    TraceLevel.Info,
                    string.Format("Received validation token: {0}", validationToken));
                return httpResponse;
            }
            else
            {
                var requestContent = Request.Content.ReadAsStringAsync().Result;

                if (!string.IsNullOrEmpty(requestContent))
                {
                    SPWebhookNotification notification = null;

                    try
                    {
                        var objNotification = JsonConvert.DeserializeObject<SPWebhookContent>(requestContent);
                        notification = objNotification.Value[0];
                    }
                    catch (JsonException ex)
                    {
                        traceWriter.Trace(Request, "SPWebhooks",
                            TraceLevel.Error,
                            string.Format("JSON deserialization error: {0}", ex.InnerException));
                        return httpResponse;
                    }

                    if (notification != null)
                    {
                        Task.Factory.StartNew(() =>
                        {
                              //handle the notification here
                              //you can send this to an Azure queue to be processed later
                            //for this sample, we just log to the trace

                            traceWriter.Trace(Request, "SPWebhook Notification",
                                TraceLevel.Info, string.Format("Resource: {0}", notification.Resource));
                            traceWriter.Trace(Request, "SPWebhook Notification",
                                TraceLevel.Info, string.Format("SubscriptionId: {0}", notification.SubscriptionId));
                            traceWriter.Trace(Request, "SPWebhook Notification",
                                TraceLevel.Info, string.Format("TenantId: {0}", notification.TenantId));
                            traceWriter.Trace(Request, "SPWebhook Notification",
                                TraceLevel.Info, string.Format("SiteUrl: {0}", notification.SiteUrl));
                            traceWriter.Trace(Request, "SPWebhook Notification",
                                TraceLevel.Info, string.Format("WebId: {0}", notification.WebId));
                            traceWriter.Trace(Request, "SPWebhook Notification",
                                TraceLevel.Info, string.Format("ExpirationDateTime: {0}", notification.ExpirationDateTime));

                        });

                        httpResponse = new HttpResponseMessage(HttpStatusCode.OK);
                    }
                }
            }
        }
        else
        {
            httpResponse = new HttpResponseMessage(HttpStatusCode.Forbidden);
        }
    }

    return httpResponse;
}
保存该文件。
步骤 3:调试 Webhook 接收器
- 选择 F5 以调试 Webhook 接收器。
- 打开浏览器时,从地址栏复制端口号。 例如:
http://localhost:<_port-number_>
第 4 步:运行 ngrok 代理
打开一个控制台终端。
转到提取的 ngrok 文件夹。
输入以下来自上一步中具有端口号 URL 的内容,以启动 ngrok:
./ngrok http port-number --host-header=localhost:port-number你可以看到 ngrok 正在运行。
复制 Forwarding HTTPS 地址。 你将使用该地址作为 SharePoint 的服务代理来发送请求。
步骤 5:使用 Postman 添加 webhook 订阅
获取新的访问令牌
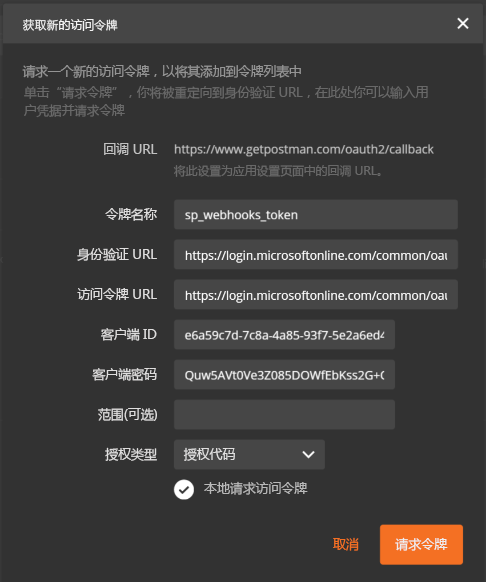
Postman 使 API 的使用变得极其简单。 第一步是将 Postman 配置为使用 Azure AD 进行身份验证,从而可以将 API 请求发送到 SharePoint。 你将使用在步骤 1 中注册的 Azure AD 应用。
打开 Postman。 你将看到边栏和请求编辑器。
选择请求编辑器中的“授权”选项卡。
选择“类型”列表中的“OAuth 2.0”。
选择“获取新访问令牌”按钮。
在对话框窗口中,输入以下内容:
- 身份验证 URL:
https://login.microsoftonline.com/common/oauth2/authorize?resource=https%3A%2F%2F<_your-sharepoint-tenant-url-without-https_>- 使用没有 https 前缀的租户 URL 替换
your-sharepoint-tenant-url-without-https。
- 访问令牌 URL:
https://login.microsoftonline.com/common/oauth2/token - 客户端 ID:之前在步骤 1 中注册的应用的客户端 ID。
- 客户端密码:之前在步骤 1 中注册的应用的客户端密码。
- 令牌名称:sp_webhooks_token
- 授权类型:授权代码
- 身份验证 URL:
选择“请求令牌”进行登录、许可,并获取会话令牌。
成功检索令牌后,应会看到 access_token 变量添加到“ 授权 ”选项卡。
选择此选项将令牌添加到标头。
双击 access_token 变量,将令牌添加到请求的标头。

获取文档列表 ID
你需要管理默认文档库的 webhook,该文档库在默认网站集中的名称设置为 Documents。 通过发出 GET 请求可获取此列表的 ID:
输入以下请求 URL:
https://site-collection/_api/web/lists/getbytitle('Documents')?$select=Title,Id将 site-collection 替换为你的网站集。
Postman 将执行请求,如果成功,应该可以看到结果。
从结果复制 ID。 稍后,你可以使用 ID 发出 webhook 请求。
添加 webhook 订阅
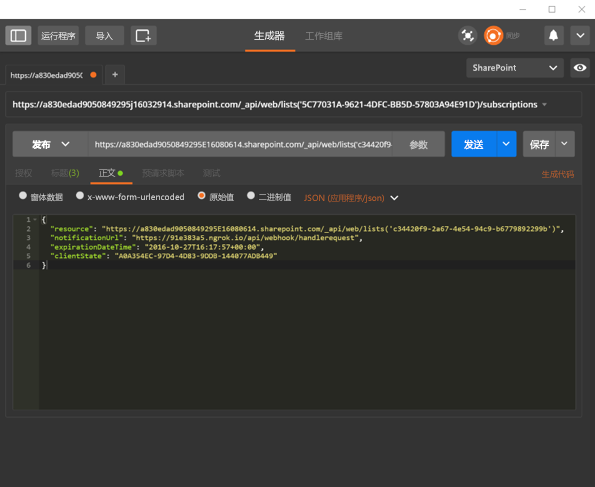
现在你有了所需的信息,构造查询和请求来添加 webhook 订阅。 使用请求编辑器执行以下步骤:
将请求从 GET 更改为 POST。
输入以下内容作为请求 URL:
https://site-collection/_api/web/lists('list-id')/subscriptions将 site-collection 替换为你的网站集。
转到“标头”选项卡。
请确保仍有“授权”标头。 如果没有,则需要请求新的访问令牌。
添加以下标头键>值对:
- 接受:
application/json;odata=nometadata - Content-Type:
application/json
- 接受:
转到“正文”选项卡,然后选择“原始”格式。
粘贴以下 JSON 作为正文:
{
  "resource": "https://site-collection/_api/web/lists('list-id')",
  "notificationUrl": "https://ngrok-forwarding-address/api/spwebhook/handlerequest",
  "expirationDateTime": "2016-10-27T16:17:57+00:00",
  "clientState": "A0A354EC-97D4-4D83-9DDB-144077ADB449"
}
确保 expirationDateTime 自今天开始最长为 6 个月。
确保如步骤 4 中的操作一样来调试 Webhook 接收器。
选择“发送”来执行此请求。
如果请求成功,则应该可以看到来自 SharePoint 的提供订阅详细信息的响应。 下面的示例显示新创建订阅的响应:
{
  "clientState": "A0A354EC-97D4-4D83-9DDB-144077ADB449",
  "expirationDateTime": "2016-10-27T16:17:57Z",
  "id": "32b95d9-4d20-4a17-bfa3-2957cb38ead8",
  "notificationUrl": "https://85557d4b.ngrok.io/api/spwebhook/handlerequest",
  "resource": "c34420f9-2ad7-4e54-94c9-b67798d2299b"
}
复制订阅 ID。下一组请求中将用到它。
转到 Visual Studio 中的 webhook 接收器项目,并检查“输出”窗口。 你应该可以看到与以下跟踪类似的跟踪日志以及其他信息:
iisexpress.exe Information: 0 : Message='Received client state: A0A354EC-97D4-4D83-9DDB-144077ADB449'
iisexpress.exe Information: 0 : Message='Received validation token: daf2803c-43cf-44c7-8dff-7066eaa40f13'
此跟踪表明 webhook 接收到了最初收到的验证请求。 如果查看代码,你会看到它立即返回此验证令牌,这样 SharePoint 就可以验证此请求:
if (queryStringParams.AllKeys.Contains("validationtoken"))
{
  httpResponse = new HttpResponseMessage(HttpStatusCode.OK);
  validationToken = queryStringParams.GetValues("validationtoken")[0].ToString();
  httpResponse.Content = new StringContent(validationToken);

  traceWriter.Trace(Request, "SPWebhooks",
    TraceLevel.Info,
    string.Format("Received validation token: {0}", validationToken));
  return httpResponse;
}
步骤 6:获取订阅详细信息
现在可以在 Postman 中运行查询来获取订阅详细信息。
打开 Postman 客户端。
将请求从 POST 更改为 GET。
输入以下内容作为请求:
https://site-collection/_api/web/lists('list-id')/subscriptions将 site-collection 替换为你的网站集。
选择“发送”来执行此请求。
如果成功,你会看到 SharePoint 返回此列表资源的订阅。 因为我们刚刚添加了一个,所以至少应看到一个返回的订阅。 下面的示例显示具有一个订阅的响应:
{
  "value": [
    {
      "clientState": "A0A354EC-97D4-4D83-9DDB-144077ADB449",
      "expirationDateTime": "2016-10-27T16:17:57Z",
      "id": "32b95add-4d20-4a17-bfa3-2957cb38ead8",
      "notificationUrl": "https://85557d4b.ngrok.io/api/spwebhook/handlerequest",
      "resource": "c34420f9-2a67-4e54-94c9-b67798229f9b"
    }
  ]
}
运行以下查询来获取特定订阅的详细信息:
https://site-collection/_api/web/lists('list-id')/subscriptions('subscription-id')将
subscription-id替换为你的订阅 ID。
步骤 7:测试 Webhook 通知
如果 webhook 接收器收到来自 SharePoint 的通知,则将文件添加到文档库并进行测试。
转到 Visual Studio。
在 SPWebhookController 中,在以下代码行上放置一个断点:
var requestContent = Request.Content.ReadAsStringAsync().Result;转到“文档”库。 在默认网站集中,此库名为“共享文档”。
添加新文件。
转到 Visual Studio 并等待命中该断点。
等待时间可能会有所不同,从几秒钟到至多五分钟不等。 命中该断点时,Webhook 接收器刚刚收到一个来自 SharePoint 的通知。
选择 F5 继续。
若要查看通知数据,由于已将通知数据添加到跟踪日志,因而可在“输出”窗口中查找以下条目:
iisexpress.exe Information: 0 : Message='Resource: c34420f9-2a67-4e54-94c9-b6770892299b'
iisexpress.exe Information: 0 : Message='SubscriptionId: 32b95ad9-4d20-4a17-bfa3-2957cb38ead8'
iisexpress.exe Information: 0 : Message='TenantId: 7a17cb7d-6898-423f-8839-45f363076f06'
iisexpress.exe Information: 0 : Message='SiteUrl: /'
iisexpress.exe Information: 0 : Message='WebId: 62b80e0b-f889-4974-a519-cc138413be40'
iisexpress.exe Information: 0 : Message='ExpirationDateTime: 2016-10-27T16:17:57.0000000Z'
此项目仅将信息写入跟踪日志。 但是在接收器中,可将此信息发送到能处理接收到的数据的表或队列,以便获取来自 SharePoint 的信息。
使用此数据,可以构造 URL,然后使用 GetChanges API 来获取最新的更改。
后续步骤
在本文中,你使用 Postman 客户端和简单的 Web API 来订阅和接收来自 SharePoint 的 webhook 通知。
接下来,请参阅 SharePoint webhook 示例引用实现,该文章介绍了使用 Azure 存储队列处理信息、从 SharePoint 获取更改,并将这些更改推送回 SharePoint 列表的端到端示例。