设备方向
请务必考虑如何使用应用程序,以及如何整合横向方向来提升用户体验。 各个布局都可设计为适应多个方向,并以最佳方式使用可用空间。 在应用程序级别,可以禁用或启用旋转。
控制方向
使用 Xamarin.Forms 时,支持使用每个项目的设置来控制设备方向。
iOS
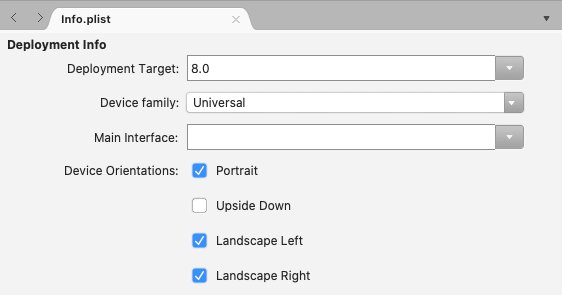
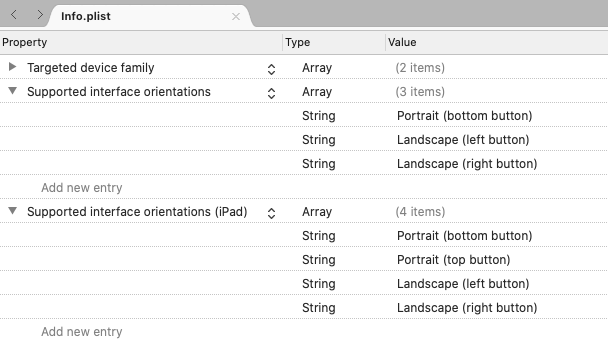
在 iOS 上,使用 Info.plist文件为应用程序配置设备方向。 使用本文档顶部的 IDE 选项选择你想要查看的说明:
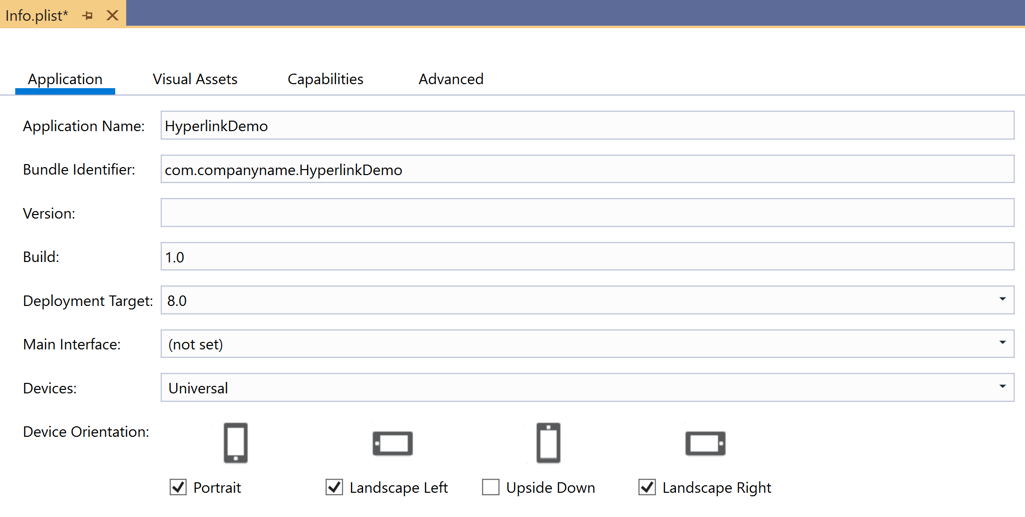
在 Visual Studio 中,打开 iOS 项目并打开 Info.plist。 该文件将在配置面板中打开,从“iPhone 部署信息”选项卡开始:
Android
若要控制 Android 上的方向,请打开 MainActivity.cs 并使用修饰 MainActivity 类的属性设置方向:
namespace MyRotatingApp.Droid
{
    [Activity (Label = "MyRotatingApp.Droid", Icon = "@drawable/icon", Theme = "@style/MainTheme", MainLauncher = true, ConfigurationChanges = ConfigChanges.ScreenSize | ConfigChanges.Orientation, ScreenOrientation = ScreenOrientation.Landscape)] //This is what controls orientation
    public class MainActivity : FormsAppCompatActivity
    {
        protected override void OnCreate (Bundle bundle)
...
Xamarin.Android 支持多个用于指定方向的选项:
- 横向 - 无论传感器数据如何,都强制要求应用程序方向为横向。
- 纵向 - 无论传感器数据如何,都强制要求应用程序方向为纵向。
- 用户 - 应用程序按照用户的首选方向显示。
- Behind - 应用程序的方向与其后面的活动的方向相同。
- 传感器 - 应用程序的方向由传感器确定,即使用户禁用了自动旋转也是如此。
- SensorLandscape - 在使用传感器数据更改屏幕面向的方向时,应用程序横向显示(以便屏幕不被视为倒置)。
- SensorPortrait - 在使用传感器数据更改屏幕面向的方向时,应用程序纵向显示(以便屏幕不被视为倒置)。
- ReverseLandscape - 应用程序采用横向方向,与平常的方向相反,因此看起来是“颠倒的”。
- ReversePortrait - 应用程序采用纵向方向,与平常的方向相反,因此看起来是“颠倒的”。
- FullSensor - 应用程序依赖于传感器数据来选择正确的方向(总共可能 4 个方向)。
- FullUser - 应用程序遵循用户的方向首选项。 如果启用了自动旋转,则可以使用所有 4 个方向。
- UserLandscape - [不支持] 应用程序采用横向方向,除非用户启用了自动旋转,在这种情况下,它将使用传感器来确定方向。 此选项会中断编译。
- UserPortrait - [不支持] 应用程序采用纵向方向,除非用户启用了自动旋转,在这种情况下,它将使用传感器来确定方向。 此选项会中断编译。
- 锁定 - [不支持] 应用程序与屏幕方向一致(无论启动时是什么方向),而不对设备物理方向的变化做出响应。 此选项会中断编译。
请注意,本机 Android API 对如何管理方向提供了很大程度的控制,包括与用户首选项明确相悖的选项。
通用 Windows 平台
在通用 Windows 平台 (UWP) 上,在 Package.appxmanifest 文件中设置所支持的方向。 打开清单将显示一个配置面板,可在其中选择支持的方向。
对方向更改做出反应
Xamarin.Forms 不提供任何本机事件来通知应用注意共享代码中的方向更改。 但是,Xamarin.Essentials 包含一个 [DeviceDisplay] 类,它提供方向更改通知。
若要在没有 Xamarin.Essentials 的情况下检测方向,请监视 Page 的 SizeChanged 事件,当 Page 的宽度或高度变化时会触发该事件。 当 Page 的宽度大于高度时,设备处于横向模式。 有关详细信息,请参阅基于屏幕方向显示图像。
或者,可重写 Page 上的 OnSizeAllocated 方法,在这里插入任何布局更改逻辑。 每次旋转设备时,都会向 Page 分配新大小时,而这又会调用 OnSizeAllocated 方法。 请注意,OnSizeAllocated 的基本实现执行重要布局函数,因此在重写中调用基本实现非常重要:
protected override void OnSizeAllocated(double width, double height)
{
    base.OnSizeAllocated(width, height); //must be called
}
未能执行此步骤将导致页面不起作用。
请注意,当设备旋转时,可能会多次调用 OnSizeAllocated 方法。 每次都更改布局会浪费资源,还可能导致闪烁。 请考虑在页面中使用实例变量来跟踪方向是横向还是纵向,并且仅在发生更改时重新绘制:
private double width = 0;
private double height = 0;

protected override void OnSizeAllocated(double width, double height)
{
    base.OnSizeAllocated(width, height); //must be called
    if (this.width != width || this.height != height)
    {
        this.width = width;
        this.height = height;
        //reconfigure layout
    }
}
检测到设备方向变化后,可能需要在用户界面中添加或删除其他视图,对可用空间的变化作出反应。 例如,请考虑每个平台上的内置计算机纵向显示:
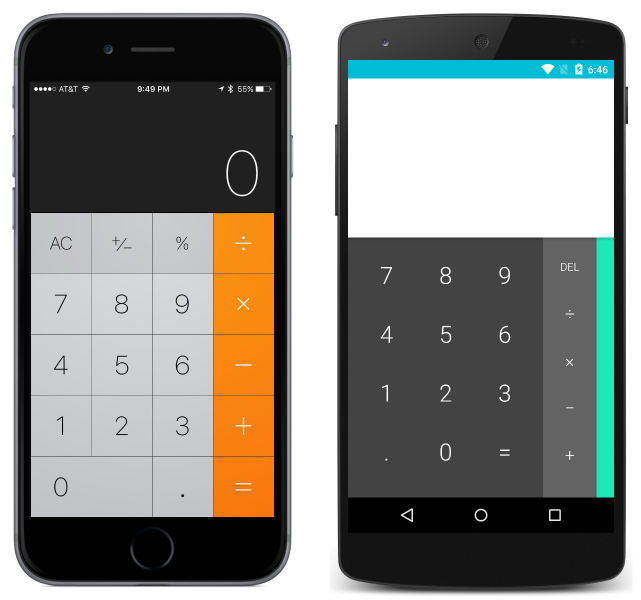
和横向显示:
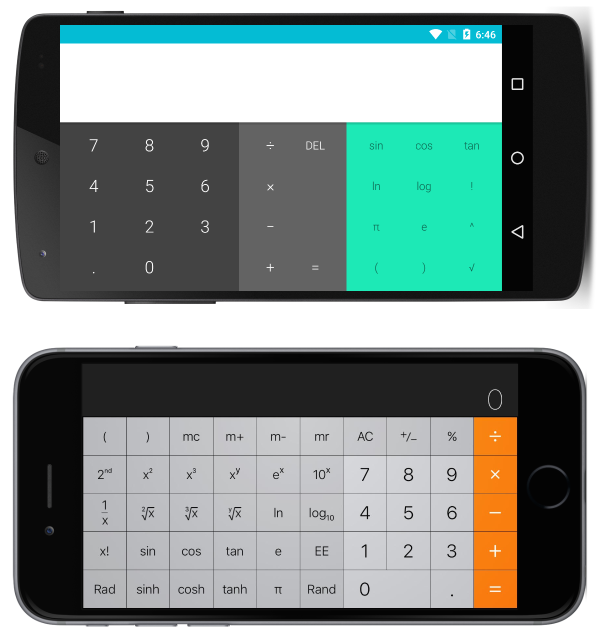
请注意,应用通过在横向方向添加更多功能来利用可用空间。
响应式布局
可使用内置布局设计界面,以便界面在设备旋转时正常过渡。 设计在响应方向变化时继续具有吸引力的界面时,请考虑以下一般规则:
- 纵横比 - 当对纵横比做出某些假设时,方向变化可能会导致问题。 例如,某个视图在纵向屏幕 1/3 的垂直空间中有足够的空间,但在横向屏幕 1/3 的垂直空间中可能就不适合了。
- 谨慎使用绝对值 - 在纵向方向中有意义的绝对(像素)值在横向方向上可能没有意义。 如果需要绝对值,请使用嵌套布局来隔离其影响。 例如,当项模板具有保证的统一高度时,使用绝对值
TableViewItemTemplate是合理的。
上述规则也在实现多个屏幕尺寸的界面时适用,并且通常被视为最佳做法。 本指南的其余部分将介绍具体示例来说明使用 Xamarin.Forms 中的每个主要布局的响应式布局。
注意
为了清楚起见,以下部分演示如何一次只使用一种类型的 Layout 来实现响应式布局。 实际上,与对每个组件使用更简单或更直观的 Layout 相比,混合使用 Layout 来实现所需的布局通常更加简单。
StackLayout
请考虑以下应用程序纵向显示:
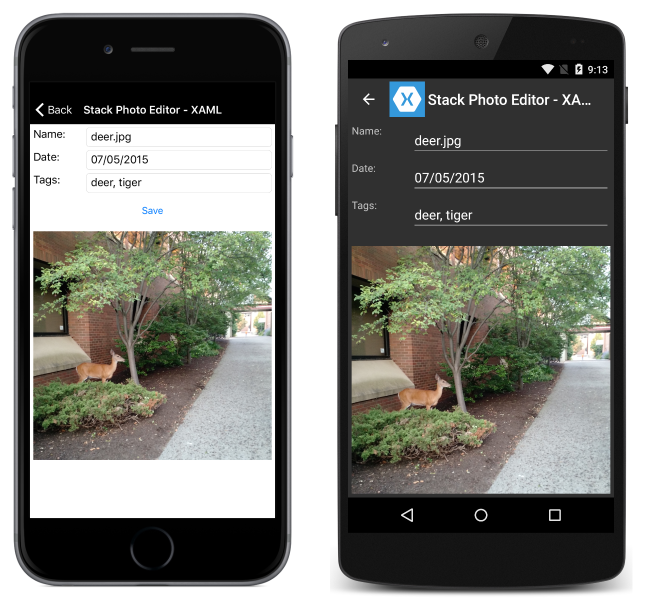
和横向显示:
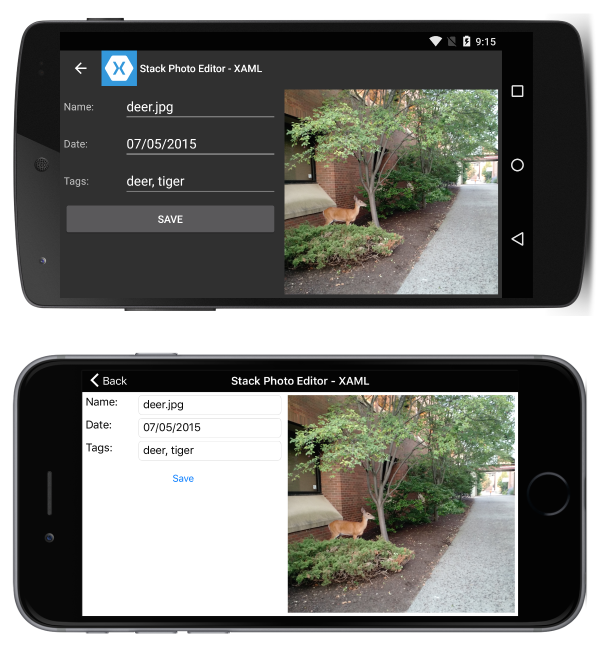
这是使用以下 XAML 来实现的:
<?xml version="1.0" encoding="UTF-8"?>
<ContentPage xmlns="http://xamarin.com/schemas/2014/forms"
xmlns:x="http://schemas.microsoft.com/winfx/2009/xaml"
x:Class="ResponsiveLayout.StackLayoutPageXaml"
Title="Stack Photo Editor - XAML">
    <ContentPage.Content>
        <StackLayout Spacing="10" Padding="5" Orientation="Vertical"
        x:Name="outerStack"> <!-- can change orientation to make responsive -->
            <ScrollView>
                <StackLayout Spacing="5" HorizontalOptions="FillAndExpand"
                    WidthRequest="1000">
                    <StackLayout Orientation="Horizontal">
                        <Label Text="Name: " WidthRequest="75"
                            HorizontalOptions="Start" />
                        <Entry Text="deer.jpg"
                            HorizontalOptions="FillAndExpand" />
                    </StackLayout>
                    <StackLayout Orientation="Horizontal">
                        <Label Text="Date: " WidthRequest="75"
                            HorizontalOptions="Start" />
                        <Entry Text="07/05/2015"
                            HorizontalOptions="FillAndExpand" />
                    </StackLayout>
                    <StackLayout Orientation="Horizontal">
                        <Label Text="Tags:" WidthRequest="75"
                            HorizontalOptions="Start" />
                        <Entry Text="deer, tiger"
                            HorizontalOptions="FillAndExpand" />
                    </StackLayout>
                    <StackLayout Orientation="Horizontal">
                        <Button Text="Save" HorizontalOptions="FillAndExpand" />
                    </StackLayout>
                </StackLayout>
            </ScrollView>
            <Image  Source="deer.jpg" />
        </StackLayout>
    </ContentPage.Content>
</ContentPage>
某些 C# 用于根据设备的方向更改 outerStack 的方向:
protected override void OnSizeAllocated (double width, double height){
    base.OnSizeAllocated (width, height);
    if (width != this.width || height != this.height) {
        this.width = width;
        this.height = height;
        if (width > height) {
            outerStack.Orientation = StackOrientation.Horizontal;
        } else {
            outerStack.Orientation = StackOrientation.Vertical;
        }
    }
}
请注意以下事项:
outerStack调整为根据方向将图像和控件呈现为水平或垂直堆栈,以充分利用可用空间。
AbsoluteLayout
请考虑以下应用程序纵向显示:
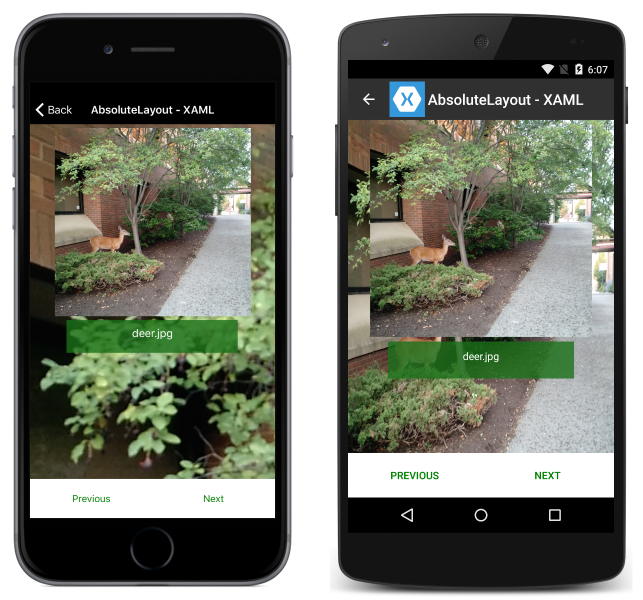
和横向显示:
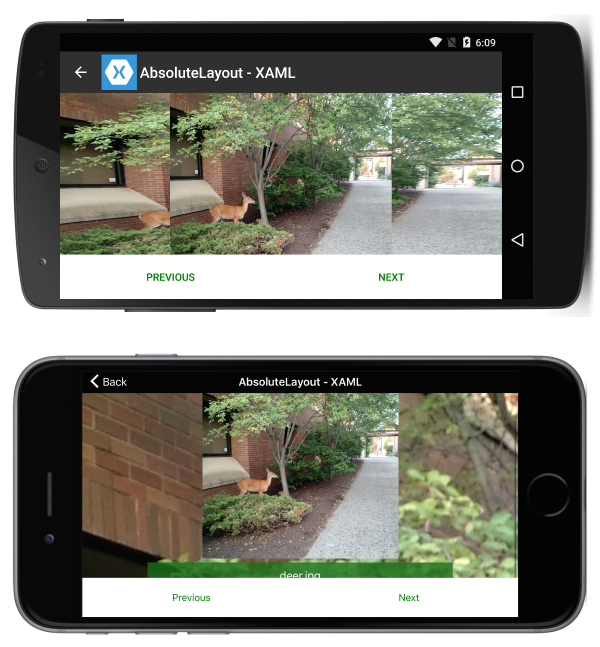
这是使用以下 XAML 来实现的:
<?xml version="1.0" encoding="UTF-8"?>
<ContentPage xmlns="http://xamarin.com/schemas/2014/forms"
xmlns:x="http://schemas.microsoft.com/winfx/2009/xaml"
x:Class="ResponsiveLayout.AbsoluteLayoutPageXaml"
Title="AbsoluteLayout - XAML" BackgroundImageSource="deer.jpg">
    <ContentPage.Content>
        <AbsoluteLayout>
            <ScrollView AbsoluteLayout.LayoutBounds="0,0,1,1"
                AbsoluteLayout.LayoutFlags="PositionProportional,SizeProportional">
                <AbsoluteLayout>
                    <Image Source="deer.jpg"
                        AbsoluteLayout.LayoutBounds=".5,0,300,300"
                        AbsoluteLayout.LayoutFlags="PositionProportional" />
                    <BoxView Color="#CC1A7019" AbsoluteLayout.LayoutBounds=".5
                        300,.7,50" AbsoluteLayout.LayoutFlags="XProportional
                        WidthProportional" />
                    <Label Text="deer.jpg" AbsoluteLayout.LayoutBounds = ".5
                        310,1, 50" AbsoluteLayout.LayoutFlags="XProportional
                        WidthProportional" HorizontalTextAlignment="Center" TextColor="White" />
                </AbsoluteLayout>
            </ScrollView>
            <Button Text="Previous" AbsoluteLayout.LayoutBounds="0,1,.5,60"
                AbsoluteLayout.LayoutFlags="PositionProportional
                    WidthProportional"
                BackgroundColor="White" TextColor="Green" BorderRadius="0" />
            <Button Text="Next" AbsoluteLayout.LayoutBounds="1,1,.5,60"
                AbsoluteLayout.LayoutFlags="PositionProportional
                    WidthProportional" BackgroundColor="White"
                    TextColor="Green" BorderRadius="0" />
        </AbsoluteLayout>
    </ContentPage.Content>
</ContentPage>
请注意以下事项:
- 由于页面布局方式,因此无需程序代码来引入响应能力。
- 使用
ScrollView时,即使屏幕的高度小于按钮和图像的固定高度之和,标签也可见。
RelativeLayout
请考虑以下应用程序纵向显示:
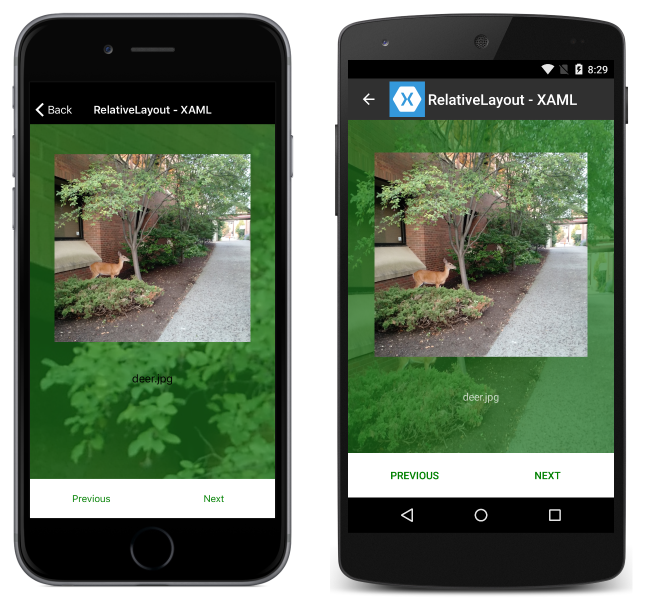
和横向显示:
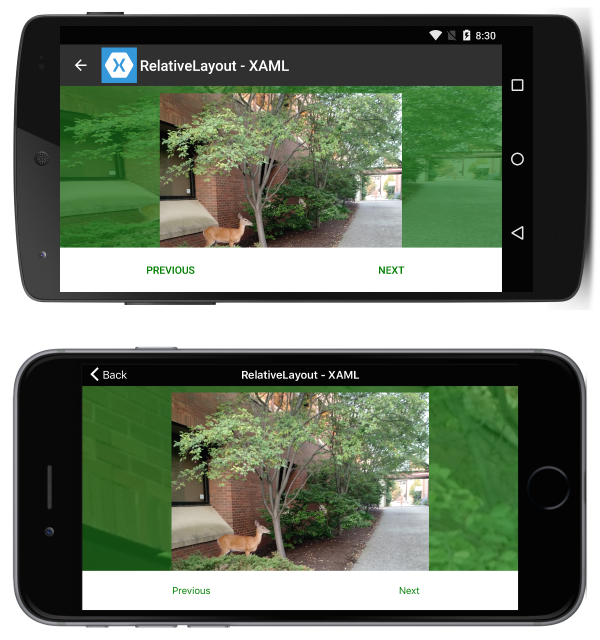
这是使用以下 XAML 来实现的:
<?xml version="1.0" encoding="UTF-8"?>
<ContentPage xmlns="http://xamarin.com/schemas/2014/forms"
xmlns:x="http://schemas.microsoft.com/winfx/2009/xaml"
x:Class="ResponsiveLayout.RelativeLayoutPageXaml"
Title="RelativeLayout - XAML"
BackgroundImageSource="deer.jpg">
    <ContentPage.Content>
        <RelativeLayout x:Name="outerLayout">
            <BoxView BackgroundColor="#AA1A7019"
                RelativeLayout.WidthConstraint="{ConstraintExpression
                    Type=RelativeToParent,Property=Width,Factor=1}"
                RelativeLayout.HeightConstraint="{ConstraintExpression
                    Type=RelativeToParent,Property=Height,Factor=1}"
                RelativeLayout.XConstraint="{ConstraintExpression
                    Type=RelativeToParent,Property=Width,Factor=0,Constant=0}"
                RelativeLayout.YConstraint="{ConstraintExpression
                    Type=RelativeToParent,Property=Height,Factor=0,Constant=0}" />
            <ScrollView
                RelativeLayout.WidthConstraint="{ConstraintExpression
                    Type=RelativeToParent,Property=Width,Factor=1}"
                RelativeLayout.HeightConstraint="{ConstraintExpression
                    Type=RelativeToParent,Property=Height,Factor=1,Constant=-60}"
                RelativeLayout.XConstraint="{ConstraintExpression
                    Type=RelativeToParent,Property=Width,Factor=0,Constant=0}"
                RelativeLayout.YConstraint="{ConstraintExpression
                    Type=RelativeToParent,Property=Height,Factor=0,Constant=0}">
                <RelativeLayout>
                    <Image Source="deer.jpg" x:Name="imageDeer"
                        RelativeLayout.WidthConstraint="{ConstraintExpression
                            Type=RelativeToParent,Property=Width,Factor=.8}"
                        RelativeLayout.XConstraint="{ConstraintExpression
                            Type=RelativeToParent,Property=Width,Factor=.1}"
                        RelativeLayout.YConstraint="{ConstraintExpression
                            Type=RelativeToParent,Property=Height,Factor=0,Constant=10}" />
                    <Label Text="deer.jpg" HorizontalTextAlignment="Center"
                        RelativeLayout.WidthConstraint="{ConstraintExpression
                            Type=RelativeToParent,Property=Width,Factor=1}"
                        RelativeLayout.HeightConstraint="{ConstraintExpression
                            Type=RelativeToParent,Property=Height,Factor=0,Constant=75}"
                        RelativeLayout.XConstraint="{ConstraintExpression
                            Type=RelativeToParent,Property=Width,Factor=0,Constant=0}"
                        RelativeLayout.YConstraint="{ConstraintExpression
                            Type=RelativeToView,ElementName=imageDeer,Property=Height,Factor=1,Constant=20}" />
                </RelativeLayout>

            </ScrollView>

            <Button Text="Previous" BackgroundColor="White" TextColor="Green" BorderRadius="0"
                RelativeLayout.YConstraint="{ConstraintExpression
                    Type=RelativeToParent,Property=Height,Factor=1,Constant=-60}"
                RelativeLayout.XConstraint="{ConstraintExpression
                    Type=RelativeToParent,Property=Width,Factor=0,Constant=0}"
                RelativeLayout.HeightConstraint="{ConstraintExpression
                    Type=RelativeToParent,Property=Width,Factor=0,Constant=60}"
                RelativeLayout.WidthConstraint="{ConstraintExpression
                    Type=RelativeToParent,Property=Width,Factor=.5}"
                 />
            <Button Text="Next" BackgroundColor="White" TextColor="Green" BorderRadius="0"
                RelativeLayout.XConstraint="{ConstraintExpression
                    Type=RelativeToParent,Property=Width,Factor=.5}"
                RelativeLayout.YConstraint="{ConstraintExpression
                    Type=RelativeToParent,Property=Height,Factor=1,Constant=-60}"
                RelativeLayout.HeightConstraint="{ConstraintExpression
                    Type=RelativeToParent,Property=Width,Factor=0,Constant=60}"
                RelativeLayout.WidthConstraint="{ConstraintExpression
                    Type=RelativeToParent,Property=Width,Factor=.5}"
                />
        </RelativeLayout>
    </ContentPage.Content>
</ContentPage>
请注意以下事项:
- 由于页面布局方式,因此无需程序代码来引入响应能力。
- 使用
ScrollView时,即使屏幕的高度小于按钮和图像的固定高度之和,标签也可见。
网格
请考虑以下应用程序纵向显示:
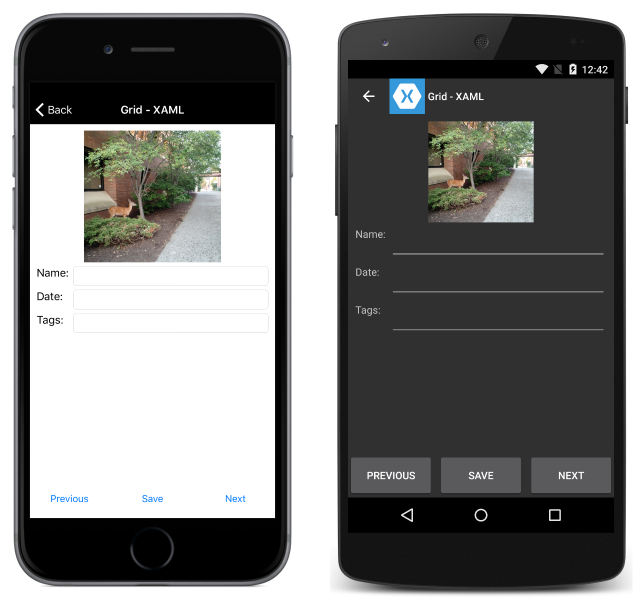
和横向显示:
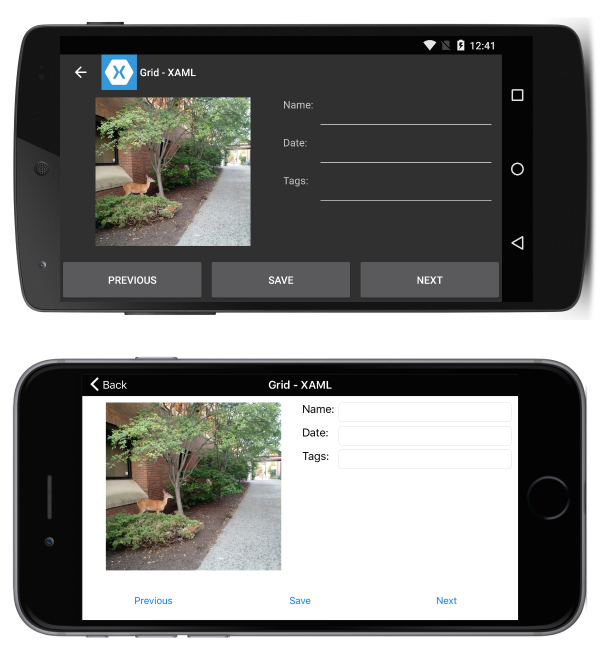
这是使用以下 XAML 来实现的:
<?xml version="1.0" encoding="UTF-8"?>
<ContentPage xmlns="http://xamarin.com/schemas/2014/forms"
xmlns:x="http://schemas.microsoft.com/winfx/2009/xaml"
x:Class="ResponsiveLayout.GridPageXaml"
Title="Grid - XAML">
    <ContentPage.Content>
        <Grid x:Name="outerGrid">
            <Grid.RowDefinitions>
                <RowDefinition Height="*" />
                <RowDefinition Height="60" />
            </Grid.RowDefinitions>
            <Grid x:Name="innerGrid" Grid.Row="0" Padding="10">
                <Grid.RowDefinitions>
                    <RowDefinition Height="*" />
                </Grid.RowDefinitions>
                <Grid.ColumnDefinitions>
                    <ColumnDefinition Width="*" />
                    <ColumnDefinition Width="*" />
                </Grid.ColumnDefinitions>
                <Image Source="deer.jpg" Grid.Row="0" Grid.Column="0" HeightRequest="300" WidthRequest="300" />
                <Grid x:Name="controlsGrid" Grid.Row="0" Grid.Column="1" >
                    <Grid.RowDefinitions>
                        <RowDefinition Height="Auto" />
                        <RowDefinition Height="Auto" />
                        <RowDefinition Height="Auto" />
                    </Grid.RowDefinitions>
                    <Grid.ColumnDefinitions>
                        <ColumnDefinition Width="Auto" />
                        <ColumnDefinition Width="*" />
                    </Grid.ColumnDefinitions>
                    <Label Text="Name:" Grid.Row="0" Grid.Column="0" />
                    <Label Text="Date:" Grid.Row="1" Grid.Column="0" />
                    <Label Text="Tags:" Grid.Row="2" Grid.Column="0" />
                    <Entry Grid.Row="0" Grid.Column="1" />
                    <Entry Grid.Row="1" Grid.Column="1" />
                    <Entry Grid.Row="2" Grid.Column="1" />
                </Grid>
            </Grid>
            <Grid x:Name="buttonsGrid" Grid.Row="1">
                <Grid.ColumnDefinitions>
                    <ColumnDefinition Width="*" />
                    <ColumnDefinition Width="*" />
                    <ColumnDefinition Width="*" />
                </Grid.ColumnDefinitions>
                <Button Text="Previous" Grid.Column="0" />
                <Button Text="Save" Grid.Column="1" />
                <Button Text="Next" Grid.Column="2" />
            </Grid>
        </Grid>
    </ContentPage.Content>
</ContentPage>
还有以下程序代码来处理旋转变化:
private double width;
private double height;

protected override void OnSizeAllocated (double width, double height){
    base.OnSizeAllocated (width, height);
    if (width != this.width || height != this.height) {
        this.width = width;
        this.height = height;
        if (width > height) {
            innerGrid.RowDefinitions.Clear();
            innerGrid.ColumnDefinitions.Clear ();
            innerGrid.RowDefinitions.Add (new RowDefinition{ Height = new GridLength (1, GridUnitType.Star) });
            innerGrid.ColumnDefinitions.Add (new ColumnDefinition { Width = new GridLength (1, GridUnitType.Star) });
            innerGrid.ColumnDefinitions.Add (new ColumnDefinition { Width = new GridLength (1, GridUnitType.Star) });
            innerGrid.Children.Remove (controlsGrid);
            innerGrid.Children.Add (controlsGrid, 1, 0);
        } else {
            innerGrid.RowDefinitions.Clear();
            innerGrid.ColumnDefinitions.Clear ();
            innerGrid.ColumnDefinitions.Add (new ColumnDefinition{ Width = new GridLength (1, GridUnitType.Star) });
            innerGrid.RowDefinitions.Add (new RowDefinition { Height = new GridLength (1, GridUnitType.Auto) });
            innerGrid.RowDefinitions.Add (new RowDefinition { Height = new GridLength (1, GridUnitType.Star) });
            innerGrid.Children.Remove (controlsGrid);
            innerGrid.Children.Add (controlsGrid, 0, 1);
        }
    }
}
请注意以下事项:
- 由于页面布局方式,有一种方法来更改控件的网格位置。
