显示 SkiaSharp 位图
SkiaSharp 中的位图基础知识一文介绍了 SkiaSharp 位图的主题。 这篇文章介绍了三种加载位图的方法和三种显示位图的方法。 本文回顾了加载位图的技术,并深入探讨了 SKCanvas 的 DrawBitmap 方法的使用。
SkiaSharp 位图的分段显示一文中讨论了 DrawBitmapLattice 和 DrawBitmapNinePatch 方法。
此页面上的示例来自示例应用程序。 从该应用程序的主页中,选择“SkiaSharp 位图”,然后转到“显示位图”部分。
加载位图
SkiaSharp 应用程序使用的位图通常来自三种不同的来源之一:
- 来自互联网
- 从嵌入在可执行文件中的资源
- 来自用户的照片库
SkiaSharp 应用程序也可以创建新位图,然后对其进行绘制或以算法方式设置位图位。 创建和绘制 SkiaSharp 位图和访问 SkiaSharp 位图像素文章中讨论了这些技术。
在以下三个加载位图的代码示例中,假定该类包含类型为 SKBitmap 的字段:
SKBitmap bitmap;
正如 SkiaSharp 中的位图基础知识一文所述,通过互联网加载位图的最佳方式是使用 HttpClient 类。 类的单个实例可以定义为一个字段:
HttpClient httpClient = new HttpClient();
在 iOS 和 Android 应用程序中使用 HttpClient 时,需要按照传输层安全性 (TLS) 1.2 文档所述设置项目属性。
使用 HttpClient 的代码通常涉及 await 运算符,因此它必须位于 async 方法中:
try
{
    using (Stream stream = await httpClient.GetStreamAsync("https:// ··· "))
    using (MemoryStream memStream = new MemoryStream())
    {
        await stream.CopyToAsync(memStream);
        memStream.Seek(0, SeekOrigin.Begin);

        bitmap = SKBitmap.Decode(memStream);
        ···
    };
}
catch
{
    ···
}
请注意,从 GetStreamAsync 获得的 Stream 对象会复制到 MemoryStream 中。 除异步方法外,Android 不允许主线程处理来自 HttpClient 的 Stream。
SKBitmap.Decode 执行了大量工作:传递给它的 Stream 对象引用一个内存块,该内存块包含一个通用位图文件格式(通常为 JPEG、PNG 或 GIF)的整个位图。 Decode 方法必须确定格式,然后将位图文件解码为 SkiaSharp 自己的内部位图格式。
在代码调用 SKBitmap.Decode 之后,它可能会使 CanvasView 无效,以便 PaintSurface 处理程序可以显示新加载的位图。
加载位图的第二种方法是将位图作为单个平台项目引用的 .NET Standard 库中的嵌入资源包含在内。 资源 ID 传递给 GetManifestResourceStream 方法。 此资源 ID 由程序集名称、文件夹名称和资源的文件名组成,用句点分隔:
string resourceID = "assemblyName.folderName.fileName";
Assembly assembly = GetType().GetTypeInfo().Assembly;

using (Stream stream = assembly.GetManifestResourceStream(resourceID))
{
    bitmap = SKBitmap.Decode(stream);
    ···
}
位图文件也可以作为资源存储在适用于 iOS、Android 和通用 Windows 平台 (UWP) 的单个平台项目中。 但是,加载这些位图需要位于平台项目中的代码。
获取位图的第三种方法是从用户的图片库。 以下代码使用包含在示例应用程序中的依赖项服务。 SkiaSharpFormsDemo .NET Standard 库包括 IPhotoLibrary 接口,而每个平台项目都包含实现该接口的 PhotoLibrary 类。
IPhotoicturePicker picturePicker = DependencyService.Get<IPhotoLibrary>();

using (Stream stream = await picturePicker.GetImageStreamAsync())
{
    if (stream != null)
    {
        bitmap = SKBitmap.Decode(stream);
        ···
    }
}
通常,此类代码也会使 CanvasView 失效,以便 PaintSurface 处理程序可以显示新位图。
SKBitmap 类定义了多个有用的属性(包括 Width 和 Height,这些属性显示位图的像素尺寸)以及许多方法(包括创建位图、复制位图以及公开像素位的方法)。
以像素尺寸显示
SkiaSharp Canvas 类定义四个 DrawBitmap 方法。 这些方法允许位图以两种根本不同的方式显示:
- 指定
SKPoint值(或单独的x和y值)以其像素尺寸显示位图。 位图的像素直接映射到视频显示的像素。 - 指定矩形会导致位图拉伸到矩形的大小和形状。
使用具有 SKPoint 参数的 DrawBitmap 或具有单独 x 和 y 参数的 DrawBitmap,以其像素尺寸显示位图:
DrawBitmap(SKBitmap bitmap, SKPoint pt, SKPaint paint = null)

DrawBitmap(SKBitmap bitmap, float x, float y, SKPaint paint = null)
这两种方法在功能上完全相同。 指定的点指示位图左上角相对于画布的位置。 由于移动设备的像素分辨率如此之高,因此较小的位图通常在这些设备上显得相当小。
可选 SKPaint 参数允许使用透明度显示位图。 为此,请创建一个 SKPaint 对象,并将 Color 属性设置为 alpha 通道小于 1 的任何 SKColor 值。 例如:
paint.Color = new SKColor(0, 0, 0, 0x80);
作为最后一个自变量传递的 0x80 表示透明度 50%。 还可以对其中一种预定义颜色设置 alpha 通道:
paint.Color = SKColors.Red.WithAlpha(0x80);
但是,颜色本身无关紧要。 只有当在 DrawBitmap 调用中使用 SKPaint 对象时,才会检查 alpha 通道。
SKPaint 对象在使用混合模式或筛选效果显示位图时也起着作用。 SkiaSharp 复合和混合模式和 SkiaSharp 图像筛选器文章对此进行了演示。
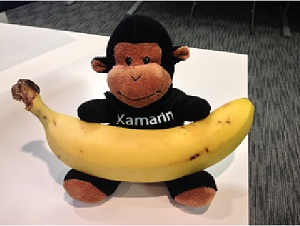
示例程序中的“像素尺寸”页显示 320 像素宽、240 像素高的位图资源:
public class PixelDimensionsPage : ContentPage
{
    SKBitmap bitmap;

    public PixelDimensionsPage()
    {
        Title = "Pixel Dimensions";

        // Load the bitmap from a resource
        string resourceID = "SkiaSharpFormsDemos.Media.Banana.jpg";
        Assembly assembly = GetType().GetTypeInfo().Assembly;

        using (Stream stream = assembly.GetManifestResourceStream(resourceID))
        {
            bitmap = SKBitmap.Decode(stream);
        }

        // Create the SKCanvasView and set the PaintSurface handler
        SKCanvasView canvasView = new SKCanvasView();
        canvasView.PaintSurface += OnCanvasViewPaintSurface;
        Content = canvasView;
    }

    void OnCanvasViewPaintSurface(object sender, SKPaintSurfaceEventArgs args)
    {
        SKImageInfo info = args.Info;
        SKSurface surface = args.Surface;
        SKCanvas canvas = surface.Canvas;

        canvas.Clear();

        float x = (info.Width - bitmap.Width) / 2;
        float y = (info.Height - bitmap.Height) / 2;

        canvas.DrawBitmap(bitmap, x, y);
    }
}
PaintSurface 处理程序通过根据显示图面的像素尺寸和位图的像素尺寸计算 x 和 y 值来使位图居中:
如果应用程序希望在左上角显示位图,则只需传递坐标 (0, 0)。
用于加载资源位图的方法
后续许多示例将需要加载位图资源。 示例解决方案中的静态 BitmapExtensions 类包含一个帮助解决问题的方法:
static class BitmapExtensions
{
    public static SKBitmap LoadBitmapResource(Type type, string resourceID)
    {
        Assembly assembly = type.GetTypeInfo().Assembly;

        using (Stream stream = assembly.GetManifestResourceStream(resourceID))
        {
            return SKBitmap.Decode(stream);
        }
    }
    ···
}
请注意 Type 参数。 这可以是与存储位图资源的程序集中的任何类型关联的 Type 对象。
此 LoadBitmapResource 方法将在需要位图资源的所有后续示例中使用。
拉伸以填充矩形
SKCanvas 类还定义了一个将位图呈现为矩形的 DrawBitmap 方法以及另一个将位图的矩形子集呈现为矩形的 DrawBitmap 方法:
DrawBitmap(SKBitmap bitmap, SKRect dest, SKPaint paint = null)

DrawBitmap(SKBitmap bitmap, SKRect source, SKRect dest, SKPaint paint = null)
在这两种情况下,将拉伸位图以填充名为 dest 的矩形。 在第二个方法中,source 矩形允许你选择位图的子集。 dest 矩形相对于输出设备;source 矩形相对于位图。
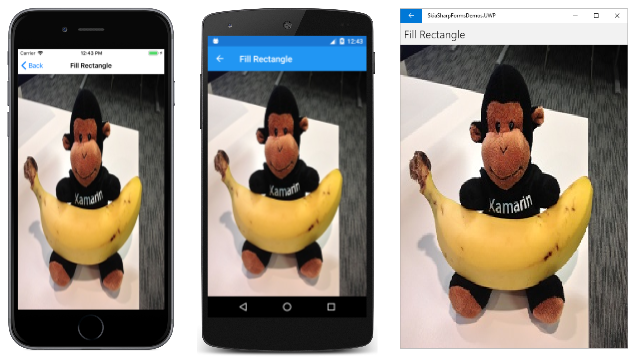
“填充矩形”页面通过在与画布大小相同的矩形中显示前面示例中使用的相同位图来演示这两个方法中的第一个:
public class FillRectanglePage : ContentPage
{
    SKBitmap bitmap =
        BitmapExtensions.LoadBitmapResource(typeof(FillRectanglePage),
                                            "SkiaSharpFormsDemos.Media.Banana.jpg");
    public FillRectanglePage ()
    {
        Title = "Fill Rectangle";

        SKCanvasView canvasView = new SKCanvasView();
        canvasView.PaintSurface += OnCanvasViewPaintSurface;
        Content = canvasView;
    }

    void OnCanvasViewPaintSurface(object sender, SKPaintSurfaceEventArgs args)
    {
        SKImageInfo info = args.Info;
        SKSurface surface = args.Surface;
        SKCanvas canvas = surface.Canvas;

        canvas.Clear();

        canvas.DrawBitmap(bitmap, info.Rect);
    }
}
请注意使用新的 BitmapExtensions.LoadBitmapResource 方法来设置 SKBitmap 字段。 目标矩形是从 SKImageInfo 的 Rect 属性获取的,该属性描述了显示图面的大小:
这通常不是你想要的。 图像通过水平方向和垂直方向以不同的方式拉伸而扭曲。 当以像素大小以外的其他方式显示位图时,通常需要保留位图的原始纵横比。
拉伸同时保持纵横比
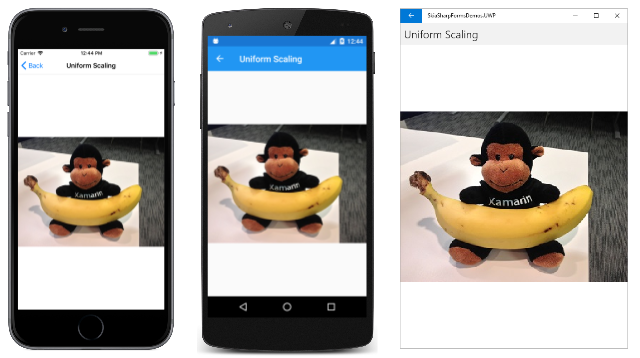
在保持纵横比的同时拉伸位图是一个也称为均匀缩放的过程。 该术语暗示了一种算法方法。 “均匀缩放”页显示了一种可能的解决方案:
public class UniformScalingPage : ContentPage
{
    SKBitmap bitmap =
        BitmapExtensions.LoadBitmapResource(typeof(UniformScalingPage),
                                            "SkiaSharpFormsDemos.Media.Banana.jpg");
    public UniformScalingPage()
    {
        Title = "Uniform Scaling";

        SKCanvasView canvasView = new SKCanvasView();
        canvasView.PaintSurface += OnCanvasViewPaintSurface;
        Content = canvasView;
    }

    void OnCanvasViewPaintSurface(object sender, SKPaintSurfaceEventArgs args)
    {
        SKImageInfo info = args.Info;
        SKSurface surface = args.Surface;
        SKCanvas canvas = surface.Canvas;

        canvas.Clear();

        float scale = Math.Min((float)info.Width / bitmap.Width,
                               (float)info.Height / bitmap.Height);
        float x = (info.Width - scale * bitmap.Width) / 2;
        float y = (info.Height - scale * bitmap.Height) / 2;
        SKRect destRect = new SKRect(x, y, x + scale * bitmap.Width,
                                           y + scale * bitmap.Height);

        canvas.DrawBitmap(bitmap, destRect);
    }
}
PaintSurface 处理程序计算的 scale 因子是显示宽度和高度与位图宽度和高度之比的最小值。 然后可以计算 x 和 y 值,以使缩放后的位图在显示宽度和高度内居中。 目标矩形的左上角为 x 和 y,右下角为这些值加上位图的缩放宽度和高度:
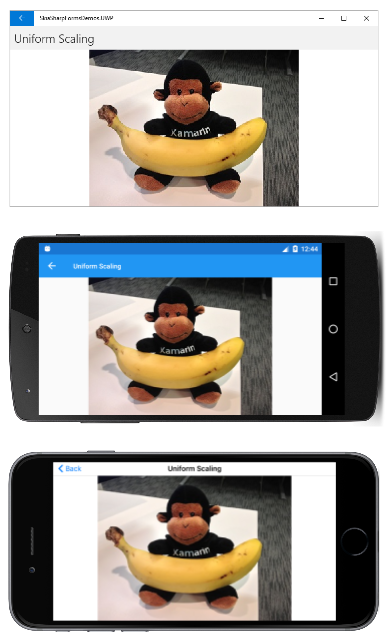
将手机侧向转动,可以看到拉伸到该区域的位图:
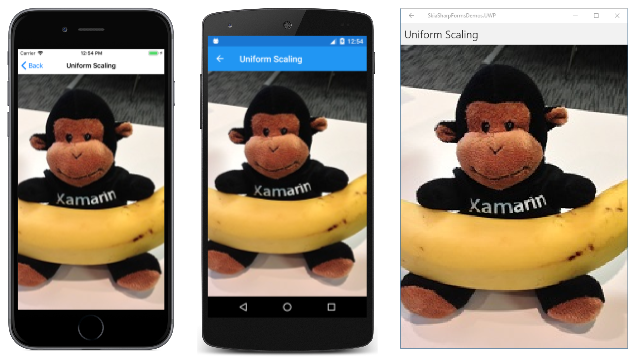
当想要实现稍微不同的算法时,使用此 scale 因子的优势就显而易见了。 假设你想要保留位图的纵横比,但还要填充目标矩形。 唯一可行的方法是裁剪图像的一部分,但可以通过在上面的代码中将 Math.Min 更改为 Math.Max 来实现该算法。 结果如下:
位图的纵横比保留,但位图左右两侧的区域被裁剪。
通用位图显示函数
基于 XAML 的编程环境(如 UWP 和 Xamarin.Forms)具有扩展或缩小位图大小,同时保留其纵横比的工具。 虽然 SkiaSharp 不包括此功能,但你可以自己实现它。
示例应用程序中包含的 BitmapExtensions 类显示了如何操作。 该类定义了两个新的 DrawBitmap 方法,用于执行纵横比计算。 这些新方法是 SKCanvas 的扩展方法。
新的 DrawBitmap 方法包括类型为 BitmapStretch的参数(BitmapExtensions.cs 文件中定义的枚举):
public enum BitmapStretch
{
    None,
    Fill,
    Uniform,
    UniformToFill,
    AspectFit = Uniform,
    AspectFill = UniformToFill
}
None、Fill、Uniform 和 UniformToFill 成员与 UWP Stretch 枚举中的成员相同。 类似的 Xamarin.FormsAspect 枚举定义成员 Fill、AspectFit 和 AspectFill。
上面显示的“均匀缩放”页面将位图置于矩形的中心,但你可能需要其他选项,例如将位图定位在矩形的左侧或右侧,或者顶部或底部。 这就是 BitmapAlignment 枚举的目的:
public enum BitmapAlignment
{
    Start,
    Center,
    End
}
与 BitmapStretch.Fill 一起使用时,对齐设置没有效果。
第一个 DrawBitmap 扩展函数包含一个目标矩形,但不包含源矩形。 定义默认值,以便倘若要使位图居中,只需指定一个 BitmapStretch 成员:
static class BitmapExtensions
{
    ···
    public static void DrawBitmap(this SKCanvas canvas, SKBitmap bitmap, SKRect dest,
                                  BitmapStretch stretch,
                                  BitmapAlignment horizontal = BitmapAlignment.Center,
                                  BitmapAlignment vertical = BitmapAlignment.Center,
                                  SKPaint paint = null)
    {
        if (stretch == BitmapStretch.Fill)
        {
            canvas.DrawBitmap(bitmap, dest, paint);
        }
        else
        {
            float scale = 1;

            switch (stretch)
            {
                case BitmapStretch.None:
                    break;

                case BitmapStretch.Uniform:
                    scale = Math.Min(dest.Width / bitmap.Width, dest.Height / bitmap.Height);
                    break;

                case BitmapStretch.UniformToFill:
                    scale = Math.Max(dest.Width / bitmap.Width, dest.Height / bitmap.Height);
                    break;
            }

            SKRect display = CalculateDisplayRect(dest, scale * bitmap.Width, scale * bitmap.Height,
                                                  horizontal, vertical);

            canvas.DrawBitmap(bitmap, display, paint);
        }
    }
    ···
}
此方法的主要用途是计算一个名为 scale 的缩放因子,然后在调用 CalculateDisplayRect 方法时将其应用于位图的宽度和高度。 这是根据水平和垂直对齐方式计算用于显示位图的矩形的方法:
static class BitmapExtensions
{
    ···
    static SKRect CalculateDisplayRect(SKRect dest, float bmpWidth, float bmpHeight,
                                       BitmapAlignment horizontal, BitmapAlignment vertical)
    {
        float x = 0;
        float y = 0;

        switch (horizontal)
        {
            case BitmapAlignment.Center:
                x = (dest.Width - bmpWidth) / 2;
                break;

            case BitmapAlignment.Start:
                break;

            case BitmapAlignment.End:
                x = dest.Width - bmpWidth;
                break;
        }

        switch (vertical)
        {
            case BitmapAlignment.Center:
                y = (dest.Height - bmpHeight) / 2;
                break;

            case BitmapAlignment.Start:
                break;

            case BitmapAlignment.End:
                y = dest.Height - bmpHeight;
                break;
        }

        x += dest.Left;
        y += dest.Top;

        return new SKRect(x, y, x + bmpWidth, y + bmpHeight);
    }
}
BitmapExtensions 类包含一个附加 DrawBitmap 方法,该方法具有用于指定位图子集的源矩形。 此方法与第一个方法类似,只不过缩放因子是根据 source 矩形计算的,然后在调用 CalculateDisplayRect 中时应用于 source 矩形:
static class BitmapExtensions
{
    ···
    public static void DrawBitmap(this SKCanvas canvas, SKBitmap bitmap, SKRect source, SKRect dest,
                                  BitmapStretch stretch,
                                  BitmapAlignment horizontal = BitmapAlignment.Center,
                                  BitmapAlignment vertical = BitmapAlignment.Center,
                                  SKPaint paint = null)
    {
        if (stretch == BitmapStretch.Fill)
        {
            canvas.DrawBitmap(bitmap, source, dest, paint);
        }
        else
        {
            float scale = 1;

            switch (stretch)
            {
                case BitmapStretch.None:
                    break;

                case BitmapStretch.Uniform:
                    scale = Math.Min(dest.Width / source.Width, dest.Height / source.Height);
                    break;

                case BitmapStretch.UniformToFill:
                    scale = Math.Max(dest.Width / source.Width, dest.Height / source.Height);
                    break;
            }

            SKRect display = CalculateDisplayRect(dest, scale * source.Width, scale * source.Height,
                                                  horizontal, vertical);

            canvas.DrawBitmap(bitmap, source, display, paint);
        }
    }
    ···
}
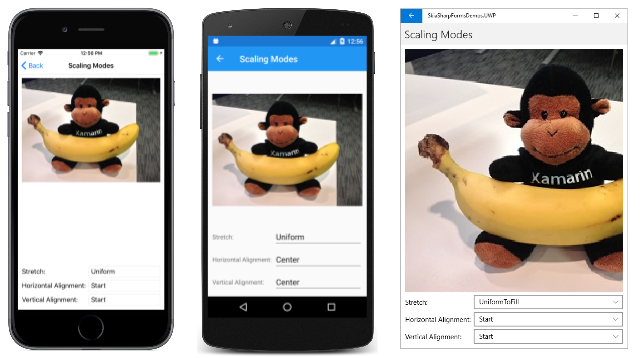
这两个新 DrawBitmap 方法中的第一个方法在“缩放模式”页面中进行了演示。 XAML 文件包含三个 Picker 元素,可用于选择 BitmapStretch 和 BitmapAlignment 枚举的成员:
<?xml version="1.0" encoding="utf-8" ?>
<ContentPage xmlns="http://xamarin.com/schemas/2014/forms"
             xmlns:x="http://schemas.microsoft.com/winfx/2009/xaml"
             xmlns:local="clr-namespace:SkiaSharpFormsDemos"
             xmlns:skia="clr-namespace:SkiaSharp.Views.Forms;assembly=SkiaSharp.Views.Forms"
             x:Class="SkiaSharpFormsDemos.Bitmaps.ScalingModesPage"
             Title="Scaling Modes">

    <Grid Padding="10">
        <Grid.RowDefinitions>
            <RowDefinition Height="*" />
            <RowDefinition Height="Auto" />
            <RowDefinition Height="Auto" />
            <RowDefinition Height="Auto" />
        </Grid.RowDefinitions>

        <Grid.ColumnDefinitions>
            <ColumnDefinition Width="Auto" />
            <ColumnDefinition Width="*" />
        </Grid.ColumnDefinitions>

        <skia:SKCanvasView x:Name="canvasView"
                           Grid.Row="0" Grid.Column="0" Grid.ColumnSpan="2"
                           PaintSurface="OnCanvasViewPaintSurface" />

        <Label Text="Stretch:"
               Grid.Row="1" Grid.Column="0"
               VerticalOptions="Center" />

        <Picker x:Name="stretchPicker"
                Grid.Row="1" Grid.Column="1"
                SelectedIndexChanged="OnPickerSelectedIndexChanged">
            <Picker.ItemsSource>
                <x:Array Type="{x:Type local:BitmapStretch}">
                    <x:Static Member="local:BitmapStretch.None" />
                    <x:Static Member="local:BitmapStretch.Fill" />
                    <x:Static Member="local:BitmapStretch.Uniform" />
                    <x:Static Member="local:BitmapStretch.UniformToFill" />
                </x:Array>
            </Picker.ItemsSource>

            <Picker.SelectedIndex>
                0
            </Picker.SelectedIndex>
        </Picker>

        <Label Text="Horizontal Alignment:"
               Grid.Row="2" Grid.Column="0"
               VerticalOptions="Center" />

        <Picker x:Name="horizontalPicker"
                Grid.Row="2" Grid.Column="1"
                SelectedIndexChanged="OnPickerSelectedIndexChanged">
            <Picker.ItemsSource>
                <x:Array Type="{x:Type local:BitmapAlignment}">
                    <x:Static Member="local:BitmapAlignment.Start" />
                    <x:Static Member="local:BitmapAlignment.Center" />
                    <x:Static Member="local:BitmapAlignment.End" />
                </x:Array>
            </Picker.ItemsSource>

            <Picker.SelectedIndex>
                0
            </Picker.SelectedIndex>
        </Picker>

        <Label Text="Vertical Alignment:"
               Grid.Row="3" Grid.Column="0"
               VerticalOptions="Center" />

        <Picker x:Name="verticalPicker"
                Grid.Row="3" Grid.Column="1"
                SelectedIndexChanged="OnPickerSelectedIndexChanged">
            <Picker.ItemsSource>
                <x:Array Type="{x:Type local:BitmapAlignment}">
                    <x:Static Member="local:BitmapAlignment.Start" />
                    <x:Static Member="local:BitmapAlignment.Center" />
                    <x:Static Member="local:BitmapAlignment.End" />
                </x:Array>
            </Picker.ItemsSource>

            <Picker.SelectedIndex>
                0
            </Picker.SelectedIndex>
        </Picker>
    </Grid>
</ContentPage>
当任何 Picker 项发生更改时,代码隐藏文件只会使 CanvasView 失效。 PaintSurface 处理程序访问三个 Picker 视图以调用 DrawBitmap 扩展方法:
public partial class ScalingModesPage : ContentPage
{
    SKBitmap bitmap =
        BitmapExtensions.LoadBitmapResource(typeof(ScalingModesPage),
                                            "SkiaSharpFormsDemos.Media.Banana.jpg");
    public ScalingModesPage()
    {
        InitializeComponent();
    }

    private void OnPickerSelectedIndexChanged(object sender, EventArgs args)
    {
        canvasView.InvalidateSurface();
    }

    void OnCanvasViewPaintSurface(object sender, SKPaintSurfaceEventArgs args)
    {
        SKImageInfo info = args.Info;
        SKSurface surface = args.Surface;
        SKCanvas canvas = surface.Canvas;

        canvas.Clear();

        SKRect dest = new SKRect(0, 0, info.Width, info.Height);

        BitmapStretch stretch = (BitmapStretch)stretchPicker.SelectedItem;
        BitmapAlignment horizontal = (BitmapAlignment)horizontalPicker.SelectedItem;
        BitmapAlignment vertical = (BitmapAlignment)verticalPicker.SelectedItem;

        canvas.DrawBitmap(bitmap, dest, stretch, horizontal, vertical);
    }
}
下面是选项的一些组合:
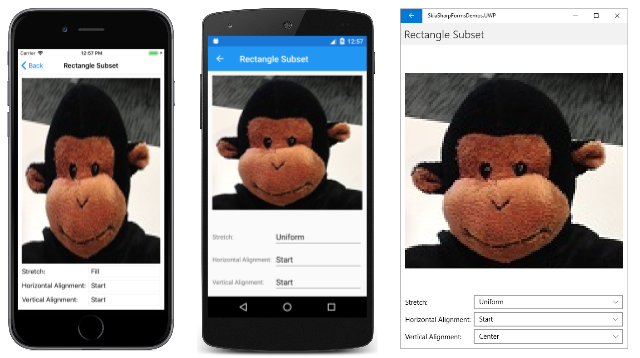
“矩形子集”页与“缩放模式”几乎具有相同的 XAML 文件,但代码隐藏文件定义了由 SOURCE 字段给出的位图的矩形子集:
public partial class ScalingModesPage : ContentPage
{
    SKBitmap bitmap =
        BitmapExtensions.LoadBitmapResource(typeof(ScalingModesPage),
                                            "SkiaSharpFormsDemos.Media.Banana.jpg");

    static readonly SKRect SOURCE = new SKRect(94, 12, 212, 118);

    public RectangleSubsetPage()
    {
        InitializeComponent();
    }

    private void OnPickerSelectedIndexChanged(object sender, EventArgs args)
    {
        canvasView.InvalidateSurface();
    }

    void OnCanvasViewPaintSurface(object sender, SKPaintSurfaceEventArgs args)
    {
        SKImageInfo info = args.Info;
        SKSurface surface = args.Surface;
        SKCanvas canvas = surface.Canvas;

        canvas.Clear();

        SKRect dest = new SKRect(0, 0, info.Width, info.Height);

        BitmapStretch stretch = (BitmapStretch)stretchPicker.SelectedItem;
        BitmapAlignment horizontal = (BitmapAlignment)horizontalPicker.SelectedItem;
        BitmapAlignment vertical = (BitmapAlignment)verticalPicker.SelectedItem;

        canvas.DrawBitmap(bitmap, SOURCE, dest, stretch, horizontal, vertical);
    }
}
此矩形源隔离猴子的头部,如以下屏幕截图所示:
