Xamarin.Forms BoxView
BoxView 渲染指定宽度、高度和颜色的简单矩形。 可以针对修饰、基本图形以及通过触摸与用户的交互使用 BoxView。
由于 Xamarin.Forms 没有内置的矢量图形系统,因此 BoxView 有助于补偿。 本文中所述的一些示例程序使用 BoxView 来渲染图形。 BoxView 的大小可以类似于特定宽度和粗细的线条,然后使用 Rotation 属性旋转任意角度。
尽管 BoxView 可以模拟简单的图形,但你可能需要研究在 Xamarin.Forms 中使用 SkiaSharp 来满足更复杂的图形需求。
设置 BoxView 颜色和大小
通常,你将设置 BoxView 的以下属性:
Color,设置其颜色。CornerRadius,设置其圆角半径。WidthRequest,以独立于设备的单位设置BoxView的宽度。HeightRequest,设置BoxView的高度。
Color 属性的类型为 Color;该属性可以设置为任何 Color 值,包括按字母顺序从 AliceBlue 到 YellowGreen 的 141 个命名颜色静态只读字段。
CornerRadius 属性的类型为 CornerRadius;该属性可以设置为单个 double 统一圆角半径值,或者由应用于 BoxView 的左上角、右上角、左下角和右下角的四个 double 值定义的 CornerRadius结构。
只有当 BoxView 在布局中不受约束时,WidthRequest 和 HeightRequest 属性才会发挥作用。 当布局容器需要知道子级的大小时,例如,当 BoxView 是 Grid 布局中自动调整大小的单元格的子级时,就会出现这种情况。 当 HorizontalOptions 和 VerticalOptions 属性设置为除 LayoutOptions.Fill 以外的值时,BoxView 也不受约束。 如果 BoxView 不受约束,但未设置 WidthRequest 和 HeightRequest 属性,则宽度或高度将设置为默认值 40 个单位,在移动设备上约为 1/4 英寸。
如果 BoxView 在布局中受约束,则会忽略 WidthRequest 和 HeightRequest 属性,在这种情况下,布局容器会将自己的大小强加给 BoxView。
BoxView 可以在一个维度上受约束,而在另一个维度上不受约束。 例如,如果 BoxView 是垂直 StackLayout 的子级,则 BoxView 的垂直维度不受约束,其水平维度通常受到约束。 但水平维度存在例外情况:如果 BoxView 的 HorizontalOptions 属性设置为 LayoutOptions.Fill 以外的其他内容,则水平维度也不受约束。 StackLayout 本身也可以有一个不受约束的水平维度,在这种情况下,BoxView 也将在水平方向上不受约束。
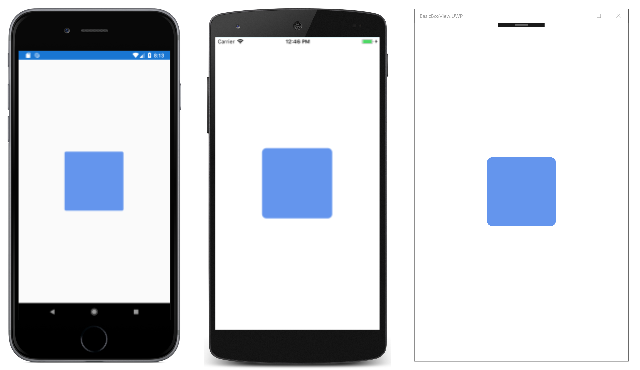
示例在其页面中心显示 1/4 英寸不受约束的 BoxView:
<ContentPage xmlns="http://xamarin.com/schemas/2014/forms"
             xmlns:x="http://schemas.microsoft.com/winfx/2009/xaml"
             xmlns:local="clr-namespace:BasicBoxView"
             x:Class="BasicBoxView.MainPage">

    <BoxView Color="CornflowerBlue"
             CornerRadius="10"
             WidthRequest="160"
             HeightRequest="160"
             VerticalOptions="Center"
             HorizontalOptions="Center" />

</ContentPage>
结果如下:
如果从 BoxView 标记中删除 VerticalOptions 和 HorizontalOptions 属性或设置为 Fill,则 BoxView 将受到页面大小的约束,并展开以填充页面。
BoxView 也可以是 AbsoluteLayout 的子级。 在这种情况下,将使用 LayoutBounds 附加的可绑定属性设置 BoxView 的位置和大小。 AbsoluteLayout 在 AbsoluteLayout 一文中进行了讨论。
你将在下面的示例程序中看到所有这些情况的示例。
呈现文本修饰
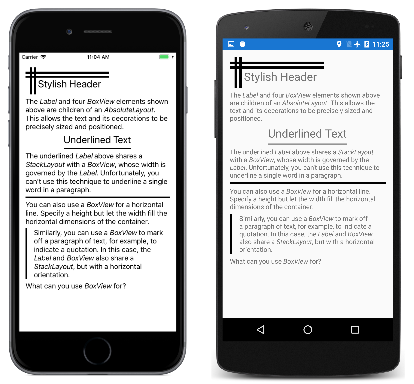
可以使用 BoxView 以水平和垂直线条的形式在页面上添加一些简单的修饰。 示例会演示此内容。 程序的所有视觉对象都在 MainPage.xaml 文件中定义,该文件在 StackLayout 中包含多个 Label 和 BoxView 元素,如下所示:
<ContentPage xmlns="http://xamarin.com/schemas/2014/forms"
             xmlns:x="http://schemas.microsoft.com/winfx/2009/xaml"
             xmlns:local="clr-namespace:TextDecoration"
             x:Class="TextDecoration.MainPage">
    <ContentPage.Padding>
        <OnPlatform x:TypeArguments="Thickness">
            <On Platform="iOS" Value="0, 20, 0, 0" />
        </OnPlatform>
    </ContentPage.Padding>

    <ContentPage.Resources>
        <ResourceDictionary>
            <Style TargetType="BoxView">
                <Setter Property="Color" Value="Black" />
            </Style>
        </ResourceDictionary>
    </ContentPage.Resources>

    <ScrollView Margin="15">
        <StackLayout>

            ···

        </StackLayout>
    </ScrollView>
</ContentPage>
后面的所有标记都是 StackLayout 的子级。 此标记由与 Label 元素一起使用的几种装饰 BoxView 元素组成:
页面顶部的时尚页眉是通过 AbsoluteLayout 实现的,其子项是四个 BoxView 元素和一个 Label,所有这些元素都分配有特定的位置和大小:
<AbsoluteLayout>
    <BoxView AbsoluteLayout.LayoutBounds="0, 10, 200, 5" />
    <BoxView AbsoluteLayout.LayoutBounds="0, 20, 200, 5" />
    <BoxView AbsoluteLayout.LayoutBounds="10, 0, 5, 65" />
    <BoxView AbsoluteLayout.LayoutBounds="20, 0, 5, 65" />
    <Label Text="Stylish Header"
           FontSize="24"
           AbsoluteLayout.LayoutBounds="30, 25, AutoSize, AutoSize"/>
</AbsoluteLayout>
在 XAML 文件中,AbsoluteLayout 后跟一个 Label,其中包含描述 AbsoluteLayout 的格式文本。
可以通过将 Label 和 BoxView 都包含在 StackLayout 中来给文本字符串加下划线,其 HorizontalOptions 值设置为 Fill 以外的其他内容。 然后,StackLayout 的宽度由 Label 的宽度控制,其随后将该宽度强加给 BoxView。 BoxView 仅分配有一个显式高度:
<StackLayout HorizontalOptions="Center">
    <Label Text="Underlined Text"
           FontSize="24" />
    <BoxView HeightRequest="2" />
</StackLayout>
不能使用此技术为较长文本字符串或段落中的单个字词加下划线。
也可以使用 BoxView 来类似于 HTML hr(水平规则)元素。 只需让 BoxView 的宽度由其父容器确定,在本例中为 StackLayout:
<BoxView HeightRequest="3" />
最后,可以通过将 BoxView 和 Label 都包含在水平 StackLayout 中,在文本段落的一侧绘制一条垂直线。 在这种情况下,BoxView 的高度与 StackLayout 的高度相同,后者由 Label 的高度控制:
<StackLayout Orientation="Horizontal">
    <BoxView WidthRequest="4"
             Margin="0, 0, 10, 0" />
    <Label>

        ···

    </Label>
</StackLayout>
使用 BoxView 列出颜色
BoxView 便于显示颜色。 此程序使用 ListView 列出 Xamarin.FormsColor 结构的所有公共静态只读字段:
示例程序包括一个名为 NamedColor 的类。 静态构造函数使用反射访问 Color 结构的所有字段,并为每个字段创建 NamedColor 对象。 这些内容存储在静态 All 属性中:
public class NamedColor
{
    // Instance members.
    private NamedColor()
    {
    }

    public string Name { private set; get; }

    public string FriendlyName { private set; get; }

    public Color Color { private set; get; }

    public string RgbDisplay { private set; get; }

    // Static members.
    static NamedColor()
    {
        List<NamedColor> all = new List<NamedColor>();
        StringBuilder stringBuilder = new StringBuilder();

        // Loop through the public static fields of the Color structure.
        foreach (FieldInfo fieldInfo in typeof(Color).GetRuntimeFields ())
        {
            if (fieldInfo.IsPublic &&
                fieldInfo.IsStatic &&
                fieldInfo.FieldType == typeof (Color))
            {
                // Convert the name to a friendly name.
                string name = fieldInfo.Name;
                stringBuilder.Clear();
                int index = 0;

                foreach (char ch in name)
                {
                    if (index != 0 && Char.IsUpper(ch))
                    {
                        stringBuilder.Append(' ');
                    }
                    stringBuilder.Append(ch);
                    index++;
                }

                // Instantiate a NamedColor object.
                Color color = (Color)fieldInfo.GetValue(null);

                NamedColor namedColor = new NamedColor
                {
                    Name = name,
                    FriendlyName = stringBuilder.ToString(),
                    Color = color,
                    RgbDisplay = String.Format("{0:X2}-{1:X2}-{2:X2}",
                                               (int)(255 * color.R),
                                               (int)(255 * color.G),
                                               (int)(255 * color.B))
                };

                // Add it to the collection.
                all.Add(namedColor);
            }
        }
        all.TrimExcess();
        All = all;
    }

    public static IList<NamedColor> All { private set; get; }
}
XAML 文件中描述了程序视觉对象。 ListView 的 ItemsSource 属性设置为静态 NamedColor.All 属性,这意味着 ListView 显示所有单个 NamedColor 对象:
<ContentPage xmlns="http://xamarin.com/schemas/2014/forms"
             xmlns:x="http://schemas.microsoft.com/winfx/2009/xaml"
             xmlns:local="clr-namespace:ListViewColors"
             x:Class="ListViewColors.MainPage">
    <ContentPage.Padding>
        <OnPlatform x:TypeArguments="Thickness">
            <On Platform="iOS" Value="10, 20, 10, 0" />
            <On Platform="Android, UWP" Value="10, 0" />
        </OnPlatform>
    </ContentPage.Padding>

    <ListView SeparatorVisibility="None"
              ItemsSource="{x:Static local:NamedColor.All}">
        <ListView.RowHeight>
            <OnPlatform x:TypeArguments="x:Int32">
                <On Platform="iOS, Android" Value="80" />
                <On Platform="UWP" Value="90" />
            </OnPlatform>
        </ListView.RowHeight>

        <ListView.ItemTemplate>
            <DataTemplate>
                <ViewCell>
                    <ContentView Padding="5">
                        <Frame OutlineColor="Accent"
                               Padding="10">
                            <StackLayout Orientation="Horizontal">
                                <BoxView Color="{Binding Color}"
                                         WidthRequest="50"
                                         HeightRequest="50" />
                                <StackLayout>
                                    <Label Text="{Binding FriendlyName}"
                                           FontSize="22"
                                           VerticalOptions="StartAndExpand" />
                                    <Label Text="{Binding RgbDisplay, StringFormat='RGB = {0}'}"
                                           FontSize="16"
                                           VerticalOptions="CenterAndExpand" />
                                </StackLayout>
                            </StackLayout>
                        </Frame>
                    </ContentView>
                </ViewCell>
            </DataTemplate>
        </ListView.ItemTemplate>
    </ListView>
</ContentPage>
NamedColor 对象的格式由设为 ListView 的数据模板的 ViewCell 对象设置。 此模板包括一个 BoxView,其 Color 属性绑定到 NamedColor 对象的 Color 属性。
通过子类化 BoxView 来玩《Game of Life》
《Game of Life》是由数学家 John Conway 发明的一种元胞自动机,20 世纪 70 年代在《Scientific American》杂志上推广。 维基百科文章康威生命游戏提供了很好的介绍。
Xamarin.Forms示例程序定义一个名为 LifeCell 的类,该类派生自 BoxView。 此类封装《Game of Life》中单个细胞的逻辑:
class LifeCell : BoxView
{
    bool isAlive;

    public event EventHandler Tapped;

    public LifeCell()
    {
        BackgroundColor = Color.White;

        TapGestureRecognizer tapGesture = new TapGestureRecognizer();
        tapGesture.Tapped += (sender, args) =>
        {
            Tapped?.Invoke(this, EventArgs.Empty);
        };
        GestureRecognizers.Add(tapGesture);
    }

    public int Col { set; get; }

    public int Row { set; get; }

    public bool IsAlive
    {
        set
        {
            if (isAlive != value)
            {
                isAlive = value;
                BackgroundColor = isAlive ? Color.Black : Color.White;
            }
        }
        get
        {
            return isAlive;
        }
    }
}
LifeCell 将另外三个属性添加到 BoxView:Col 和 Row 属性存储细胞在网格中的位置,IsAlive 属性指示其状态。 如果细胞处于存活状态,则 IsAlive 属性还会将 BoxView 的 Color 属性设置为黑色;如果细胞不处于存活状态,则为白色。
LifeCell 还会安装一个 TapGestureRecognizer,以允许用户通过点击它们来切换细胞的状态。 该类将 Tapped 事件从手势识别器转换为其自己的 Tapped 事件。
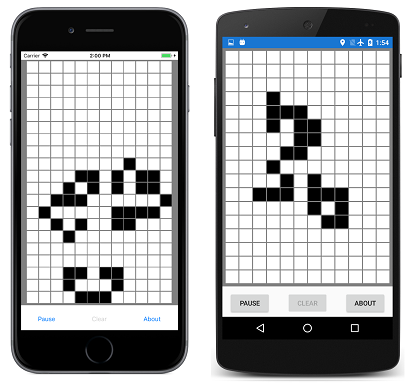
GameOfLife 程序还包括一个 LifeGrid 类(封装游戏的大部分逻辑)以及一个 MainPage 类(处理程序的视觉对象)。 其中包括描述游戏规则的覆盖层。 以下是运行中的程序,在页面上显示了几百个 LifeCell 对象:
创建数字时钟
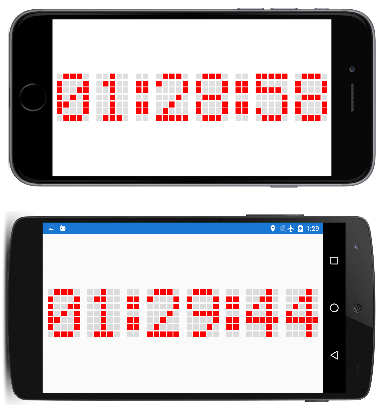
示例程序创建 210 个 BoxView 元素,以模拟老式 5×7 点阵显示的点。 可以在纵向或横向模式下读取时间,但在横向模式下会更大:
XAML 文件只不过是实例化用于时钟的 AbsoluteLayout:
<ContentPage xmlns="http://xamarin.com/schemas/2014/forms"
             xmlns:x="http://schemas.microsoft.com/winfx/2009/xaml"
             xmlns:local="clr-namespace:DotMatrixClock"
             x:Class="DotMatrixClock.MainPage"
             Padding="10"
             SizeChanged="OnPageSizeChanged">

    <AbsoluteLayout x:Name="absoluteLayout"
                    VerticalOptions="Center" />
</ContentPage>
其他所有内容都发生在代码隐藏文件中。 通过描述对应于 10 位数字和冒号的点的多个数组的定义,大大简化了点阵显示逻辑:
public partial class MainPage : ContentPage
{
    // Total dots horizontally and vertically.
    const int horzDots = 41;
    const int vertDots = 7;

    // 5 x 7 dot matrix patterns for 0 through 9.
    static readonly int[, ,] numberPatterns = new int[10, 7, 5]
    {
        {
            { 0, 1, 1, 1, 0}, { 1, 0, 0, 0, 1}, { 1, 0, 0, 1, 1}, { 1, 0, 1, 0, 1},
            { 1, 1, 0, 0, 1}, { 1, 0, 0, 0, 1}, { 0, 1, 1, 1, 0}
        },
        {
            { 0, 0, 1, 0, 0}, { 0, 1, 1, 0, 0}, { 0, 0, 1, 0, 0}, { 0, 0, 1, 0, 0},
            { 0, 0, 1, 0, 0}, { 0, 0, 1, 0, 0}, { 0, 1, 1, 1, 0}
        },
        {
            { 0, 1, 1, 1, 0}, { 1, 0, 0, 0, 1}, { 0, 0, 0, 0, 1}, { 0, 0, 0, 1, 0},
            { 0, 0, 1, 0, 0}, { 0, 1, 0, 0, 0}, { 1, 1, 1, 1, 1}
        },
        {
            { 1, 1, 1, 1, 1}, { 0, 0, 0, 1, 0}, { 0, 0, 1, 0, 0}, { 0, 0, 0, 1, 0},
            { 0, 0, 0, 0, 1}, { 1, 0, 0, 0, 1}, { 0, 1, 1, 1, 0}
        },
        {
            { 0, 0, 0, 1, 0}, { 0, 0, 1, 1, 0}, { 0, 1, 0, 1, 0}, { 1, 0, 0, 1, 0},
            { 1, 1, 1, 1, 1}, { 0, 0, 0, 1, 0}, { 0, 0, 0, 1, 0}
        },
        {
            { 1, 1, 1, 1, 1}, { 1, 0, 0, 0, 0}, { 1, 1, 1, 1, 0}, { 0, 0, 0, 0, 1},
            { 0, 0, 0, 0, 1}, { 1, 0, 0, 0, 1}, { 0, 1, 1, 1, 0}
        },
        {
            { 0, 0, 1, 1, 0}, { 0, 1, 0, 0, 0}, { 1, 0, 0, 0, 0}, { 1, 1, 1, 1, 0},
            { 1, 0, 0, 0, 1}, { 1, 0, 0, 0, 1}, { 0, 1, 1, 1, 0}
        },
        {
            { 1, 1, 1, 1, 1}, { 0, 0, 0, 0, 1}, { 0, 0, 0, 1, 0}, { 0, 0, 1, 0, 0},
            { 0, 1, 0, 0, 0}, { 0, 1, 0, 0, 0}, { 0, 1, 0, 0, 0}
        },
        {
            { 0, 1, 1, 1, 0}, { 1, 0, 0, 0, 1}, { 1, 0, 0, 0, 1}, { 0, 1, 1, 1, 0},
            { 1, 0, 0, 0, 1}, { 1, 0, 0, 0, 1}, { 0, 1, 1, 1, 0}
        },
        {
            { 0, 1, 1, 1, 0}, { 1, 0, 0, 0, 1}, { 1, 0, 0, 0, 1}, { 0, 1, 1, 1, 1},
            { 0, 0, 0, 0, 1}, { 0, 0, 0, 1, 0}, { 0, 1, 1, 0, 0}
        },
    };

    // Dot matrix pattern for a colon.
    static readonly int[,] colonPattern = new int[7, 2]
    {
        { 0, 0 }, { 1, 1 }, { 1, 1 }, { 0, 0 }, { 1, 1 }, { 1, 1 }, { 0, 0 }
    };

    // BoxView colors for on and off.
    static readonly Color colorOn = Color.Red;
    static readonly Color colorOff = new Color(0.5, 0.5, 0.5, 0.25);

    // Box views for 6 digits, 7 rows, 5 columns.
    BoxView[, ,] digitBoxViews = new BoxView[6, 7, 5];

    ···

}
这些字段以 BoxView 元素的三维数组结束,用于存储六位数的点模式。
构造函数为数字和冒号创建所有 BoxView 元素,并初始化冒号的 BoxView 元素的 Color 属性:
public partial class MainPage : ContentPage
{

    ···

    public MainPage()
    {
        InitializeComponent();

        // BoxView dot dimensions.
        double height = 0.85 / vertDots;
        double width = 0.85 / horzDots;

        // Create and assemble the BoxViews.
        double xIncrement = 1.0 / (horzDots - 1);
        double yIncrement = 1.0 / (vertDots - 1);
        double x = 0;

        for (int digit = 0; digit < 6; digit++)
        {
            for (int col = 0; col < 5; col++)
            {
                double y = 0;

                for (int row = 0; row < 7; row++)
                {
                    // Create the digit BoxView and add to layout.
                    BoxView boxView = new BoxView();
                    digitBoxViews[digit, row, col] = boxView;
                    absoluteLayout.Children.Add(boxView,
                                                new Rectangle(x, y, width, height),
                                                AbsoluteLayoutFlags.All);
                    y += yIncrement;
                }
                x += xIncrement;
            }
            x += xIncrement;

            // Colons between the hours, minutes, and seconds.
            if (digit == 1 || digit == 3)
            {
                int colon = digit / 2;

                for (int col = 0; col < 2; col++)
                {
                    double y = 0;

                    for (int row = 0; row < 7; row++)
                    {
                        // Create the BoxView and set the color.
                        BoxView boxView = new BoxView
                            {
                                Color = colonPattern[row, col] == 1 ?
                                            colorOn : colorOff
                            };
                        absoluteLayout.Children.Add(boxView,
                                                    new Rectangle(x, y, width, height),
                                                    AbsoluteLayoutFlags.All);
                        y += yIncrement;
                    }
                    x += xIncrement;
                }
                x += xIncrement;
            }
        }

        // Set the timer and initialize with a manual call.
        Device.StartTimer(TimeSpan.FromSeconds(1), OnTimer);
        OnTimer();
    }

    ···

}
此程序使用 AbsoluteLayout 的相对定位和大小调整功能。 每个 BoxView 的宽度和高度都设置为分数值,特别是 1 除以水平点和垂直点数量的 85%。 位置也设置为分数值。
由于所有位置和大小都相对于 AbsoluteLayout 的总大小,因此页面的 SizeChanged 处理程序只需设置 AbsoluteLayout 的 HeightRequest:
public partial class MainPage : ContentPage
{

    ···

    void OnPageSizeChanged(object sender, EventArgs args)
    {
        // No chance a display will have an aspect ratio > 41:7
        absoluteLayout.HeightRequest = vertDots * Width / horzDots;
    }

    ···

}
将自动设置 AbsoluteLayout 的宽度,因为它拉伸到页面的全宽。
MainPage 类中的最后一个代码处理计时器回调,并设置每个数字的点的颜色。 代码隐藏文件开头的多维数组的定义有助于使此逻辑成为程序的最简单部分:
public partial class MainPage : ContentPage
{

    ···

    bool OnTimer()
    {
        DateTime dateTime = DateTime.Now;

        // Convert 24-hour clock to 12-hour clock.
        int hour = (dateTime.Hour + 11) % 12 + 1;

        // Set the dot colors for each digit separately.
        SetDotMatrix(0, hour / 10);
        SetDotMatrix(1, hour % 10);
        SetDotMatrix(2, dateTime.Minute / 10);
        SetDotMatrix(3, dateTime.Minute % 10);
        SetDotMatrix(4, dateTime.Second / 10);
        SetDotMatrix(5, dateTime.Second % 10);
        return true;
    }

    void SetDotMatrix(int index, int digit)
    {
        for (int row = 0; row < 7; row++)
            for (int col = 0; col < 5; col++)
            {
                bool isOn = numberPatterns[digit, row, col] == 1;
                Color color = isOn ? colorOn : colorOff;
                digitBoxViews[index, row, col].Color = color;
            }
    }
}
创建模拟时钟
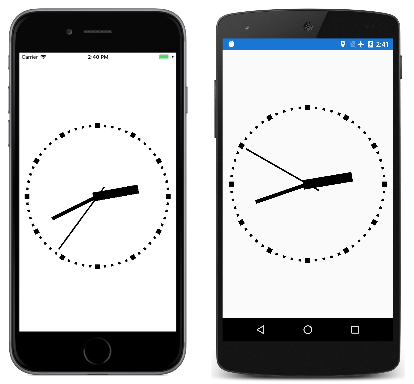
点阵时钟似乎是 BoxView 的一个明显应用,但 BoxView 元素也能够实现模拟时钟:
示例程序中的所有视觉对象都是 AbsoluteLayout 的子元素。 这些元素使用 LayoutBounds 附加属性进行大小调整,并使用 Rotation 属性旋转。
时钟指针的三个 BoxView 元素在 XAML 文件中实例化,但不定位或调整大小:
<ContentPage xmlns="http://xamarin.com/schemas/2014/forms"
             xmlns:x="http://schemas.microsoft.com/winfx/2009/xaml"
             xmlns:local="clr-namespace:BoxViewClock"
             x:Class="BoxViewClock.MainPage">
    <ContentPage.Padding>
        <OnPlatform x:TypeArguments="Thickness">
            <On Platform="iOS" Value="0, 20, 0, 0" />
        </OnPlatform>
    </ContentPage.Padding>

    <AbsoluteLayout x:Name="absoluteLayout"
                    SizeChanged="OnAbsoluteLayoutSizeChanged">

        <BoxView x:Name="hourHand"
                 Color="Black" />

        <BoxView x:Name="minuteHand"
                 Color="Black" />

        <BoxView x:Name="secondHand"
                 Color="Black" />
    </AbsoluteLayout>
</ContentPage>
代码隐藏文件的构造函数为时钟圆周上的刻度标记实例化 60 个 BoxView 元素:
public partial class MainPage : ContentPage
{

    ···

    BoxView[] tickMarks = new BoxView[60];

    public MainPage()
    {
        InitializeComponent();

        // Create the tick marks (to be sized and positioned later).
        for (int i = 0; i < tickMarks.Length; i++)
        {
            tickMarks[i] = new BoxView { Color = Color.Black };
            absoluteLayout.Children.Add(tickMarks[i]);
        }

        Device.StartTimer(TimeSpan.FromSeconds(1.0 / 60), OnTimerTick);
    }

    ···

}
所有 BoxView 元素的大小调整和定位都发生在 AbsoluteLayout 的 SizeChanged 处理程序中。 类内部的一个小结构 HandParams 描述了三个指针中每一个指针相对于时钟总大小的大小:
public partial class MainPage : ContentPage
{
    // Structure for storing information about the three hands.
    struct HandParams
    {
        public HandParams(double width, double height, double offset) : this()
        {
            Width = width;
            Height = height;
            Offset = offset;
        }

        public double Width { private set; get; }   // fraction of radius
        public double Height { private set; get; }  // ditto
        public double Offset { private set; get; }  // relative to center pivot
    }

    static readonly HandParams secondParams = new HandParams(0.02, 1.1, 0.85);
    static readonly HandParams minuteParams = new HandParams(0.05, 0.8, 0.9);
    static readonly HandParams hourParams = new HandParams(0.125, 0.65, 0.9);

    ···

 }
SizeChanged 处理程序确定 AbsoluteLayout 的中心和半径,然后确定用作刻度线的 60 个 BoxView 元素的大小和位置。 for 循环通过设置这些 BoxView 元素的 Rotation 属性结束。 在 SizeChanged 处理程序结束时,调用 LayoutHand 方法来调整时钟的三个指针的大小和位置:
public partial class MainPage : ContentPage
{

    ···

    void OnAbsoluteLayoutSizeChanged(object sender, EventArgs args)
    {
        // Get the center and radius of the AbsoluteLayout.
        Point center = new Point(absoluteLayout.Width / 2, absoluteLayout.Height / 2);
        double radius = 0.45 * Math.Min(absoluteLayout.Width, absoluteLayout.Height);

        // Position, size, and rotate the 60 tick marks.
        for (int index = 0; index < tickMarks.Length; index++)
        {
            double size = radius / (index % 5 == 0 ? 15 : 30);
            double radians = index * 2 * Math.PI / tickMarks.Length;
            double x = center.X + radius * Math.Sin(radians) - size / 2;
            double y = center.Y - radius * Math.Cos(radians) - size / 2;
            AbsoluteLayout.SetLayoutBounds(tickMarks[index], new Rectangle(x, y, size, size));
            tickMarks[index].Rotation = 180 * radians / Math.PI;
        }

        // Position and size the three hands.
        LayoutHand(secondHand, secondParams, center, radius);
        LayoutHand(minuteHand, minuteParams, center, radius);
        LayoutHand(hourHand, hourParams, center, radius);
    }

    void LayoutHand(BoxView boxView, HandParams handParams, Point center, double radius)
    {
        double width = handParams.Width * radius;
        double height = handParams.Height * radius;
        double offset = handParams.Offset;

        AbsoluteLayout.SetLayoutBounds(boxView,
            new Rectangle(center.X - 0.5 * width,
                          center.Y - offset * height,
                          width, height));

        // Set the AnchorY property for rotations.
        boxView.AnchorY = handParams.Offset;
    }

    ···

}
LayoutHand 方法调整每个指针的大小和位置,使其直接指向 12:00 位置。 在该方法结束时,AnchorY 属性设置为对应于时钟中心的位置。 这表示旋转的中心。
指针在计时器回调函数中旋转:
public partial class MainPage : ContentPage
{

    ···

    bool OnTimerTick()
    {
        // Set rotation angles for hour and minute hands.
        DateTime dateTime = DateTime.Now;
        hourHand.Rotation = 30 * (dateTime.Hour % 12) + 0.5 * dateTime.Minute;
        minuteHand.Rotation = 6 * dateTime.Minute + 0.1 * dateTime.Second;

        // Do an animation for the second hand.
        double t = dateTime.Millisecond / 1000.0;

        if (t < 0.5)
        {
            t = 0.5 * Easing.SpringIn.Ease(t / 0.5);
        }
        else
        {
            t = 0.5 * (1 + Easing.SpringOut.Ease((t - 0.5) / 0.5));
        }

        secondHand.Rotation = 6 * (dateTime.Second + t);
        return true;
    }
}
第二个指针的处理方式略有不同:应用一个动画缓动函数来使运动看起来像是机械的,而不是平滑的。 每一次滴答声时,第二个指针都会稍微后退一点,然后越过目的地。 这一点点代码让移动更加真实。
