Xamarin.Forms 控件模板
借助 Xamarin.Forms 控件模板,可以定义 ContentView 派生的自定义控件和 ContentPage 派生的页面的可视结构。 控件模板将自定义控件或页面的用户界面 (UI) 与实现该控件或页面的逻辑分离。 还可以将其他内容插入到模板化自定义控件或模板化页面的预定义位置。
例如,可以创建控件模板来重新定义自定义控件提供的 UI。 然后所需的自定义控件实例即可以使用该控件模板。 或者,可以创建控件模板来定义应用程序的多个页面将使用的任何通用 UI。 然后多个页面即可以使用该控件模板,同时各个页面仍显示其唯一的内容。
创建 ControlTemplate
以下示例显示 CardView 自定义控件的代码:
public class CardView : ContentView
{
    public static readonly BindableProperty CardTitleProperty = BindableProperty.Create(nameof(CardTitle), typeof(string), typeof(CardView), string.Empty);
    public static readonly BindableProperty CardDescriptionProperty = BindableProperty.Create(nameof(CardDescription), typeof(string), typeof(CardView), string.Empty);
    // ...

    public string CardTitle
    {
        get => (string)GetValue(CardTitleProperty);
        set => SetValue(CardTitleProperty, value);
    }

    public string CardDescription
    {
        get => (string)GetValue(CardDescriptionProperty);
        set => SetValue(CardDescriptionProperty, value);
    }
    // ...
}
派生自 ContentView 类的 CardView 类表示使用类似卡的布局显示数据的自定义控件。 此类包含它显示的数据的属性(由可绑定属性提供支持)。 但 CardView 类未定义任何 UI。 相反,UI 由控件模板定义。 有关创建 ContentView 派生的自定义控件的详细信息,请参阅 Xamarin.Forms ContentView。
使用 ControlTemplate 类型创建控件模板。 创建 ControlTemplate 时,将 View 对象组合在一起,以生成自定义控件或页面的 UI。 ControlTemplate 必须将一个 View 作为其根元素。 但该根元素通常包含其他 View 对象。 对象组合构成控件的可视结构。
尽管可以通过内联方式定义 ControlTemplate,但通常是将 ControlTemplate 声明为资源字典中的资源。 控件模板是资源,因此它们遵从适用于所有资源的相同范围规则。 例如,如果在应用程序定义 XAML 文件的根元素中声明控件模板,则该模板可以在应用程序中的任何位置使用。 若在页面中定义该模板,仅该页面可以使用此控件模板。 有关资源的详细信息,请参阅 Xamarin.Forms 资源字典。
以下 XAML 示例显示 CardView 对象的 ControlTemplate:
<ContentPage xmlns="http://xamarin.com/schemas/2014/forms"
             xmlns:x="http://schemas.microsoft.com/winfx/2009/xaml"
             ...>
    <ContentPage.Resources>
      <ControlTemplate x:Key="CardViewControlTemplate">
          <Frame BindingContext="{Binding Source={RelativeSource TemplatedParent}}"
                 BackgroundColor="{Binding CardColor}"
                 BorderColor="{Binding BorderColor}"
                 CornerRadius="5"
                 HasShadow="True"
                 Padding="8"
                 HorizontalOptions="Center"
                 VerticalOptions="Center">
              <Grid>
                  <Grid.RowDefinitions>
                      <RowDefinition Height="75" />
                      <RowDefinition Height="4" />
                      <RowDefinition Height="Auto" />
                  </Grid.RowDefinitions>
                  <Grid.ColumnDefinitions>
                      <ColumnDefinition Width="75" />
                      <ColumnDefinition Width="200" />
                  </Grid.ColumnDefinitions>
                  <Frame IsClippedToBounds="True"
                         BorderColor="{Binding BorderColor}"
                         BackgroundColor="{Binding IconBackgroundColor}"
                         CornerRadius="38"
                         HeightRequest="60"
                         WidthRequest="60"
                         HorizontalOptions="Center"
                         VerticalOptions="Center">
                      <Image Source="{Binding IconImageSource}"
                             Margin="-20"
                             WidthRequest="100"
                             HeightRequest="100"
                             Aspect="AspectFill" />
                  </Frame>
                  <Label Grid.Column="1"
                         Text="{Binding CardTitle}"
                         FontAttributes="Bold"
                         FontSize="Large"
                         VerticalTextAlignment="Center"
                         HorizontalTextAlignment="Start" />
                  <BoxView Grid.Row="1"
                           Grid.ColumnSpan="2"
                           BackgroundColor="{Binding BorderColor}"
                           HeightRequest="2"
                           HorizontalOptions="Fill" />
                  <Label Grid.Row="2"
                         Grid.ColumnSpan="2"
                         Text="{Binding CardDescription}"
                         VerticalTextAlignment="Start"
                         VerticalOptions="Fill"
                         HorizontalOptions="Fill" />
              </Grid>
          </Frame>
      </ControlTemplate>
    </ContentPage.Resources>
    ...
</ContentPage>
将 ControlTemplate 作为资源声明时,它必须使用 x:Key 特性指定一个密钥,以便可以在资源字典中标识它。 在此示例中,CardViewControlTemplate 的根元素 是 Frame 对象。 Frame 对象使用 RelativeSource 标记扩展,将其 BindingContext 设置为模板将应用到的运行时对象实例(称为“模板化父级”)。 Frame 对象使用 Grid、Frame、Image、Label 和 BoxView 对象组合来定义 CardView 对象的可视结构。 由于这些对象的绑定表达式继承自根 Frame 元素的 BindingContext,因此它们会针对 CardView 属性进行解析。 有关 RelativeSource 标记扩展的详细信息,请参阅 Xamarin.Forms 相对绑定。
使用 ControlTemplate
通过将 ControlTemplate 属性设置为控件模板对象,可以将 ControlTemplate 应用到 ContentView 派生的自定义控件。 同样,通过将 ControlTemplate 属性设置为控件模板对象,可以将 ControlTemplate 应用到 ContentPage 派生的页面。 在运行时,如果应用 ControlTemplate,ControlTemplate 中定义的所有控件将添加到模板化自定义控件或模板化页面的可视化树。
以下示例显示 CardViewControlTemplate 如何分配到各个 CardView 对象的 ControlTemplate 属性:
<ContentPage xmlns="http://xamarin.com/schemas/2014/forms"
             xmlns:x="http://schemas.microsoft.com/winfx/2009/xaml"
             xmlns:controls="clr-namespace:ControlTemplateDemos.Controls"
             ...>
    <StackLayout Margin="30">
        <controls:CardView BorderColor="DarkGray"
                           CardTitle="John Doe"
                           CardDescription="Lorem ipsum dolor sit amet, consectetur adipiscing elit. Nulla elit dolor, convallis non interdum."
                           IconBackgroundColor="SlateGray"
                           IconImageSource="user.png"
                           ControlTemplate="{StaticResource CardViewControlTemplate}" />
        <controls:CardView BorderColor="DarkGray"
                           CardTitle="Jane Doe"
                           CardDescription="Phasellus eu convallis mi. In tempus augue eu dignissim fermentum. Morbi ut lacus vitae eros lacinia."
                           IconBackgroundColor="SlateGray"
                           IconImageSource="user.png"
                           ControlTemplate="{StaticResource CardViewControlTemplate}" />
        <controls:CardView BorderColor="DarkGray"
                           CardTitle="Xamarin Monkey"
                           CardDescription="Aliquam sagittis, odio lacinia fermentum dictum, mi erat scelerisque erat, quis aliquet arcu."
                           IconBackgroundColor="SlateGray"
                           IconImageSource="user.png"
                           ControlTemplate="{StaticResource CardViewControlTemplate}" />
    </StackLayout>
</ContentPage>
在此示例中,CardViewControlTemplate 中的控件成为各个 CardView 对象的可视化树的一部分。 由于控件模板的根 Frame 对象将 BindingContext 设置为模板化父级,因此 Frame 及其子级针对各个 CardView 对象的属性来解析绑定表达式。
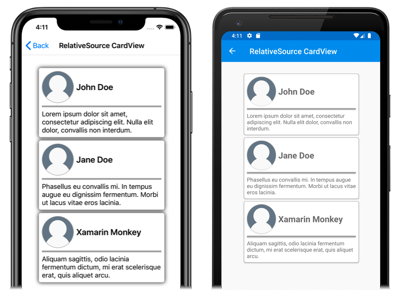
以下屏幕截图显示 CardViewControlTemplate 如何应用到三个 CardView 对象:
重要
通过替代模板化自定义控件或模板化页面中的 OnApplyTemplate 方法,可以检测 ControlTemplate 应用到控件实例的时间点。 有关详细信息,请参阅获取模板中的命名元素。
使用 TemplateBinding 传递参数
TemplateBinding 标记扩展将 ControlTemplate 中元素的属性绑定到由模板化自定义控件或模板化页面定义的公共属性。 使用 TemplateBinding 时,可让控件属性用作模板参数。 因此,若设置了模板化自定义控件或模板化页面的属性,该值将传递到包含 TemplateBinding 的元素中。
重要说明
TemplateBinding 标记表达式允许删除以前控件模板中的 RelativeSource 绑定,并替换 Binding 表达式。
TemplateBinding 标记扩展定义以下属性:
Path(string类型),属性的路径。Mode(BindingMode类型),更改在源和目标之间的传播方向。Converter(IValueConverter类型),绑定值转换器。ConverterParameter(object类型),绑定值转换器的参数。StringFormat(string类型),绑定的字符串格式。
TemplateBinding 标记扩展的 ContentProperty 为 Path。 因此,如果路径是 TemplateBinding 表达式中的第一个项,则可以省略标记扩展的“Path=”部分。 有关如何在绑定表达式中使用这些属性的详细信息,请参阅 Xamarin.Forms 数据绑定。
警告
只应将 TemplateBinding 标记扩展用于 ControlTemplate 中。 不过,尝试在 ControlTemplate 外部使用 TemplateBinding 表达式不会引发生成错误或异常。
以下 XAML 示例说明了 CardView 对象的 ControlTemplate,它使用了 TemplateBinding 标记扩展:
<ContentPage xmlns="http://xamarin.com/schemas/2014/forms"
             xmlns:x="http://schemas.microsoft.com/winfx/2009/xaml"
             ...>
    <ContentPage.Resources>
        <ControlTemplate x:Key="CardViewControlTemplate">
            <Frame BackgroundColor="{TemplateBinding CardColor}"
                   BorderColor="{TemplateBinding BorderColor}"
                   CornerRadius="5"
                   HasShadow="True"
                   Padding="8"
                   HorizontalOptions="Center"
                   VerticalOptions="Center">
                <Grid>
                    <Grid.RowDefinitions>
                        <RowDefinition Height="75" />
                        <RowDefinition Height="4" />
                        <RowDefinition Height="Auto" />
                    </Grid.RowDefinitions>
                    <Grid.ColumnDefinitions>
                        <ColumnDefinition Width="75" />
                        <ColumnDefinition Width="200" />
                    </Grid.ColumnDefinitions>
                    <Frame IsClippedToBounds="True"
                           BorderColor="{TemplateBinding BorderColor}"
                           BackgroundColor="{TemplateBinding IconBackgroundColor}"
                           CornerRadius="38"
                           HeightRequest="60"
                           WidthRequest="60"
                           HorizontalOptions="Center"
                           VerticalOptions="Center">
                        <Image Source="{TemplateBinding IconImageSource}"
                               Margin="-20"
                               WidthRequest="100"
                               HeightRequest="100"
                               Aspect="AspectFill" />
                    </Frame>
                    <Label Grid.Column="1"
                           Text="{TemplateBinding CardTitle}"
                           FontAttributes="Bold"
                           FontSize="Large"
                           VerticalTextAlignment="Center"
                           HorizontalTextAlignment="Start" />
                    <BoxView Grid.Row="1"
                             Grid.ColumnSpan="2"
                             BackgroundColor="{TemplateBinding BorderColor}"
                             HeightRequest="2"
                             HorizontalOptions="Fill" />
                    <Label Grid.Row="2"
                           Grid.ColumnSpan="2"
                           Text="{TemplateBinding CardDescription}"
                           VerticalTextAlignment="Start"
                           VerticalOptions="Fill"
                           HorizontalOptions="Fill" />
                </Grid>
            </Frame>
        </ControlTemplate>
    </ContentPage.Resources>
    ...
</ContentPage>
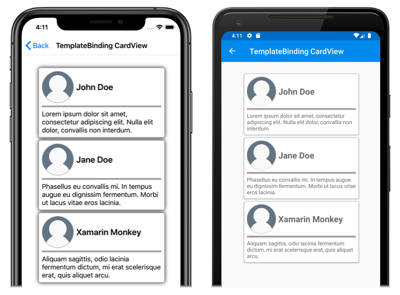
在此示例中,TemplateBinding 标记扩展针对各个 CardView 对象的属性解析绑定表达式。 以下屏幕截图显示 CardViewControlTemplate 如何应用到三个 CardView 对象:
重要
使用 TemplateBinding 标记扩展等效于使用 RelativeSource 标记扩展将模板根元素的 BindingContext 设置为其模板化父级,然后使用 Binding 标记扩展解析子对象的绑定。 事实上,TemplateBinding 标记扩展会创建 Source 为 RelativeBindingSource.TemplatedParent 的 Binding。
使用样式应用 ControlTemplate
此外,也可以通过样式应用控件模板。 实现方法为创建使用 ControlTemplate 的隐式或显式样式。
以下 XAML 示例显示使用 CardViewControlTemplate 的隐式样式:
<ContentPage xmlns="http://xamarin.com/schemas/2014/forms"
             xmlns:x="http://schemas.microsoft.com/winfx/2009/xaml"
             xmlns:controls="clr-namespace:ControlTemplateDemos.Controls"
             ...>
    <ContentPage.Resources>
        <ControlTemplate x:Key="CardViewControlTemplate">
            ...
        </ControlTemplate>

        <Style TargetType="controls:CardView">
            <Setter Property="ControlTemplate"
                    Value="{StaticResource CardViewControlTemplate}" />
        </Style>
    </ContentPage.Resources>
    <StackLayout Margin="30">
        <controls:CardView BorderColor="DarkGray"
                           CardTitle="John Doe"
                           CardDescription="Lorem ipsum dolor sit amet, consectetur adipiscing elit. Nulla elit dolor, convallis non interdum."
                           IconBackgroundColor="SlateGray"
                           IconImageSource="user.png" />
        <controls:CardView BorderColor="DarkGray"
                           CardTitle="Jane Doe"
                           CardDescription="Phasellus eu convallis mi. In tempus augue eu dignissim fermentum. Morbi ut lacus vitae eros lacinia."
                           IconBackgroundColor="SlateGray"
                           IconImageSource="user.png"/>
        <controls:CardView BorderColor="DarkGray"
                           CardTitle="Xamarin Monkey"
                           CardDescription="Aliquam sagittis, odio lacinia fermentum dictum, mi erat scelerisque erat, quis aliquet arcu."
                           IconBackgroundColor="SlateGray"
                           IconImageSource="user.png" />
    </StackLayout>
</ContentPage>
在此示例中,隐式 Style 自动应用于各个 CardView 对象,并将各个 CardView 的 ControlTemplate 属性设置为 CardViewControlTemplate。
有关样式的详细信息,请参阅 Xamarin.Forms 样式。
重新定义控件的 UI
将 ControlTemplate 实例化并分配到 ContentView 派生的自定义控件或 ContentPage 派生的页面的 ControlTemplate 属性时,ControlTemplate 中定义的可视结构会替换为该自定义控件或页面定义的可视结构。
例如,CardViewUI 自定义控件使用以下 XAML 定义其用户界面:
<ContentView xmlns="http://xamarin.com/schemas/2014/forms"
             xmlns:x="http://schemas.microsoft.com/winfx/2009/xaml"
             x:Class="ControlTemplateDemos.Controls.CardViewUI"
             x:Name="this">
    <Frame BindingContext="{x:Reference this}"
           BackgroundColor="{Binding CardColor}"
           BorderColor="{Binding BorderColor}"
           CornerRadius="5"
           HasShadow="True"
           Padding="8"
           HorizontalOptions="Center"
           VerticalOptions="Center">
        <Grid>
            <Grid.RowDefinitions>
                <RowDefinition Height="75" />
                <RowDefinition Height="4" />
                <RowDefinition Height="Auto" />
            </Grid.RowDefinitions>
            <Grid.ColumnDefinitions>
                <ColumnDefinition Width="75" />
                <ColumnDefinition Width="200" />
            </Grid.ColumnDefinitions>
            <Frame IsClippedToBounds="True"
                   BorderColor="{Binding BorderColor, FallbackValue='Black'}"
                   BackgroundColor="{Binding IconBackgroundColor, FallbackValue='Gray'}"
                   CornerRadius="38"
                   HeightRequest="60"
                   WidthRequest="60"
                   HorizontalOptions="Center"
                   VerticalOptions="Center">
                <Image Source="{Binding IconImageSource}"
                       Margin="-20"
                       WidthRequest="100"
                       HeightRequest="100"
                       Aspect="AspectFill" />
            </Frame>
            <Label Grid.Column="1"
                   Text="{Binding CardTitle, FallbackValue='Card title'}"
                   FontAttributes="Bold"
                   FontSize="Large"
                   VerticalTextAlignment="Center"
                   HorizontalTextAlignment="Start" />
            <BoxView Grid.Row="1"
                     Grid.ColumnSpan="2"
                     BackgroundColor="{Binding BorderColor, FallbackValue='Black'}"
                     HeightRequest="2"
                     HorizontalOptions="Fill" />
            <Label Grid.Row="2"
                   Grid.ColumnSpan="2"
                   Text="{Binding CardDescription, FallbackValue='Card description'}"
                   VerticalTextAlignment="Start"
                   VerticalOptions="Fill"
                   HorizontalOptions="Fill" />
        </Grid>
    </Frame>
</ContentView>
不过,通过在 ControlTemplate 中定义新的可视结构,并将其分配到 CardViewUI 对象的 ControlTemplate 属性,可以替换包含此 UI 的控件:
<ContentPage xmlns="http://xamarin.com/schemas/2014/forms"
             xmlns:x="http://schemas.microsoft.com/winfx/2009/xaml"
             ...>
    <ContentPage.Resources>
        <ControlTemplate x:Key="CardViewCompressed">
            <Grid>
                <Grid.RowDefinitions>
                    <RowDefinition Height="100" />
                </Grid.RowDefinitions>
                <Grid.ColumnDefinitions>
                    <ColumnDefinition Width="100" />
                    <ColumnDefinition Width="*" />
                </Grid.ColumnDefinitions>
                <Image Source="{TemplateBinding IconImageSource}"
                        BackgroundColor="{TemplateBinding IconBackgroundColor}"
                        WidthRequest="100"
                        HeightRequest="100"
                        Aspect="AspectFill"
                        HorizontalOptions="Center"
                        VerticalOptions="Center" />
                <StackLayout Grid.Column="1">
                    <Label Text="{TemplateBinding CardTitle}"
                           FontAttributes="Bold" />
                    <Label Text="{TemplateBinding CardDescription}" />
                </StackLayout>
            </Grid>
        </ControlTemplate>
    </ContentPage.Resources>
    <StackLayout Margin="30">
        <controls:CardViewUI BorderColor="DarkGray"
                             CardTitle="John Doe"
                             CardDescription="Lorem ipsum dolor sit amet, consectetur adipiscing elit. Nulla elit dolor, convallis non interdum."
                             IconBackgroundColor="SlateGray"
                             IconImageSource="user.png"
                             ControlTemplate="{StaticResource CardViewCompressed}" />
        <controls:CardViewUI BorderColor="DarkGray"
                             CardTitle="Jane Doe"
                             CardDescription="Phasellus eu convallis mi. In tempus augue eu dignissim fermentum. Morbi ut lacus vitae eros lacinia."
                             IconBackgroundColor="SlateGray"
                             IconImageSource="user.png"
                             ControlTemplate="{StaticResource CardViewCompressed}" />
        <controls:CardViewUI BorderColor="DarkGray"
                             CardTitle="Xamarin Monkey"
                             CardDescription="Aliquam sagittis, odio lacinia fermentum dictum, mi erat scelerisque erat, quis aliquet arcu."
                             IconBackgroundColor="SlateGray"
                             IconImageSource="user.png"
                             ControlTemplate="{StaticResource CardViewCompressed}" />
    </StackLayout>
</ContentPage>
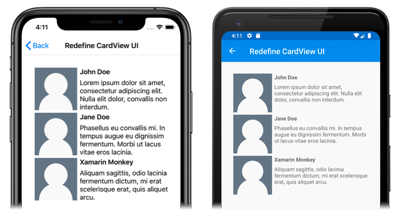
在此示例中,通过 ControlTemplate 重新定义了 CardViewUI 对象的可视结构,它提供了适合压缩列表的更加简洁的可视结构:
将内容替换到 ContentPresenter
可以将 ContentPresenter 置于控件模板中,来标记模板化自定义控件或模板化页面要显示的内容将在何处显示。 然后使用该控件模板的自定义控件或页面将定义 ContentPresenter 要显示的内容。 下图演示了包含多个控件的页面的 ControlTemplate,其中包括由蓝色矩形标记的 ContentPresenter:
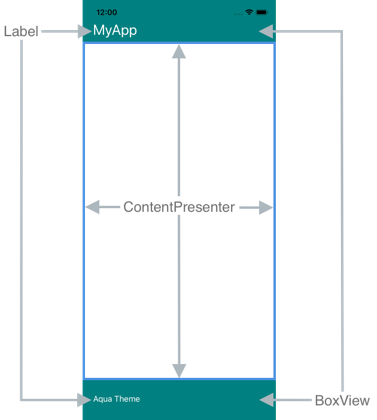
以下 XAML 说明了其可视结构中包含 ContentPresenter 的控件模板 TealTemplate:
<ControlTemplate x:Key="TealTemplate">
    <Grid>
        <Grid.RowDefinitions>
            <RowDefinition Height="0.1*" />
            <RowDefinition Height="0.8*" />
            <RowDefinition Height="0.1*" />
        </Grid.RowDefinitions>
        <BoxView Color="Teal" />
        <Label Margin="20,0,0,0"
               Text="{TemplateBinding HeaderText}"
               TextColor="White"
               FontSize="Title"
               VerticalOptions="Center" />
        <ContentPresenter Grid.Row="1" />
        <BoxView Grid.Row="2"
                 Color="Teal" />
        <Label x:Name="changeThemeLabel"
               Grid.Row="2"
               Margin="20,0,0,0"
               Text="Change Theme"
               TextColor="White"
               HorizontalOptions="Start"
               VerticalOptions="Center">
            <Label.GestureRecognizers>
                <TapGestureRecognizer Tapped="OnChangeThemeLabelTapped" />
            </Label.GestureRecognizers>
        </Label>
        <controls:HyperlinkLabel Grid.Row="2"
                                 Margin="0,0,20,0"
                                 Text="Help"
                                 TextColor="White"
                                 Url="https://learn.microsoft.com/xamarin/xamarin-forms/"
                                 HorizontalOptions="End"
                                 VerticalOptions="Center" />
    </Grid>
</ControlTemplate>
以下示例显示 TealTemplate 如何分配到 ContentPage 派生页的 ControlTemplate 属性:
<controls:HeaderFooterPage xmlns="http://xamarin.com/schemas/2014/forms"
                           xmlns:x="http://schemas.microsoft.com/winfx/2009/xaml"
                           xmlns:controls="clr-namespace:ControlTemplateDemos.Controls"
                           ControlTemplate="{StaticResource TealTemplate}"
                           HeaderText="MyApp"
                           ...>
    <StackLayout Margin="10">
        <Entry Placeholder="Enter username" />
        <Entry Placeholder="Enter password"
               IsPassword="True" />
        <Button Text="Login" />
    </StackLayout>
</controls:HeaderFooterPage>
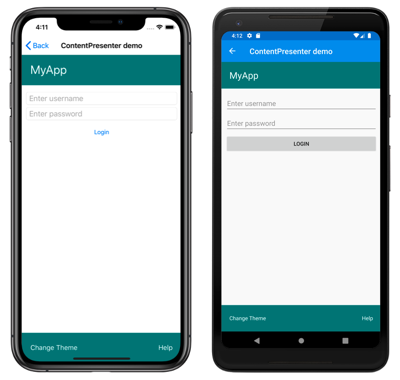
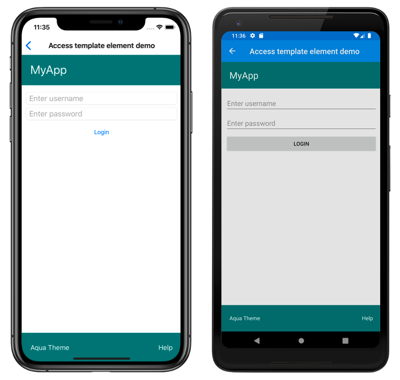
在运行时,如果 TealTemplate 应用到此页面,页面内容将替换到控件模板中定义的 ContentPresenter:
从模板中获取命名元素
可以从模板化的自定义控件或模板化页面检索控件模板内的命名元素。 这可以通过 GetTemplateChild 方法来实现,找到命名元素后,该方法在实例化的 ControlTemplate 可视化树中返回该命名元素。 否则,它将返回 null。
在实例化控件模板后,调用模板的 OnApplyTemplate 方法。 因此应从模板化控件或模板化页面替代的 OnApplyTemplate 调用 GetTemplateChild 方法。
重要说明
只有在调用 OnApplyTemplate 方法后,才能调用 GetTemplateChild 方法。
以下 XAML 说明了可应用到 ContentPage 派生页面的控件模板 TealTemplate:
<ControlTemplate x:Key="TealTemplate">
    <Grid>
        ...
        <Label x:Name="changeThemeLabel"
               Grid.Row="2"
               Margin="20,0,0,0"
               Text="Change Theme"
               TextColor="White"
               HorizontalOptions="Start"
               VerticalOptions="Center">
            <Label.GestureRecognizers>
                <TapGestureRecognizer Tapped="OnChangeThemeLabelTapped" />
            </Label.GestureRecognizers>
        </Label>
        ...
    </Grid>
</ControlTemplate>
在此示例中,命名了 Label 元素,并且可从此模板化页面的代码中检索它。 这是通过从模板化页面的 OnApplyTemplate 替代调用 GetTemplateChild 方法来实现的:
public partial class AccessTemplateElementPage : HeaderFooterPage
{
    Label themeLabel;

    public AccessTemplateElementPage()
    {
        InitializeComponent();
    }

    protected override void OnApplyTemplate()
    {
        base.OnApplyTemplate();
        themeLabel = (Label)GetTemplateChild("changeThemeLabel");
        themeLabel.Text = OriginalTemplate ? "Aqua Theme" : "Teal Theme";
    }
}
在此示例中,ControlTemplate 实例化后,检索了 Label 对象 changeThemeLabel。 然后,AccessTemplateElementPage 类可以访问并操控 changeThemeLabel。 以下屏幕截图显示 Label 显示的文本发生更改:
绑定到 viewmodel
即使 ControlTemplate 绑定到模板化父级(模板应用到的运行时对象实例),ControlTemplate 也可以将数据绑定到 viewmodel。
以下 XAML 示例显示使用 viewmodel PeopleViewModel 的页面:
<ContentPage xmlns="http://xamarin.com/schemas/2014/forms"
             xmlns:x="http://schemas.microsoft.com/winfx/2009/xaml"
             xmlns:local="clr-namespace:ControlTemplateDemos"
             xmlns:controls="clr-namespace:ControlTemplateDemos.Controls"
             ...>
    <ContentPage.BindingContext>
        <local:PeopleViewModel />
    </ContentPage.BindingContext>

    <ContentPage.Resources>
        <DataTemplate x:Key="PersonTemplate">
            <controls:CardView BorderColor="DarkGray"
                               CardTitle="{Binding Name}"
                               CardDescription="{Binding Description}"
                               ControlTemplate="{StaticResource CardViewControlTemplate}" />
        </DataTemplate>
    </ContentPage.Resources>

    <StackLayout Margin="10"
                 BindableLayout.ItemsSource="{Binding People}"
                 BindableLayout.ItemTemplate="{StaticResource PersonTemplate}" />
</ContentPage>
在此示例中,页面的 BindingContext 设置为 PeopleViewModel 实例。 此 viewmodel 公开 People 集合和名称为 DeletePersonCommand 的 ICommand。 页面上的 StackLayout 使用可绑定的布局将数据绑定到 People 集合,可绑定布局的 ItemTemplate 设置为 PersonTemplate 资源。 此 DataTemplate 指定将使用 CardView 对象显示 People 集合中的各个项。 使用名称为 CardViewControlTemplate 的 ControlTemplate 定义 CardView 对象的可视结构:
<ControlTemplate x:Key="CardViewControlTemplate">
    <Frame BindingContext="{Binding Source={RelativeSource TemplatedParent}}"
           BackgroundColor="{Binding CardColor}"
           BorderColor="{Binding BorderColor}"
           CornerRadius="5"
           HasShadow="True"
           Padding="8"
           HorizontalOptions="Center"
           VerticalOptions="Center">
        <Grid>
            <Grid.RowDefinitions>
                <RowDefinition Height="75" />
                <RowDefinition Height="4" />
                <RowDefinition Height="Auto" />
            </Grid.RowDefinitions>
            <Label Text="{Binding CardTitle}"
                   FontAttributes="Bold"
                   FontSize="Large"
                   VerticalTextAlignment="Center"
                   HorizontalTextAlignment="Start" />
            <BoxView Grid.Row="1"
                     BackgroundColor="{Binding BorderColor}"
                     HeightRequest="2"
                     HorizontalOptions="Fill" />
            <Label Grid.Row="2"
                   Text="{Binding CardDescription}"
                   VerticalTextAlignment="Start"
                   VerticalOptions="Fill"
                   HorizontalOptions="Fill" />
            <Button Text="Delete"
                    Command="{Binding Source={RelativeSource AncestorType={x:Type local:PeopleViewModel}}, Path=DeletePersonCommand}"
                    CommandParameter="{Binding CardTitle}"
                    HorizontalOptions="End" />
        </Grid>
    </Frame>
</ControlTemplate>
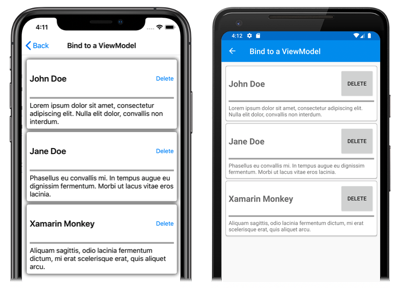
在此示例中,ControlTemplate 的根元素 是 Frame 对象。 Frame 对象使用 RelativeSource 标记扩展将其 BindingContext 设置为模板化父级。 由于 Frame 对象及其子级的绑定表达式继承自根 Frame 元素的 BindingContext,因此它们会针对 CardView 属性进行解析。 以下屏幕截图说明了显示 People 集合的页面,其中包括三个项:
ControlTemplate 中的对象绑定到其模板化父级的属性,但控件模板内的 Button 同时绑定到其模板化父级和 viewmodel 中的 DeletePersonCommand。 这是因为 Button.Command 属性将其绑定源重新定义为上级的绑定上下文,其绑定上下文类型为 PeopleViewModel,即 StackLayout。 然后绑定表达式的 Path 部分解析 DeletePersonCommand 属性。 但是 Button.CommandParameter 属性不改变其绑定源,而是从 ControlTemplate 中的父级继承它。 因此,CommandParameter 属性绑定到 CardView 的 CardTitle 属性。
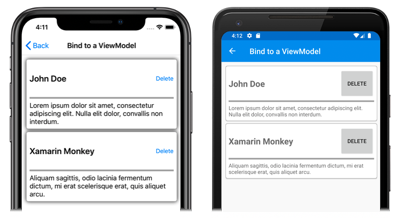
Button 绑定的整体效果是:当点击 Button 时,执行 PeopleViewModel 类中的 DeletePersonCommand,同时 CardName 属性的值传递到 DeletePersonCommand。 这导致从可绑定布局中删除指定的 CardView:
有关相对绑定的详细信息,请参阅 Xamarin.Forms 相对绑定。
