Xamarin.Forms 中的本地通知
本地通知是安装在移动设备上的应用程序发送的警报。 本地通知通常用于如下功能:
- 日历事件
- Reminders
- 基于位置的触发器
每个平台以不同的方式处理本地通知的创建、显示和使用。 本文介绍如何创建跨平台抽象以使用 Xamarin.Forms 发送、安排、接收本地通知。
创建跨平台接口
Xamarin.Forms 应用程序应创建和使用通知,而无需考虑基础平台实现。 以下 INotificationManager 接口在共享代码库中实现,并定义了应用程序可用于与通知交互的跨平台 API:
public interface INotificationManager
{
    event EventHandler NotificationReceived;
    void Initialize();
    void SendNotification(string title, string message, DateTime? notifyTime = null);
    void ReceiveNotification(string title, string message);
}
此接口将在每个平台项目中实现。 NotificationReceived 事件允许应用程序处理传入通知。 Initialize 方法应执行准备通知系统所需的任何本机平台逻辑。 SendNotification 方法应在可选的 DateTime 时发送通知。 当收到消息时,ReceiveNotification 方法应由基础平台调用。
在 Xamarin.Forms 使用接口
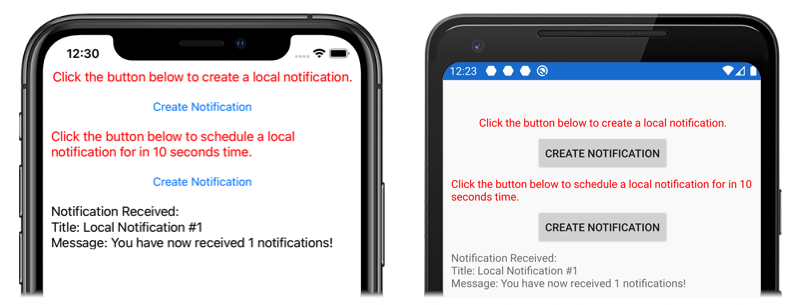
创建接口后,即使尚未创建平台实现,也可以在共享 Xamarin.Forms 项目中使用该接口。 示例应用程序包含名为 MainPage.xaml 的,其中包含以内容ContentPage:
<StackLayout Margin="0,35,0,0"
             x:Name="stackLayout">
    <Label Text="Click the button below to create a local notification."
           TextColor="Red"
           HorizontalOptions="Center"
           VerticalOptions="Start" />
    <Button Text="Create Notification"
            HorizontalOptions="Center"
            VerticalOptions="Start"
            Clicked="OnSendClick" />
    <Label Text="Click the button below to schedule a local notification for in 10 seconds time."
           TextColor="Red"
           HorizontalOptions="Center"
           VerticalOptions="Start" />
    <Button Text="Create Notification"
            HorizontalOptions="Center"
            VerticalOptions="Start"
            Clicked="OnScheduleClick" />
</StackLayout>
布局包含解释说明的 Label 元素,以及在点击时发送或安排通知的 Button 元素。
MainPage 类代码隐藏处理通知的发送和接收:
public partial class MainPage : ContentPage
{
    INotificationManager notificationManager;
    int notificationNumber = 0;

    public MainPage()
    {
        InitializeComponent();

        notificationManager = DependencyService.Get<INotificationManager>();
        notificationManager.NotificationReceived += (sender, eventArgs) =>
        {
            var evtData = (NotificationEventArgs)eventArgs;
            ShowNotification(evtData.Title, evtData.Message);
        };
    }

    void OnSendClick(object sender, EventArgs e)
    {
        notificationNumber++;
        string title = $"Local Notification #{notificationNumber}";
        string message = $"You have now received {notificationNumber} notifications!";
        notificationManager.SendNotification(title, message);
    }

    void OnScheduleClick(object sender, EventArgs e)
    {
        notificationNumber++;
        string title = $"Local Notification #{notificationNumber}";
        string message = $"You have now received {notificationNumber} notifications!";
        notificationManager.SendNotification(title, message, DateTime.Now.AddSeconds(10));
    }

    void ShowNotification(string title, string message)
    {
        Device.BeginInvokeOnMainThread(() =>
        {
            var msg = new Label()
            {
                Text = $"Notification Received:\nTitle: {title}\nMessage: {message}"
            };
            stackLayout.Children.Add(msg);
        });
    }
}
MainPage 类构造函数使用 Xamarin.FormsDependencyService 检索 INotificationManager 的特定于平台的实例。 OnSendClick 和 OnScheduleClicked 方法使用 INotificationManager 实例来发送和安排新的通知。 ShowNotification 方法是从附加到 NotificationReceived 事件的事件处理程序中调用的,并在调用该事件时将新的 Label 插入到页面中。
NotificationReceived 事件处理程序将其事件参数强制转换为 NotificationEventArgs。 此类型在共享 Xamarin.Forms 项目中定义:
public class NotificationEventArgs : EventArgs
{
    public string Title { get; set; }
    public string Message { get; set; }
}
有关 Xamarin.FormsDependencyService 的详细信息,请参阅 Xamarin.Forms DependencyService。
创建 Android 接口实现
要使 Xamarin.Forms 应用程序在 Android 上发送和接收通知,应用程序必须提供 INotificationManager 接口的实现。
创建 AndroidNotificationManager 类
AndroidNotificationManager 类实现 INotificationManager 接口:
using System;
using Android.App;
using Android.Content;
using Android.Graphics;
using Android.OS;
using AndroidX.Core.App;
using Xamarin.Forms;
using AndroidApp = Android.App.Application;

[assembly: Dependency(typeof(LocalNotifications.Droid.AndroidNotificationManager))]
namespace LocalNotifications.Droid
{
    public class AndroidNotificationManager : INotificationManager
    {
        const string channelId = "default";
        const string channelName = "Default";
        const string channelDescription = "The default channel for notifications.";

        public const string TitleKey = "title";
        public const string MessageKey = "message";

        bool channelInitialized = false;
        int messageId = 0;
        int pendingIntentId = 0;

        NotificationManager manager;

        public event EventHandler NotificationReceived;

        public static AndroidNotificationManager Instance { get; private set; }

        public AndroidNotificationManager() => Initialize();

        public void Initialize()
        {
            if (Instance == null)
            {
                CreateNotificationChannel();
                Instance = this;
            }
        }

        public void SendNotification(string title, string message, DateTime? notifyTime = null)
        {
            if (!channelInitialized)
            {
                CreateNotificationChannel();
            }

            if (notifyTime != null)
            {
                Intent intent = new Intent(AndroidApp.Context, typeof(AlarmHandler));
                intent.PutExtra(TitleKey, title);
                intent.PutExtra(MessageKey, message);

                PendingIntent pendingIntent = PendingIntent.GetBroadcast(AndroidApp.Context, pendingIntentId++, intent, PendingIntentFlags.CancelCurrent);
                long triggerTime = GetNotifyTime(notifyTime.Value);
                AlarmManager alarmManager = AndroidApp.Context.GetSystemService(Context.AlarmService) as AlarmManager;
                alarmManager.Set(AlarmType.RtcWakeup, triggerTime, pendingIntent);
            }
            else
            {
                Show(title, message);
            }
        }

        public void ReceiveNotification(string title, string message)
        {
            var args = new NotificationEventArgs()
            {
                Title = title,
                Message = message,
            };
            NotificationReceived?.Invoke(null, args);
        }

        public void Show(string title, string message)
        {
            Intent intent = new Intent(AndroidApp.Context, typeof(MainActivity));
            intent.PutExtra(TitleKey, title);
            intent.PutExtra(MessageKey, message);

            PendingIntent pendingIntent = PendingIntent.GetActivity(AndroidApp.Context, pendingIntentId++, intent, PendingIntentFlags.UpdateCurrent);

            NotificationCompat.Builder builder = new NotificationCompat.Builder(AndroidApp.Context, channelId)
                .SetContentIntent(pendingIntent)
                .SetContentTitle(title)
                .SetContentText(message)
                .SetLargeIcon(BitmapFactory.DecodeResource(AndroidApp.Context.Resources, Resource.Drawable.xamagonBlue))
                .SetSmallIcon(Resource.Drawable.xamagonBlue)
                .SetDefaults((int)NotificationDefaults.Sound | (int)NotificationDefaults.Vibrate);

            Notification notification = builder.Build();
            manager.Notify(messageId++, notification);
        }

        void CreateNotificationChannel()
        {
            manager = (NotificationManager)AndroidApp.Context.GetSystemService(AndroidApp.NotificationService);

            if (Build.VERSION.SdkInt >= BuildVersionCodes.O)
            {
                var channelNameJava = new Java.Lang.String(channelName);
                var channel = new NotificationChannel(channelId, channelNameJava, NotificationImportance.Default)
                {
                    Description = channelDescription
                };
                manager.CreateNotificationChannel(channel);
            }

            channelInitialized = true;
        }

        long GetNotifyTime(DateTime notifyTime)
        {
            DateTime utcTime = TimeZoneInfo.ConvertTimeToUtc(notifyTime);
            double epochDiff = (new DateTime(1970, 1, 1) - DateTime.MinValue).TotalSeconds;
            long utcAlarmTime = utcTime.AddSeconds(-epochDiff).Ticks / 10000;
            return utcAlarmTime; // milliseconds
        }
    }
}
命名空间上方的 assembly 属性使用 DependencyService 注册 INotificationManager 接口实现。
Android 允许应用程序定义多个通知通道。 Initialize 方法创建示例应用程序用于发送通知的基本通道。 SendNotification 方法定义创建和发送通知所需的特定于平台的逻辑。 在收到消息时,ReceiveNotification 方法将由 Android OS 调用,并调用事件处理程序。
SendNotification 方法立即或在准确的 DateTime 创建一个本地通知。 可以使用 AlarmManager 类为准确的 DateTime 安排一个通知,且该通知将由从 BroadcastReceiver 类派生的对象接收:
[BroadcastReceiver(Enabled = true, Label = "Local Notifications Broadcast Receiver")]
public class AlarmHandler : BroadcastReceiver
{
    public override void OnReceive(Context context, Intent intent)
    {
        if (intent?.Extras != null)
        {
            string title = intent.GetStringExtra(AndroidNotificationManager.TitleKey);
            string message = intent.GetStringExtra(AndroidNotificationManager.MessageKey);

            AndroidNotificationManager manager = AndroidNotificationManager.Instance ?? new AndroidNotificationManager();
            manager.Show(title, message);
        }
    }
}
重要
默认情况下,使用 AlarmManager 类安排的通知将不会在设备重启后存在。 但是,你可以将应用程序设计为在设备重新启动时自动重新安排通知。 有关详细信息,请参阅 developer.android.com 上的安排重复警报中的当设备重新启动时启动警报。 有关 Android 上后台处理的信息,请参阅 developer.android.com 上的后台处理指南。
有关广播接收器的详细信息,请参阅 Xamarin.Android 中的广播接收器。
处理 Android 中的传入通知
MainActivity 类必须检测传入通知并通知 AndroidNotificationManager 实例。 MainActivity 类上的 Activity 属性应指定 LaunchMode.SingleTop 的 LaunchMode 值:
[Activity(
        //...
        LaunchMode = LaunchMode.SingleTop]
    public class MainActivity : global::Xamarin.Forms.Platform.Android.FormsAppCompatActivity
    {
        // ...
    }
当应用程序在前台时,SingleTop 模式会阻止启动 Activity 的多个实例。 此 LaunchMode 可能不适合在更复杂的通知方案中启动多个活动的应用程序。 有关 LaunchMode 枚举值的详细信息,请参阅 Android Activity LaunchMode 。
在 MainActivity 中,将修改以接收传入通知:
protected override void OnCreate(Bundle savedInstanceState)
{
    // ...

    global::Xamarin.Forms.Forms.Init(this, savedInstanceState);
    LoadApplication(new App());
    CreateNotificationFromIntent(Intent);
}

protected override void OnNewIntent(Intent intent)
{
    CreateNotificationFromIntent(intent);
}

void CreateNotificationFromIntent(Intent intent)
{
    if (intent?.Extras != null)
    {
        string title = intent.GetStringExtra(AndroidNotificationManager.TitleKey);
        string message = intent.GetStringExtra(AndroidNotificationManager.MessageKey);
        DependencyService.Get<INotificationManager>().ReceiveNotification(title, message);
    }
}
CreateNotificationFromIntent 方法从 intent 参数中提取通知数据,并使用 ReceiveNotification 方法将其提供给 AndroidNotificationManager。 CreateNotificationFromIntent 方法是从 OnCreate 方法和 OnNewIntent 方法中调用的:
- 当通过通知数据启动应用程序时,
Intent数据将传递到OnCreate方法。 - 如果应用程序已在前台,则
Intent数据将传递到OnNewIntent方法。
Android 为通知提供多个高级选项。 有关详细信息,请参阅 Xamarin.Android 中的通知。
创建 iOS 接口实现
要使 Xamarin.Forms 应用程序在 iOS 上发送和接收通知,应用程序必须提供 INotificationManager 的实现。
创建 iOSNotificationManager 类
iOSNotificationManager 类实现 INotificationManager 接口:
using System;
using Foundation;
using UserNotifications;
using Xamarin.Forms;

[assembly: Dependency(typeof(LocalNotifications.iOS.iOSNotificationManager))]
namespace LocalNotifications.iOS
{
    public class iOSNotificationManager : INotificationManager
    {
        int messageId = 0;
        bool hasNotificationsPermission;
        public event EventHandler NotificationReceived;

        public void Initialize()
        {
            // request the permission to use local notifications
            UNUserNotificationCenter.Current.RequestAuthorization(UNAuthorizationOptions.Alert, (approved, err) =>
            {
                hasNotificationsPermission = approved;
            });
        }

        public void SendNotification(string title, string message, DateTime? notifyTime = null)
        {
            // EARLY OUT: app doesn't have permissions
            if (!hasNotificationsPermission)
            {
                return;
            }

            messageId++;

            var content = new UNMutableNotificationContent()
            {
                Title = title,
                Subtitle = "",
                Body = message,
                Badge = 1
            };

            UNNotificationTrigger trigger;
            if (notifyTime != null)
            {
                // Create a calendar-based trigger.
                trigger = UNCalendarNotificationTrigger.CreateTrigger(GetNSDateComponents(notifyTime.Value), false);
            }
            else
            {
                // Create a time-based trigger, interval is in seconds and must be greater than 0.
                trigger = UNTimeIntervalNotificationTrigger.CreateTrigger(0.25, false);
            }

            var request = UNNotificationRequest.FromIdentifier(messageId.ToString(), content, trigger);
            UNUserNotificationCenter.Current.AddNotificationRequest(request, (err) =>
            {
                if (err != null)
                {
                    throw new Exception($"Failed to schedule notification: {err}");
                }
            });
        }

        public void ReceiveNotification(string title, string message)
        {
            var args = new NotificationEventArgs()
            {
                Title = title,
                Message = message
            };
            NotificationReceived?.Invoke(null, args);
        }

        NSDateComponents GetNSDateComponents(DateTime dateTime)
        {
            return new NSDateComponents
            {
                Month = dateTime.Month,
                Day = dateTime.Day,
                Year = dateTime.Year,
                Hour = dateTime.Hour,
                Minute = dateTime.Minute,
                Second = dateTime.Second
            };
        }
    }
}
命名空间上方的 assembly 属性使用 DependencyService 注册 INotificationManager 接口实现。
在 iOS 上,必须先请求使用通知的权限,然后再尝试计划通知。 Initialize 方法请求使用本地通知的授权。 SendNotification 方法定义创建和发送通知所需的逻辑。 在收到消息时,ReceiveNotification 方法将由 iOS 调用,并调用事件处理程序。
注意
SendNotification 方法会立即使用 UNTimeIntervalNotificationTrigger 对象或在准确的 DateTime 使用 UNCalendarNotificationTrigger 对象创建本地通知。
处理 iOS 中的传入通知
在 iOS 上,必须创建属于 UNUserNotificationCenterDelegate 的子类的委托来处理传入消息。 示例应用程序定义 iOSNotificationReceiver 类:
public class iOSNotificationReceiver : UNUserNotificationCenterDelegate
{
    public override void WillPresentNotification(UNUserNotificationCenter center, UNNotification notification, Action<UNNotificationPresentationOptions> completionHandler)
    {
        ProcessNotification(notification);
        completionHandler(UNNotificationPresentationOptions.Alert);
    }

    void ProcessNotification(UNNotification notification)
    {
        string title = notification.Request.Content.Title;
        string message = notification.Request.Content.Body;

        DependencyService.Get<INotificationManager>().ReceiveNotification(title, message);
    }
}
此类使用 DependencyService 获取 iOSNotificationManager 类的实例,并向 ReceiveNotification 方法提供传入通知数据。
在应用程序启动过程中,AppDelegate 类必须将 iOSNotificationReceiver 对象指定为 UNUserNotificationCenter 委托。 FinishedLaunching 方法中会出现这种情况:
public override bool FinishedLaunching(UIApplication app, NSDictionary options)
{
    global::Xamarin.Forms.Forms.Init();

    UNUserNotificationCenter.Current.Delegate = new iOSNotificationReceiver();

    LoadApplication(new App());
    return base.FinishedLaunching(app, options);
}
iOS 为通知提供多个高级选项。 有关详细信息,请参阅 Xamarin.iOS 中的通知。
测试应用程序
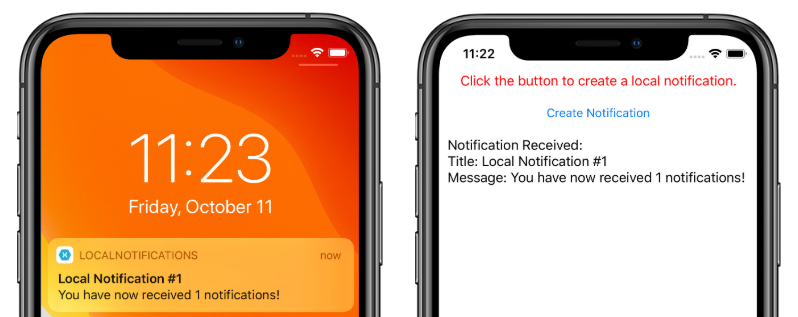
平台项目包含 INotificationManager 接口的已注册实现后,可在两个平台上测试应用程序。 运行应用程序并单击其中一个“创建通知”按钮以创建通知。
在 Android 上,通知区域中会出现通知。 点击通知时,应用程序会收到通知,并显示消息:

在 iOS 上,传入通知自动由应用程序接收,而无需用户输入。 应用程序会收到通知,并显示消息:

