生成新式 macOS 应用
本文介绍了开发人员可以用来在 Xamarin.Mac 中生成新式 macOS 应用的几个提示、功能和技术。
使用新式视图构建新式外观
新式外观将包括新式窗口和工具栏外观,例如如下所示的示例应用:
启用全尺寸内容视图
为了在 Xamarin.Mac 应用中实现此外观,开发人员希望使用全尺寸内容视图,这意味着内容在工具和标题栏区域下扩展,并且将由 macOS 自动模糊。
若要在代码中启用此功能,请为 NSWindowController 创建一个自定义类,使其如下所示:
using System;
using Foundation;
using AppKit;

namespace MacModern
{
    public partial class MainWindowController : NSWindowController
    {
        #region Constructor
        public MainWindowController (IntPtr handle) : base (handle)
        {
        }
        #endregion

        #region Override Methods
        public override void WindowDidLoad ()
        {
            base.WindowDidLoad ();

            // Set window to use Full Size Content View
            Window.StyleMask = NSWindowStyle.FullSizeContentView;
        }
        #endregion
    }
}
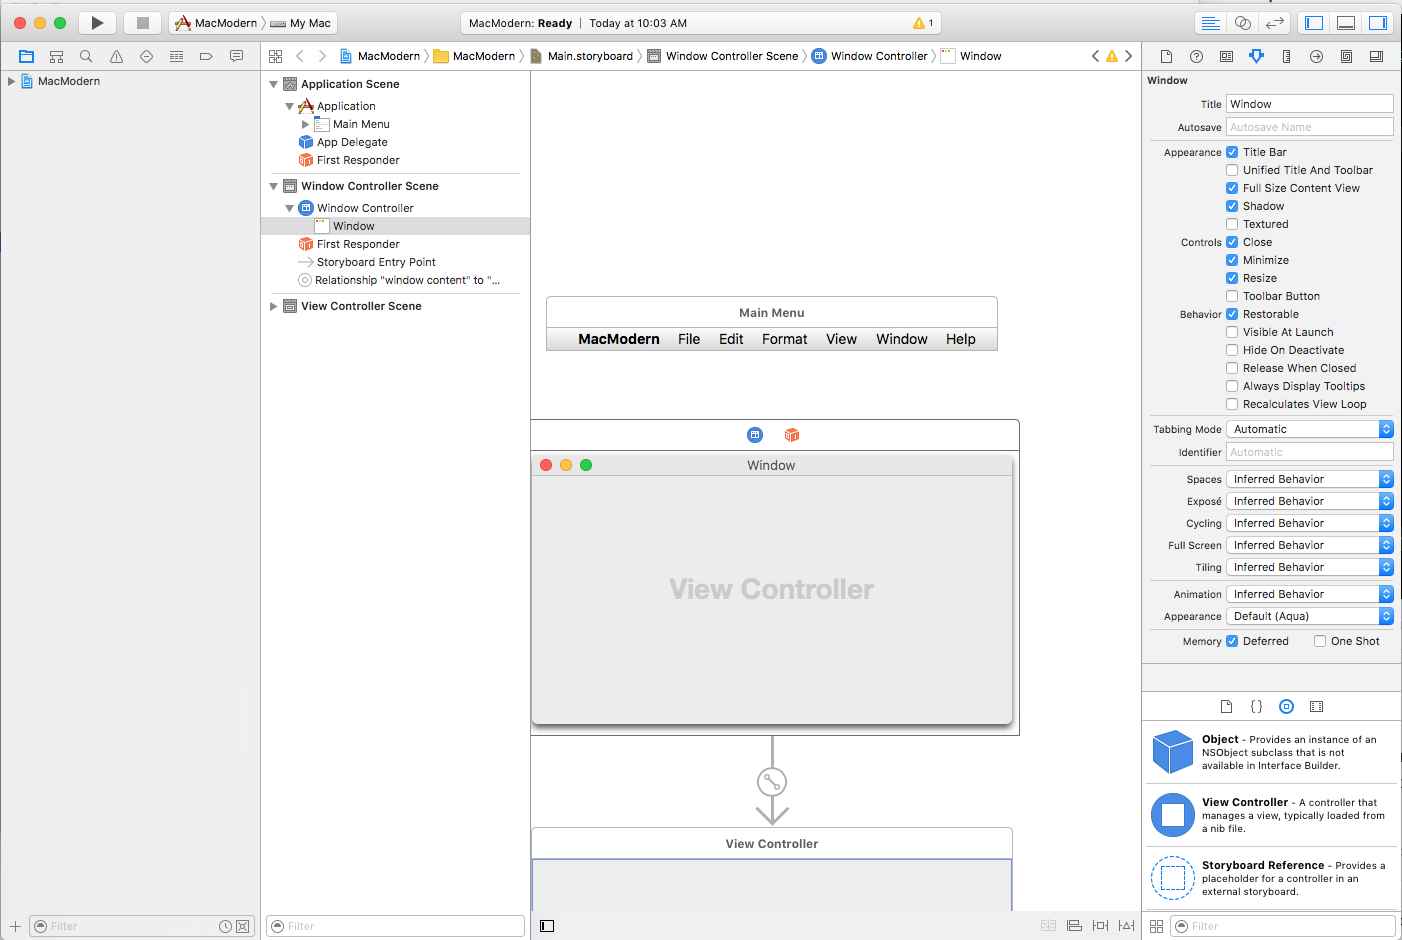
还可以在 Xcode 的 Interface Builder 中启用此功能,方法是选择“窗口”并选中“全尺寸内容视图”:
使用“全尺寸内容视图”时,开发人员可能需要偏移标题和工具栏区域下的内容,以便特定内容(如标签)不会在内容下方滑动。
更复杂的是,标题和工具栏区域的动态高度可能基于用户当前执行的操作、用户安装的 macOS 版本和/或应用运行的 Mac 硬件。
因此,在布置用户界面时,简单地对偏移量进行硬编码是行不通的。 开发人员需要采用动态方法。
Apple 已包含类的 NSWindow Key-Value Observable ContentLayoutRect 属性,用于在代码中获取当前内容区域。 当内容区域发生更改时,开发人员可以使用此值手动定位所需的元素。
更好的解决方案是使用 Auto Layout 和 Size 类在代码或 Interface Builder 中定位 UI 元素。
以下示例中的类似代码可用于在应用的视图控制器中使用 AutoLayout 和 Size 类定位 UI 元素:
using System;
using AppKit;
using Foundation;

namespace MacModern
{
    public partial class ViewController : NSViewController
    {
        #region Computed Properties
        public NSLayoutConstraint topConstraint { get; set; }
        #endregion

        ...

        #region Override Methods
        public override void UpdateViewConstraints ()
        {
            // Has the constraint already been set?
            if (topConstraint == null) {
                // Get the top anchor point
                var contentLayoutGuide = ItemTitle.Window?.ContentLayoutGuide as NSLayoutGuide;
                var topAnchor = contentLayoutGuide.TopAnchor;

                // Found?
                if (topAnchor != null) {
                    // Assemble constraint and activate it
                    topConstraint = topAnchor.ConstraintEqualToAnchor (topAnchor, 20);
                    topConstraint.Active = true;
                }
            }

            base.UpdateViewConstraints ();
        }
        #endregion
    }
}
此代码为将应用于标签 (ItemTitle) 的顶级约束创建存储,以确保其不会滑到标题和工具栏区域下:
public NSLayoutConstraint topConstraint { get; set; }
通过重写视图控制器的 UpdateViewConstraints 方法,开发人员可以测试是否已生成所需的约束,并根据需要创建它。
如果需要生成新的约束,则访问需要约束的控件的窗口的 ContentLayoutGuide 属性,并将其强制转换为 NSLayoutGuide:
var contentLayoutGuide = ItemTitle.Window?.ContentLayoutGuide as NSLayoutGuide;
将访问 NSLayoutGuide 的 TopAnchor 属性,如果可用,则它用于生成具有所需偏移量的新约束,并使新约束处于活动状态以应用它:
// Assemble constraint and activate it
topConstraint = topAnchor.ConstraintEqualToAnchor (topAnchor, 20);
topConstraint.Active = true;
启用简化工具栏
普通 macOS 窗口包括一个标准标题栏,沿着窗口的顶部边缘延伸。 如果窗口还包括工具栏,则会在此标题栏区域下显示:
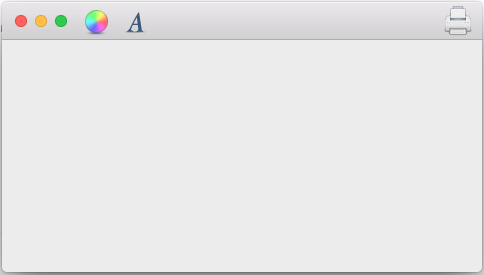
使用简化工具栏时,标题区域会消失,工具栏将向上移动到标题栏的位置,与窗口的“关闭”、“最小化”和“最大化”按钮一行:
通过重写 NSViewController 的 ViewWillAppear 方法并使其如下所示,可以启用简化工具栏:
public override void ViewWillAppear ()
{
    base.ViewWillAppear ();

    // Enable streamlined Toolbars
    View.Window.TitleVisibility = NSWindowTitleVisibility.Hidden;
}
此效果通常用于 Shoebox Applications(一个窗口应用),如地图、日历、便笺和系统首选项。
使用附件视图控制器
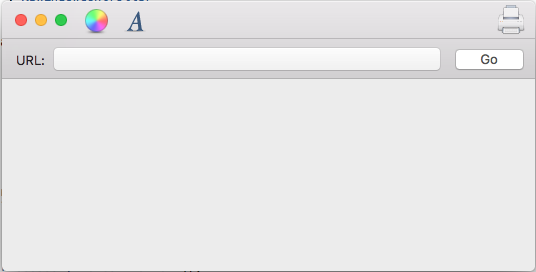
根据应用的设计,开发人员可能还想使用显示在标题/工具栏区域正下方的附件视图控制器来补充标题栏区域,以便根据用户当前从事的活动为用户提供上下文相关的控件:
系统会自动模糊和调整附件视图控制器的大小,而无需开发人员干预。
若要添加附件视图控制器,请执行以下操作:
在“解决方案资源管理器”中,双击
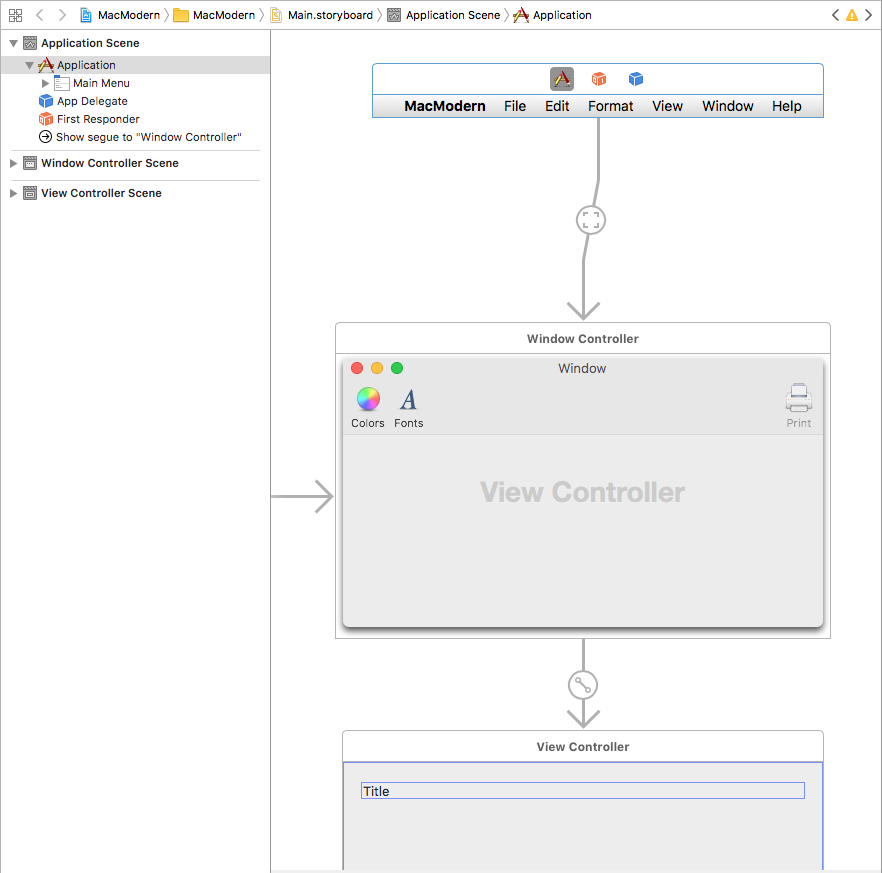
Main.storyboard文件,将其打开进行编辑。将自定义视图控制器拖到窗口的层次结构中:
布局附件视图的 UI:
将附件视图公开为输出口或任何其他操作或其 UI 的输出口:
保存更改。
返回到 Visual Studio for Mac 以同步更改。
编辑 NSWindowController,使其如下所示:
using System;
using Foundation;
using AppKit;

namespace MacModern
{
    public partial class MainWindowController : NSWindowController
    {
        #region Constructor
        public MainWindowController (IntPtr handle) : base (handle)
        {
        }
        #endregion

        #region Override Methods
        public override void WindowDidLoad ()
        {
            base.WindowDidLoad ();

            // Create a title bar accessory view controller and attach
            // the view created in Interface Builder
            var accessoryView = new NSTitlebarAccessoryViewController ();
            accessoryView.View = AccessoryViewGoBar;

            // Set the location and attach the accessory view to the
            // titlebar to be displayed
            accessoryView.LayoutAttribute = NSLayoutAttribute.Bottom;
            Window.AddTitlebarAccessoryViewController (accessoryView);

        }
        #endregion
    }
}
此代码的关键点是视图设置为 Interface Builder 中定义的自定义视图,并将其公开为输出口:
accessoryView.View = AccessoryViewGoBar;
以及定义附件显示位置的 LayoutAttribute:
accessoryView.LayoutAttribute = NSLayoutAttribute.Bottom;
由于 macOS 现已完全本地化,因此Left已弃用属性RightNSLayoutAttribute,应替换为Leading和 Trailing。
使用选项卡式窗口
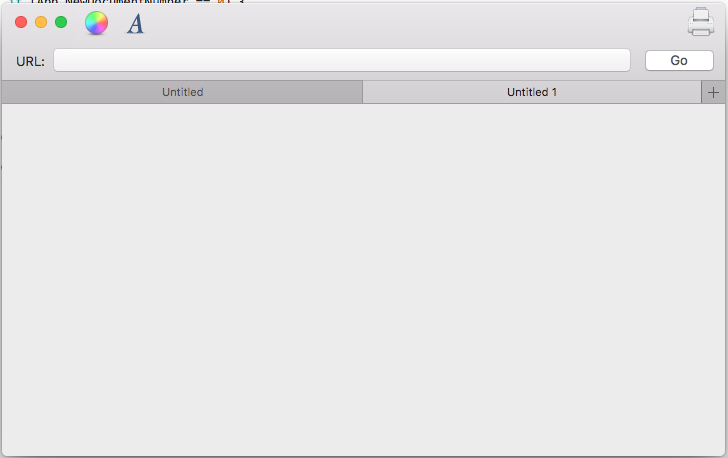
此外,macOS 系统还可以将附件视图控制器添加到应用的窗口。 例如,若要创建选项卡式窗口,其中多个应用的窗口合并到一个虚拟窗口中:
通常,开发人员需要在 Xamarin.Mac 应用中采取有限的操作并使用选项卡式窗口,系统会自动处理它们,如下所示:
- 调用
OrderFront方法时,窗口将自动变成选项卡式。 - 调用
OrderOut方法时,窗口将自动取消选项卡式。 - 在代码中,所有选项卡式窗口仍然被视为“可见”,但任何非最前面的选项卡都被系统使用 CoreGraphics 隐藏。
- 使用
NSWindow的TabbingIdentifier属性将窗口组合到选项卡中。 - 如果它是基于
NSDocument的应用,则会自动启用其中的一些功能(例如添加到选项卡栏的加号按钮),而无需执行任何开发人员操作。 - 非基于
NSDocument的应用可以通过重写NSWindowsController的GetNewWindowForTab方法,在选项卡组中启用“加号”按钮来添加新文档。
将所有部分组合在一起,想要使用基于系统的选项卡式窗口的应用的 AppDelegate 可能如下所示:
using AppKit;
using Foundation;

namespace MacModern
{
    [Register ("AppDelegate")]
    public class AppDelegate : NSApplicationDelegate
    {
        #region Computed Properties
        public int NewDocumentNumber { get; set; } = 0;
        #endregion

        #region Constructors
        public AppDelegate ()
        {
        }
        #endregion

        #region Override Methods
        public override void DidFinishLaunching (NSNotification notification)
        {
            // Insert code here to initialize your application
        }

        public override void WillTerminate (NSNotification notification)
        {
            // Insert code here to tear down your application
        }
        #endregion

        #region Custom Actions
        [Export ("newDocument:")]
        public void NewDocument (NSObject sender)
        {
            // Get new window
            var storyboard = NSStoryboard.FromName ("Main", null);
            var controller = storyboard.InstantiateControllerWithIdentifier ("MainWindow") as NSWindowController;

            // Display
            controller.ShowWindow (this);
        }
        #endregion
    }
}
其中,NewDocumentNumber 属性跟踪创建的新文档数量,NewDocument 方法会创建一个新文档并显示它。
然后,NSWindowController 如下所示:
using System;
using Foundation;
using AppKit;

namespace MacModern
{
    public partial class MainWindowController : NSWindowController
    {
        #region Application Access
        /// <summary>
        /// A helper shortcut to the app delegate.
        /// </summary>
        /// <value>The app.</value>
        public static AppDelegate App {
            get { return (AppDelegate)NSApplication.SharedApplication.Delegate; }
        }
        #endregion

        #region Constructor
        public MainWindowController (IntPtr handle) : base (handle)
        {
        }
        #endregion

        #region Public Methods
        public void SetDefaultDocumentTitle ()
        {
            // Is this the first document?
            if (App.NewDocumentNumber == 0) {
                // Yes, set title and increment
                Window.Title = "Untitled";
                ++App.NewDocumentNumber;
            } else {
                // No, show title and count
                Window.Title = $"Untitled {App.NewDocumentNumber++}";
            }
        }
        #endregion

        #region Override Methods
        public override void WindowDidLoad ()
        {
            base.WindowDidLoad ();

            // Prefer Tabbed Windows
            Window.TabbingMode = NSWindowTabbingMode.Preferred;
            Window.TabbingIdentifier = "Main";

            // Set default window title
            SetDefaultDocumentTitle ();

            // Set window to use Full Size Content View
            // Window.StyleMask = NSWindowStyle.FullSizeContentView;

            // Create a title bar accessory view controller and attach
            // the view created in Interface Builder
            var accessoryView = new NSTitlebarAccessoryViewController ();
            accessoryView.View = AccessoryViewGoBar;

            // Set the location and attach the accessory view to the
            // titlebar to be displayed
            accessoryView.LayoutAttribute = NSLayoutAttribute.Bottom;
            Window.AddTitlebarAccessoryViewController (accessoryView);

        }

        public override void GetNewWindowForTab (NSObject sender)
        {
            // Ask app to open a new document window
            App.NewDocument (this);
        }
        #endregion
    }
}
其中静态 App 属性提供了访问 AppDelegate 的快捷方式。 SetDefaultDocumentTitle 方法根据创建的新文档数量设置新的文档标题。
以下代码告知 macOS 应用更喜欢使用选项卡,并提供一个字符串来允许将应用的窗口组合到选项卡:
// Prefer Tabbed Windows
Window.TabbingMode = NSWindowTabbingMode.Preferred;
Window.TabbingIdentifier = "Main";
以下替代方法会将加号按钮添加到选项卡栏,该按钮将在用户单击时创建新文档:
public override void GetNewWindowForTab (NSObject sender)
{
    // Ask app to open a new document window
    App.NewDocument (this);
}
使用 Core Animation
Core Animation 是一个内置于 macOS 中的高性能图形渲染引擎。 核心动画经过优化,利用新式 macOS 硬件中提供的 GPU(图形处理单元),而不是在 CPU 上运行图形操作(这会降低计算机的速度)。
Core Animation 提供的 CALayer 可用于快速流畅的滚动和动画等任务。 应用的用户界面应由多个子视图和图层组成,以充分利用 Core Animation。
CALayer 对象提供了多个属性,使开发人员能够控制屏幕上向用户显示的内容,例如:
Content- 可以是提供图层内容的NSImage或CGImage。BackgroundColor- 将图层的背景色设置为CGColorBorderWidth- 设置边框宽度。BorderColor- 设置边框颜色。
若要在应用的 UI 中使用 Core Graphics,它必须使用基于图层的视图,Apple 建议开发人员始终在窗口的内容视图中启用该视图。 这样,所有子视图也会自动继承层支持。
此外,Apple 建议使用基于图层的视图,而不是将新的 CALayer 添加为子图层,因为系统将自动处理多个所需的设置(例如 Retina Display 所需的设置)。
可以通过将 NSView 的 WantsLayer 设置为 true 或在 Xcode 的 Interface Builder 中的“视图效果检查器”下通过检查“Core Animation 图层”来启用图层支持:
使用图层重新绘制视图
在 Xamarin.Mac 应用中使用基于图层的视图时,另一个重要步骤是在 NSViewController 中将 NSView 的 LayerContentsRedrawPolicy 设置为 OnSetNeedsDisplay。 例如:
public override void ViewWillAppear ()
{
    base.ViewWillAppear ();

    // Set the content redraw policy
    View.LayerContentsRedrawPolicy = NSViewLayerContentsRedrawPolicy.OnSetNeedsDisplay;
}
如果开发人员未设置此属性,则每当视图的帧源发生更改时,都会重新绘制视图,出于性能原因不需要这样做。 但是,如果将此属性设置为 OnSetNeedsDisplay,则开发人员必须手动将 NeedsDisplay 设置为 true,才能强制重新绘制内容。
当视图标记为脏时,系统会检查视图的 WantsUpdateLayer 属性。 如果返回 true,则调用 UpdateLayer 方法,否则将调用视图的 DrawRect 方法来更新视图的内容。
Apple 提供以下建议,用于在需要时更新视图内容:
- Apple 更喜欢尽可能使用
UpdateLater而不是DrawRect,因为它可提供显著的性能提升。 - 对类似 UI 元素使用相同的
layer.Contents。 - Apple 还希望开发人员尽可能使用标准视图(如
NSTextField)撰写 UI。
若要使用 UpdateLayer,请为 NSView 创建自定义类,并使代码如下所示:
using System;
using Foundation;
using AppKit;

namespace MacModern
{
    public partial class MainView : NSView
    {
        #region Computed Properties
        public override bool WantsLayer {
            get { return true; }
        }

        public override bool WantsUpdateLayer {
            get { return true; }
        }
        #endregion

        #region Constructor
        public MainView (IntPtr handle) : base (handle)
        {
        }
        #endregion

        #region Override Methods
        public override void DrawRect (CoreGraphics.CGRect dirtyRect)
        {
            base.DrawRect (dirtyRect);

        }

        public override void UpdateLayer ()
        {
            base.UpdateLayer ();

            // Draw view
            Layer.BackgroundColor = NSColor.Red.CGColor;
        }
        #endregion
    }
}
使用新式拖放
若要为用户提供新式拖放体验,开发人员应在应用的拖放操作中采用 Drag Flocking。 Drag Flocking 是指当用户继续拖动操作时,每个被拖动的文件或项目最初显示为聚集的单个元素(在光标下按项目数分组)。
如果用户终止拖动操作,则各个元素将取消聚集,并返回到其原始位置。
以下示例代码会在自定义视图上启用 Drag Flocking:
using System;
using System.Collections.Generic;
using Foundation;
using AppKit;

namespace MacModern
{
    public partial class MainView : NSView, INSDraggingSource, INSDraggingDestination
    {
        #region Constructor
        public MainView (IntPtr handle) : base (handle)
        {
        }
        #endregion

        #region Override Methods
        public override void MouseDragged (NSEvent theEvent)
        {
            // Create group of string to be dragged
            var string1 = new NSDraggingItem ((NSString)"Item 1");
            var string2 = new NSDraggingItem ((NSString)"Item 2");
            var string3 = new NSDraggingItem ((NSString)"Item 3");

            // Drag a cluster of items
            BeginDraggingSession (new [] { string1, string2, string3 }, theEvent, this);
        }
        #endregion
    }
}
通过将被拖动的每个项目作为数组中的一个单独元素发送到 NSView 的 BeginDraggingSession 方法,可以实现聚集效果。
使用 NSTableView 或 NSOutlineView 时,请使用 NSTableViewDataSource 类的 PastboardWriterForRow 方法启动拖动操作:
using System;
using System.Collections.Generic;
using Foundation;
using AppKit;

namespace MacModern
{
    public class ContentsTableDataSource: NSTableViewDataSource
    {
        #region Constructors
        public ContentsTableDataSource ()
        {
        }
        #endregion

        #region Override Methods
        public override INSPasteboardWriting GetPasteboardWriterForRow (NSTableView tableView, nint row)
        {
            // Return required pasteboard writer
            ...

            // Pasteboard writer failed
            return null;
        }
        #endregion
    }
}
这允许开发人员为表中正在拖动的每个项提供单独的 NSDraggingItem,而不是将所有行作为一个组写入粘贴板的旧方法 WriteRowsWith。
使用 NSCollectionViews 时,再次使用 PasteboardWriterForItemAt 方法,而不是拖动开始时的 WriteItemsAt 方法。
开发人员应始终避免将大型文件放在粘贴板上。 对于 macOS Sierra 来说,File Promises 是一项新功能,它允许开发人员在粘贴板上放置对给定文件的引用,稍后当用户使用新的 NSFilePromiseProvider 和 NSFilePromiseReceiver 类完成拖动操作时,将实现这些引用。
使用新式事件跟踪
对于已添加到标题或工具栏区域的用户界面元素(如 NSButton),用户应该能够单击元素并让它照常触发事件(例如显示弹出窗口)。 但是,由于该项也位于标题或工具栏区域中,用户应能够单击并拖动元素以移动窗口。
若要在代码中完成此操作,请为元素(如 NSButton)创建自定义类并替代 MouseDown 事件,如下所示:
public override void MouseDown (NSEvent theEvent)
{
    var shouldCallSuper = false;

    Window.TrackEventsMatching (NSEventMask.LeftMouseUp, 2000, NSRunLoop.NSRunLoopEventTracking, (NSEvent evt, ref bool stop) => {
        // Handle event as normal
        stop = true;
        shouldCallSuper = true;
    });

    Window.TrackEventsMatching(NSEventMask.LeftMouseDragged, 2000, NSRunLoop.NSRunLoopEventTracking, (NSEvent evt, ref bool stop) => {
        // Pass drag event to window
        stop = true;
        Window.PerformWindowDrag (evt);
    });

    // Call super to handle mousedown
    if (shouldCallSuper) {
        base.MouseDown (theEvent);
    }
}
此代码使用 UI 元素所附加的 NSWindow 的 TrackEventsMatching 方法来截获 LeftMouseUp 和 LeftMouseDragged 事件。 对于 LeftMouseUp 事件,UI 元素会正常响应。 对于 LeftMouseDragged 事件,该事件将传递给 NSWindow 的 PerformWindowDrag 方法,以在屏幕上移动窗口。
调用 NSWindow 类的 PerformWindowDrag 方法具有以下优势:
- 它允许窗口移动,即使应用挂起(例如处理深层循环时)。
- 空间切换将按预期工作。
- 空格栏将正常显示。
- 窗口贴靠和对齐正常工作。
使用新式容器视图控件
macOS Sierra 对以前版本的操作系统中现有的容器视图控件进行了许多新式改进。
表视图增强功能
开发人员应始终使用新的基于 NSView 的容器视图控件版本,如 NSTableView。 例如:
using System;
using System.Collections.Generic;
using Foundation;
using AppKit;

namespace MacModern
{
    public class ContentsTableDelegate : NSTableViewDelegate
    {
        #region Constructors
        public ContentsTableDelegate ()
        {
        }
        #endregion

        #region Override Methods
        public override NSView GetViewForItem (NSTableView tableView, NSTableColumn tableColumn, nint row)
        {
            // Build new view
            var view = new NSView ();
            ...

            // Return the view representing the item to display
            return view;
        }
        #endregion
    }
}
这允许将自定义表行操作附加到表中的给定行(如向右轻扫以删除该行)。 若要启用此行为,请替代 NSTableViewDelegate 的 RowActions 方法:
using System;
using System.Collections.Generic;
using Foundation;
using AppKit;

namespace MacModern
{
    public class ContentsTableDelegate : NSTableViewDelegate
    {
        #region Constructors
        public ContentsTableDelegate ()
        {
        }
        #endregion

        #region Override Methods
        public override NSView GetViewForItem (NSTableView tableView, NSTableColumn tableColumn, nint row)
        {
            // Build new view
            var view = new NSView ();
            ...

            // Return the view representing the item to display
            return view;
        }

        public override NSTableViewRowAction [] RowActions (NSTableView tableView, nint row, NSTableRowActionEdge edge)
        {
            // Take action based on the edge
            if (edge == NSTableRowActionEdge.Trailing) {
                // Create row actions
                var editAction = NSTableViewRowAction.FromStyle (NSTableViewRowActionStyle.Regular, "Edit", (action, rowNum) => {
                    // Handle row being edited
                    ...
                });

                var deleteAction = NSTableViewRowAction.FromStyle (NSTableViewRowActionStyle.Destructive, "Delete", (action, rowNum) => {
                    // Handle row being deleted
                    ...
                });

                // Return actions
                return new [] { editAction, deleteAction };
            } else {
                // No matching actions
                return null;
            }
        }
        #endregion
    }
}
静态 NSTableViewRowAction.FromStyle 用于创建以下样式的新表行操作:
Regular- 执行标准非破坏性操作,例如编辑行的内容。Destructive- 执行破坏性操作,例如从表中删除行。 这些操作将以红色背景呈现。
滚动视图增强功能
直接使用滚动视图 (NSScrollView) 或作为其他控件(如 NSTableView)的一部分使用时,滚动视图的内容可以使用新式外观和视图在 Xamarin.Mac 应用中的标题和工具栏区域下滑动。
因此,滚动视图内容区域中的第一项可能会被标题和工具栏区域部分遮盖。
若要解决此问题,Apple 向 NSScrollView 类添加了两个新属性:
ContentInsets- 允许开发人员提供一个NSEdgeInsets对象,定义将应用于滚动视图顶部的偏移量。AutomaticallyAdjustsContentInsets- 如果为true,则滚动视图将自动为开发人员处理ContentInsets。
通过使用 ContentInsets,开发人员可以调整滚动视图的开始,以允许包含附件,例如:
- 类似于邮件应用程序中显示的排序指示器。
- 搜索字段。
- “刷新”或“更新”按钮。
新式应用中的自动布局和本地化
Apple 在 Xcode 中包含多项技术,使开发人员能够轻松创建国际化的 macOS 应用。 Xcode 现在允许开发人员在其情节提要文件中将面向用户的文本与应用的用户界面设计分开,并提供在 UI 更改时保持这种分离的工具。
有关详细信息,请参阅 Apple 的国际化和本地化指南。
实现基本国际化
通过实现基本国际化,开发人员可以提供一个单独的情节提要文件来表示应用的 UI,并分离出所有面向用户的字符串。
当开发人员创建定义应用用户界面的初始情节提要文件时,它们将以基本国际化(开发人员所说的语言)生成。
接下来,开发人员可以导出本地化和基本国际化字符串(在情节提要 UI 设计中),这些字符串可以翻译成多种语言。
稍后可以导入这些本地化,Xcode 将为情节提要生成特定于语言的字符串文件。
实现“自动布局”以支持本地化
由于字符串值的本地化版本可能具有截然不同的大小和/或读取方向,开发人员应使用“自动布局”在情节提要文件中定位和调整应用的用户界面。
Apple 建议执行以下操作:
- 删除固定宽度约束 - 应允许所有基于文本的视图根据其内容调整大小。 固定宽度视图可能采用特定语言裁剪其内容。
- 使用固有内容大小 - 默认情况下,基于文本的视图将自动调整大小以适应其内容。 对于未正确调整大小的基于文本的视图,请在 Xcode 的 Interface Builder 中选择它们,然后选择“编辑”>“调整大小以适应内容”。
- 应用前导和尾随属性 - 由于文本的方向可以根据用户的语言更改,因此请使用新的
Leading和Trailing约束属性,而不是现有的Right和Left属性。Leading和Trailing将根据语言方向自动调整。 - 将视图固定到相邻视图 - 这允许视图在周围的视图发生更改时重新定位和调整大小,以响应所选语言。
- 不设置窗口最小和/或最大大小 - 允许窗口更改大小,因为所选语言会调整其内容区域的大小。
- 持续测试布局更改 - 在应用开发期间,应以不同的语言不断测试。 有关更多详细信息,请参阅 Apple 的测试国际化应用文档。
- 使用 NSStackViews 将视图固定在一起 -
NSStackViews允许其内容以可预测的方式移动和增长,并根据所选语言更改内容大小。
在 Xcode 的 Interface Builder 中本地化
Apple 在 Xcode 的 Interface Builder 中提供了多个功能,开发人员在设计或编辑应用的 UI 以支持本地化时可以使用这些功能。 “属性检查器”的“文本方向”部分允许开发人员提供有关如何在所选基于文本的视图(如 NSTextField)上使用和更新方向的提示:
“文本方向”有三个可能的值:
- 自然 - 布局基于分配给控件的字符串。
- 从左到右 - 布局始终强制为从左到右。
- 从右到左 - 布局始终强制为从右到左。
“布局”有两个可能的值:
- 从左到右 - 布局始终从左到右。
- 从右到左 - 布局始终从右到左。
通常,除非需要特定的对齐方式,否则不应更改这些内容。
Mirror 属性指示系统翻转特定控件属性(如单元格图像位置)。 它具有三个可能值:
- 自动 - 位置将根据所选语言的方向自动更改。
- 在从右到左界面中 - 位置将仅以从右到左的语言更改。
- 从不 - 位置永远不会改变。
如果开发人员对基于文本的视图的内容指定了“居中”、“两端对齐”或“完整”对齐方式,则永远不会根据所选语言翻转这些内容。
在 macOS Sierra 之前,在代码中创建的控件不会自动镜像。 开发人员必须使用如下所示的代码来处理镜像:
public override void ViewDidLoad ()
{
    base.ViewDidLoad ();

    // Setting a button's mirroring based on the layout direction
    var button = new NSButton ();
    if (button.UserInterfaceLayoutDirection == NSUserInterfaceLayoutDirection.LeftToRight) {
        button.Alignment = NSTextAlignment.Right;
        button.ImagePosition = NSCellImagePosition.ImageLeft;
    } else {
        button.Alignment = NSTextAlignment.Left;
        button.ImagePosition = NSCellImagePosition.ImageRight;
    }
}
其中,Alignment 和 ImagePosition 是基于控件的 UserInterfaceLayoutDirection 设置的。
macOS Sierra 添加了多个新的便利构造函数(通过静态 CreateButton 方法),这些构造函数采用多个参数(如 Title、Image 和 Action),并将自动正确镜像。 例如:
var button2 = NSButton.CreateButton (myTitle, myImage, () => {
    // Take action when the button is pressed
    ...
});
使用“系统外观”
新式 macOS 应用可以采用适用于图像创建、编辑或演示文稿应用的新深色界面外观:
这可以通过在显示窗口之前添加一行代码来完成。 例如:
using System;
using AppKit;
using Foundation;

namespace MacModern
{
    public partial class ViewController : NSViewController
    {
        ...

        #region Override Methods
        public override void ViewWillAppear ()
        {
            base.ViewWillAppear ();

            // Apply the Dark Interface Appearance
            View.Window.Appearance = NSAppearance.GetAppearance (NSAppearance.NameVibrantDark);

            ...
        }
        #endregion
    }
}
NSAppearance 类的静态 GetAppearance 方法用于从系统获取命名外观(在本例中为 NSAppearance.NameVibrantDark)。
Apple 对使用“系统外观”有以下建议:
- 首选命名颜色而不是硬编码值(如
LabelColor和SelectedControlColor)。 - 尽可能使用系统标准控件样式。
使用“系统外观”的 macOS 应用将自动为已从“系统首选项”应用启用辅助功能的用户正确工作。 因此,Apple 建议开发人员始终在其 macOS 应用中使用“系统外观”。
使用情节提要设计 UI
情节提要允许开发人员不仅设计构成应用用户界面的各个元素,还可以可视化和设计给定元素的 UI 流和层次结构。
控制器允许开发人员将元素收集到一个组成单元中,Segue 会提取并删除在整个视图层次结构中移动所需的典型“胶水代码”:
有关详细信息,请参阅我们的情节提要简介文档。
在许多情况下,情节提要中定义的给定场景将需要视图层次结构中先前场景的数据。 对于在场景之间传递信息,Apple 有以下建议:
- 数据依赖项应始终通过层次结构向下级联。
- 避免对 UI 结构依赖项进行硬编码,因为这会限制 UI 的灵活性。
- 使用 C# 接口提供泛型数据依赖项。
充当 Segue 源的视图控制器可以替代 PrepareForSegue 方法,并在执行 Segue 以显示目标视图控制器之前执行所需的任何初始化(例如传递数据)。 例如:
public override void PrepareForSegue (NSStoryboardSegue segue, NSObject sender)
{
    base.PrepareForSegue (segue, sender);

    // Take action based on Segue ID
    switch (segue.Identifier) {
    case "MyNamedSegue":
        // Prepare for the segue to happen
        ...
        break;
    }
}
有关详细信息,请参阅我们的 Segue 文档。
传播操作
根据 macOS 应用的设计,有时,UI 控件上操作的最佳处理程序可能位于 UI 层次结构中的其他位置。 这通常适用于位于其自己的场景中的菜单和菜单项,独立于应用的 UI 的其余部分。
若要处理这种情况,开发人员可以创建一个自定义操作并将操作传递到响应方链。 有关详细信息,请参阅我们的使用自定义窗口操作文档。
新式 Mac 功能
Apple 在 macOS Sierra 中包括了多个面向用户的功能,使开发人员能够充分利用 Mac 平台,例如:
- NSUserActivity - 这允许应用描述用户当前参与的活动。
NSUserActivity最初是为了支持 HandOff 而创建的,其中,在用户的一个设备上启动的活动可以被拾取并在另一台设备上继续。NSUserActivity在 macOS 中的工作方式与在 iOS 中相同,因此请参阅我们的 Handoff 简介 iOS 文档以了解更多详细信息。 - Mac 上的 Siri - Siri 使用当前活动 (
NSUserActivity) 为用户可以发出的命令提供上下文。 - 状态还原 - 当用户在 macOS 上退出应用后再重新启动应用时,应用将自动返回到其以前的状态。 开发人员可以使用状态还原 API 在向用户显示用户界面之前对暂时性 UI 状态进行编码和还原。 如果应用基于
NSDocument,则会自动处理状态还原。 若要为非基于NSDocument的应用启用状态还原,请将NSWindow类的Restorable设置为true。 - 云中的文档 - 在 macOS Sierra 之前,应用必须显式选择使用用户的 iCloud 云盘中的文档。 在 macOS Sierra 中,用户的 Desktop 和 Documents 文件夹可由系统自动与其 iCloud 云盘同步。 因此,可能会删除文档的本地副本,以释放用户计算机上的空间。 基于
NSDocument的应用将自动处理此更改。 所有其他应用类型都需要使用NSFileCoordinator来同步文档的读取和写入。
总结
本文介绍了开发人员可以用来在 Xamarin.Mac 中生成新式 macOS 应用的几个提示、功能和技术。
