Xamarin.iOS 中的通知
重要
本节中的信息与 iOS 9 及更早版本相关。 对于 iOS 10 及更高版本,请参阅用户通知框架指南。
iOS 有三种方法向用户指示已收到通知:
- 声音或振动 - iOS 可以播放声音来通知用户。 如果禁用声音,则可将设备配置为振动。
- 提醒 - 可以在屏幕上显示一个对话框,其中包含有关通知的信息。
- 标记 - 发布通知时,可以在应用程序图标上显示数字(标记)。
iOS 还提供了一个通知中心,用于向用户显示本地和远程的所有通知。 用户可以通过从屏幕顶部向下轻扫来访问此功能:

在 iOS 中创建本地通知
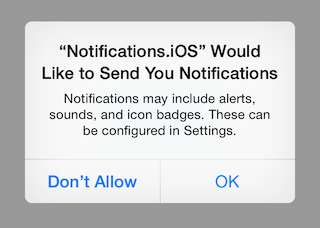
iOS 使创建和处理本地通知非常简单。 首先,iOS 8 要求应用程序向用户请求显示通知的权限。 在尝试发送本地通知之前,请将以下代码添加到应用,通常在 AppDelegate 的 FinishedLaunching 方法中:
var notificationSettings = UIUserNotificationSettings.GetSettingsForTypes(
    UIUserNotificationType.Alert | UIUserNotificationType.Badge | UIUserNotificationType.Sound, null
);
application.RegisterUserNotificationSettings(notificationSettings);
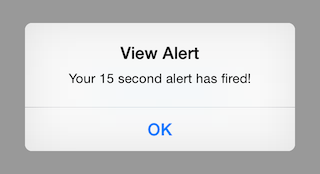
若要安排本地通知,请创建一个 UILocalNotification 对象,设置 FireDate,然后通过 UIApplication.SharedApplication 对象上的 ScheduleLocalNotification 方法来安排它。 以下代码片段演示如何安排通知,使该通知在一分钟后触发,并显示包含消息的提醒:
UILocalNotification notification = new UILocalNotification();
notification.FireDate = NSDate.FromTimeIntervalSinceNow(15);
//notification.AlertTitle = "Alert Title"; // required for Apple Watch notifications
notification.AlertAction = "View Alert";
notification.AlertBody = "Your 15 second alert has fired!";
UIApplication.SharedApplication.ScheduleLocalNotification(notification);
以下屏幕截图显示了此提醒的外观:
请注意,如果用户选择不允许通知,则不会显示任何内容。
如果要将标记应用于应用程序图标并显示数字,可以按以下行代码所示设置它:
notification.ApplicationIconBadgeNumber = 1;
若要使用图标播放声音,请在通知上设置 SoundName 属性,如以下代码片段所示:
notification.SoundName = UILocalNotification.DefaultSoundName;
如果通知声音超过 30 秒,则 iOS 将改为播放默认声音。
重要
iOS 模拟器中有一个 bug,它会触发委托通知两次。 在设备上运行应用程序时,不应发生此问题。
处理通知
iOS 应用程序几乎以完全相同的方式处理远程和本地通知。 当应用程序运行时,AppDelegate 类上的 ReceivedLocalNotification 方法或 ReceivedRemoteNotification 方法会被调用,且通知信息将作为参数传递。
应用程序可以通过不同的方式处理通知。 例如,应用程序可能只显示提醒来提醒用户有关某些事件的信息。 或者,通知可用于向用户显示某个进程已完成的提醒,例如将文件同步到服务器。
以下代码演示如何处理本地通知以及显示提醒并将标记数重置为零:
public override void ReceivedLocalNotification(UIApplication application, UILocalNotification notification)
{
    // show an alert
    UIAlertController okayAlertController = UIAlertController.Create(notification.AlertAction, notification.AlertBody, UIAlertControllerStyle.Alert);
    okayAlertController.AddAction(UIAlertAction.Create("OK", UIAlertActionStyle.Default, null));

    Window.RootViewController.PresentViewController(okayAlertController, true, null);

    // reset our badge
    UIApplication.SharedApplication.ApplicationIconBadgeNumber = 0;
}
如果应用程序未在运行,iOS 将播放声音和/或更新图标标记(如果适用)。 当用户启动与警报关联的应用程序时,应用程序将启动,应用委托上的 FinishedLaunching 方法将被调用,并且通知信息将通过 launchOptions 参数传入。 如果选项字典包含键 UIApplication.LaunchOptionsLocalNotificationKey,AppDelegate 就知道应用程序是从本地通知启动的。 下面的代码片段演示了此过程:
// check for a local notification
if (launchOptions.ContainsKey(UIApplication.LaunchOptionsLocalNotificationKey))
{
    var localNotification = launchOptions[UIApplication.LaunchOptionsLocalNotificationKey] as UILocalNotification;
    if (localNotification != null)
    {
        UIAlertController okayAlertController = UIAlertController.Create(localNotification.AlertAction, localNotification.AlertBody, UIAlertControllerStyle.Alert);
        okayAlertController.AddAction(UIAlertAction.Create("OK", UIAlertActionStyle.Default, null));

        Window.RootViewController.PresentViewController(okayAlertController, true, null);

        // reset our badge
        UIApplication.SharedApplication.ApplicationIconBadgeNumber = 0;
    }
}
对于远程通知,launchOptions 将有一个 LaunchOptionsRemoteNotificationKey,它关联一个 NSDictionary,其中包含远程通知有效负载。 可以通过 alert、badge 和 sound 键提取通知有效负载。 以下代码片段演示如何获取远程通知:
NSDictionary remoteNotification = options[UIApplication.LaunchOptionsRemoteNotificationKey];
if(remoteNotification != null)
{
    string alert = remoteNotification["alert"];
}
总结
本部分介绍了如何在 Xamarin.iOS 中创建和发布通知。 它展示了应用程序如何通过替代 ReceivedLocalNotification 方法或 AppDelegate 中的 ReceivedRemoteNotification 方法来响应通知。

