使用 Google Cloud Messaging 实现远程通知
警告
Google 自 2018 年 4 月 10 日起弃用了 GCM。 以下文档和示例项目可能不再受维护。 Google 的 GCM 服务器和客户端 API 将于 2019 年 5 月 29 日删除。 Google 建议将 GCM 应用迁移到 Firebase Cloud Messaging (FCM)。 有关 GCM 弃用和迁移的详细信息,请参阅 Google Cloud Messaging - 已弃用。
若要开始将 Firebase Cloud Messaging 和 Xamarin 配合使用来实现远程通知,请参阅使用 FCM 实现远程通知。
本演练逐步详解了如何使用 Google Cloud Messaging 在 Xamarin.Android 应用程序中实现远程通知(也称为“推送通知”)。 它介绍了与 Google Cloud Messaging (GCM) 通信时必须实现的各种类,说明了如何在 Android 清单中设置用于访问 GCM 的权限,并使用示例测试程序演示了端到端消息传递。
GCM 通知概述
在本演练中,我们将创建一个 Xamarin.Android 应用程序,该应用程序使用 Google Cloud Messaging (GCM) 实现远程通知(也称为“推送通知”)。 我们将实现使用 GCM 进行远程消息传递的各种意向和侦听器服务,并将使用一个用于模拟应用程序服务器的命令行程序来测试我们的实现。
在继续本演练之前,必须获取必要的凭据以使用 Google 的 GCM 服务器;Google Cloud Messaging 中说明了此过程。 具体而言,需要一个 API 密钥和一个发送方 ID(用于插入到本演练中提供的示例代码)。
我们将使用以下步骤创建启用了 GCM 的 Xamarin.Android 客户端应用:
- 安装与 GCM 服务器通信所需的其他包。
- 配置用于访问 GCM 服务器的应用权限。
- 实现代码以检查 Google Play Services 是否存在。
- 实现一个注册意向服务,以便与 GCM 协商来获取注册令牌。
- 实现一个实例 ID 侦听器服务,以便从 GCM 侦听注册令牌更新。
- 实现一个 GCM 侦听器服务,以便通过 GCM 从应用服务器接收远程消息。
此应用将使用称为“主题消息传递”的新 GCM 功能。 在主题消息传递中,应用服务器将消息发送到主题,而不是发送到单个设备的列表。 订阅该主题的设备可以将主题消息作为推送通知进行接收。
客户端应用准备就绪后,我们将实现一个命令行 C# 应用程序,该应用程序通过 GCM 将推送通知发送到客户端应用。
演练
首先,让我们创建一个新的空解决方案,其名称为“RemoteNotifications”。 接下来,让我们将一个基于“Android 应用”模板的新 Android 项目添加到这个解决方案。 让我们将此项目命名为“ClientApp”。 (如果不熟悉如何创建 Xamarin.Android 项目,请参阅你好,Android。)ClientApp 项目将包含通过 GCM 接收远程通知的 Xamarin.Android 客户端应用程序的代码。
添加所需的包
在实现客户端应用代码之前,必须安装几个用于与 GCM 通信的包。 此外,如果尚未安装 Google Play Store 应用程序,则必须将其添加到设备。
添加 Xamarin Google Play Services GCM 包
若要从 Google Cloud Messaging 接收消息,Google Play Services 框架必须存在于设备上。 如果没有此框架,Android 应用程序将无法从 GCM 服务器接收消息。 当 Android 设备接通电源时,Google Play Services 会在后台运行,静默侦听来自 GCM 的消息。 这些消息到达时,Google Play Services 会将消息转换为意向,然后将这些意向广播给已注册这些意向的应用程序。
在 Visual Studio 中,右键单击“引用”>“管理 NuGet 包...”;在 Visual Studio for Mac 中,右键单击“包”>“添加包...”。搜索“Xamarin Google Play Services - GCM”并将此包安装到 ClientApp 项目中:
当你安装“Xamarin Google Play Services - GCM”时,会自动安装“Xamarin Google Play Services - Base”。 如果收到错误,请将项目的“面向的最低 Android”设置为“使用 SDK 版本进行编译”以外的值,然后重试 NuGet 安装。
接下来,编辑 MainActivity.cs 并添加以下 using 语句:
using Android.Gms.Common;
using Android.Util;
这使得 Google Play Services GMS 包中的类型可供我们的代码使用,并且它添加了日志记录功能,我们将使用该功能来跟踪我们与 GMS 之间的事务。
Google Play 商店
若要从 GCM 接收消息,必须在设备上安装 Google Play Store 应用程序。 (每当设备上安装 Google Play 应用程序时,也都会安装 Google Play 商店,因此它很可能已安装在你的测试设备上。)如果没有 Google Play,Android 应用程序将无法从 GCM 接收消息。 如果设备上尚未安装 Google Play 商店应用,请访问 Google Play 网站下载并安装 Google Play。
或者,可以使用运行 Android 2.2 或更高版本的 Android 模拟器而不是某个测试设备(你不必在 Android 模拟器上安装 Google Play 商店)。 但是,如果使用模拟器,则必须使用 Wi-Fi 连接到 GCM,并且必须在 Wi-Fi 防火墙中打开多个端口,如本演练稍后所述。
设置包名称
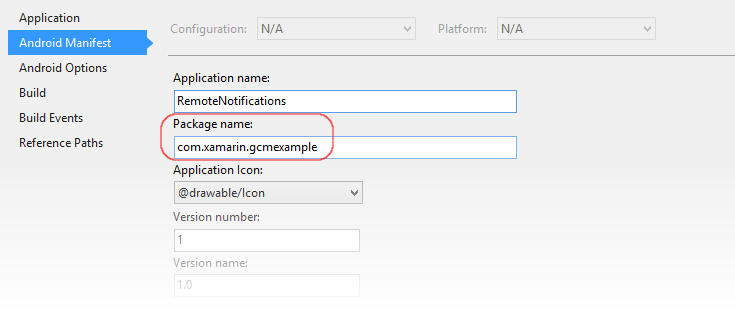
在 Google Cloud Messaging 中,我们为已启用 GCM 的应用指定了包名称(此包名称还充当与 API 密钥和发送方 ID 关联的应用程序 ID)。 让我们打开 ClientApp 项目的属性,并将包名称设置为此字符串。 在此示例中,我们将包名称设置为 com.xamarin.gcmexample:
请注意,如果此包名称与我们在 Google 开发者控制台中输入的包名称不完全匹配,则客户端应用将无法从 GCM 接收注册令牌。
将权限添加到 Android 清单
Android 应用程序必须先配置以下权限,然后才能接收来自 Google Cloud Messaging 的通知:
com.google.android.c2dm.permission.RECEIVE– 授权我们的应用程序注册和接收来自 Google Cloud Messaging 的消息。 (c2dm是什么意思?这代表“云到设备的消息传递”,它是 GCM 的前身,现已弃用。GCM 在其许多权限字符串中仍使用c2dm。)android.permission.WAKE_LOCK–(可选)防止设备 CPU 在侦听消息时进入睡眠状态。android.permission.INTERNET– 授予 Internet 访问权限,以便客户端应用可以与 GCM 通信。package_name
.permission.C2D_MESSAGE– 向 Android 注册应用程序并请求以独占方式接收所有 C2D(云到设备)消息的权限。 package_name 前缀与应用程序 ID 相同。
我们将在 Android 清单中设置这些权限。 让我们编辑 AndroidManifest.xml,并将内容替换为以下 XML:
<?xml version="1.0" encoding="utf-8"?>
<manifest xmlns:android="http://schemas.android.com/apk/res/android"
    package="YOUR_PACKAGE_NAME"
    android:versionCode="1"
    android:versionName="1.0"
    android:installLocation="auto">
    <uses-permission android:name="com.google.android.c2dm.permission.RECEIVE" />
    <uses-permission android:name="android.permission.WAKE_LOCK" />
    <uses-permission android:name="android.permission.INTERNET" />
    <uses-permission android:name="YOUR_PACKAGE_NAME.permission.C2D_MESSAGE" />
    <permission android:name="YOUR_PACKAGE_NAME.permission.C2D_MESSAGE"
                android:protectionLevel="signature" />
    <application android:label="ClientApp" android:icon="@drawable/Icon">
    </application>
</manifest>
在上述 XML 中,将 YOUR_PACKAGE_NAME 更改为客户端应用项目的包名称。 例如 com.xamarin.gcmexample。
检查 Google Play Services 是否存在
在本演练中,我们将创建一个简单应用,其 UI 中包含单个 TextView。 此应用不直接指示与 GCM 的交互。 相反,我们将观看输出窗口以了解应用如何与 GCM 握手,并且我们将在新通知到达时检查通知栏是否有新通知。
首先,让我们为消息区域创建布局。 编辑 Resources.layout.Main.axml,并将内容替换为以下 XML:
<?xml version="1.0" encoding="utf-8"?>
<LinearLayout xmlns:android="http://schemas.android.com/apk/res/android"
    android:orientation="vertical"
    android:layout_width="match_parent"
    android:layout_height="match_parent"
    android:padding="10dp">
    <TextView
        android:text=" "
        android:layout_width="wrap_content"
        android:layout_height="wrap_content"
        android:id="@+id/msgText"
        android:textAppearance="?android:attr/textAppearanceMedium"
        android:padding="10dp" />
</LinearLayout>
保存 Main.axml 并关闭它。
客户端应用启动时,我们希望它在我们尝试联系 GCM 之前验证 Google Play Services 是否可用。 编辑 MainActivity.cs,并将 count 实例变量声明替换为以下实例变量声明:
TextView msgText;
接下来,将以下方法添加到 MainActivity 类:
public bool IsPlayServicesAvailable ()
{
    int resultCode = GoogleApiAvailability.Instance.IsGooglePlayServicesAvailable (this);
    if (resultCode != ConnectionResult.Success)
    {
        if (GoogleApiAvailability.Instance.IsUserResolvableError (resultCode))
            msgText.Text = GoogleApiAvailability.Instance.GetErrorString (resultCode);
        else
        {
            msgText.Text = "Sorry, this device is not supported";
            Finish ();
        }
        return false;
    }
    else
    {
        msgText.Text = "Google Play Services is available.";
        return true;
    }
}
此代码会检查设备以了解是否安装了 Google Play Services APK。 如果未安装,则会在消息区域中显示一则消息,指示用户从 Google Play 商店下载 APK(或在设备的系统设置中启用它)。 由于我们希望在客户端应用启动时运行此检查,因此我们会在 OnCreate 的末尾添加对此方法的调用。
接下来,将 OnCreate 方法替换为以下代码:
protected override void OnCreate (Bundle bundle)
{
    base.OnCreate (bundle);

    SetContentView (Resource.Layout.Main);
    msgText = FindViewById<TextView> (Resource.Id.msgText);

    IsPlayServicesAvailable ();
}
此代码将检查 Google Play Services APK 是否存在,并将结果写入消息区域。
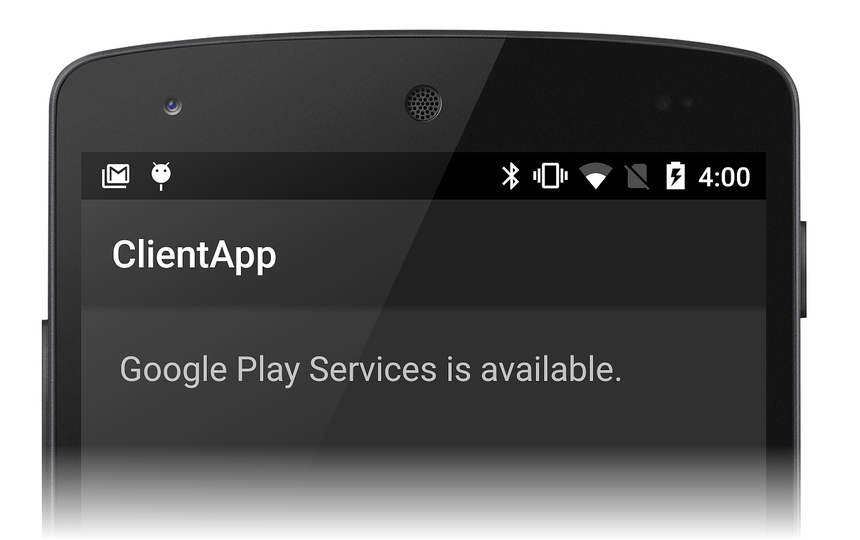
让我们完全重新生成并运行该应用。 应会看到类似于以下屏幕截图的屏幕:
如果未收到此结果,请验证是否已在设备上安装 Google Play Services APK,以及“Xamarin Google Play Services - GCM”包是否已添加到 ClientApp 项目,如前所述。 如果遇到生成错误,请尝试清理解决方案并再次生成项目。
接下来,我们将编写代码来联系 GCM 并取回注册令牌。
向 GCM 注册
应用必须先向 GCM 注册并取回注册令牌,然后才能从应用服务器接收远程通知。 向 GCM 注册应用程序的工作由我们创建的 IntentService 处理。 IntentService 执行下列步骤:
使用 InstanceID API 生成安全令牌,以授权客户端应用访问应用服务器。 作为回报,我们从 GCM 取回注册令牌。
将注册令牌转发到应用服务器(如果应用服务器需要该注册令牌)。
订阅一个或多个通知主题通道。
实现此 IntentService 后,我们将对其进行测试,看看我们是否可从 GCM 取回注册令牌。
添加名为 RegistrationIntentService.cs 的新文件,并将模板代码替换为以下内容:
using System;
using Android.App;
using Android.Content;
using Android.Util;
using Android.Gms.Gcm;
using Android.Gms.Gcm.Iid;

namespace ClientApp
{
    [Service(Exported = false)]
    class RegistrationIntentService : IntentService
    {
        static object locker = new object();

        public RegistrationIntentService() : base("RegistrationIntentService") { }

        protected override void OnHandleIntent (Intent intent)
        {
            try
            {
                Log.Info ("RegistrationIntentService", "Calling InstanceID.GetToken");
                lock (locker)
                {
                    var instanceID = InstanceID.GetInstance (this);
                    var token = instanceID.GetToken (
                        "YOUR_SENDER_ID", GoogleCloudMessaging.InstanceIdScope, null);

                    Log.Info ("RegistrationIntentService", "GCM Registration Token: " + token);
                    SendRegistrationToAppServer (token);
                    Subscribe (token);
                }
            }
            catch (Exception e)
            {
                Log.Debug("RegistrationIntentService", "Failed to get a registration token");
                return;
            }
        }

        void SendRegistrationToAppServer (string token)
        {
            // Add custom implementation here as needed.
        }

        void Subscribe (string token)
        {
            var pubSub = GcmPubSub.GetInstance(this);
            pubSub.Subscribe(token, "/topics/global", null);
        }
    }
}
在上面的示例代码中,将 YOUR_SENDER_ID 更改为客户端应用项目的发送方 ID 号。 若要获取项目的发送方 ID,请执行以下操作:
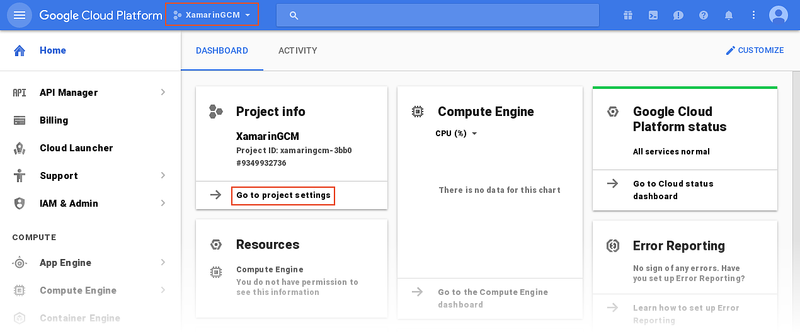
登录到 Google Cloud 控制台,然后从下拉菜单中选择项目名称。 在为项目显示的“项目信息”窗格中,单击“转到项目设置”:
在“设置”页上,找到项目编号 – 这是项目的发送方 ID:
我们希望在应用开始运行时启动我们的 RegistrationIntentService。 编辑 MainActivity.cs 并修改 OnCreate 方法,以便在我们检查 Google Play Services 的存在后启动 RegistrationIntentService:
protected override void OnCreate (Bundle bundle)
{
    base.OnCreate (bundle);

    SetContentView(Resource.Layout.Main);
    msgText = FindViewById<TextView> (Resource.Id.msgText);

    if (IsPlayServicesAvailable ())
    {
        var intent = new Intent (this, typeof (RegistrationIntentService));
        StartService (intent);
    }
}
现在,让我们看看 RegistrationIntentService 的每个部分以了解其工作原理。
首先,使用以下特性批注我们的 RegistrationIntentService,以指示我们的服务不会由系统实例化:
[Service (Exported = false)]
RegistrationIntentService 构造函数将工作线程命名为 RegistrationIntentService,以使调试更容易。
public RegistrationIntentService() : base ("RegistrationIntentService") { }
RegistrationIntentService 的核心功能位于 OnHandleIntent 方法中。 让我们浏览一下这段代码,看看它如何向 GCM 注册我们的应用。
请求注册令牌
OnHandleIntent 首先调用 Google 的 InstanceID.GetToken 方法,以便从 GCM 请求注册令牌。 我们将此代码包装在一个 lock 中,以防止可能同时发生多个注册意向 – lock 确保按顺序处理这些意向。 如果无法获取注册令牌,则会引发异常,并且我们会记录错误。 如果注册成功,token 会设置为我们从 GCM 取回的注册令牌:
static object locker = new object ();
...
try
{
    lock (locker)
    {
        var instanceID = InstanceID.GetInstance (this);
        var token = instanceID.GetToken (
            "YOUR_SENDER_ID", GoogleCloudMessaging.InstanceIdScope, null);
        ...
    }
}
catch (Exception e)
{
    Log.Debug ...
将注册令牌转发到应用服务器
如果收到注册令牌(即未引发异常),则我们会调用 SendRegistrationToAppServer 将用户的注册令牌与应用程序维护的服务器端帐户(如果有的话)相关联。 由于此实现依赖于应用服务器的设计,因此这里提供了一个空方法:
void SendRegistrationToAppServer (string token)
{
    // Add custom implementation here as needed.
}
在某些情况下,应用服务器不需要用户的注册令牌;在这种情况下,可以省略此方法。 当注册令牌发送到应用服务器时,SendRegistrationToAppServer 应保留一个布尔值,以指示令牌是否已发送到服务器。 如果此布尔值为 false,SendRegistrationToAppServer 会向应用服务器发送令牌 - 否则,令牌已在之前的调用中发送到应用服务器。
订阅通知主题
接下来,我们将调用方法 Subscribe 以向 GCM 表明我们要订阅通知主题。 在 Subscribe 中,我们调用 GcmPubSub.Subscribe API 来订阅我们的客户端应用在 /topics/global 下的所有消息:
void Subscribe (string token)
{
    var pubSub = GcmPubSub.GetInstance(this);
    pubSub.Subscribe(token, "/topics/global", null);
}
如果我们要接收通知消息,应用服务器必须将通知消息发送到 /topics/global。 请注意,/topics 下的主题名称可以是你想要的任何名称,只要应用服务器和客户端应用都同意这些名称即可。 (在这里,我们选择了名称 global 来指示我们想要接收应用服务器支持的所有主题的消息。)
实现实例 ID 侦听器服务
注册令牌是唯一且安全的;但是,如果应用进行了重新安装或出现了安全问题,客户端应用(或 GCM)可能需要刷新注册令牌。 因此,我们必须实现 InstanceIdListenerService 以响应来自 GCM 的令牌刷新请求。
添加名为 InstanceIdListenerService.cs 的新文件,并将模板代码替换为以下内容:
using Android.App;
using Android.Content;
using Android.Gms.Gcm.Iid;

namespace ClientApp
{
    [Service(Exported = false), IntentFilter(new[] { "com.google.android.gms.iid.InstanceID" })]
    class MyInstanceIDListenerService : InstanceIDListenerService
    {
        public override void OnTokenRefresh()
        {
            var intent = new Intent (this, typeof (RegistrationIntentService));
            StartService (intent);
        }
    }
}
使用以下特性批注 InstanceIdListenerService,以指示该服务不会由系统实例化,并且它可以接收 GCM 注册令牌(也称为“实例 ID”)刷新请求:
[Service(Exported = false), IntentFilter(new[] { "com.google.android.gms.iid.InstanceID" })]
服务中的 OnTokenRefresh 方法将启动 RegistrationIntentService,以便它可以截获新的注册令牌。
测试向 GCM 进行的注册
让我们完全重新生成并运行该应用。 如果已成功从 GCM 收到注册令牌,则应在输出窗口中显示该注册令牌。 例如:
D/Mono    ( 1934): Assembly Ref addref ClientApp[0xb4ac2400] -> Xamarin.GooglePlayServices.Gcm[0xb4ac2640]: 2
I/RegistrationIntentService( 1934): Calling InstanceID.GetToken
I/RegistrationIntentService( 1934): GCM Registration Token: f8LdveCvXig:APA91bFIsjUAbP-V8TPQdLR89qQbEJh1SYG38AcCbBUf34z5gSdUc5OsXrgs93YFiGcRSRafPfzkz23lf3-LvYV1CwrFheMjHgwPeFSh12MywnRIhz
处理下游消息
到目前为止,我们实现的代码只是“设置”代码;它检查是否安装了 Google Play Services,并与 GCM 和应用服务器协商,以便准备好我们的客户端应用来接收远程通知。 但是,我们尚未实现实际接收和处理下游通知消息的代码。 为此,我们必须实现 GCM 侦听器服务。 此服务从应用服务器接收主题消息,并在本地将其作为通知进行广播。 实现此服务后,我们将创建一个测试程序以将消息发送到 GCM,这样我们便可以看到实现是否正常工作。
添加通知图标
让我们首先添加一个小图标,该图标将在启动通知时显示在通知区域中。 可以将此图标复制到项目或创建你自己的自定义图标。 我们将图标文件命名为 ic_stat_button_click.png 并将其复制到 Resources/drawable 文件夹中。 请记得使用“添加”>“现有项...”将此图标文件包含在你的项目中。
实现 GCM 侦听器服务
添加名为 GcmListenerService.cs 的新文件,并将模板代码替换为以下内容:
using Android.App;
using Android.Content;
using Android.OS;
using Android.Gms.Gcm;
using Android.Util;

namespace ClientApp
{
    [Service (Exported = false), IntentFilter (new [] { "com.google.android.c2dm.intent.RECEIVE" })]
    public class MyGcmListenerService : GcmListenerService
    {
        public override void OnMessageReceived (string from, Bundle data)
        {
            var message = data.GetString ("message");
            Log.Debug ("MyGcmListenerService", "From:    " + from);
            Log.Debug ("MyGcmListenerService", "Message: " + message);
            SendNotification (message);
        }

        void SendNotification (string message)
        {
            var intent = new Intent (this, typeof(MainActivity));
            intent.AddFlags (ActivityFlags.ClearTop);
            var pendingIntent = PendingIntent.GetActivity (this, 0, intent, PendingIntentFlags.OneShot);

            var notificationBuilder = new Notification.Builder(this)
                .SetSmallIcon (Resource.Drawable.ic_stat_ic_notification)
                .SetContentTitle ("GCM Message")
                .SetContentText (message)
                .SetAutoCancel (true)
                .SetContentIntent (pendingIntent);

            var notificationManager = (NotificationManager)GetSystemService(Context.NotificationService);
            notificationManager.Notify (0, notificationBuilder.Build());
        }
    }
}
让我们看看 GcmListenerService 的每个部分以了解其工作原理。
首先,我们使用一个特性来批注 GcmListenerService 以指示此服务不会由系统实例化,并且我们包括一个意向筛选器来指示它接收 GCM 消息:
[Service (Exported = false), IntentFilter (new [] { "com.google.android.c2dm.intent.RECEIVE" })]
GcmListenerService 从 GCM 接收消息时,会调用 OnMessageReceived 方法。 此方法从传入的 Bundle 中提取消息内容,记录消息内容(以便我们可以在输出窗口中查看它),并调用 SendNotification 以使用接收到的消息内容启动本地通知:
var message = data.GetString ("message");
Log.Debug ("MyGcmListenerService", "From:    " + from);
Log.Debug ("MyGcmListenerService", "Message: " + message);
SendNotification (message);
SendNotification 方法使用 Notification.Builder 创建通知,然后它使用 NotificationManager 启动通知。 实际上,这会将远程通知消息转换为要向用户显示的本地通知。
有关使用 Notification.Builder 和 NotificationManager 的详细信息,请参阅本地通知。
在清单中声明接收方
必须先在 Android 清单中声明 GCM 侦听器,然后才能从 GCM 接收消息。 让我们编辑 AndroidManifest.xml,并将 <application> 部分替换为以下 XML:
<application android:label="RemoteNotifications" android:icon="@drawable/Icon">
    <receiver android:name="com.google.android.gms.gcm.GcmReceiver"
              android:exported="true"
              android:permission="com.google.android.c2dm.permission.SEND">
        <intent-filter>
            <action android:name="com.google.android.c2dm.intent.RECEIVE" />
            <action android:name="com.google.android.c2dm.intent.REGISTRATION" />
            <category android:name="YOUR_PACKAGE_NAME" />
        </intent-filter>
    </receiver>
</application>
在上述 XML 中,将 YOUR_PACKAGE_NAME 更改为客户端应用项目的包名称。 在我们的演练示例中,包名称为 com.xamarin.gcmexample。
让我们看看此 XML 中的每个设置的作用:
| 设置 | 说明 |
|---|---|
com.google.android.gms.gcm.GcmReceiver |
声明我们的应用实现了一个 GCM 接收器,用于捕获和处理传入的推送通知消息。 |
com.google.android.c2dm.permission.SEND |
声明只有 GCM 服务器才能将消息直接发送到应用。 |
com.google.android.c2dm.intent.RECEIVE |
意向筛选器,用于播发我们的应用处理来自 GCM 的广播消息。 |
com.google.android.c2dm.intent.REGISTRATION |
意向筛选器,用于播发我们的应用处理新的注册意向(即,我们实现了实例 ID 侦听器服务)。 |
或者,可以使用这些特性修饰 GcmListenerService,而不是在 XML 中指定它们;这里我们在 AndroidManifest.xml 中指定它们,以使代码示例更易于理解。
创建消息发送方以测试应用
让我们将 C# 桌面控制台应用程序项目添加到解决方案,并将其命名为 MessageSender。 我们将使用此控制台应用程序来模拟应用程序服务器 - 它会通过 GCM 将通知消息发送到 ClientApp。
添加 Json.NET 包
在此控制台应用中,我们将生成一个 JSON 有效负载,其中包含要发送到客户端应用的通知消息。 我们将使用 MessageSender 中的 Json.NET 包,以便更轻松地生成 GCM 所需的 JSON 对象。 在 Visual Studio 中,右键单击“引用”>“管理 NuGet 包...”;在 Visual Studio for Mac 中,右键单击“包”>“添加包...”。
让我们搜索 Json.NET 包并将其安装在项目中:
添加对 System.Net.Http 的引用
我们还需要添加一个对 System.Net.Http 的引用,以便我们可以实例化 HttpClient,从而将测试消息发送到 GCM。 在 MessageSender 项目中,右键单击“引用”>“添加引用”并向下滚动,直到看到“System.Net.Http”。 勾选“System.Net.Http”旁边的复选标记,然后单击“确定”。
实现用于发送测试消息的代码
在 MessageSender 中,编辑 Program.cs 并将内容替换为以下代码:
using System;
using System.Net.Http;
using System.Net.Http.Headers;
using System.Text;
using System.Threading.Tasks;
using Newtonsoft.Json.Linq;

namespace MessageSender
{
    class MessageSender
    {
        public const string API_KEY = "YOUR_API_KEY";
        public const string MESSAGE = "Hello, Xamarin!";

        static void Main (string[] args)
        {
            var jGcmData = new JObject();
            var jData = new JObject();

            jData.Add ("message", MESSAGE);
            jGcmData.Add ("to", "/topics/global");
            jGcmData.Add ("data", jData);

            var url = new Uri ("https://gcm-http.googleapis.com/gcm/send");
            try
            {
                using (var client = new HttpClient())
                {
                    client.DefaultRequestHeaders.Accept.Add(
                        new MediaTypeWithQualityHeaderValue("application/json"));

                    client.DefaultRequestHeaders.TryAddWithoutValidation (
                        "Authorization", "key=" + API_KEY);

                    Task.WaitAll(client.PostAsync (url,
                        new StringContent(jGcmData.ToString(), Encoding.Default, "application/json"))
                            .ContinueWith(response =>
                            {
                                Console.WriteLine(response);
                                Console.WriteLine("Message sent: check the client device notification tray.");
                            }));
                }
            }
            catch (Exception e)
            {
                Console.WriteLine("Unable to send GCM message:");
                Console.Error.WriteLine(e.StackTrace);
            }
        }
    }
}
在上述代码中,将 YOUR_API_KEY 更改为客户端应用项目的 API 密钥。
此测试应用服务器将以下 JSON 格式的消息发送到 GCM:
{
  "to": "/topics/global",
  "data": {
    "message": "Hello, Xamarin!"
  }
}
GCM 转而将此消息转发到客户端应用。 让我们生成 MessageSender 并打开控制台窗口,在该窗口中可以从命令行运行它。
尝试一下!
现在,我们已准备就绪,可以测试客户端应用了。 如果使用模拟器,或者设备通过 Wi-Fi 与 GCM 通信,则必须在防火墙上打开以下 TCP 端口,以便 GCM 消息通过:5228、5229 和 5230。
启动客户端应用并观察输出窗口。 RegistrationIntentService 从 GCM 成功接收注册令牌后,输出窗口应显示该令牌,日志输出如下所示:
I/RegistrationIntentService(16103): GCM Registration Token: eX9ggabZV1Q:APA91bHjBnQXMUeBOT6JDiLpRt8m2YWtY ...
此时,客户端应用已准备就绪,可以接收远程通知消息了。 在命令行中,运行 MessageSender.exe 程序,以将“Hello, Xamarin”通知消息发送到客户端应用。 如果尚未生成 MessageSender 项目,请立即生成。
若要在 Visual Studio 下运行 MessageSender.exe,请打开命令提示符,更改到 MessageSender/bin/Debug 目录,然后直接运行以下命令:
MessageSender.exe
若要在 Visual Studio for Mac 下运行 MessageSender.exe,请打开终端会话,更改到 MessageSender/bin/Debug 目录,然后使用 mono 运行 MessageSender.exe
mono MessageSender.exe
消息最多可能需要一分钟的时间才能通过 GCM 传播并回到客户端应用。 如果已成功接收消息,则我们应在输出窗口中看到类似于以下内容的输出:
D/MyGcmListenerService(16103): From:    /topics/global
D/MyGcmListenerService(16103): Message: Hello, Xamarin!
此外,你应该注意到通知栏中出现了一个新的通知图标:
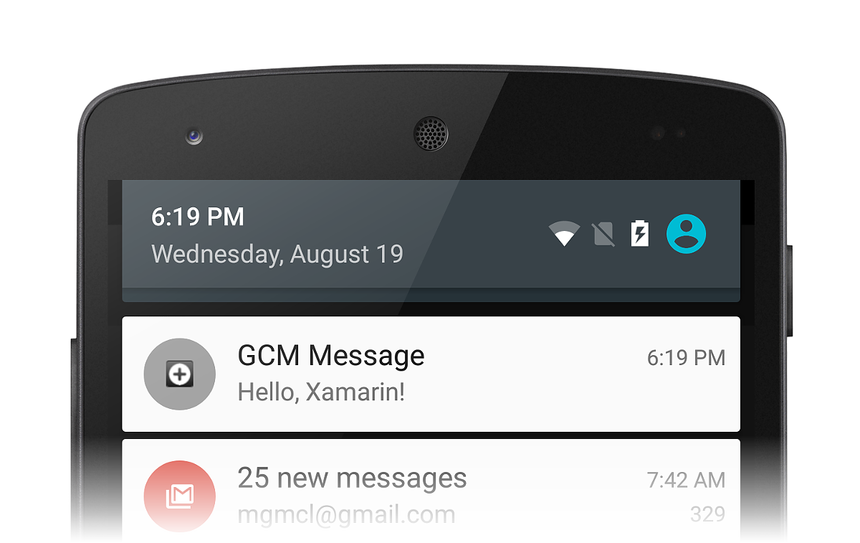
打开通知栏查看通知时,应会看到我们的远程通知:
恭喜,你的应用已收到其第一个远程通知!
请注意,如果强制停止了该应用,则将不再收到 GCM 消息。 若要在强制停止后恢复通知,必须手动重启该应用。 有关此 Android 策略的详细信息,请参阅对已停止的应用启动控制和此堆栈溢出帖子。
总结
本演练详细介绍了在 Xamarin.Android 应用程序中实现远程通知的步骤。 其中介绍了如何安装 GCM 通信所需的其他包,并说明了如何配置应用权限以访问 GCM 服务器。 它提供了示例代码,用于说明如何检查 Google Play Services 是否存在、如何实现注册意向服务和实例 ID 侦听器服务(用于与 GCM 协商以获取注册令牌),以及如何实现 GCM 侦听器服务以接收和处理远程通知消息。 最后,我们实现了一个命令行测试程序,用于通过 GCM 将测试通知发送到客户端应用。


