部署 Apache 超集™
重要
AKS 上的 Azure HDInsight 已于 2025 年 1 月 31 日停用。 了解此公告的详细信息。
需要将工作负荷迁移到 Microsoft Fabric 或等效的 Azure 产品,以避免工作负荷突然终止。
重要
此功能目前以预览版提供。 Microsoft Azure 预览版补充使用条款 包括适用于 beta 版、预览版或尚未正式发布的 Azure 功能的更多法律条款。 有关此特定预览版的信息,请参阅 Azure HDInsight 在 AKS 中的预览信息。 如有问题或功能建议,请在 AskHDInsight 上提交请求,并附上详细信息。关注我们以获取有关 Azure HDInsight 社区 的更多更新。
可视化对于有效地浏览、呈现和共享数据至关重要。 Apache Superset 允许在灵活的 Web UI 中针对您的数据运行查询、进行可视化展示和构建仪表板。
本文介绍如何在 Azure 中部署 Apache Superset UI 实例,并将其连接到 AKS 上的 HDInsight 的 Trino 群集,以查询数据和创建仪表板。
本文中介绍的步骤摘要:
- 先决条件
- 为 Apache 超集创建 Kubernetes 群集。
- 部署 Apache Superset。
先决条件
如果使用 Windows,请在 WSL2 上使用 Ubuntu 在 Windows 中的 bash shell Linux 环境中运行这些说明。 否则,需要修改命令才能在 Windows 中工作。
创建 Trino 群集并分配托管标识
如果尚未创建,请在 AKS 上使用 HDInsight 创建Trino 群集。
若要使 Apache Superset 调用 Trino,它需要具有托管标识(MSI)。 创建或选取现有的 用户分配的托管标识。
修改 Trino 群集配置,以允许在步骤 2 中创建的托管标识运行查询。 了解如何管理访问。
安装本地工具
设置 Azure CLI。
一个。 安装 Azure CLI。
b. 登录到 Azure CLI:
az login。c. 安装 Azure CLI 预览版扩展。
# Install the aks-preview extension
az extension add --name aks-preview

# Update the extension to make sure you've the latest version installed
az extension update --name aks-preview
安装 Kubernetes。
安装 Helm。
为 Apache Superset 创建 kubernetes 群集
此步骤创建 Azure Kubernetes 服务 (AKS) 群集,可在其中安装 Apache Superset。 需要将您已关联到集群的托管标识绑定,以允许 Superset 使用该标识对 Trino 集群进行身份验证。
请在 bash 中为 Superset 的安装创建以下变量。
# ----- Parameters ------

# The subscription ID where you want to install Superset
SUBSCRIPTION=
# Superset cluster name (visible only to you)
CLUSTER_NAME=trinosuperset
# Resource group containing the Azure Kubernetes service
RESOURCE_GROUP_NAME=trinosuperset
# The region to deploy Superset (ideally same region as Trino): to list regions: az account list-locations REGION=westus3
# The resource path of your managed identity. To get this resource path:
#   1. Go to the Azure Portal and find your user assigned managed identity
#   2. Select JSON View on the top right
#   3. Copy the Resource ID value.
MANAGED_IDENTITY_RESOURCE=
选择您要安装 Superset 的订阅。
az account set --subscription $SUBSCRIPTION在当前订阅上启用 Pod 标识功能。
az feature register --name EnablePodIdentityPreview --namespace Microsoft.ContainerService
az provider register -n Microsoft.ContainerService
创建 AKS 群集以部署 Superset。
# Create resource group
az group create --location $REGION --name $RESOURCE_GROUP_NAME

# Create AKS cluster
az \
aks create \
-g $RESOURCE_GROUP_NAME \
-n $CLUSTER_NAME \
--node-vm-size Standard_DS2_v2 \
--node-count 3 \
--enable-managed-identity \
--assign-identity $MANAGED_IDENTITY_RESOURCE \
--assign-kubelet-identity $MANAGED_IDENTITY_RESOURCE

# Set the context of your new Kubernetes cluster
az aks get-credentials --resource-group $RESOURCE_GROUP_NAME --name $CLUSTER_NAME
部署 Apache Superset
若要允许超集安全地与 Trino 群集通信,最简单的方法是设置超集以使用 Azure 托管标识。 此步骤意味着您的群集可以使用您分配给它的标识,而不需要手动部署或旋转密钥。
需要为 Superset Helm 部署创建 values.yaml 文件。 请参阅 示例代码。
可选:使用 Microsoft Azure Postgres,而不是使用 Kubernetes 群集中部署的 Postgres。
创建一个“Azure Database for PostgreSQL”实例,以简化维护、允许备份并提供更好的可靠性。
postgresql:
  enabled: false

supersetNode:
  connections:
    db_host: '{{SERVER_NAME}}.postgres.database.azure.com'
    db_port: '5432'
    db_user: '{{POSTGRES_USER}}'
    db_pass: '{{POSTGRES_PASSWORD}}'
    db_name: 'postgres' # default db name for Azure Postgres
如有必要,请添加 values.yaml 的其他部分。 Superset软件文档 建议更改默认密码。
使用 Helm 部署 Superset。
# Verify you have the context of the right Kubernetes cluster
kubectl cluster-info
# Add the Superset repository
helm repo add superset https://apache.github.io/superset
# Deploy
helm repo update
helm upgrade --install --values values.yaml superset superset/superset
连接到Superset并建立连接。
注意
应为每个要使用的 Trino 目录创建单独的连接。
使用端口转发连接到 Superset 软件。
kubectl port-forward service/superset 8088:8088 --namespace default打开 Web 浏览器并转到 http://localhost:8088/. 如果未更改管理员密码,请使用用户名登录:管理员、密码:管理员。
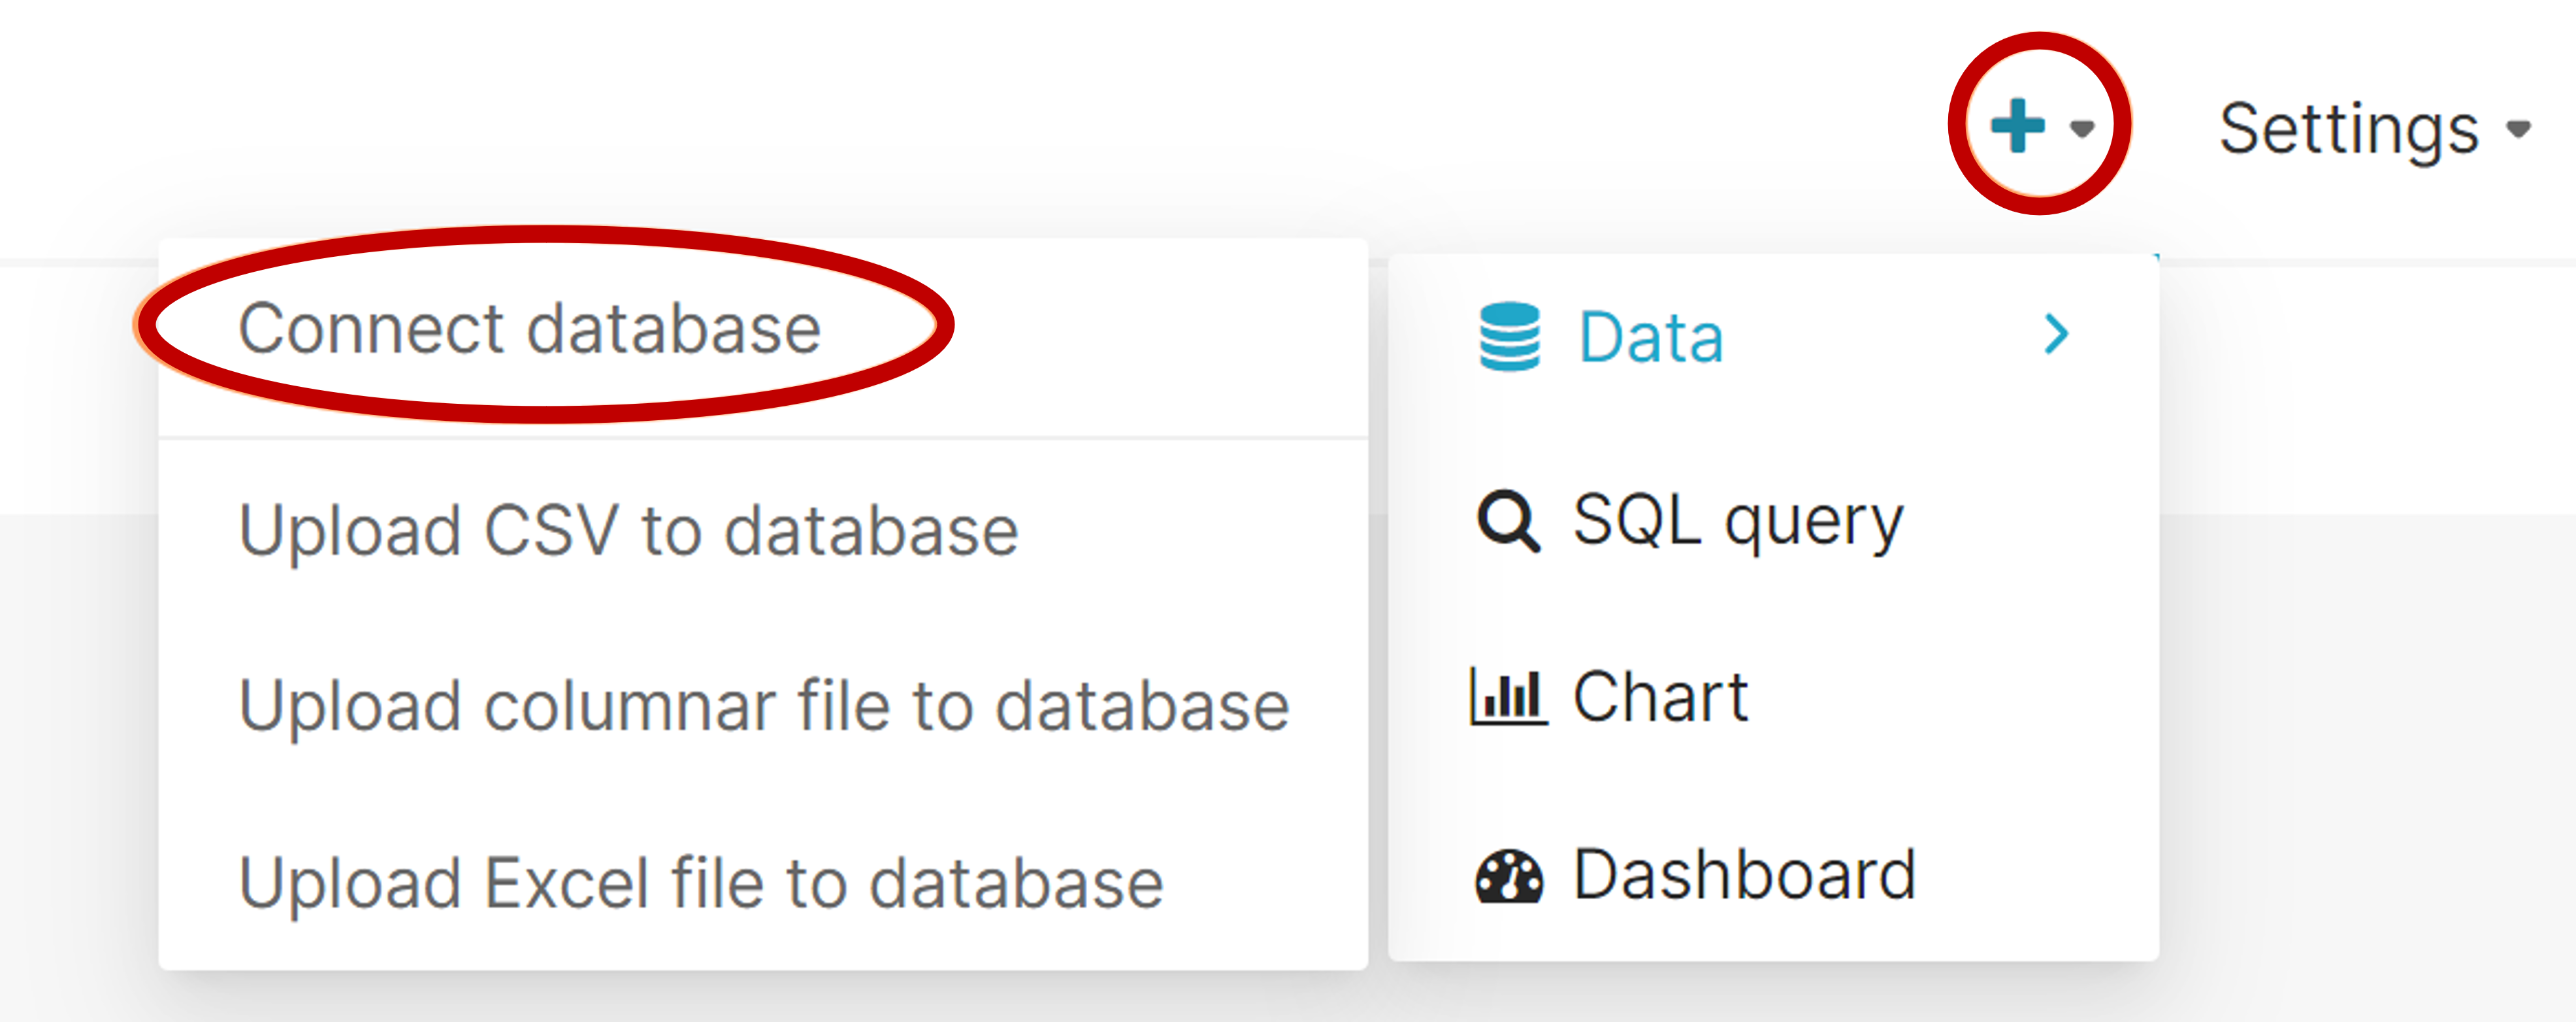
从右侧的加号“+”菜单中选择“连接数据库”。
选择 Trino。
输入 Trino 群集的 SQL Alchemy URI。
需要修改此连接字符串的三个部分:
财产 例 描述 用户 trino@ @ 符号之前的名称是用于连接到 Trino 的用户名。 主机名 mytrinocluster.00000000000000000000000000000
.eastus.hdinsightaks.netTrino 群集的主机名。
可以从 Azure 门户中群集的“概述”页获取此信息。目录 /tpch 斜杠后,是默认目录名称。
需要将此目录更改为包含要可视化的数据的目录。trino://$USER@$TRINO_CLUSTER_HOST_NAME.hdinsightaks.net:443/$DEFAULT_CATALOG示例:
trino://trino@mytrinocluster.00000000000000000000000000.westus3.hdinsightaks.net:443/tpch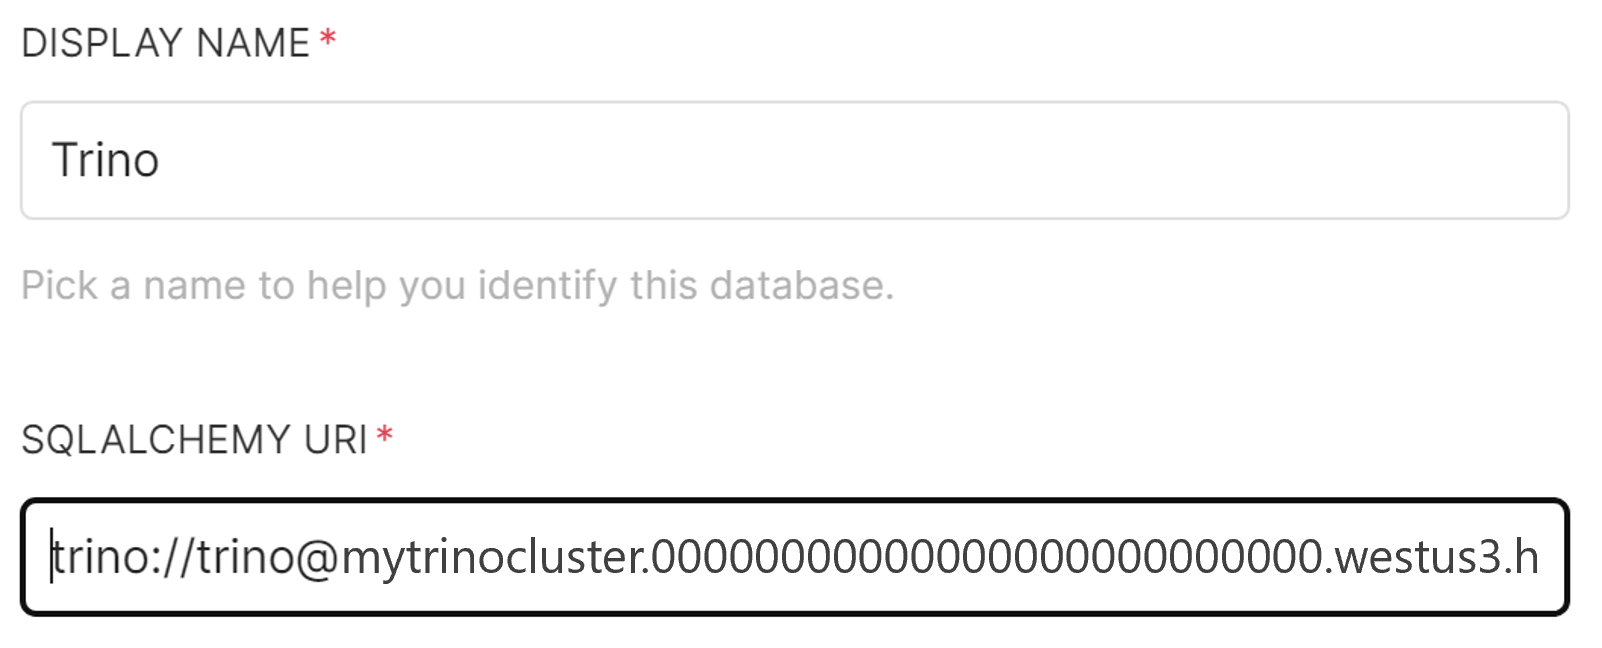
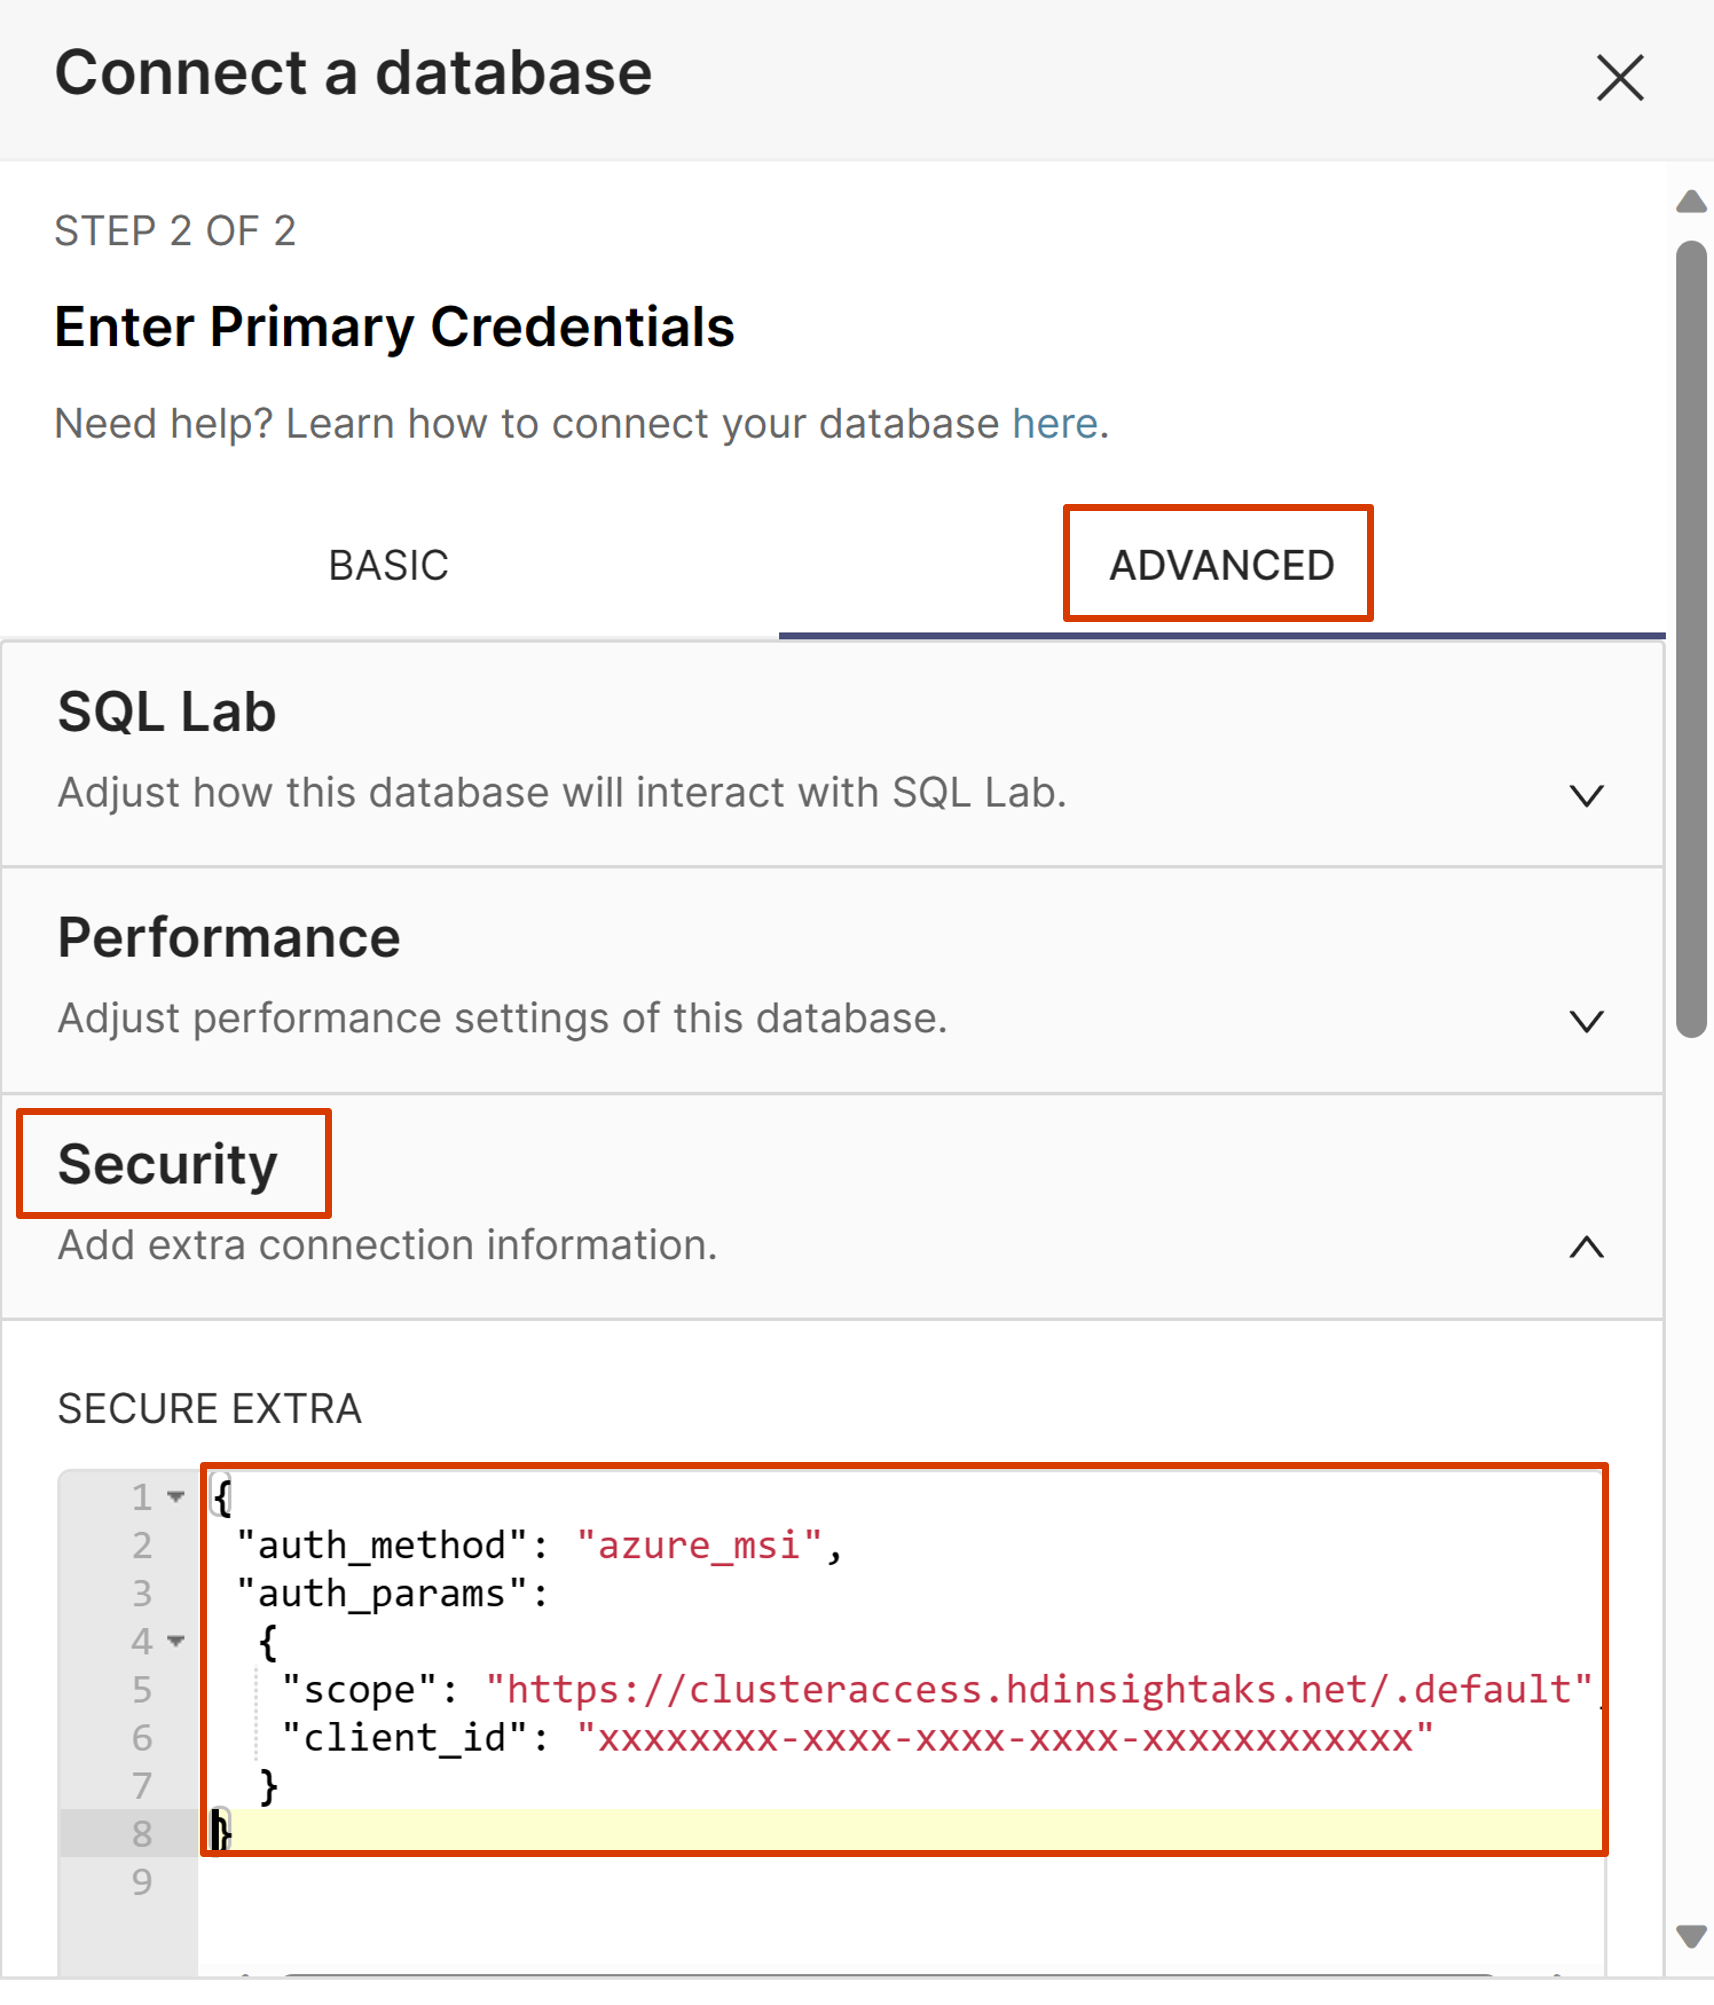
选择“高级”选项卡,并在“其他安全性”中输入以下配置。将client_id值替换为托管标识的 GUID 客户端 ID(此值可在 Azure 门户的托管标识资源概述页中找到)。
 {
   "auth_method": "azure_msi",
   "auth_params":
   {
     "scope": "https://clusteraccess.hdinsightaks.net/.default",
     "client_id": "xxxxxxxx-xxxx-xxxx-xxxx-xxxxxxxxxxxx"
   }
 }
添加 MSI 的屏幕截图
选择“连接”。
现在,你已准备好创建数据集和图表。
故障 排除
验证 Trino 集群是否已配置为允许 Superset 集群的用户分配的托管身份进行连接。 可以通过查看 Trino 群集的资源 JSON(authorizationProfile/userIds)来验证此值。 请确保您使用的是身份的对象 ID,而不是客户端 ID。
请确保连接配置中没有错误。
- 请确保“额外安全”已填写完毕。
- URL 正确。
- 使用
tpch目录测试连接是否正常工作,然后再使用自己的目录。
后续步骤
若要将 Superset 公开到互联网,并通过 Microsoft Entra ID 允许用户登录,需要完成以下常规步骤。 这些步骤需要 Kubernetes 使用的中级技能及以上经验。