教程:使用 Visual Studio 创建 PowerPoint 任务窗格加载项
在本教程中,你将创建一个 PowerPoint 任务窗格加载项,该加载项:
- 向幻灯片添加图像
- 向幻灯片添加文本
- 获取幻灯片元数据
- 添加新幻灯片
- 在幻灯片之间导航
提示
如果需要本教程的完整版本,请访问 GitHub 上的 Office 加载项示例存储库。
先决条件
安装了 Office/SharePoint 开发工作负载的 Visual Studio 2019 或更高版本。
注意
如果之前已安装 Visual Studio,请 使用 Visual Studio 安装程序,以确保安装 Office/SharePoint 开发 工作负载。
已连接到 Microsoft 365 订阅的 Office (包括 Office 网页版)。
注意
如果你还没有 Office,你可能有资格通过 Microsoft 365 开发人员计划获得用于开发Microsoft 365 E5开发人员订阅;有关详细信息,请参阅常见问题解答。 或者,可以 注册 1 个月的免费试用版 或 购买 Microsoft 365 计划。
创建加载项项目
完成以下步骤以使用 Visual Studio 创建 PowerPoint 加载项项目。
选择“创建新项目”。
使用搜索框,输入“加载项”。 选择“PowerPoint 外接程序”,然后选择“下一步”。
将项目命名为“
HelloWorld”,然后选择“创建”。在“创建 Office 加载项”对话框窗口中,选择“将新功能添加到 PowerPoint”,再选择“完成”以创建项目。
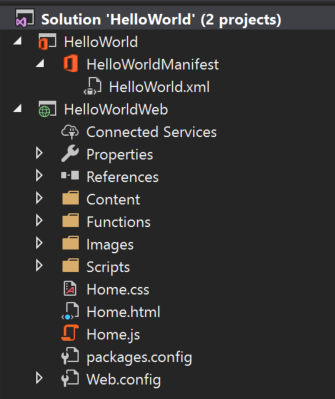
此时,Visual Studio 创建解决方案,且它的两个项目显示在“解决方案资源管理器”中。 Home.html 文件将在 Visual Studio 中打开。
必须安装以下 NuGet 包。 在 Visual Studio 中使用 NuGet 包管理器在 HelloWorldWeb 项目上安装它们。 有关说明,请参阅Visual Studio帮助。 安装第一个时,可能会自动安装其中的第二个。
- Microsoft.AspNet.WebApi.WebHost
- Microsoft.AspNet.WebApi.Core
重要
使用 NuGet 包管理器 安装这些包时, 不要 安装建议的 jQuery 更新。 随 Visual Studio 解决方案一起安装的 jQuery 版本与解决方案文件中的 jQuery 调用匹配。
使用 NuGet 包管理器 将 Newtonsoft.Json 包更新到版本 13.0.3 或更高版本。 然后删除 app.config 文件(如果该文件已添加到 HelloWorld 项目)。
浏览 Visual Studio 解决方案
在用户完成向导后,Visual Studio 会创建一个包含两个项目的解决方案。
| Project | 说明 |
|---|---|
| 加载项项目 | 仅包含 XML 格式的仅外接程序清单文件,其中包含描述加载项的所有设置。 这些设置有助于 Office 应用程序确定应在何时激活加载项,以及应在哪里显示加载项。 Visual Studio 生成了此文件的内容,以便于用户能够立即运行项目并使用外接程序。 通过修改 XML 文件随时更改这些设置。 |
| Web 应用项目 | 包含加载项的内容页,包括开发 Office 感知 HTML 和 JavaScript 页面所需的全部文件和文件引用。 开发加载项时,Visual Studio 在本地 IIS 服务器上托管 Web 应用。 准备好发布加载项后,需要将此 Web 应用项目部署到 Web 服务器。 |
更新代码
请按照下面的步骤编辑加载项代码,以创建在本教程后续步骤中实现加载项功能的框架。
Home.html 指定在加载项的任务窗格中呈现的 HTML。 在 Home.html 文件中,查找包含
id="content-main"的 div,并将找到的整个 div 替换为以下标记,再保存此文件。<!-- TODO2: Create the content-header div. --> <div id="content-main"> <div class="padding"> <!-- TODO1: Create the insert-image button. --> <!-- TODO3: Create the insert-text button. --> <!-- TODO4: Create the get-slide-metadata button. --> <!-- TODO5: Create the add-slides and go-to-slide buttons. --> </div> </div>打开 Web 应用程序项目根目录中的文件 Home.js。 此文件指定加载项脚本。 将整个内容替换为下列代码,并保存文件。
(function () {
    "use strict";

    let messageBanner;

    Office.onReady(function () {
        $(document).ready(function () {
            // Initialize the FabricUI notification mechanism and hide it.
            const element = document.querySelector('.MessageBanner');
            messageBanner = new components.MessageBanner(element);
            messageBanner.hideBanner();

            // TODO1: Assign event handler for insert-image button.
            // TODO4: Assign event handler for insert-text button.
            // TODO6: Assign event handler for get-slide-metadata button.
            // TODO8: Assign event handlers for add-slides and the four navigation buttons.
        });
    });

    // TODO2: Define the insertImage function.

    // TODO3: Define the insertImageFromBase64String function.

    // TODO5: Define the insertText function.

    // TODO7: Define the getSlideMetadata function.

    // TODO9: Define the addSlides and navigation functions.

    // Helper function for displaying notifications.
    function showNotification(header, content) {
        $("#notification-header").text(header);
        $("#notification-body").text(content);
        messageBanner.showBanner();
        messageBanner.toggleExpansion();
    }
})();
插入图像
完成以下步骤以添加用于检索一天中的必应照片的代码,并将该图像插入幻灯片中。
使用解决方案资源管理器,将 Controllers 新文件夹添加到 HelloWorldWeb 项目。
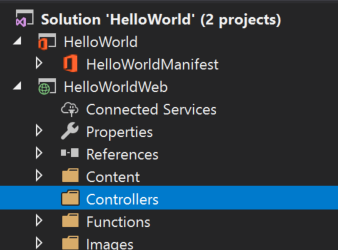
右键单击“ (”或选择并按住“ 控制器 ”文件夹) ,然后选择“ 添加新>基架项目...”。
在“添加基架”对话框窗口中,依次选择“Web API 2 控制器 - 空”和“添加”按钮。
在“添加控制器”对话框窗口中,输入“PhotoController”作为控制器名称,再选择“添加”按钮。 此时,Visual Studio 创建并打开 PhotoController.cs 文件。
重要
在版本 16.10.3 之后的某些 Visual Studio 版本中,基架过程未正确完成。 如果有 Global.asax 和 ./App_Start/WebApiConfig.cs 文件,请跳到步骤 6。
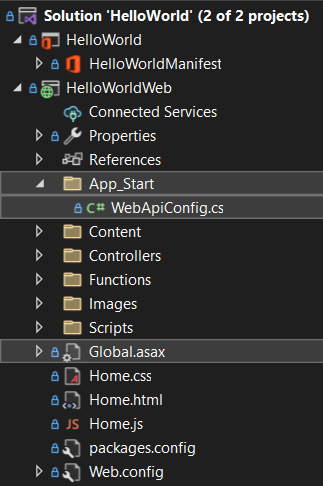
如果 HelloWorldWeb 项目中缺少基架文件,请按如下所示添加它们。
使用 解决方案资源管理器,将名为 App_Start 的新文件夹添加到 HelloWorldWeb 项目。
右键单击 (或选择并按住) App_Start 文件夹,然后选择 “添加>类...”。
在“ 添加新项 ”对话框中,将文件命名 WebApiConfig.cs 然后选择“ 添加” 按钮。
将 WebApiConfig.cs 文件的全部内容替换为以下代码。
using System;
using System.Collections.Generic;
using System.Linq;
using System.Web;
using System.Web.Http;

namespace HelloWorldWeb.App_Start
{
    public static class WebApiConfig
    {
        public static void Register(HttpConfiguration config)
        {
            config.MapHttpAttributeRoutes();

            config.Routes.MapHttpRoute(
                name: "DefaultApi",
                routeTemplate: "api/{controller}/{id}",
                defaults: new { id = RouteParameter.Optional }
            );
        }
    }
}
在解决方案资源管理器中,右键单击 (或选中并按住 HelloWorldWeb 项目) ,然后选择“添加新>项...”。
在 “添加新项 ”对话框中,搜索“全局”,选择“ 全局应用程序类”,然后选择“ 添加” 按钮。 默认情况下,该文件名为 Global.asax。
将 Global.asax.cs 文件的全部内容替换为以下代码。
using HelloWorldWeb.App_Start;
using System;
using System.Collections.Generic;
using System.Linq;
using System.Web;
using System.Web.Http;
using System.Web.Security;
using System.Web.SessionState;

namespace HelloWorldWeb
{
    public class WebApiApplication : System.Web.HttpApplication
    {
        protected void Application_Start()
        {
            GlobalConfiguration.Configure(WebApiConfig.Register);
        }
    }
}
在解决方案资源管理器中,右键单击 (或按住 Global.asax 文件) ,然后选择“查看标记”。
将 Global.asax 文件的全部内容替换为以下代码。
<%@ Application Codebehind="Global.asax.cs" Inherits="HelloWorldWeb.WebApiApplication" Language="C#" %>
将 PhotoController.cs 文件的全部内容替换为以下代码,该代码调用必应服务以 Base64 编码字符串的形式检索当天的照片。 使用 Office JavaScript API 将图像插入文档中时,必须将图像数据指定为 Base64 编码的字符串。
using System;
using System.IO;
using System.Net;
using System.Text;
using System.Web.Http;
using System.Xml;

namespace HelloWorldWeb.Controllers
{
    public class PhotoController : ApiController
    {
        public string Get()
        {
            string url = "http://www.bing.com/HPImageArchive.aspx?format=xml&idx=0&n=1";

            // Create the request.
            HttpWebRequest request = (HttpWebRequest)WebRequest.Create(url);
            WebResponse response = request.GetResponse();

            using (Stream responseStream = response.GetResponseStream())
            {
                // Process the result.
                StreamReader reader = new StreamReader(responseStream, Encoding.UTF8);
                string result = reader.ReadToEnd();

                // Parse the XML response and get the URL.
                XmlDocument doc = new XmlDocument();
                doc.LoadXml(result);
                string photoURL = "http://bing.com" + doc.SelectSingleNode("/images/image/url").InnerText;

                // Fetch the photo and return it as a Base64-encoded string.
                return getPhotoFromURL(photoURL);
            }
        }

        private string getPhotoFromURL(string imageURL)
        {
            var webClient = new WebClient();
            byte[] imageBytes = webClient.DownloadData(imageURL);
            return Convert.ToBase64String(imageBytes);
        }
    }
}
在 Home.html 文件中,将
TODO1替换为以下标记。 此标记定义在加载项任务窗格内显示的“插入图像”按钮。<button class="Button Button--primary" id="insert-image"> <span class="Button-icon"><i class="ms-Icon ms-Icon--plus"></i></span> <span class="Button-label">Insert Image</span> <span class="Button-description">Gets the photo of the day that shows on the Bing home page and adds it to the slide.</span> </button>在 Home.js 文件中,将
TODO1替换为下列代码,以分配“插入图像”按钮的事件处理程序。$('#insert-image').on("click", insertImage);在 Home.js 文件中,将
TODO2替换为下列代码,以定义insertImage函数。 此函数从必应 Web 服务提取图像,再调用insertImageFromBase64String函数将相应图像插入文档。function insertImage() { // Get image from web service (as a Base64-encoded string). $.ajax({ url: "/api/photo/", dataType: "text", success: function (result) { insertImageFromBase64String(result); }, error: function (xhr, status, error) { showNotification("Error", "Oops, something went wrong."); } }); }在 Home.js 文件中,将
TODO3替换为下列代码,以定义insertImageFromBase64String函数。 此函数使用 Office JavaScript API 将图像插入文档。 注意:coercionType选项被指定为setSelectedDataAsync请求的第二个参数,指明了要插入的数据的类型。asyncResult对象封装setSelectedDataAsync请求的结果,包括状态和错误消息(如果请求失败的话)。
function insertImageFromBase64String(image) {
    // Call Office.js to insert the image into the document.
    Office.context.document.setSelectedDataAsync(image, {
        coercionType: Office.CoercionType.Image
    },
        function (asyncResult) {
            if (asyncResult.status === Office.AsyncResultStatus.Failed) {
                showNotification("Error", asyncResult.error.message);
            }
        });
}
测试加载项
使用 Visual Studio,通过按 F5 或选择 “开始 ”按钮启动 PowerPoint,并在功能区上显示 “显示任务窗格 加载项”按钮来测试新创建的 PowerPoint 加载项。 加载项本地托管在 IIS 上。

如果加载项任务窗格尚未在 PowerPoint 中打开,请选择功能区上的“ 显示任务窗格 ”按钮将其打开。

在任务窗格中,选择“插入图像”按钮,将一天中的必应照片添加到当前幻灯片。
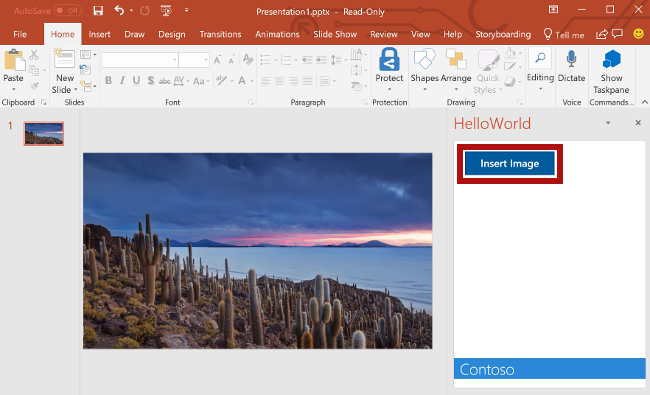
注意
如果收到错误“找不到文件 ...”\bin\roslyn\csc.exe“,然后执行以下作:
- 打开 .\Web.config 文件。
- 找到 .cs
extension的编译器>节点,然后删除 属性及其<type值。 - 保存文件。
在 Visual Studio 中,通过按 Shift+F5 或选择“ 停止 ”按钮来停止加载项。 PowerPoint 在加载项停止时自动关闭。

自定义用户界面 (UI) 元素
完成以下步骤以添加用于自定义任务窗格 UI 的标记。
在 Home.html 文件中,将
TODO2替换为以下标记,以将页眉部分和标题添加到任务窗格。 注意:- 以
ms-开头的样式由 Office 加载项中的Fabric Core 定义,它是用于生成 Office 用户体验的 JavaScript 前端框架。 Home.html 文件包含对 Fabric 样式表的引用。
<div id="content-header"> <div class="ms-Grid ms-bgColor-neutralPrimary"> <div class="ms-Grid-row"> <div class="padding ms-Grid-col ms-u-sm12 ms-u-md12 ms-u-lg12"> <div class="ms-font-xl ms-fontColor-white ms-fontWeight-semibold">My PowerPoint add-in</div></div> </div> </div> </div>- 以
在 Home.html 文件中,查找包含
class="footer"的 div,并删除找到的整个 div,以从任务窗格中删除页脚部分。
测试加载项
使用 Visual Studio,通过按 F5 或选择 “开始 ”按钮启动 PowerPoint,并在功能区上显示 “显示任务窗格 加载项”按钮来测试 PowerPoint 加载项。 加载项本地托管在 IIS 上。

如果加载项任务窗格尚未在 PowerPoint 中打开,请选择功能区上的“ 显示任务窗格 ”按钮将其打开。

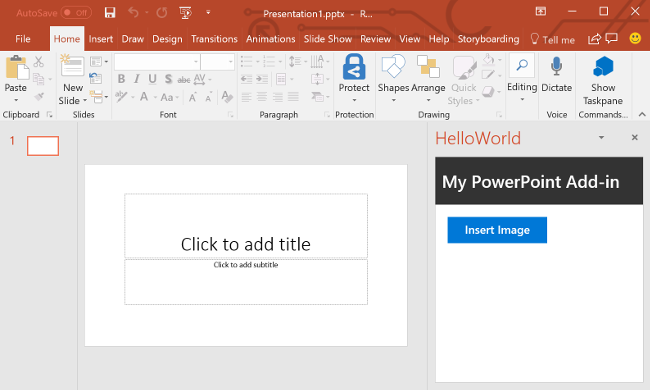
请注意,任务窗格现在包含页眉部分和标题,并且不再包含页脚部分。
在 Visual Studio 中,通过按 Shift+F5 或选择“ 停止 ”按钮来停止加载项。 PowerPoint 在加载项停止时自动关闭。

插入文本
完成以下步骤以添加用于将文本插入到标题幻灯片的代码,该幻灯片包含一天中的必应照片。
在 Home.html 文件中,将
TODO3替换为以下标记。 此标记定义在加载项任务窗格内显示的“插入文本”按钮。<br /><br /> <button class="Button Button--primary" id="insert-text"> <span class="Button-icon"><i class="ms-Icon ms-Icon--plus"></i></span> <span class="Button-label">Insert Text</span> <span class="Button-description">Inserts text into the slide.</span> </button>在 Home.js 文件中,将
TODO4替换为下列代码,以分配“插入文本”按钮的事件处理程序。$('#insert-text').on("click", insertText);在 Home.js 文件中,将
TODO5替换为下列代码,以定义insertText函数。 此函数将文本插入当前幻灯片。function insertText() { Office.context.document.setSelectedDataAsync('Hello World!', function (asyncResult) { if (asyncResult.status === Office.AsyncResultStatus.Failed) { showNotification("Error", asyncResult.error.message); } }); }
测试加载项
使用 Visual Studio,通过按 F5 或选择 “开始 ”按钮启动 PowerPoint 来测试加载项,同时在功能区上显示 “显示任务窗格 加载项”按钮。 加载项本地托管在 IIS 上。

如果加载项任务窗格尚未在 PowerPoint 中打开,请选择功能区上的“ 显示任务窗格 ”按钮将其打开。

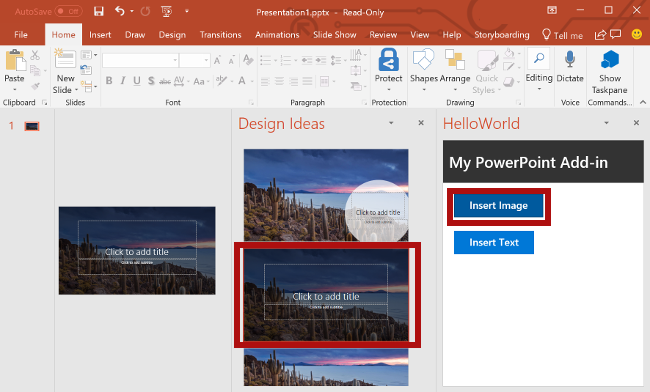
在任务窗格中,选择“插入图像”按钮,将一天中的必应照片添加到当前幻灯片,再为包含标题文本框的幻灯片选择一种设计。
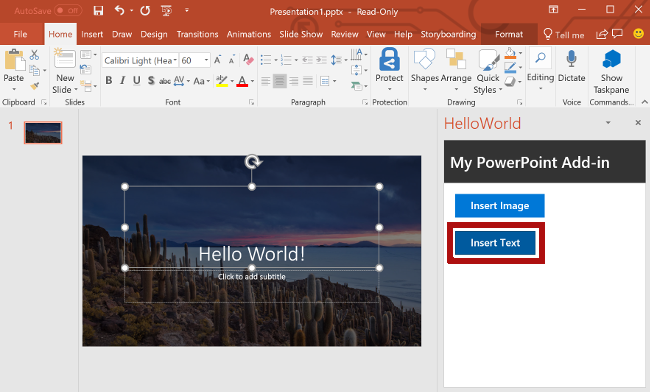
将光标置于标题幻灯片上的文本框中,再选择任务窗格中的“插入文本”按钮,向幻灯片添加文本。
在 Visual Studio 中,通过按 Shift+F5 或选择“ 停止 ”按钮来停止加载项。 PowerPoint 在加载项停止时自动关闭。

获取幻灯片元数据
完成以下步骤以添加用于检索所选幻灯片的元数据的代码。
在 Home.html 文件中,将
TODO4替换为以下标记。 此标记定义在加载项任务窗格内显示的“获取幻灯片元数据”按钮。<br /><br /> <button class="Button Button--primary" id="get-slide-metadata"> <span class="Button-icon"><i class="ms-Icon ms-Icon--plus"></i></span> <span class="Button-label">Get Slide Metadata</span> <span class="Button-description">Gets metadata for the selected slides.</span> </button>在 Home.js 文件中,将
TODO6替换为下列代码,以分配“获取幻灯片元数据”按钮的事件处理程序。$('#get-slide-metadata').on("click", getSlideMetadata);在 Home.js 文件中,将
TODO7替换为下列代码,以定义getSlideMetadata函数。 此函数检索所选幻灯片的元数据,并将其写入加载项任务窗格中的弹出对话框窗口。function getSlideMetadata() { Office.context.document.getSelectedDataAsync(Office.CoercionType.SlideRange, function (asyncResult) { if (asyncResult.status === Office.AsyncResultStatus.Failed) { showNotification("Error", asyncResult.error.message); } else { showNotification("Metadata for selected slides:", JSON.stringify(asyncResult.value), null, 2); } } ); }
测试加载项
使用 Visual Studio,通过按 F5 或选择 “开始 ”按钮启动 PowerPoint 来测试加载项,同时在功能区上显示 “显示任务窗格 加载项”按钮。 加载项本地托管在 IIS 上。

如果加载项任务窗格尚未在 PowerPoint 中打开,请选择功能区上的“ 显示任务窗格 ”按钮将其打开。

在任务窗格中,选择“获取幻灯片元数据”按钮,以获取选定幻灯片的元数据。 此时,幻灯片元数据写入到任务窗格底部的弹出对话框窗口。 在此示例中,JSON 元数据中的
slides数组包含一个对象,用于指定选定幻灯片的id、title和index。 如果在检索幻灯片元数据时选择了多张幻灯片,JSON 元数据中的slides数组会对每张选定幻灯片都包含一个对象。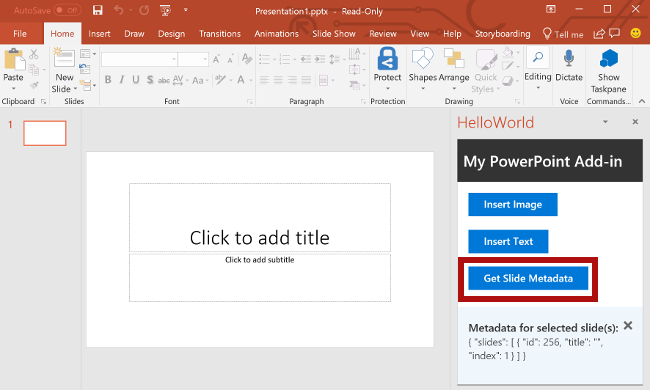
在 Visual Studio 中,通过按 Shift+F5 或选择“ 停止 ”按钮来停止加载项。 PowerPoint 在加载项停止时自动关闭。

在幻灯片之间导航
完成以下步骤以添加用于在文档幻灯片之间导航的代码。
在 Home.html 文件中,将
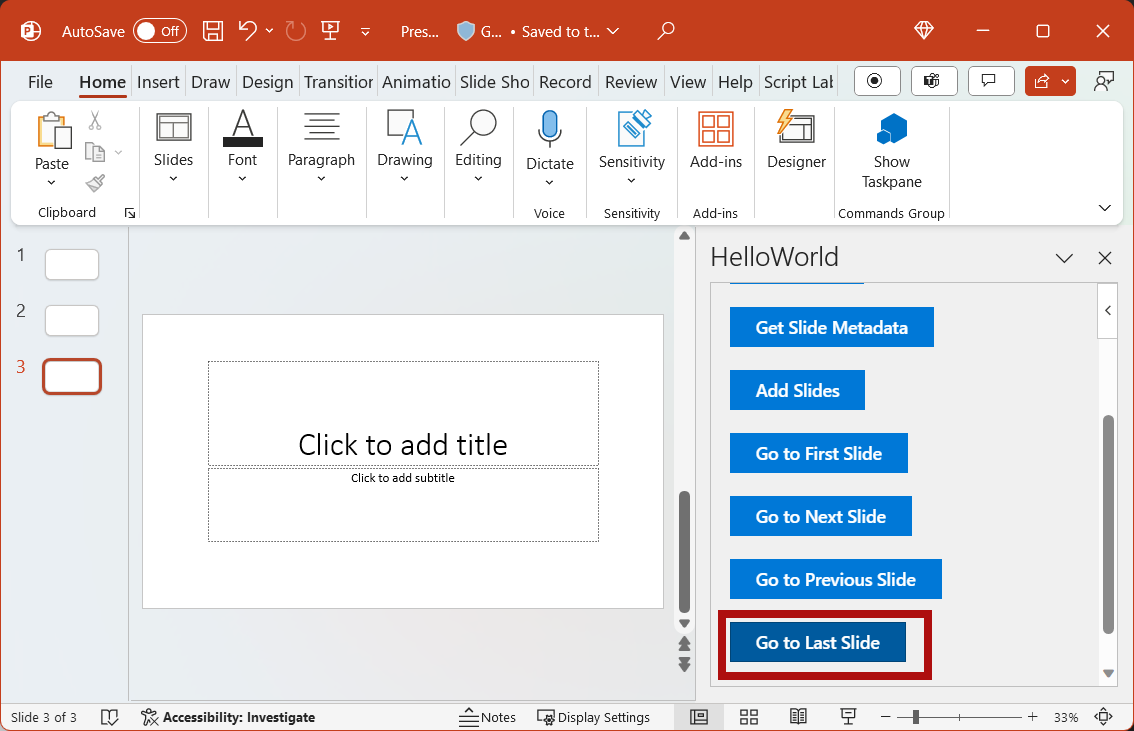
TODO5替换为以下标记。 此标记定义在加载项任务窗格内显示的四个导航按钮。<br /><br /> <button class="Button Button--primary" id="add-slides"> <span class="Button-icon"><i class="ms-Icon ms-Icon--plus"></i></span> <span class="Button-label">Add Slides</span> <span class="Button-description">Adds 2 slides.</span> </button> <br /><br /> <button class="Button Button--primary" id="go-to-first-slide"> <span class="Button-icon"><i class="ms-Icon ms-Icon--plus"></i></span> <span class="Button-label">Go to First Slide</span> <span class="Button-description">Go to the first slide.</span> </button> <br /><br /> <button class="Button Button--primary" id="go-to-next-slide"> <span class="Button-icon"><i class="ms-Icon ms-Icon--plus"></i></span> <span class="Button-label">Go to Next Slide</span> <span class="Button-description">Go to the next slide.</span> </button> <br /><br /> <button class="Button Button--primary" id="go-to-previous-slide"> <span class="Button-icon"><i class="ms-Icon ms-Icon--plus"></i></span> <span class="Button-label">Go to Previous Slide</span> <span class="Button-description">Go to the previous slide.</span> </button> <br /><br /> <button class="Button Button--primary" id="go-to-last-slide"> <span class="Button-icon"><i class="ms-Icon ms-Icon--plus"></i></span> <span class="Button-label">Go to Last Slide</span> <span class="Button-description">Go to the last slide.</span> </button>在 Home.js 文件中,将 替换为
TODO8以下代码,为 “添加幻灯片” 和四个导航按钮分配事件处理程序。$('#add-slides').on("click", addSlides); $('#go-to-first-slide').on("click", goToFirstSlide); $('#go-to-next-slide').on("click", goToNextSlide); $('#go-to-previous-slide').on("click", goToPreviousSlide); $('#go-to-last-slide').on("click", goToLastSlide);在 Home.js 文件中,将 替换为
TODO9以下代码来定义addSlides和 导航函数。 这些函数中每一个都使用goToByIdAsync方法,以根据幻灯片在文档中的位置(第一张、最后一张、上一张和下一张)选择幻灯片。async function addSlides() { await PowerPoint.run(async function (context) { context.presentation.slides.add(); context.presentation.slides.add(); await context.sync(); showNotification("Success", "Slides added."); goToLastSlide(); }); } function goToFirstSlide() { Office.context.document.goToByIdAsync(Office.Index.First, Office.GoToType.Index, function (asyncResult) { if (asyncResult.status == "failed") { showNotification("Error", asyncResult.error.message); } }); } function goToLastSlide() { Office.context.document.goToByIdAsync(Office.Index.Last, Office.GoToType.Index, function (asyncResult) { if (asyncResult.status == "failed") { showNotification("Error", asyncResult.error.message); } }); } function goToPreviousSlide() { Office.context.document.goToByIdAsync(Office.Index.Previous, Office.GoToType.Index, function (asyncResult) { if (asyncResult.status == "failed") { showNotification("Error", asyncResult.error.message); } }); } function goToNextSlide() { Office.context.document.goToByIdAsync(Office.Index.Next, Office.GoToType.Index, function (asyncResult) { if (asyncResult.status == "failed") { showNotification("Error", asyncResult.error.message); } }); }
测试加载项
使用 Visual Studio,通过按 F5 或选择 “开始 ”按钮启动 PowerPoint 来测试加载项,同时在功能区上显示 “显示任务窗格 加载项”按钮。 加载项本地托管在 IIS 上。

如果加载项任务窗格尚未在 PowerPoint 中打开,请选择功能区上的“ 显示任务窗格 ”按钮将其打开。

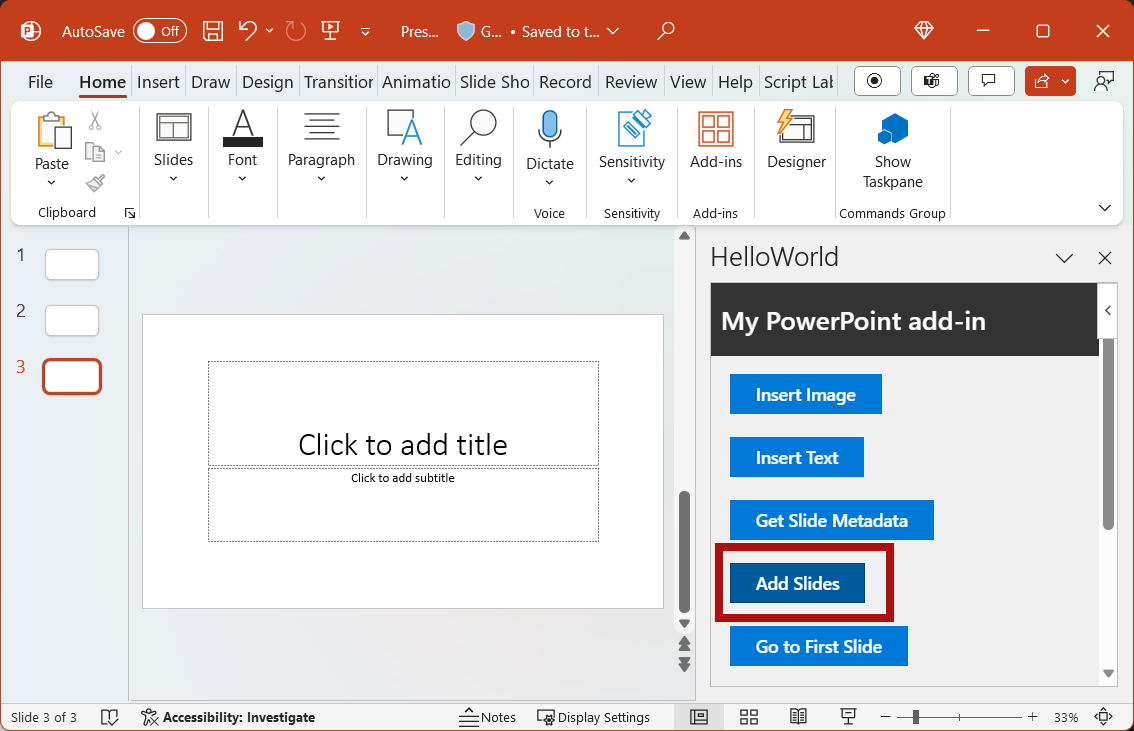
在任务窗格中,选择 “添加幻灯片” 按钮。 两张新幻灯片将添加到文档中,并选中并显示文档中的最后一张幻灯片。
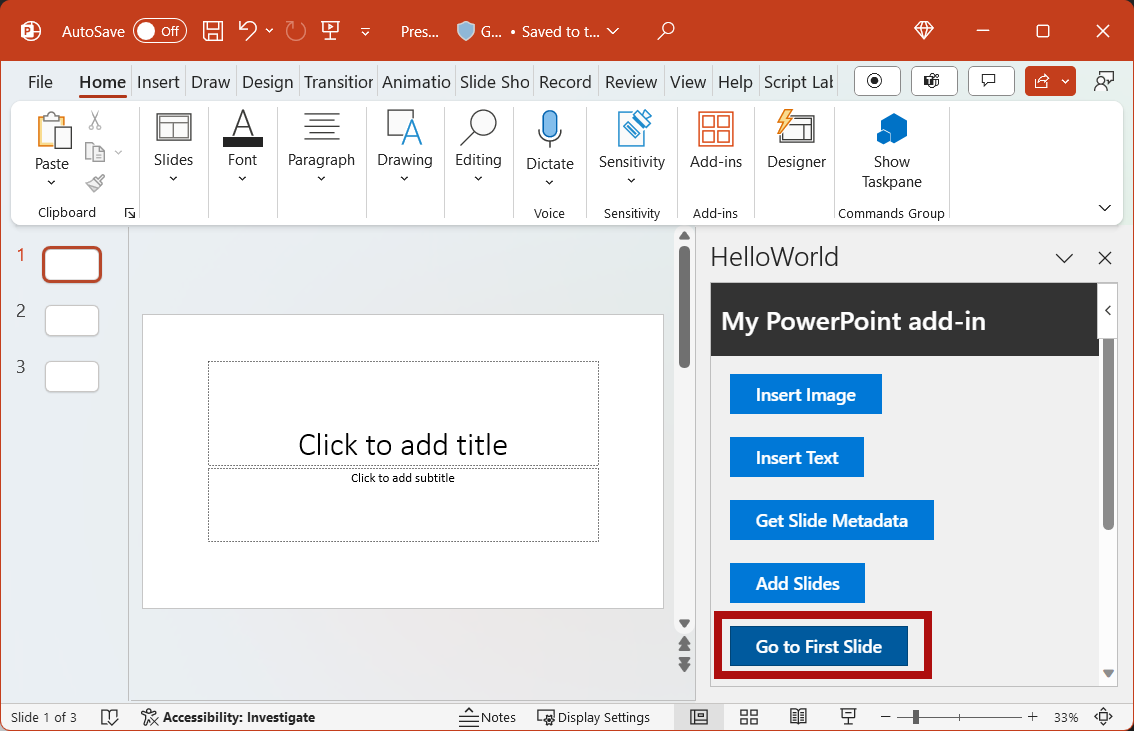
在任务窗格中,选择“前往第一张幻灯片”按钮。 此时,选择并显示文档中的第一张幻灯片。
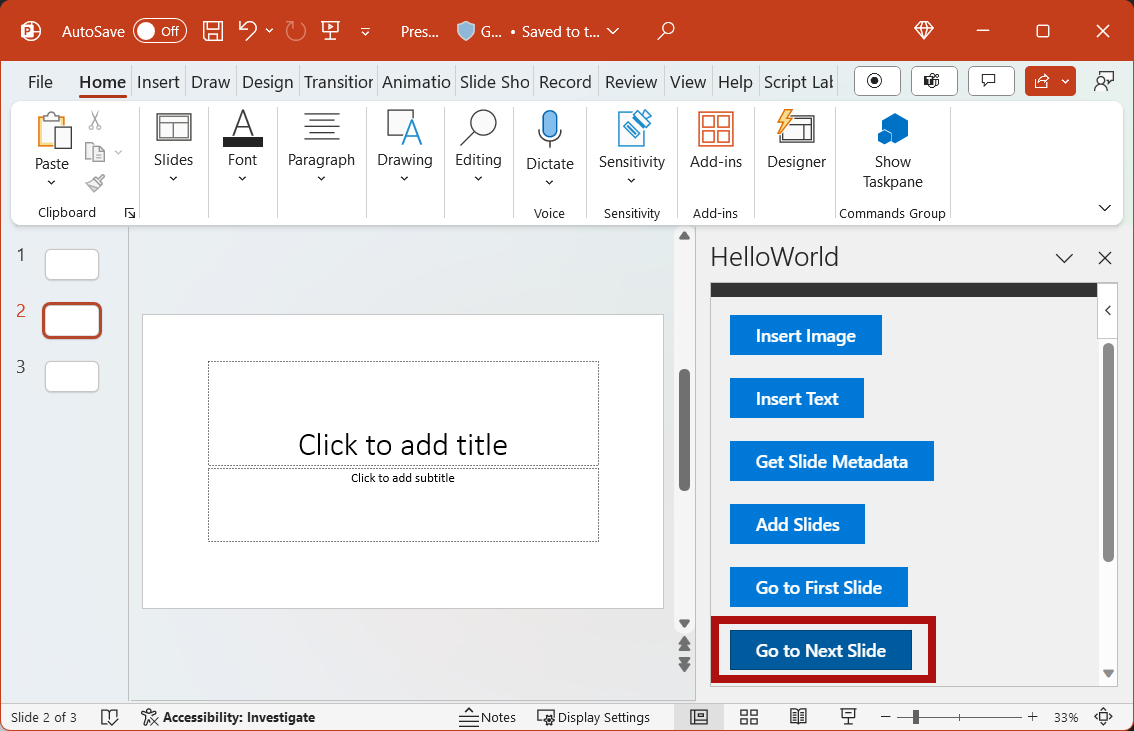
在任务窗格中,选择“前往下一张幻灯片”按钮。 此时,选择并显示文档中的下一张幻灯片。
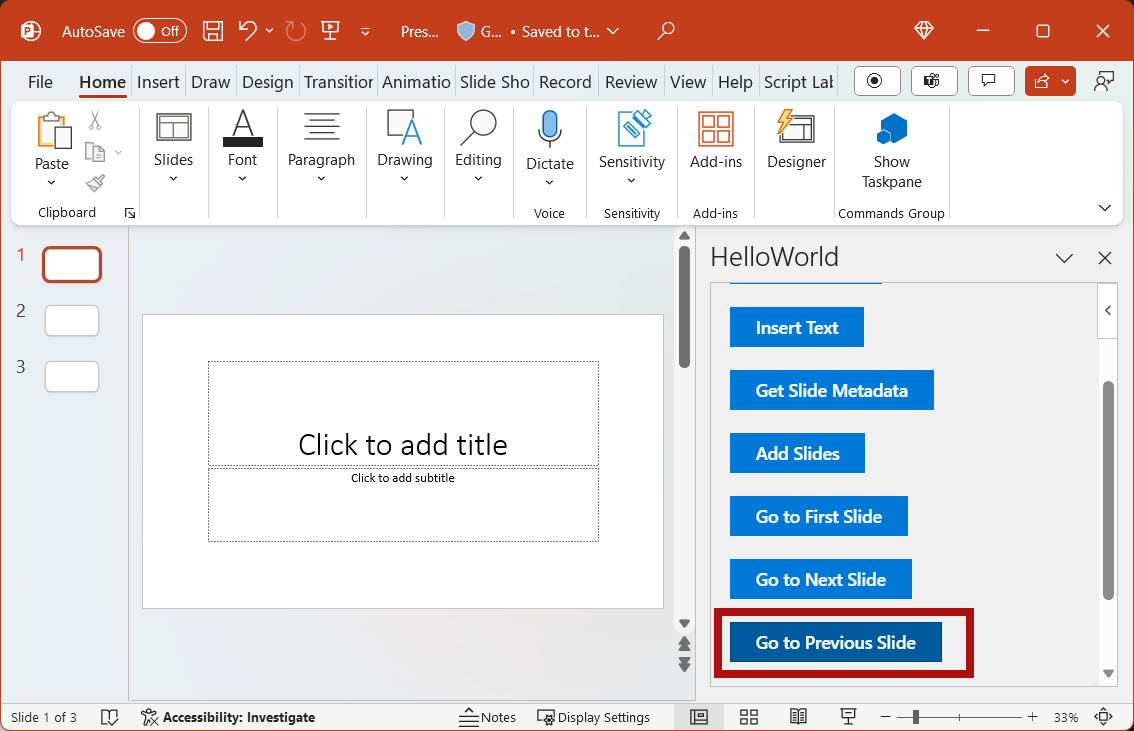
在任务窗格中,选择“前往上一张幻灯片”按钮。 此时,选择并显示文档中的上一张幻灯片。
在任务窗格中,选择“前往最后一张幻灯片”按钮。 此时,选择并显示文档中的最后一张幻灯片。
在 Visual Studio 中,通过按 Shift+F5 或选择“ 停止 ”按钮来停止加载项。 PowerPoint 在加载项停止时自动关闭。

代码示例
- 已完成的 PowerPoint 加载项教程:完成本教程的结果。
后续步骤
在本教程中,你创建了一个 PowerPoint 加载项,用于插入图像、插入文本、获取幻灯片元数据并在幻灯片之间导航。 若要了解有关生成 PowerPoint 加载项的详细信息,请继续阅读以下文章。