在 Teams 中生成 RAG 机器人
高级 Q&A 聊天机器人是借助大型语言模型 (LLM) 构建的强大应用。 聊天机器人使用名为 Retrieval-Augmented Generation (RAG) 的方法从特定源拉取信息来回答问题。 RAG 体系结构有两个main流:
数据引入:用于从源引入数据并为其编制索引的管道。 这通常发生在脱机状态。
检索和生成:RAG 链在运行时接受用户查询,并从索引中检索相关数据,然后将其传递给模型。
Microsoft Teams 使你能够使用 RAG 构建对话机器人,以创建增强的体验,以最大限度地提高工作效率。 Teams 工具包在 “与数据聊天” 类别中提供了一系列随时可用的应用模板,这些模板将 Azure AI 搜索、Microsoft 365 SharePoint 和自定义 API 的功能组合为不同的数据源和 LLM,以在 Teams 中创建对话搜索体验。
先决条件
| 安装 | 用于使用... |
|---|---|
| Visual Studio Code | JavaScript、TypeScript 或 Python 生成环境。 使用最新版本。 |
| Teams 工具包 | Microsoft Visual Studio Code扩展,用于为应用创建项目基架。 使用最新版本。 |
| Node.js | 后端 JavaScript 运行时环境。 有关详细信息,请参阅 项目类型的Node.js 版本兼容性表。 |
| Microsoft Teams | Microsoft Teams,在一个位置通过聊天、会议和通话应用与你合作的每个人进行协作。 |
| Azure OpenAI | 首先创建 OpenAI API 密钥,以使用 OpenAI 的生成性预训练转换器 (GPT) 。 如果要在 Azure 中托管应用或访问资源,则必须创建 Azure OpenAI 服务。 |
创建新的基本 AI 聊天机器人项目
打开 Visual Studio Code。
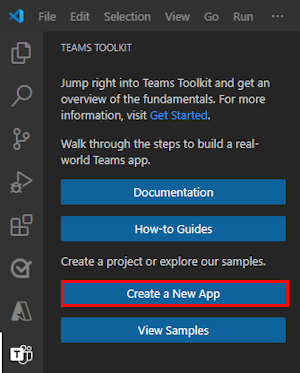
选择“Visual Studio Code活动栏中的 Teams 工具包
 ”图标。
”图标。选择“ 创建新应用”。
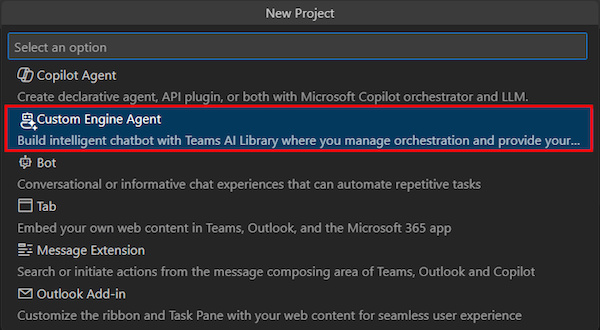
选择“ 自定义引擎代理”。
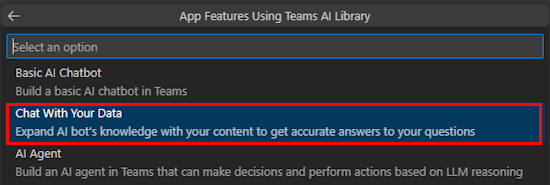
选择“ 使用数据聊天”。
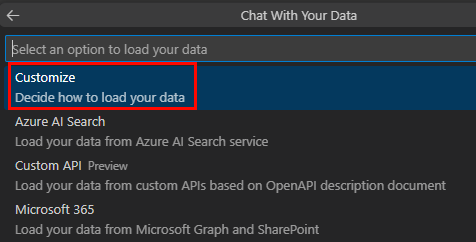
选择“ 自定义”。
选择 “JavaScript”。

选择 “Azure OpenAI ”或“ OpenAI”。

根据所选服务输入 Azure OpenAI 或 OpenAI 凭据。 选择“Enter”。

选择“ 默认文件夹”。

若要更改默认位置,请执行以下步骤:
- 选择“ 浏览”。
- 选择项目工作区的位置。
- 选择 “选择文件夹”。
输入应用的应用 名称,然后选择 Enter 键。

已成功创建“ 与你的数据聊天” 项目工作区。
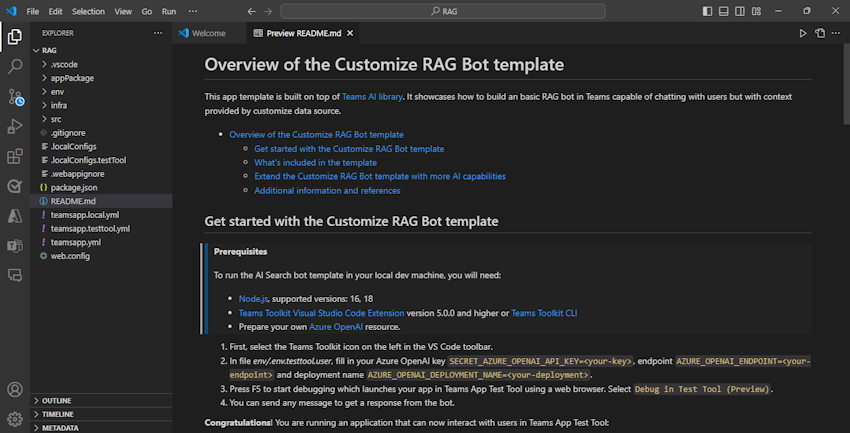
在“资源管理器”下,转到 env.env.testtool.user> 文件。
更新以下值:
SECRET_AZURE_OPENAI_API_KEY=<your-key>AZURE_OPENAI_ENDPOINT=<your-endpoint>AZURE_OPENAI_DEPLOYMENT_NAME=<your-deployment>

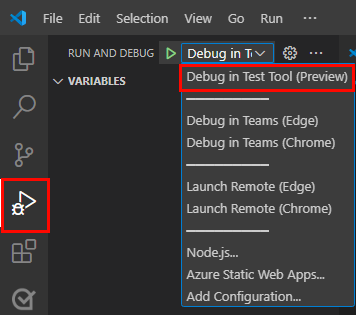
若要调试应用,请选择 F5 键或从左窗格中选择 “运行和调试” (Ctrl+Shift+D) ,然后从下拉列表中选择“ 在测试工具 (预览) 调试”。
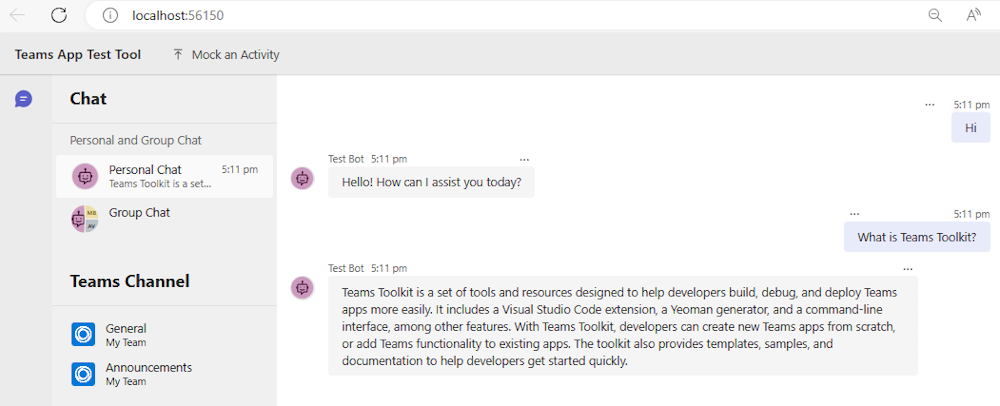
测试工具在网页中打开机器人。
浏览机器人应用源代码
| Folder | 目录 |
|---|---|
.vscode |
用于调试的Visual Studio Code文件。 |
appPackage |
Teams 应用清单的模板。 |
env |
环境文件。 |
infra |
用于预配 Azure 资源的模板。 |
src |
应用的源代码。 |
src/index.js |
设置机器人应用服务器。 |
src/adapter.js |
设置机器人适配器。 |
src/config.js |
定义环境变量。 |
src/prompts/chat/skprompt.txt |
定义提示。 |
src/prompts/chat/config.json |
配置提示。 |
src/app/app.js |
处理 RAG 机器人的业务逻辑。 |
src/app/myDataSource.js |
定义数据源。 |
src/data/*.md |
原始文本数据源。 |
teamsapp.yml |
这是main Teams 工具包项目文件。 项目文件定义属性和配置阶段定义。 |
teamsapp.local.yml |
这将替代 teamsapp.yml 启用本地执行和调试的操作。 |
teamsapp.testtool.yml |
这将替代 teamsapp.yml 在 Teams 应用测试工具中启用本地执行和调试的操作。 |
Teams AI 的 RAG 方案
在 AI 上下文中,矢量数据库被广泛用作 RAG 存储,用于存储嵌入数据并提供矢量相似性搜索。 Teams AI 库提供实用工具来帮助为给定输入创建嵌入。
提示
Teams AI 库不提供矢量数据库实现,因此你需要添加自己的逻辑来处理创建的嵌入。
// create OpenAIEmbeddings instance
const model = new OpenAIEmbeddings({ ... endpoint, apikey, model, ... });

// create embeddings for the given inputs
const embeddings = await model.createEmbeddings(model, inputs);

// your own logic to process embeddings
下图显示了 Teams AI 库如何提供功能来简化检索和生成过程的每个步骤:
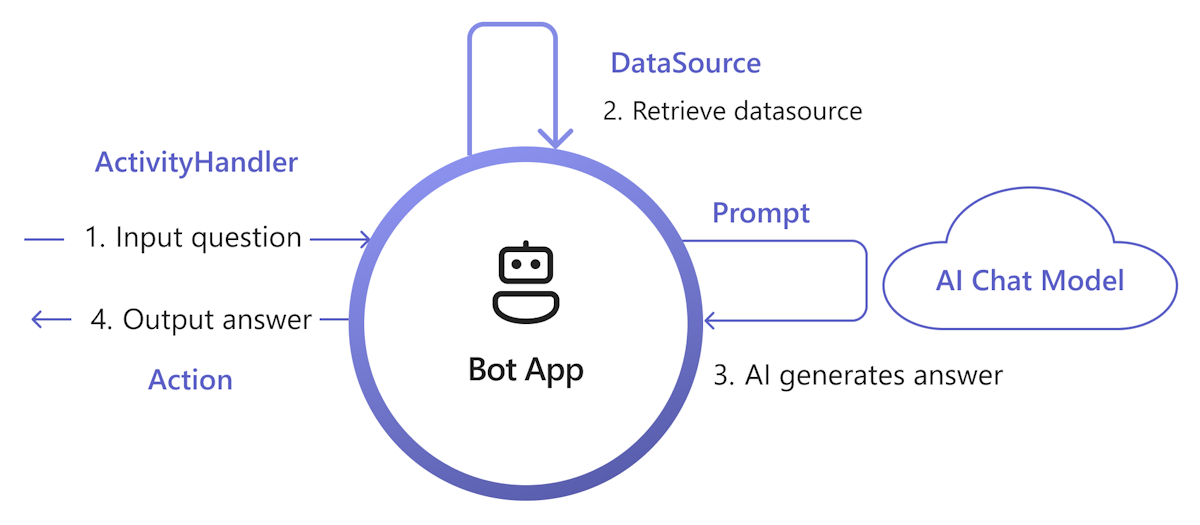
处理输入:最直接的方法是在不进行任何更改的情况下将用户的输入传递给检索。 但是,如果要在检索之前自定义输入,可以将 活动处理程序 添加到某些传入活动。
检索 DataSource:Teams AI 库提供了
DataSource用于添加自己的检索逻辑的接口。 你需要创建自己的DataSource实例,Teams AI 库按需调用它。class MyDataSource implements DataSource { /** * Name of the data source. */ public readonly name = "my-datasource"; /** * Renders the data source as a string of text. * @param context Turn context for the current turn of conversation with the user. * @param memory An interface for accessing state values. * @param tokenizer Tokenizer to use when rendering the data source. * @param maxTokens Maximum number of tokens allowed to be rendered. * @returns The text to inject into the prompt as a `RenderedPromptSection` object. */ renderData( context: TurnContext, memory: Memory, tokenizer: Tokenizer, maxTokens: number ): Promise<RenderedPromptSection<string>> { ... } }使用提示调用 AI:在 Teams AI 提示系统中,可以通过调整
augmentation.data_sources配置部分轻松注入DataSource。 这会将提示与DataSource和库业务流程协调程序连接起来,以将DataSource文本注入到最终提示中。 有关详细信息,请参阅 authorprompt。 例如,在提示的config.json文件中:{ "schema": 1.1, ... "augmentation": { "data_sources": { "my-datasource": 1200 } } }生成响应:默认情况下,Teams AI 库以短信的形式答复 AI 生成的响应。 如果要自定义响应,可以替代默认 SAY 操作 或显式调用 AI 模型 来生成答复,例如,使用自适应卡片。
下面是向应用添加 RAG 的最小实现集。 通常,它实现 DataSource 将你 knowledge 注入提示,以便 AI 可以基于 knowledge生成响应。
创建
myDataSource.ts文件以实现DataSource接口:export class MyDataSource implements DataSource { public readonly name = "my-datasource"; public async renderData( context: TurnContext, memory: Memory, tokenizer: Tokenizer, maxTokens: number ): Promise<RenderedPromptSection<string>> { const input = memory.getValue('temp.input') as string; let knowledge = "There's no knowledge found."; // hard-code knowledge if (input?.includes("shuttle bus")) { knowledge = "Company's shuttle bus may be 15 minutes late on rainy days."; } else if (input?.includes("cafe")) { knowledge = "The Cafe's available time is 9:00 to 17:00 on working days and 10:00 to 16:00 on weekends and holidays." } return { output: knowledge, length: knowledge.length, tooLong: false } } }DataSource在app.ts文件中注册 :// Register your data source to prompt manager planner.prompts.addDataSource(new MyDataSource());
prompts/qa/skprompt.txt创建文件并添加以下文本:The following is a conversation with an AI assistant. The assistant is helpful, creative, clever, and very friendly to answer user's question. Base your answer off the text below:prompts/qa/config.json创建 文件并添加以下代码以连接到数据源:{ "schema": 1.1, "description": "Chat with QA Assistant", "type": "completion", "completion": { "model": "gpt-35-turbo", "completion_type": "chat", "include_history": true, "include_input": true, "max_input_tokens": 2800, "max_tokens": 1000, "temperature": 0.9, "top_p": 0.0, "presence_penalty": 0.6, "frequency_penalty": 0.0, "stop_sequences": [] }, "augmentation": { "data_sources": { "my-datasource": 1200 } } }
选择数据源
在 “与数据聊天 ”或“RAG”方案中,Teams 工具包提供以下类型的数据源:
自定义:允许完全控制数据引入,以生成自己的矢量索引并将其用作数据源。 有关详细信息,请参阅 生成自己的数据引入。
还可以使用 Azure Cosmos DB 矢量数据库扩展或 Azure PostgreSQL Server 矢量扩展作为矢量数据库,或使用必应 Web 搜索 API 获取最新的 Web 内容,以实现任何数据源实例以与你自己的数据源连接。
Azure AI 搜索:提供了一个示例,用于将文档添加到 Azure AI 搜索服务,然后使用搜索索引作为数据源。
自定义 API:允许聊天机器人调用 OpenAPI 说明文档中定义的 API,以从 API 服务检索域数据。
Microsoft Graph 和 SharePoint:提供了一个示例,用于将 Microsoft Graph 搜索 API 中的 Microsoft 365 内容用作数据源。
构建自己的数据引入
若要生成数据引入,请执行以下步骤:
加载源文档:确保文档具有有意义的文本,因为嵌入模型仅将文本作为输入。
拆分为区块:请确保拆分文档以避免 API 调用失败,因为嵌入模型具有输入令牌限制。
调用嵌入模型:调用嵌入模型 API,为给定输入创建嵌入。
存储嵌入:将创建的嵌入存储在矢量数据库中。 还包括有用的元数据和原始内容,供进一步参考。
示例代码
loader.ts:纯文本作为源输入。import * as fs from "node:fs"; export function loadTextFile(path: string): string { return fs.readFileSync(path, "utf-8"); }splitter.ts:将文本拆分为具有重叠的区块。// split words by delimiters. const delimiters = [" ", "\t", "\r", "\n"]; export function split(content: string, length: number, overlap: number): Array<string> { const results = new Array<string>(); let cursor = 0, curChunk = 0; results.push(""); while(cursor < content.length) { const curChar = content[cursor]; if (delimiters.includes(curChar)) { // check chunk length while (curChunk < results.length && results[curChunk].length >= length) { curChunk ++; } for (let i = curChunk; i < results.length; i++) { results[i] += curChar; } if (results[results.length - 1].length >= length - overlap) { results.push(""); } } else { // append for (let i = curChunk; i < results.length; i++) { results[i] += curChar; } } cursor ++; } while (curChunk < results.length - 1) { results.pop(); } return results; }embeddings.ts:使用 Teams AI 库OpenAIEmbeddings创建嵌入。import { OpenAIEmbeddings } from "@microsoft/teams-ai"; const embeddingClient = new OpenAIEmbeddings({ azureApiKey: "<your-aoai-key>", azureEndpoint: "<your-aoai-endpoint>", azureDeployment: "<your-embedding-deployment, e.g., text-embedding-ada-002>" }); export async function createEmbeddings(content: string): Promise<number[]> { const response = await embeddingClient.createEmbeddings(content); return response.output[0]; }searchIndex.ts:创建 Azure AI 搜索索引。import { SearchIndexClient, AzureKeyCredential, SearchIndex } from "@azure/search-documents"; const endpoint = "<your-search-endpoint>"; const apiKey = "<your-search-key>"; const indexName = "<your-index-name>"; const indexDef: SearchIndex = { name: indexName, fields: [ { type: "Edm.String", name: "id", key: true, }, { type: "Edm.String", name: "content", searchable: true, }, { type: "Edm.String", name: "filepath", searchable: true, filterable: true, }, { type: "Collection(Edm.Single)", name: "contentVector", searchable: true, vectorSearchDimensions: 1536, vectorSearchProfileName: "default" } ], vectorSearch: { algorithms: [{ name: "default", kind: "hnsw" }], profiles: [{ name: "default", algorithmConfigurationName: "default" }] }, semanticSearch: { defaultConfigurationName: "default", configurations: [{ name: "default", prioritizedFields: { contentFields: [{ name: "content" }] } }] } }; export async function createNewIndex(): Promise<void> { const client = new SearchIndexClient(endpoint, new AzureKeyCredential(apiKey)); await client.createIndex(indexDef); }searchIndexer.ts:将创建的嵌入项和其他字段上传到 Azure AI 搜索索引。import { AzureKeyCredential, SearchClient } from "@azure/search-documents"; export interface Doc { id: string, content: string, filepath: string, contentVector: number[] } const endpoint = "<your-search-endpoint>"; const apiKey = "<your-search-key>"; const indexName = "<your-index-name>"; const searchClient: SearchClient<Doc> = new SearchClient<Doc>(endpoint, indexName, new AzureKeyCredential(apiKey)); export async function indexDoc(doc: Doc): Promise<boolean> { const response = await searchClient.mergeOrUploadDocuments([doc]); return response.results.every((result) => result.succeeded); }index.ts:协调上述组件。import { createEmbeddings } from "./embeddings"; import { loadTextFile } from "./loader"; import { createNewIndex } from "./searchIndex"; import { indexDoc } from "./searchIndexer"; import { split } from "./splitter"; async function main() { // Only need to call once await createNewIndex(); // local files as source input const files = [`${__dirname}/data/A.md`, `${__dirname}/data/A.md`]; for (const file of files) { // load file const fullContent = loadTextFile(file); // split into chunks const contents = split(fullContent, 1000, 100); let partIndex = 0; for (const content of contents) { partIndex ++; // create embeddings const embeddings = await createEmbeddings(content); // upload to index await indexDoc({ id: `${file.replace(/[^a-z0-9]/ig, "")}___${partIndex}`, content: content, filepath: file, contentVector: embeddings, }); } } } main().then().finally();
Azure AI 搜索作为数据源
在本部分中,你将了解如何:
将文档添加到 Azure AI 搜索
注意
此方法创建一个名为 AI 模型的端到端聊天 API。 还可以使用之前创建的索引作为数据源,并使用 Teams AI 库自定义检索和提示。
可以将知识文档引入 Azure AI 搜索服务,并使用 Azure OpenAI 对数据创建向量索引。 引入后,可以将索引用作数据源。
在 Azure Blob 存储 中准备数据。
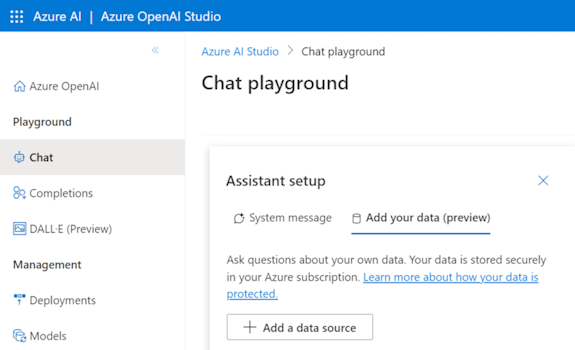
在 Azure OpenAI Studio 中,选择“ 添加数据源”。
更新必填字段。
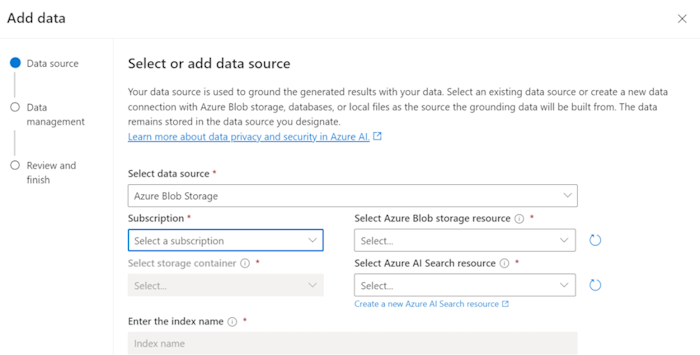
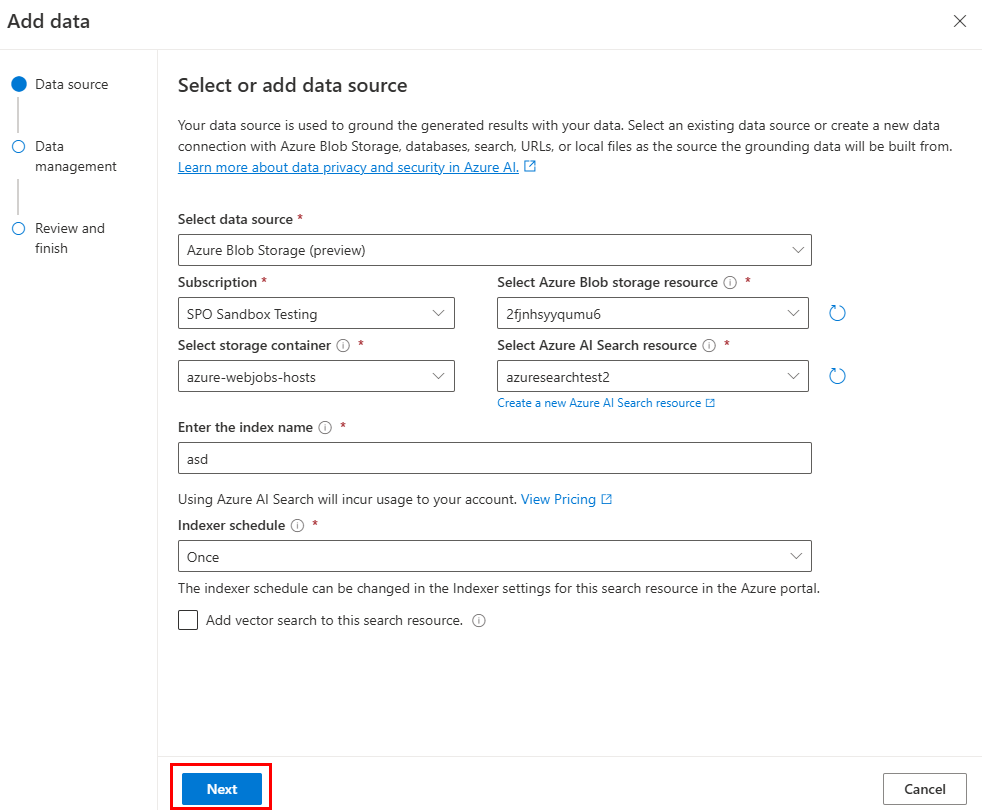
选择 下一步。
此时会显示 “数据管理 ”页。
更新必填字段。
选择 下一步。
更新必填字段。 选择 下一步。
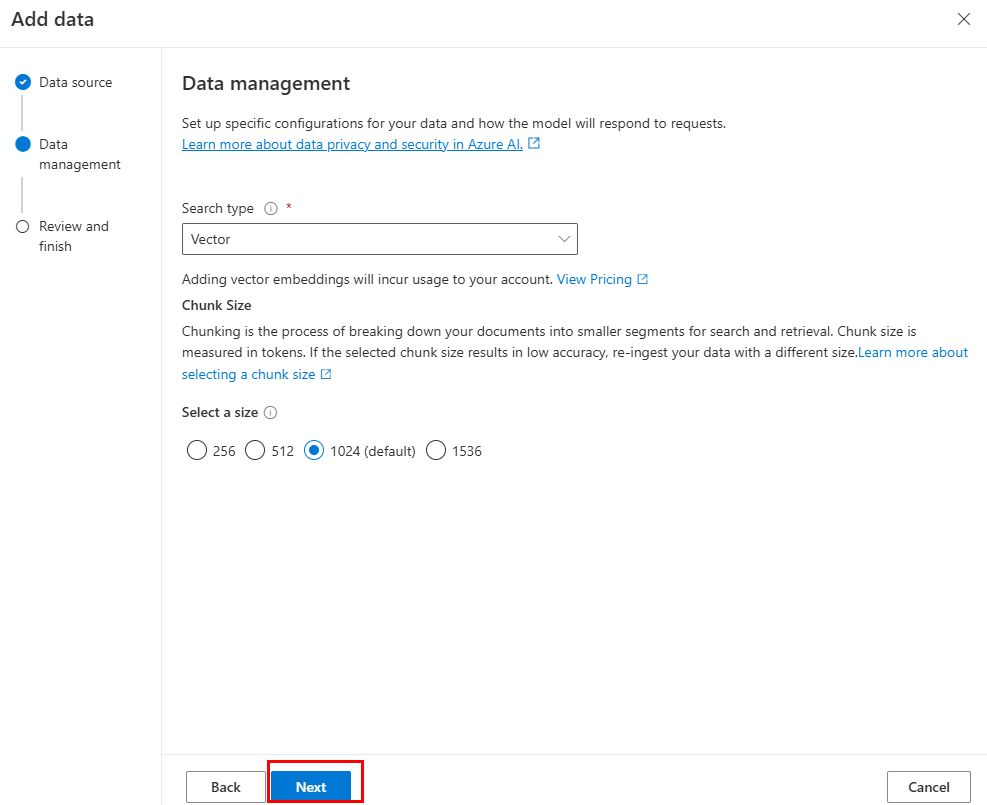
选择“ 保存并关闭”。
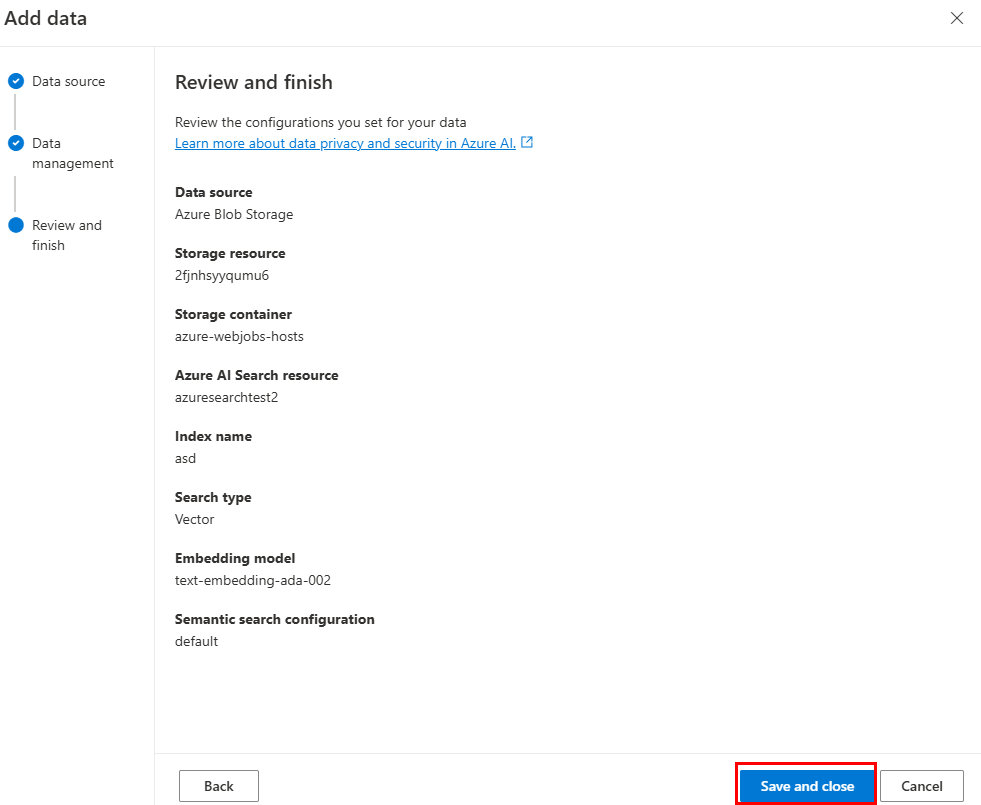
使用 Azure AI 搜索索引数据源
将数据引入 Azure AI 搜索后,可以实现自己的 DataSource 数据,以从搜索索引检索数据。
const { AzureKeyCredential, SearchClient } = require("@azure/search-documents");
const { DataSource, Memory, OpenAIEmbeddings, Tokenizer } = require("@microsoft/teams-ai");
const { TurnContext } = require("botbuilder");

// Define the interface for document
class Doc {
  constructor(id, content, filepath) {
    this.id = id;
    this.content = content; // searchable
    this.filepath = filepath;
  }
}

// Azure OpenAI configuration
const aoaiEndpoint = "<your-aoai-endpoint>";
const aoaiApiKey = "<your-aoai-key>";
const aoaiDeployment = "<your-embedding-deployment, e.g., text-embedding-ada-002>";

// Azure AI Search configuration
const searchEndpoint = "<your-search-endpoint>";
const searchApiKey = "<your-search-apikey>";
const searchIndexName = "<your-index-name>";

// Define MyDataSource class implementing DataSource interface
class MyDataSource extends DataSource {
  constructor() {
    super();
    this.name = "my-datasource";
    this.embeddingClient = new OpenAIEmbeddings({
      azureEndpoint: aoaiEndpoint,
      azureApiKey: aoaiApiKey,
      azureDeployment: aoaiDeployment
    });
    this.searchClient = new SearchClient(searchEndpoint, searchIndexName, new AzureKeyCredential(searchApiKey));
  }

  async renderData(context, memory, tokenizer, maxTokens) {
    // use user input as query
    const input = memory.getValue("temp.input");

    // generate embeddings
    const embeddings = (await this.embeddingClient.createEmbeddings(input)).output[0];

    // query Azure AI Search
    const response = await this.searchClient.search(input, {
      select: [ "id", "content", "filepath" ],
      searchFields: ["rawContent"],
      vectorSearchOptions: {
        queries: [{
          kind: "vector",
          fields: [ "contentVector" ],
          vector: embeddings,
          kNearestNeighborsCount: 3
        }]
      },
      queryType: "semantic",
      top: 3,
      semanticSearchOptions: {
        // your semantic configuration name
        configurationName: "default",
      }
    });

    // Add documents until you run out of tokens
    let length = 0, output = '';
    for await (const result of response.results) {
      // Start a new doc
      let doc = `${result.document.content}\n\n`;
      let docLength = tokenizer.encode(doc).length;
      const remainingTokens = maxTokens - (length + docLength);
      if (remainingTokens <= 0) {
          break;
      }

      // Append doc to output
      output += doc;
      length += docLength;
    }
    return { output, length, tooLong: length > maxTokens };
  }
}
为自定义 API 添加更多 API 作为数据源
按照以下步骤使用更多 API 从自定义 API 模板扩展自定义引擎代理。
更新
./appPackage/apiSpecificationFile/openapi.*。复制要从规范中添加的 API 的相应部分,并将其追加到
./appPackage/apiSpecificationFile/openapi.*。更新
./src/prompts/chat/actions.json。更新以下对象中 API 的路径、查询和正文所需的信息和属性:
{
  "name": "${{YOUR-API-NAME}}",
  "description": "${{YOUR-API-DESCRIPTION}}",
  "parameters": {
    "type": "object",
    "properties": {
      "query": {
        "type": "object",
        "properties": {
          "${{YOUR-PROPERTY-NAME}}": {
            "type": "${{YOUR-PROPERTY-TYPE}}",
            "description": "${{YOUR-PROPERTY-DESCRIPTION}}",
          }
          // You can add more query properties here
        }
      },
      "path": {
        // Same as query properties
      },
      "body": {
        // Same as query properties
      }
    }
  }
}
更新
./src/adaptiveCards。创建一个具有名称
${{YOUR-API-NAME}}.json的新文件,并填写 API 的 API 响应的自适应卡片。./src/app/app.js更新文件。在 之前
module.exports = app;添加以下代码:app.ai.action(${{YOUR-API-NAME}}, async (context: TurnContext, state: ApplicationTurnState, parameter: any) => { const client = await api.getClient(); const path = client.paths[${{YOUR-API-PATH}}]; if (path && path.${{YOUR-API-METHOD}}) { const result = await path.${{YOUR-API-METHOD}}(parameter.path, parameter.body, { params: parameter.query, }); const card = generateAdaptiveCard("../adaptiveCards/${{YOUR-API-NAME}}.json", result); await context.sendActivity({ attachments: [card] }); } else { await context.sendActivity("no result"); } return "result"; });
Microsoft 365 作为数据源
了解如何利用 Microsoft Graph 搜索 API 来查询 Microsoft 365 内容作为 RAG 应用的数据源。 若要了解有关 Microsoft Graph 搜索 API 的详细信息,请参阅使用 Microsoft 搜索 API 来搜索 OneDrive 和 SharePoint 内容。
先决条件:必须创建图形 API客户端,并向其Files.Read.All授予访问 SharePoint 和 OneDrive 文件、文件夹、页面和新闻的权限范围。
数据引入
Microsoft图形搜索 API(可搜索 SharePoint 内容)可用。 因此,只需确保将文档上传到 SharePoint 或 OneDrive,无需额外的数据引入。
注意
仅当文件的文件扩展名在“管理文件类型”页上列出时,SharePoint 服务器才会为其编制索引。 有关支持的文件扩展名的完整列表,请参阅 sharePoint 服务器和 SharePoint Microsoft 365 中的默认索引文件扩展名和分析的文件类型。
数据源实现
在 SharePoint 和 OneDrive 中搜索文本文件的示例如下:
import {
  DataSource,
  Memory,
  RenderedPromptSection,
  Tokenizer,
} from "@microsoft/teams-ai";
import { TurnContext } from "botbuilder";
import { Client, ResponseType } from "@microsoft/microsoft-graph-client";

export class GraphApiSearchDataSource implements DataSource {
  public readonly name = "my-datasource";
  public readonly description =
    "Searches the graph for documents related to the input";
  public client: Client;

  constructor(client: Client) {
    this.client = client;
  }

  public async renderData(
    context: TurnContext,
    memory: Memory,
    tokenizer: Tokenizer,
    maxTokens: number
  ): Promise<RenderedPromptSection<string>> {
    const input = memory.getValue("temp.input") as string;
    const contentResults = [];
    const response = await this.client.api("/search/query").post({
      requests: [
        {
          entityTypes: ["driveItem"],
          query: {
            // Search for markdown files in the user's OneDrive and SharePoint
            // The supported file types are listed here:
            // https://learn.microsoft.com/sharepoint/technical-reference/default-crawled-file-name-extensions-and-parsed-file-types
            queryString: `${input} filetype:txt`,
          },
          // This parameter is required only when searching with application permissions
          // https://learn.microsoft.com/graph/search-concept-searchall
          // region: "US",
        },
      ],
    });
    for (const value of response?.value ?? []) {
      for (const hitsContainer of value?.hitsContainers ?? []) {
        contentResults.push(...(hitsContainer?.hits ?? []));
      }
    }

    // Add documents until you run out of tokens
    let length = 0,
      output = "";
    for (const result of contentResults) {
      const rawContent = await this.downloadSharepointFile(
        result.resource.webUrl
      );
      if (!rawContent) {
        continue;
      }
      let doc = `${rawContent}\n\n`;
      let docLength = tokenizer.encode(doc).length;
      const remainingTokens = maxTokens - (length + docLength);
      if (remainingTokens <= 0) {
        break;
      }

      // Append do to output
      output += doc;
      length += docLength;
    }
    return { output, length, tooLong: length > maxTokens };
  }

  // Download the file from SharePoint
  // https://docs.microsoft.com/en-us/graph/api/driveitem-get-content
  private async downloadSharepointFile(
    contentUrl: string
  ): Promise<string | undefined> {
    const encodedUrl = this.encodeSharepointContentUrl(contentUrl);
    const fileContentResponse = await this.client
      .api(`/shares/${encodedUrl}/driveItem/content`)
      .responseType(ResponseType.TEXT)
      .get();

    return fileContentResponse;
  }

  private encodeSharepointContentUrl(webUrl: string): string {
    const byteData = Buffer.from(webUrl, "utf-8");
    const base64String = byteData.toString("base64");
    return (
      "u!" + base64String.replace("=", "").replace("/", "_").replace("+", "_")
    );
  }
}
