快速入门:保护 SDK (C++) 的客户端应用程序初始化
本快速入门介绍如何实现 MIP C++ SDK 在运行时使用的客户端初始化模式。
注意
本快速入门中概述的步骤对于使用 MIP 保护 SDK 的任何客户端应用程序都是必需的。 应在身份验证委托和许可委托类的应用程序初始化和实现后完成这些快速入门。
先决条件
如果尚未完成,请确保:
- 完成 Microsoft 信息保护 (MIP) SDK 安装和配置中的步骤。 此“客户端应用程序初始化”快速入门需要先正确安装和配置 SDK。
- 可选:
创建 Visual Studio 解决方案和项目
首先,创建并配置初始 Visual Studio 解决方案和项目,其他快速入门以此为基础。
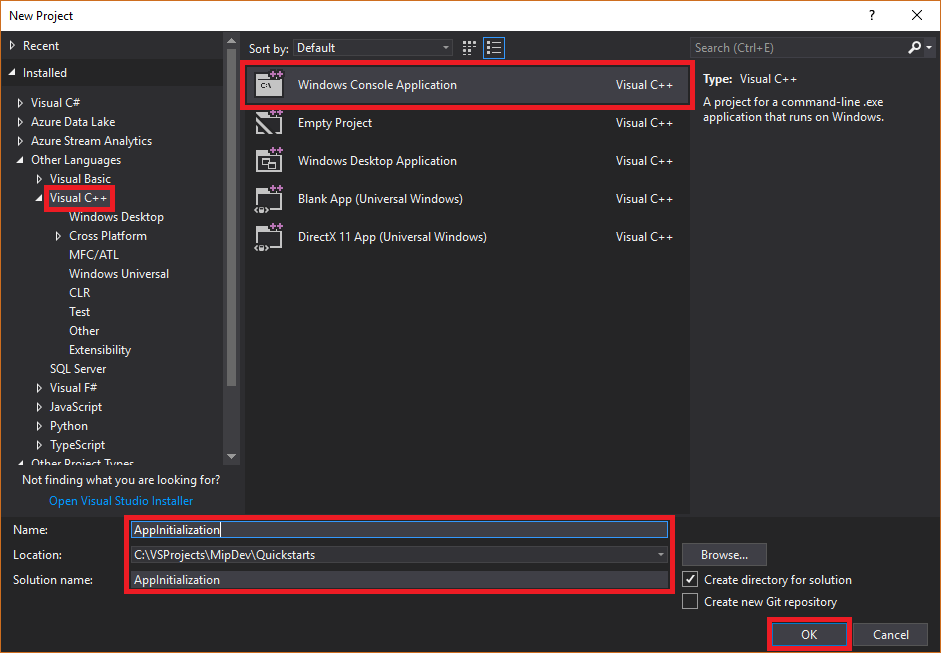
打开 Visual Studio 2017,依次选择“文件”菜单、“新建”、“项目”。 在“新建项目”对话框中:
在左窗格的“已安装”下的“其他语言”中,选择“Visual C++”。
在中心窗格中,选择“Windows 控制台应用程序”
在底部窗格中,对项目“名称”、“位置”和包含的“解决方案名称”进行相应更新。
完成后,单击右下角的“确定”按钮。
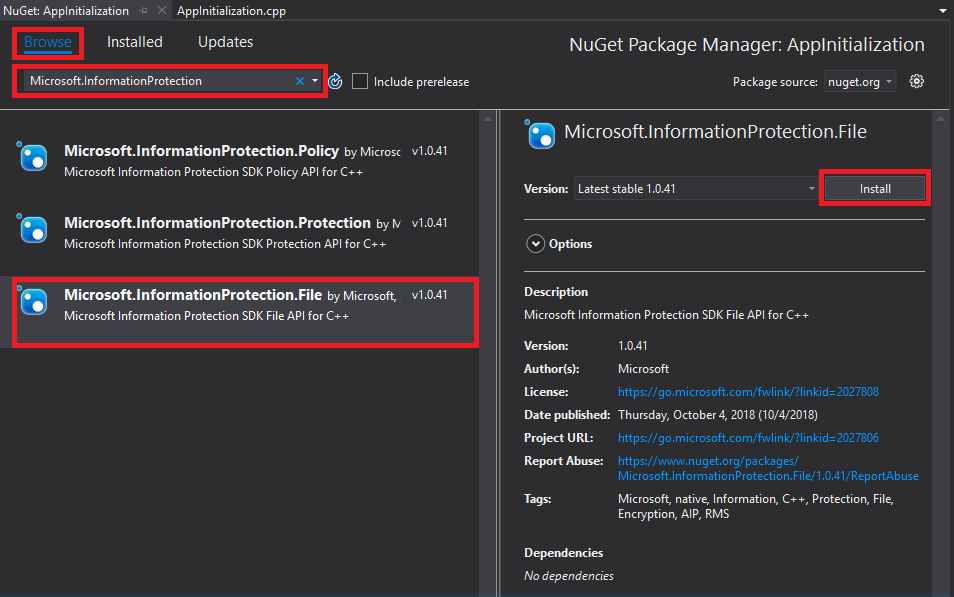
将 MIP 保护 SDK 的 Nuget 包添加到项目:
在“解决方案资源管理器”中,右键单击项目节点(直接在顶部/解决方案节点下方单击),然后选择“管理 NuGet 包...”:
当“NuGet 包管理器”选项卡在编辑器组选项卡区域中打开时:
- 选择浏览。
- 在搜索框中输入“Microsoft.InformationProtection”。
- 选择“Microsoft.InformationProtection.Protection”包。
- 单击“安装”,然后在显示“预览更改”确认对话框时,单击“确定”。


实现观察程序类来监视保护配置文件和引擎对象
现在,通过扩展 SDK 的 mip::ProtectionProfile::Observer 类,为保护配置文件观察程序类创建一个基本实现。 观察程序将实例化,稍后再用于监视保护配置文件对象的加载,以及将引擎对象添加到配置文件。
将新类添加到项目,这将会生成 header/.h 和 implementation/.cpp 文件:
在“解决方案资源管理器”中,再次右键单击项目节点,选择“添加”,然后选择“类”。
在“添加类”对话框中:
- 在“类名”字段中,输入“profile_observer”。 请注意,系统会根据输入的名称自动填充“.h 文件”和“.cpp 文件”字段。
- 完成后,单击“确定”按钮。

为类生成 .h 文件和 .cpp 文件后,这两个文件都会在编辑器组选项卡中打开。 现在更新每个文件,实现新的观察程序类:
通过选择/删除生成的
profile_observer类来更新“profile_observer.h”。 不要删除上一步生成的预处理器指令(#pragma、#include)。 然后,将以下源复制/粘贴到文件中的任何现有预处理器指令之后:#include <memory> #include "mip/protection/protection_profile.h" using std::exception_ptr; using std::shared_ptr; class ProtectionProfileObserver final : public mip::ProtectionProfile::Observer { public: ProtectionProfileObserver() { } void OnLoadSuccess(const std::shared_ptr<mip::ProtectionProfile>& profile, const std::shared_ptr<void>& context) override; void OnLoadFailure(const std::exception_ptr& Failure, const std::shared_ptr<void>& context) override; void OnAddEngineSuccess(const std::shared_ptr<mip::ProtectionEngine>& engine, const std::shared_ptr<void>& context) override; void OnAddEngineFailure(const std::exception_ptr& Failure, const std::shared_ptr<void>& context) override; };通过选择/删除生成的
profile_observer类实现来更新“profile_observer.cpp”。 不要删除上一步生成的预处理器指令(#pragma、#include)。 然后,将以下源复制/粘贴到文件中的任何现有预处理器指令之后:#include <future> using std::promise; using std::shared_ptr; using std::static_pointer_cast; using mip::ProtectionEngine; using mip::ProtectionProfile; void ProtectionProfileObserver::OnLoadSuccess(const shared_ptr<ProtectionProfile>& profile, const shared_ptr<void>& context) { auto promise = static_pointer_cast<std::promise<shared_ptr<ProtectionProfile>>>(context); promise->set_value(profile); } void ProtectionProfileObserver::OnLoadFailure(const std::exception_ptr& error, const shared_ptr<void>& context) { auto promise = static_pointer_cast<std::promise<shared_ptr<ProtectionProfile>>>(context); promise->set_exception(error); } void ProtectionProfileObserver::OnAddEngineSuccess(const shared_ptr<ProtectionEngine>& engine, const shared_ptr<void>& context) { auto promise = static_pointer_cast<std::promise<shared_ptr<ProtectionEngine>>>(context); promise->set_value(engine); } void ProtectionProfileObserver::OnAddEngineFailure(const std::exception_ptr& error, const shared_ptr<void>& context) { auto promise = static_pointer_cast<std::promise<shared_ptr<ProtectionEngine>>>(context); promise->set_exception(error); }
请执行 1 中的步骤。 将保护引擎观察程序“engine_observer”的新类添加到项目,这将会生成 header/.h 和 implementation/.cpp 文件。
为类生成 .h 文件和 .cpp 文件后,这两个文件都会在编辑器组选项卡中打开。 现在更新每个文件,实现新的观察程序类:
通过选择/删除生成的
engine_observer类来更新“engine_observer.h”。 不要删除上一步生成的预处理器指令(#pragma、#include)。 然后,将以下源复制/粘贴到文件中的任何现有预处理器指令之后:#include <memory> #include "mip/protection/protection_engine.h" using std::vector; using std::exception_ptr; using std::shared_ptr; class ProtectionEngineObserver final : public mip::ProtectionEngine::Observer { public: ProtectionEngineObserver() {} void OnGetTemplatesSuccess(const vector<std::shared_ptr<mip::TemplateDescriptor>>& templateDescriptors, const shared_ptr<void>& context) override; void OnGetTemplatesFailure(const exception_ptr& Failure, const shared_ptr<void>& context) override; };通过选择/删除生成的
engine_observer类实现来更新“engine_observer.cpp”。 不要删除上一步生成的预处理器指令(#pragma、#include)。 然后,将以下源复制/粘贴到文件中的任何现有预处理器指令之后:#include "mip/protection/protection_profile.h" #include "engine_observer.h" using std::promise; void ProtectionEngineObserver::OnGetTemplatesSuccess(const vector<shared_ptr<mip::TemplateDescriptor>>& templateDescriptors,const shared_ptr<void>& context) { auto loadPromise = static_cast<promise<vector<shared_ptr<mip::TemplateDescriptor>>>*>(context.get()); loadPromise->set_value(templateDescriptors); }; void ProtectionEngineObserver::OnGetTemplatesFailure(const exception_ptr& Failure, const shared_ptr<void>& context) { auto loadPromise = static_cast<promise<shared_ptr<mip::ProtectionProfile>>*>(context.get()); loadPromise->set_exception(Failure); };
使用 Ctrl+Shift+B(生成解决方案)运行解决方案的测试编译/链接,以确保在继续之前成功完成生成。

实现身份验证委托和许可委托
MIP SDK 使用类扩展性实现身份验证,它提供了一种与客户端应用程序共享身份验证工作的机制。 客户端必须获取合适的 OAuth2 访问令牌,并在运行时提供给 MIP SDK。
通过扩展 SDK 的 mip::AuthDelegate 类,并替代/实现 mip::AuthDelegate::AcquireOAuth2Token() 纯虚函数,为身份验证委托创建一个实现。 遵循文件 SDK 应用程序初始化快速入门下详细介绍的步骤。 身份验证委托稍后由保护配置文件和保护引擎对象实例化并使用。
实现许可委托
现在,通过扩展 SDK 的 mip::ConsentDelegate 类,并替代/实现 mip::AuthDelegate::GetUserConsent() 纯虚函数,为许可委托创建一个实现。 遵循文件 SDK 应用程序初始化快速入门下详细介绍的步骤。 许可委托稍后由保护配置文件和保护引擎对象实例化并使用。
构造保护配置文件和引擎
如前所述,使用 MIP API 的 SDK 客户端需要配置文件和引擎对象。 通过添加代码来实例化配置文件和引擎对象,完成本快速入门的编码部分:
在“解决方案资源管理器”中,打开项目中包含
main()方法实现的 .cpp 文件。 该文件默认与包含它的项目同名,该名称在项目创建期间指定。删除生成的
main()实现。 不要删除在项目创建期间由 Visual Studio 生成的预处理器指令(#pragma、#include)。 在任何预处理器指令后面追加以下代码:
#include "mip/mip_init.h"
#include "mip/mip_context.h"
#include "auth_delegate.h"
#include "consent_delegate.h"
#include "profile_observer.h"
#include"engine_observer.h"

using std::promise;
using std::future;
using std::make_shared;
using std::shared_ptr;
using std::string;
using std::cout;
using mip::ApplicationInfo;
using mip::ProtectionProfile;
using mip::ProtectionEngine;

int main(){

  // Construct/initialize objects required by the application's profile object
  // ApplicationInfo object (App ID, name, version)
  ApplicationInfo appInfo{"<application-id>",
                          "<application-name>",
                          "<application-version>"};

  std::shared_ptr<mip::MipConfiguration> mipConfiguration = std::make_shared<mip::MipConfiguration>(mAppInfo,
				                                                                                               "mip_data",
                                                                                      			         mip::LogLevel::Trace,
                                                                                                     false);

  std::shared_ptr<mip::MipContext> mMipContext = mip::MipContext::Create(mipConfiguration);

  auto profileObserver = make_shared<ProtectionProfileObserver>(); // Observer object
  auto authDelegateImpl = make_shared<AuthDelegateImpl>("<application-id>"); // Authentication delegate object (App ID)
  auto consentDelegateImpl = make_shared<ConsentDelegateImpl>(); // Consent delegate object

  // Construct/initialize profile object
  ProtectionProfile::Settings profileSettings(
    mMipContext,
    mip::CacheStorageType::OnDisk,
    consentDelegateImpl,
    profileObserver);

  // Set up promise/future connection for async profile operations; load profile asynchronously
  auto profilePromise = make_shared<promise<shared_ptr<ProtectionProfile>>>();
  auto profileFuture = profilePromise->get_future();
  try
  {
    mip::ProtectionProfile::LoadAsync(profileSettings, profilePromise);
  }
  catch (const std::exception& e)
  {
    cout << "An exception occurred... are the Settings and ApplicationInfo objects populated correctly?\n\n"
          << e.what() << "'\n";
    system("pause");
    return 1;
  }

  auto profile = profileFuture.get();

  // Construct/initialize engine object
  ProtectionEngine::Settings engineSettings(
     mip::Identity("<engine-account>"),         // Engine identity (account used for authentication)
     authDelegateImpl,                          // Reference to mip::AuthDelegate implementation
     "",                                        // ClientData field
     "en-US");                                  // Locale (default = en-US)

  // Set the engineId so it can be cached and reused.
  engineSettings.SetEngineId("<engine-account>");

  // Set up promise/future connection for async engine operations; add engine to profile asynchronously
  auto enginePromise = make_shared<promise<shared_ptr<ProtectionEngine>>>();
  auto engineFuture = enginePromise->get_future();
  profile->AddEngineAsync(engineSettings, enginePromise);
  std::shared_ptr<ProtectionEngine> engine;

  try
  {
    engine = engineFuture.get();
  }
  catch (const std::exception& e)
  {
    cout << "An exception occurred... is the access token incorrect/expired?\n\n"
         << e.what() << "'\n";
    system("pause");
    return 1;
  }

  // Application shutdown. Null out profile and engine, call ReleaseAllResources();
  // Application may crash at shutdown if resources aren't properly released.
  engine = nullptr;
  profile = nullptr;
  mipContext.Shutdown();
  mipContext = nullptr;

  return 0;
}
使用字符串常量替换刚刚粘贴的源代码中的所有占位符值:
占位符 值 示例 <application-id> 分配给在“MIP SDK 安装和配置”(setup-configure-mip.md) 一文的步骤 #2 中注册的应用程序的 Microsoft Entra 应用程序 ID (GUID)。 替换 2 个实例。 "0edbblll-8773-44de-b87c-b8c6276d41eb"<application-name> 应用程序的用户定义的易记名称。 必须包含有效的 ASCII 字符(不包括“;”),并且最好与在 Microsoft Entra 注册中使用的应用程序名称匹配。 "AppInitialization"<application-version> 应用程序的用户定义的版本信息。 必须包含有效的 ASCII 字符(不包括“;”)。 "1.1.0.0"<engine-account> 用于引擎标识的帐户。 在获取令牌期间使用用户帐户进行身份验证时,帐户必须与此值匹配。 "user1@tenant.onmicrosoft.com"<engine-state> 与引擎关联的用户定义的状态。 "My App State"现在,对应用程序进行最终生成并解决所有错误。 代码应会成功生成,但在完成下一个快速入门之前还不能正确运行。 如果运行应用程序,将显示类似于以下内容的输出。 应用程序将成功构造保护配置文件和保护引擎,但不会触发身份验证模块,并且在完成下一个快速入门之前,你将无法提供访问令牌。
 C:\MIP Sample Apps\ProtectionQS\Debug\ProtectionQS.exe (process 8252) exited with code 0.
 To automatically close the console when debugging stops, enable Tools->Options->Debugging->Automatically close the console when debugging stops.
 Press any key to close this window . . .
后续步骤
完成初始化代码后,接下来可以开始学习下一个快速入门,你将开始了解 MIP 保护 SDK。