添加 FTP 提供程序定义 <add>
概述
<providerDefinitions> 元素的 <add> 元素指定托管代码或本机代码 (COM) 提供程序的注册信息。
从 FTP 7.5 开始,FTP 服务支持自定义身份验证和角色、日志记录和主目录查找的扩展性。 创建扩展性提供程序后,必须先在托管代码提供程序的 .NET 全局程序集缓存 (GAC) 中注册此提供程序,或者在系统的本机代码 (COM) 提供程序注册表中注册。 有关如何创建 FTP 自定义提供程序的其他信息,请参阅 Microsoft IIS.net 网站上的以下章节:
兼容性
| 版本 | 说明 |
|---|---|
| IIS 10.0 | <add> 元素在 IIS 10.0 中未进行修改。 |
| IIS 8.5 | <add> 元素在 IIS 8.5 中未进行修改。 |
| IIS 8.0 | <add> 元素在 IIS 8.0 中未进行修改。 |
| IIS 7.5 | <providerDefinitions> 元素的 <add> 元素作为 IIS 7.5 的功能提供。 |
| IIS 7.0 | <providerDefinitions> 元素的 <add> 元素是在 IIS 7.0 的独立下载项 FTP 7.0 中引入的。 |
| IIS 6.0 | IIS 6.0 中的 FTP 服务不支持扩展性。 |
在 Windows 7 和 Windows Server 2008 R2 中,FTP 7.5 服务作为 IIS 7.5 的功能提供,因此无需再下载 FTP 服务。
安装
若要支持 Web 服务器的 FTP 发布,必须安装 FTP 服务。 为此,请按照以下步骤操作。
Windows Server 2012 或 Windows Server 2012 R2
在任务栏上,单击 “服务器管理器”。
在“服务器管理器”中,单击“管理”菜单,然后单击“添加角色和功能”。
在“添加角色和功能”向导中,单击“下一步”。 选择安装类型,然后单击“下一步”。 选择目标服务器,然后单击“下一步”。
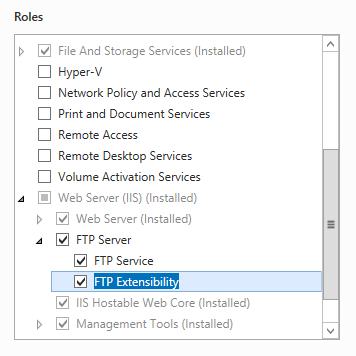
在“服务器角色”页上,展开“Web 服务器 (IIS)”,然后选择“FTP 服务器”。
注意
若要支持 FTP 服务使用 ASP.Membership 身份验证或 IIS 管理器身份验证,除“FTP 服务”外还需选择“FTP 扩展性”。
 .
.单击“下一步”,然后在“选择功能”页上,再次单击“下一步”。
在“确认安装选择”页上,单击“安装”。
在“结果” 页面中单击“关闭” 。
Windows 8 或 Windows 8.1
在“开始”屏幕上,将指针一直移动到左下角,右键单击“开始”按钮,然后单击“控制面板”。
在“控制面板”中,单击“程序与功能”,然后单击“打开或关闭 Windows 功能”。
展开“Internet Information Services”,然后选择“FTP 服务器”。
注意
若要支持 FTP 服务使用 ASP.Membership 身份验证或 IIS 管理器身份验证,还需选择“FTP 扩展性”。
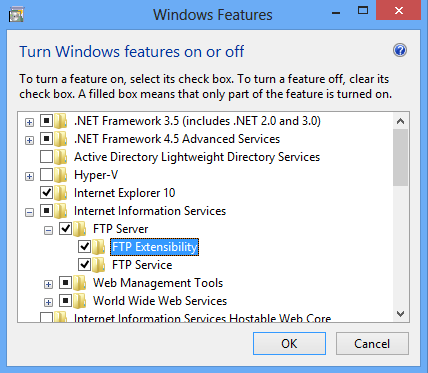
单击“确定”。
单击“关闭” 。
Windows Server 2008 R2
在任务栏上,单击“开始”,指向“管理工具”,然后单击“服务器管理器”。
在“服务器管理器”层次结构窗格中,展开“角色”,然后单击“Web 服务器 (IIS)”。
在“Web 服务器 (IIS)”窗格中,滚动到“角色服务”部分,然后单击“添加角色服务”。
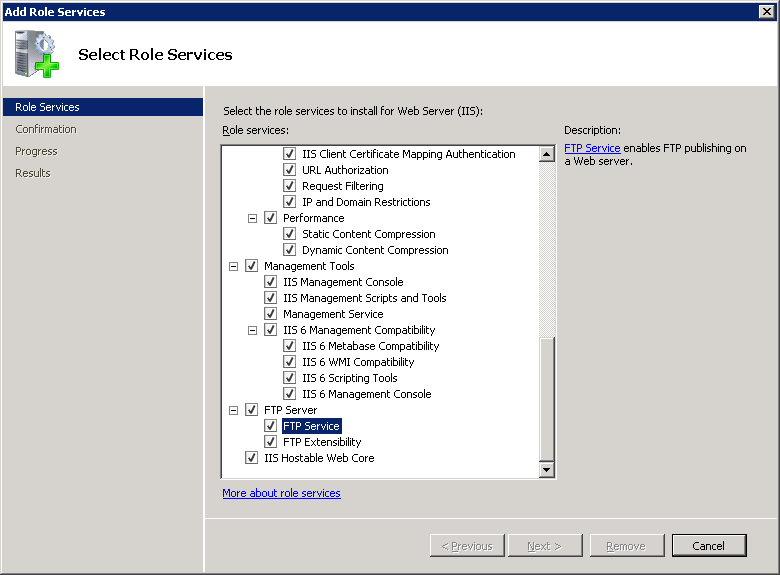
在“添加角色服务向导”的“选择角色服务”页,展开“FTP 服务器”。
选择“FTP 服务”。
注意
若要支持 FTP 服务使用 ASP.Membership 身份验证或 IIS 管理器身份验证,还需选择“FTP 扩展性”。
单击 “下一步” 。
在“确认安装选择”页中,单击“安装”。
在“结果” 页面中单击“关闭” 。
Windows 7
在任务栏上,单击“开始”,然后单击“控制面板”。
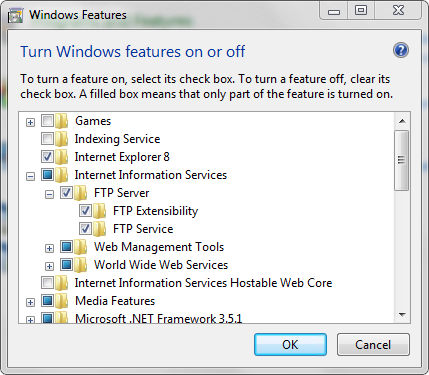
在“控制面板”中,单击“程序与功能”,然后单击“打开或关闭 Windows 功能”。
展开“Internet Information Services”,然后展开“FTP 服务器”。
选择“FTP 服务”。
注意
若要支持 FTP 服务使用 ASP.Membership 身份验证或 IIS 管理器身份验证,还需选择“FTP 扩展性”。
单击“确定”。
Windows Server 2008 或 Windows Vista
从以下 URL 下载安装包:
按照以下演练中的说明安装 FTP 服务:
操作方式
如何为 FTP 站点添加托管代码自定义身份验证提供程序
注意
这些步骤假定已在服务器的全局程序集缓存 (GAC) 上安装并注册了自定义 FTP 身份验证提供程序。有关如何注册托管程序集的详细信息,请参阅 Microsoft MSDN 网站上的全局程序集缓存工具 (Gacutil.exe) 主题。
确定扩展性提供程序的程序集信息:
- 在 Windows 资源管理器中打开“C:\Windows\assembly”路径,其中 C: 是操作系统驱动器。
- 找到程序集。 例如 FtpAuthenticationDemo。
- 右键单击该程序集,然后单击“属性”。
- 复制“区域性”值。 例如 Neutral。
- 复制“版本号”。 例如 1.0.0.0。
- 复制“公钥标记”值。 例如 426f62526f636b73。
- 单击“取消” 。
将扩展性提供程序添加到 FTP 身份验证提供程序的全局列表中:
- 打开“Internet Information Services (IIS)管理器” 。
- 在“连接”窗格中单击计算机名称。
- 双击主窗口中的“FTP 身份验证”。
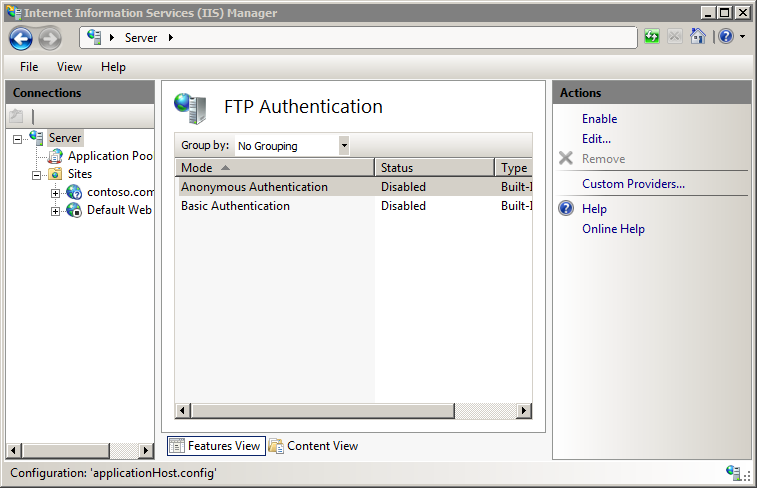
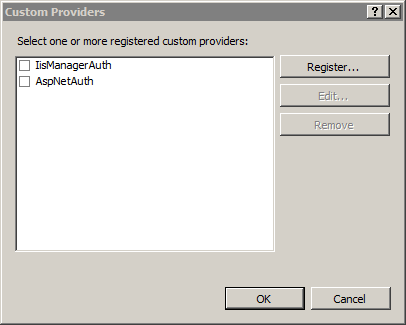
- 单击“操作”窗格中的“自定义提供程序...”。
- 单击“注册”。
- 在“名称”框中为自定义身份验证提供程序输入一个易记名称。 例如 FtpAuthenticationDemo。
- 单击“托管提供程序(.NET)”。
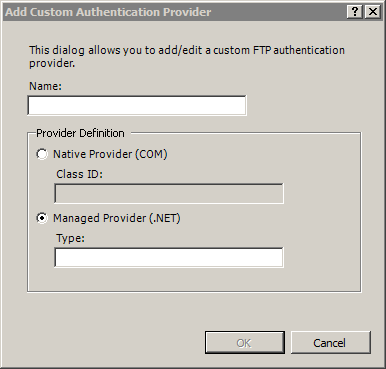
- 使用之前复制的信息输入扩展性提供程序的程序集信息。 例如:
FtpAuthentication.FtpAuthDemo, FtpAuthenticationDemo, version=1.0.0.0, Culture=neutral, PublicKeyToken=426f62526f636b73 - 单击“确定”。
- 清除提供程序列表中的自定义身份验证提供程序的复选框。
- 单击“确定”。
为 FTP 站点添加自定义身份验证提供程序:
- 在 Internet Information Services (IIS) 管理器中打开 FTP 站点。
- 双击主窗口中的“FTP 身份验证”。
- 单击“操作”窗格中的“自定义提供程序...”。
- 选中并启用提供程序列表中的自定义身份验证提供程序。
- 单击“确定”。
配置
<providerDefinitions> 元素的 <add> 元素在 ApplicationHost.config 中配置,并且是在全局级别配置。
特性
| 属性 | 说明 |
|---|---|
name |
必需的字符串属性。 指定自定义提供程序的友好名称。 没有默认值。 |
type |
可选的字符串属性。 指定托管代码提供程序的类型。 没有默认值。 |
clsid |
可选的字符串属性。 指定本机代码提供程序的 COM 类 ID。 没有默认值。 |
子元素
无。
配置示例
下面的示例演示了服务器的全局 <system.ftpServer> 元素中的若干配置设置。 更具体而言,此示例中的设置演示如何:
启用 FTP 凭据缓存,并指定超时值为 10 分钟(600 秒)。
对于数据通道通信,将低端口配置为 5000,高端口配置为 6000。
启用日志记录,指定须按站点保留日志文件,并按 UTC 时间每天轮换日志文件。
指定自定义 FTP 提供程序,并为该提供程序指定自定义参数。
指定全局 IP 限制,以允许从本地主机进行 FTP 访问,并拒绝 IP 地址块 169.254.0.0 到 169.254.255.255 的访问。
使用以下选项配置请求筛选:
- 阻止 FTP 访问 _vti_bin 虚拟目录,此目录与 FrontPage 服务器扩展一起使用。
- 阻止与可执行文件关联的多个文件类型。
- 指定最大文件大小为 100MB。
添加一个全局授权规则,用于为管理员组授予访问权限。
指明可以将域名语法用于 FTP 虚拟主机名。
<system.ftpServer>
   <caching>
      <credentialsCache enabled="true" flushInterval="600" />
   </caching>
   <firewallSupport lowDataChannelPort="5000" highDataChannelPort="6000" />
   <log centralLogFileMode="Site">
      <centralLogFile period="Daily" localTimeRollover="false" enabled="true" />
   </log>
   <providerDefinitions>
      <add name="FtpXmlAuthentication"
         type="FtpXmlAuthentication, FtpXmlAuthentication, version=1.0.0.0, Culture=neutral, PublicKeyToken=426f62526f636b73" />
      <activation>
         <providerData name="FtpXmlAuthentication">
            <add key="xmlFileName" value="C:\Inetpub\XmlSample\Users.xml" />
         </providerData>
      </activation>
   </providerDefinitions>
   <security>
      <ipSecurity enableReverseDns="false" allowUnlisted="true">
         <add ipAddress="169.254.0.0" subnetMask="255.255.0.0" allowed="false" />
         <add ipAddress="127.0.0.1" allowed="true" />
      </ipSecurity>
      <requestFiltering>
         <hiddenSegments>
            <add segment="_vti_bin" />
         </hiddenSegments>
         <fileExtensions allowUnlisted="true">
            <add fileExtension="exe" allowed="false" />
            <add fileExtension="cmd" allowed="false" />
            <add fileExtension="com" allowed="false" />
            <add fileExtension="bat" allowed="false" />
         </fileExtensions>
         <requestLimits maxAllowedContentLength="104857600" />
      </requestFiltering>
      <authorization>
         <add accessType="Allow" roles="administrators" permissions="Read, Write" />
      </authorization>
   </security>
   <serverRuntime>
      <hostNameSupport useDomainNameAsHostName="true" />
   </serverRuntime>
</system.ftpServer>
代码示例
以下示例将自定义 FTP 提供程序定义添加到服务器。
AppCmd.exe
appcmd.exe set config -section:system.ftpServer/providerDefinitions /+"[name='FtpXmlAuthentication',type='FtpXmlAuthentication, FtpXmlAuthentication, version=1.0.0.0, Culture=neutral, PublicKeyToken=426f62526f636b73']" /commit:apphost
注意
使用 AppCmd.exe 配置这些设置时,必须确保将 commit 参数设置为 apphost。 这会将配置设置提交到 ApplicationHost.config 文件中的相应位置部分。
C#
using System;
using System.Text;
using Microsoft.Web.Administration;

internal static class Sample
{
   private static void Main()
   {
      using (ServerManager serverManager = new ServerManager())
      {
         Configuration config = serverManager.GetApplicationHostConfiguration();
         ConfigurationSection providerDefinitionsSection = config.GetSection("system.ftpServer/providerDefinitions");
         ConfigurationElementCollection providerDefinitionsCollection = providerDefinitionsSection.GetCollection();

         ConfigurationElement addElement = providerDefinitionsCollection.CreateElement("add");
         addElement["name"] = @"FtpXmlAuthentication";
         addElement["type"] = @"FtpXmlAuthentication, FtpXmlAuthentication, version=1.0.0.0, Culture=neutral, PublicKeyToken=426f62526f636b73";
         providerDefinitionsCollection.Add(addElement);

         serverManager.CommitChanges();
      }
   }
}
VB.NET
Imports System
Imports System.Text
Imports Microsoft.Web.Administration

Module Sample
   Sub Main()
      Dim serverManager As ServerManager = New ServerManager
      Dim config As Configuration = serverManager.GetApplicationHostConfiguration
      Dim providerDefinitionsSection As ConfigurationSection = config.GetSection("system.ftpServer/providerDefinitions")
      Dim providerDefinitionsCollection As ConfigurationElementCollection = providerDefinitionsSection.GetCollection

      Dim addElement As ConfigurationElement = providerDefinitionsCollection.CreateElement("add")
      addElement("name") = "FtpXmlAuthentication"
      addElement("type") = "FtpXmlAuthentication, FtpXmlAuthentication, version=1.0.0.0, Culture=neutral, PublicKeyToken=426f62526f636b73"
      providerDefinitionsCollection.Add(addElement)

      serverManager.CommitChanges()
   End Sub
End Module
JavaScript
var adminManager = new ActiveXObject('Microsoft.ApplicationHost.WritableAdminManager');
adminManager.CommitPath = "MACHINE/WEBROOT/APPHOST";

var providerDefinitionsSection = adminManager.GetAdminSection("system.ftpServer/providerDefinitions", "MACHINE/WEBROOT/APPHOST");
var providerDefinitionsCollection = providerDefinitionsSection.Collection;

var addElement = providerDefinitionsCollection.CreateNewElement("add");
addElement.Properties.Item("name").Value = "FtpXmlAuthentication";
addElement.Properties.Item("type").Value = "FtpXmlAuthentication, FtpXmlAuthentication, version=1.0.0.0, Culture=neutral, PublicKeyToken=426f62526f636b73";
providerDefinitionsCollection.AddElement(addElement);

adminManager.CommitChanges();
VBScript
Set adminManager = createObject("Microsoft.ApplicationHost.WritableAdminManager")
adminManager.CommitPath = "MACHINE/WEBROOT/APPHOST"

Set providerDefinitionsSection = adminManager.GetAdminSection("system.ftpServer/providerDefinitions", "MACHINE/WEBROOT/APPHOST")
Set providerDefinitionsCollection = providerDefinitionsSection.Collection

Set addElement = providerDefinitionsCollection.CreateNewElement("add")
addElement.Properties.Item("name").Value = "FtpXmlAuthentication"
addElement.Properties.Item("type").Value = "FtpXmlAuthentication, FtpXmlAuthentication, version=1.0.0.0, Culture=neutral, PublicKeyToken=426f62526f636b73"
providerDefinitionsCollection.AddElement(addElement)

adminManager.CommitChanges()