使用 Microsoft Graph 工具包生成生产力应用
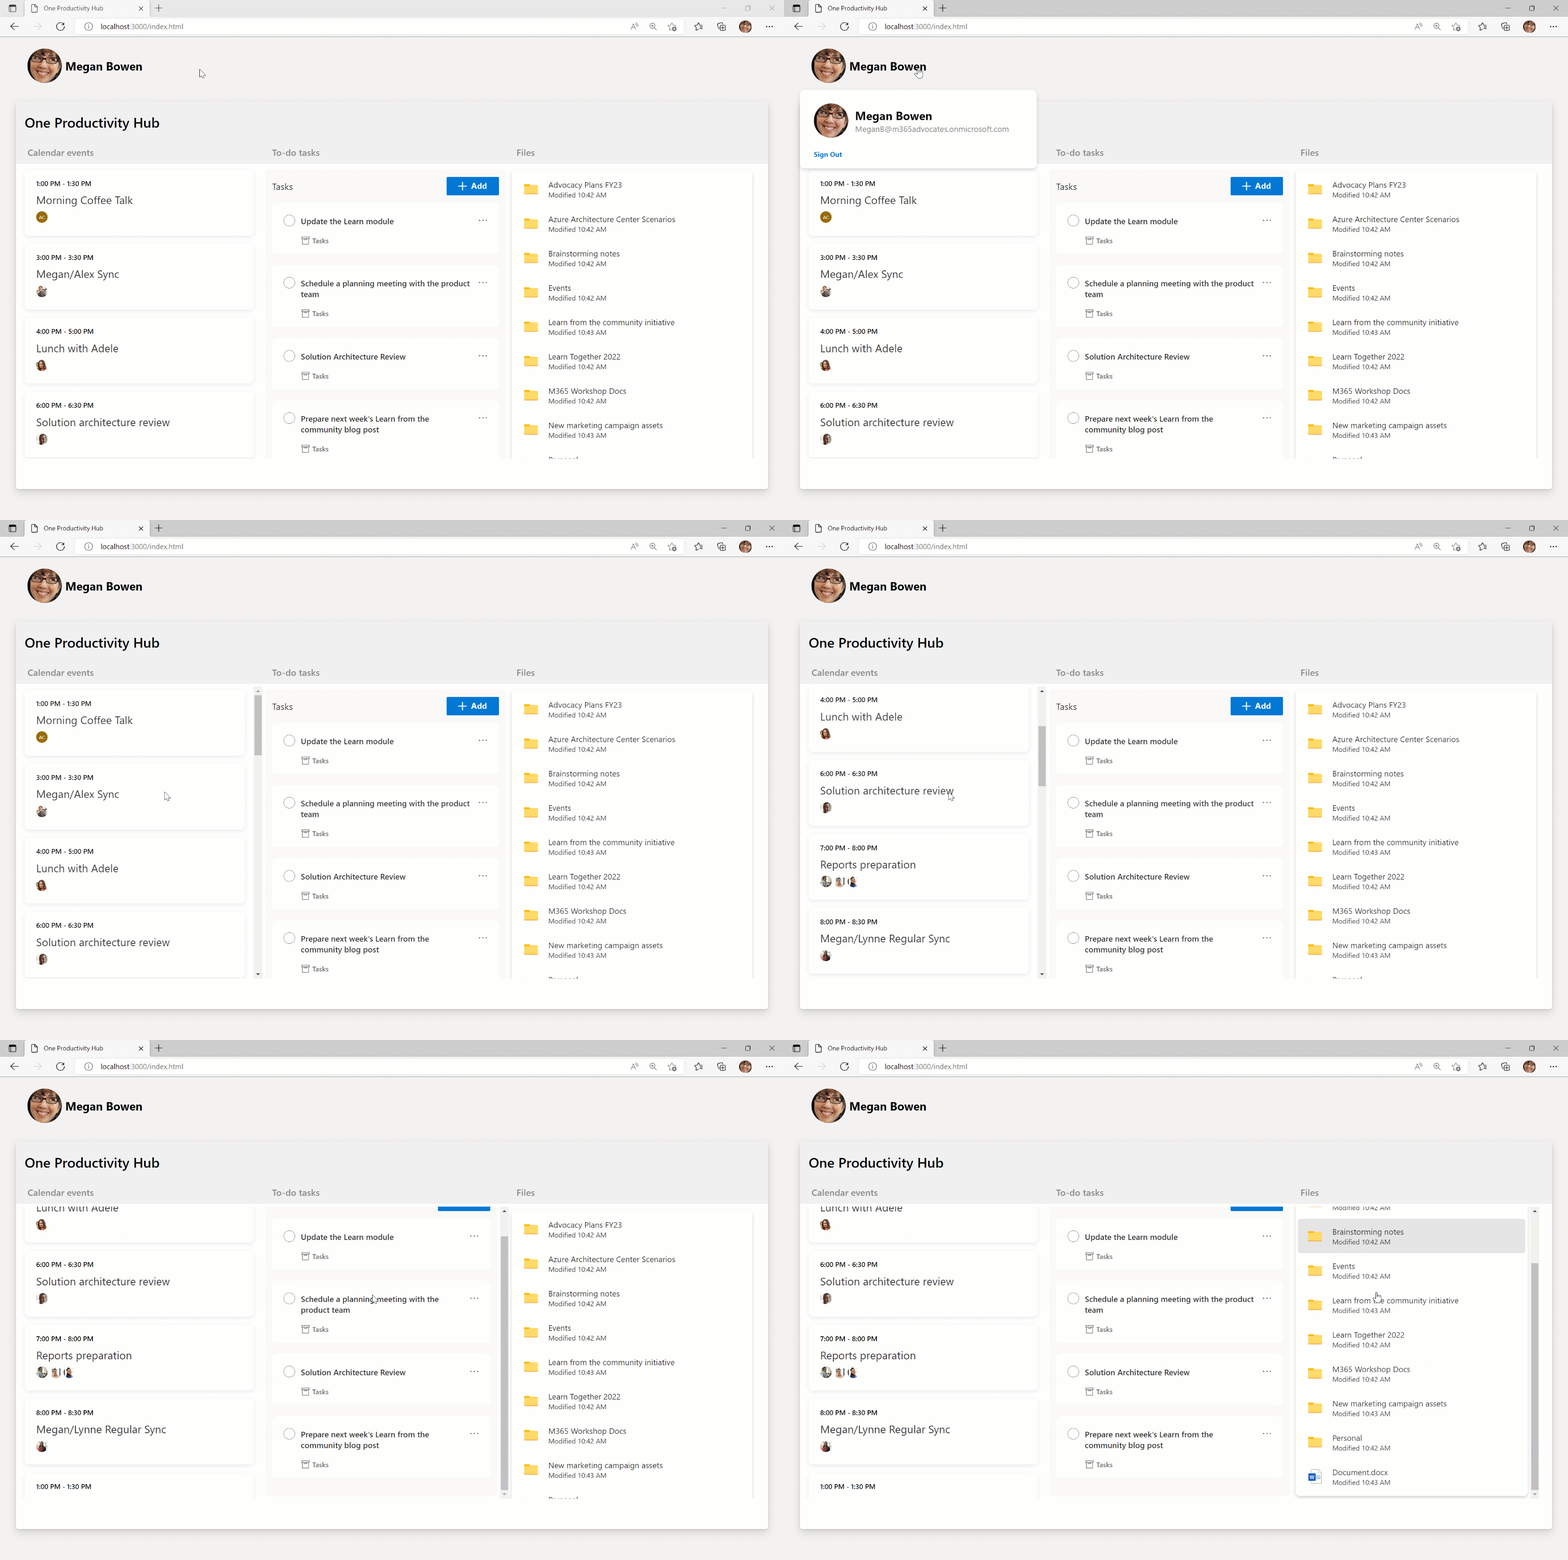
Microsoft Graph 工具包是 Web 组件和身份验证提供程序的集合,用于将应用连接到 Microsoft 365 数据和智能。 本教程介绍如何使用 Microsoft Graph 工具包组件和 MSAL2 提供程序创建一个 Web 应用程序,以监视日历事件、要执行的任务和文件。
示例的工作原理是什么?
此示例创建一个 Web 应用,该应用使用 Microsoft Graph 工具包 MSAL2 提供程序通过Microsoft Entra ID启用身份验证,并使用 UI 组件来呈现日历事件、任务和外观类似于本机 Microsoft 体验的文件。

先决条件
- 需要 Microsoft 365 开发人员租户。 你可能有资格通过 Microsoft 365 开发人员计划获得一个;有关详细信息,请参阅 常见问题解答。 或者,可以 注册 1 个月的免费试用版或购买 Microsoft 365 计划。
- 安装Visual Studio Code。
- 安装 Visual Studio Code Live Server 以测试 Web 应用。
在 Microsoft Entra ID 中注册应用程序
在 Microsoft Entra ID中注册应用程序以启用用户身份验证。
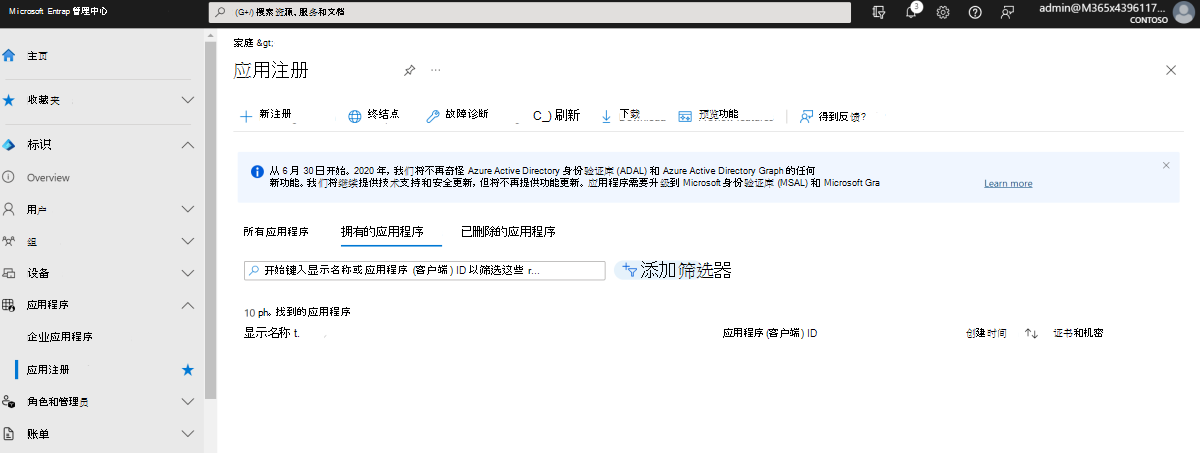
转到Microsoft Entra 管理中心并使用 Microsoft 365 开发人员计划租户登录。
展开“标识”菜单>,展开“应用程序>”选择“应用注册>”新建注册”。

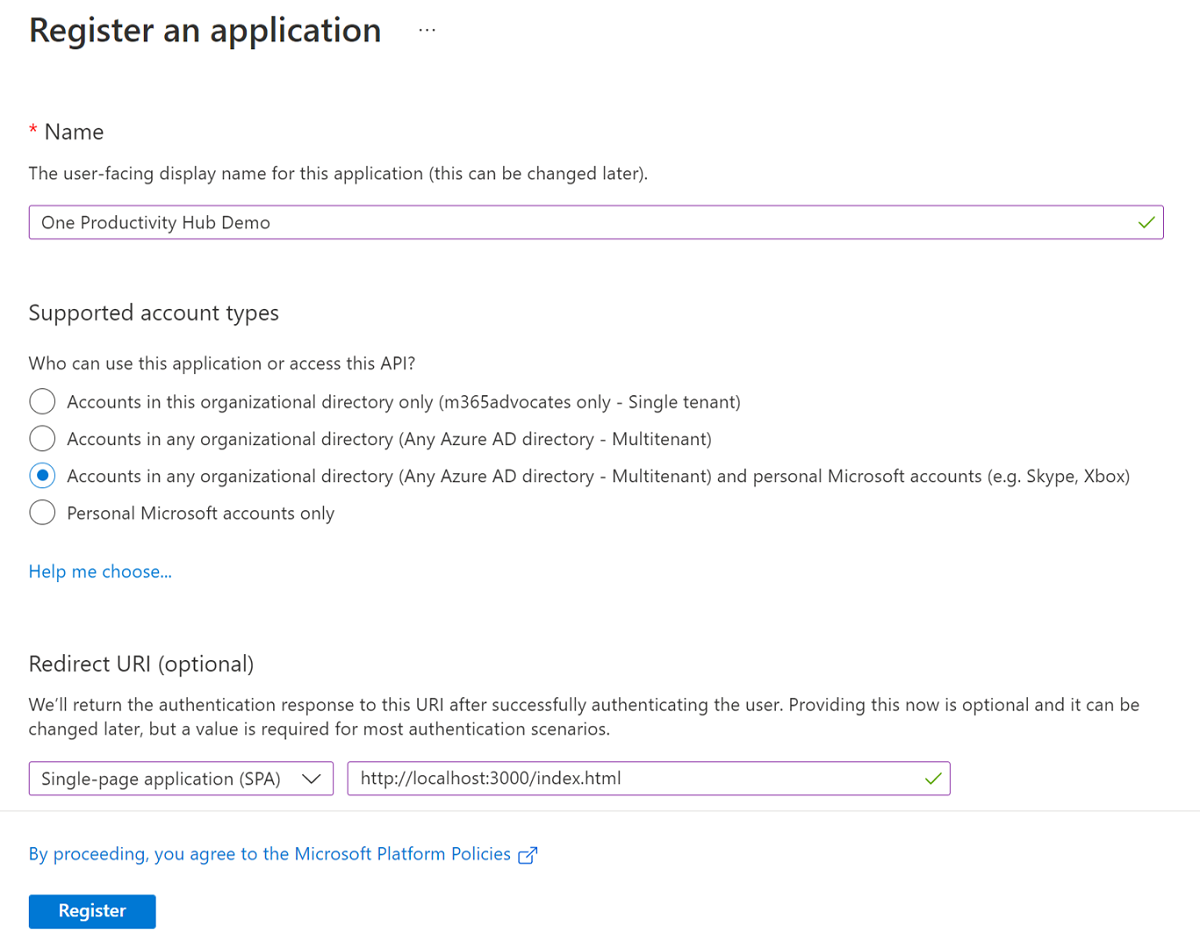
使用以下值完成 “注册应用程序 表单”,然后选择“ 注册”。
- 名称:一个生产力中心演示
- 支持的帐户类型:任何组织目录中的帐户 (任何Microsoft Entra目录 - 多租户) 和个人 Microsoft 帐户 (,例如 Skype、Xbox)
-
重定向 URI:选择“ 单页应用程序 (SPA) ”作为重定向 URI 的类型,并作为重定向 URI 进行
http://localhost:3000/index.html本地测试。

应用注册完成后,转到应用程序页中的“ 概述 ”选项卡,复制 “应用程序 (客户端) ID”。 以下步骤需要此 ID。
创建应用程序
在此步骤中,你将创建一个 Web 应用,并使用 Microsoft Graph 工具包 MSAL2 提供程序启用身份验证。
创建 Web 应用
创建一个新文件夹并将其命名为 OneProductivityHub。 右键单击并打开带有Visual Studio Code的文件夹。
在 OneProductivityHub 文件夹中创建一个新文件,并将其 命名为index.html。
从选项中选择
CTRL + SPACE并选择 HTML 示例 。若要通过 CDN 使用 Microsoft Graph 工具包启用身份验证,请在 节中的 index.html
<body></body>中添加以下脚本标记:<script type="module"> import { registerMgtComponents, registerMgtMsal2Provider } from "https://unpkg.com/@microsoft/mgt@4"; registerMgtMsal2Provider(); registerMgtComponents(); </script>
初始化 MSAL2 提供程序
在 index.html中,在 节中添加
<body></body>MSAL2 提供程序,如下所示:<mgt-msal2-provider client-id="<YOUR_CLIENT_ID>" scopes="User.Read, User.ReadBasic.All, Calendars.Read, Files.Read, Files.Read.All, Sites.Read.All, Tasks.Read, Tasks.ReadWrite, People.Read"> </mgt-msal2-provider>重要
提供程序中定义的以下范围将显示为在身份验证过程中请求用户同意所需的权限列表:
User.Read, User.ReadBasic.All, Calendars.Read, Files.Read, Files.Read.All, Sites.Read.All, Tasks.Read, Tasks.ReadWrite, People.Read。将 替换为
<YOUR_CLIENT_ID>从 Microsoft Entra 应用程序复制的客户端 ID。请确保 index.html 的最终版本类似于以下示例:
<!DOCTYPE html>
<html>
<head>
  <meta charset='utf-8'>
  <meta http-equiv='X-UA-Compatible' content='IE=edge'>
  <title>One Productivity Hub</title>
  <meta name='viewport' content='width=device-width, initial-scale=1'>
  <link rel='stylesheet' type='text/css' media='screen' href='main.css'>
  <script src='main.js'></script>
</head>
<body>
  <script type="module">
    import { registerMgtComponents, registerMgtMsal2Provider } from "https://unpkg.com/@microsoft/mgt@4";
    registerMgtMsal2Provider();
    registerMgtComponents();
  </script>
  <mgt-msal2-provider
      client-id="<YOUR_CLIENT_ID>"
      scopes="User.Read,
      User.ReadBasic.All,
      Calendars.Read,
      Files.Read,
      Files.Read.All,
      Sites.Read.All,
      Tasks.Read
      Tasks.ReadWrite,
      People.Read">
  </mgt-msal2-provider>
</body>
</html>
设计应用程序
在此步骤中,你将使用 Microsoft Graph 工具包组件设计 Web 应用,并使用 CSS 设置其样式。
初始化登录组件
在 部分index.html<body></body>,在 提供程序下添加以下代码。
<div>
  <mgt-login />
</div>
为其余组件创建标题和列
若要使应用看起来结构化,请为将在 One Productivity Hub 中添加的每个功能创建标题和列。 在 index.html 下的 <body></body>登录组件下,在 div 中添加以下 HTML 代码。
<div class="features">

  <div class="header"><div class="title">
    <h2>One Productivity Hub</h2>
    <div class="row">
      <div class="column"><h3>Calendar events</h3></div>
      <div class="column"><h3>To-do tasks</h3></div>
      <div class="column"><h3>Files</h3></div>
    </div>
  </div></div>

  <div class="row" id="content">
    <div class="column" id="mgt-col"></div>
    <div class="column" id="mgt-col"></div>
    <div class="column" id="mgt-col"></div>
  </div>

</div>
议程组件
在标记为 class="row"的 div 下,在第一列 div 中添加“议程”组件。
<mgt-agenda />
To-do 组件
在标记为 class="row"的 div 下,将“To-do”组件添加到第二列 div 内。
<mgt-todo />
FileList 组件
在标记为 class="row"的 div 下,在第三列 div 中添加文件列表组件。
<mgt-file-list />
使用 CSS 设置 Web 应用的样式
在项目下创建 index.css 文件,并添加以下 CSS 代码。
body,
#root>div {
    background-color: #F3F2F1;
}
.features {
    min-height: 80vh;
    margin: 20px;
    background-color: #FFF;
    box-shadow: 0px 1.2px 3.6px rgba(0, 0, 0, 0.11), 0px 6.4px 14.4px rgba(0, 0, 0, 0.13);
    border-radius: 4px;
    font-family: 'Segoe UI', Tahoma, Geneva, Verdana, sans-serif;
}
.header {
    display: flex;
    background-color: #f0f0f0;
}
.title {
    margin-top: 20px;
    margin-left: 10px;
    width: 100%;
}
.title h2 {
    font-size: 24px;
    padding-left: 5px;
    display: inline;
    font-weight: 600;
}
.title h3 {
    float: left;
    width: 32%;
    background:transparent;
    font-size: 16px;
    margin-bottom: 10px;
    padding-left: 10px;
    padding-top: 10px;
    color: #8A8886;
    font-weight: 600;
}
mgt-login {
    margin-left: 20px;
    --avatar-size: 60px;
    --font-family: 'Segoe UI';
    --font-size: 20px;
    --font-weight: 700;
    --color: black;
    --text-transform: none;
    --line2-font-size: 14px;
    --line2-font-weight: 400;
    --line2-color: #8A8886;
    --line2-text-transform: none;
}
#content, html, body {
    height: 98%;
  }
#mgt-col {
  float: left;
  width: 32%;
  background:transparent;
  height:500px;
  overflow: hidden;
  padding: 5px;
  margin-top: 5px;
}
#mgt-col:hover {
  overflow-y: auto;
}
在 中的index.html 中
<head></head>,将样式表链接href定义为 index.css。<link rel='stylesheet' type='text/css' media='screen' href='index.css'>确保 index.html 的最终版本类似于以下内容。
<!DOCTYPE html>
  <html>
  <head>
    <meta charset='utf-8'>
    <meta http-equiv='X-UA-Compatible' content='IE=edge'>
    <title>One Productivity Hub</title>
    <meta name='viewport' content='width=device-width, initial-scale=1'>
    <link rel='stylesheet' type='text/css' media='screen' href='index.css'>
    <script src='main.js'></script>
  </head>
  <body>
    <script type="module">
      import { registerMgtComponents, registerMgtMsal2Provider } from "https://unpkg.com/@microsoft/mgt@4";
      registerMgtMsal2Provider();
      registerMgtComponents();
    </script>
    <mgt-msal2-provider
        client-id="<YOUR_CLIENT_ID>"
        scopes="User.Read,
        User.ReadBasic.All,
        Calendars.Read,
        Files.Read,
        Files.Read.All,
        Sites.Read.All,
        Tasks.Read,
        Tasks.ReadWrite,
        People.Read">
    </mgt-msal2-provider>
    <div>
      <mgt-login />
    </div>
    <div class="features">
        <div class="header">
            <div class="title">
                <h2>One Productivity Hub</h2>
                <div class="row">
                    <div class="column"><h3>Calendar events</h3></div>
                    <div class="column"><h3>To-do tasks</h3></div>
                    <div class="column"><h3>Files</h3></div>
                </div>
            </div>
        </div>
        <div class="row" id="content">
            <div class="column" id="mgt-col"><mgt-agenda /></div>
            <div class="column" id="mgt-col"><mgt-todo /></div>
            <div class="column" id="mgt-col"><mgt-file-list /></div>
        </div>
    </div>
  </body>
</html>
运行应用程序
在此步骤中,你将使用 Live Server 在浏览器中运行示例应用。
选择
CTRL + SHIFT + P以在 Visual Studio Code 中打开面板,在面板上键入Preferences并从选项中进行选择Preferences: Open Workspace Settings (JSON)。在打开的
settings.json文件中,添加以下代码。{ "liveServer.settings.host": "localhost", "liveServer.settings.port": 3000 }选择
CTRL + SHIFT + P以在 Visual Studio Code 中打开面板,在面板上键入Live Server并从选项中进行选择Live Server: Open with Live Server。 Live Server 将在浏览器中运行应用。选择“ 登录 ”,并使用 Microsoft 365 开发人员计划租户登录。
同意使用应用程序功能(例如查看日历事件、要完成的任务和文件夹)所需的权限。
若要确保 One Productivity Hub 应用正常工作,请在 Microsoft 365 开发人员租户中添加一些日历事件、要完成的任务和文件夹。

摘要
你已成功使用 Microsoft Graph 工具包生成 One Productivity Hub 示例应用。 在本教程中,你创建了一个 Web 应用,并已使用 Microsoft Graph 工具包 MSAL2 提供程序和 UI 组件。
如果你正在寻找增强 One Productivity Hub 应用的方法,请参阅 Microsoft Graph 工具包中可用的 Web 组件 列表,并在应用中包括其他组件。
后续步骤
若要了解有关 Microsoft Graph 工具包的详细信息,请参阅 Microsoft Graph 工具包概述 和使用 Microsoft Graph 工具包开发应用 学习路径。
你有关于此部分的问题? 如果有,请向我们提供反馈,以便我们对此部分作出改进。