在 Xamarin 应用程序中使用 Microsoft Authenticator 或 Intune 公司门户
在 Android 和 iOS 上,Microsoft Authenticator 和特定于 Android 的 Microsoft Intune 公司门户等中介可以启用:
- 单一登录 (SSO) :用户无需登录到每个应用程序。
- 设备标识:中介访问设备证书。 当设备加入工作区时,将在设备上创建此证书。
- 应用程序标识验证:应用程序在调用中介时会传递其重定向 URL。 中介将验证该 URL。
若要启用这些功能之一,请在调用 WithBroker() 方法时使用 PublicClientApplicationBuilder.CreateApplication 参数。 .WithBroker() 参数默认设置为 true。
适用于 .NET 的 Microsoft 身份验证库 (MSAL.NET) 中的中介身份验证设置因平台而异:
注意
MSAL.NET 版本 4.61.0 及更高版本不支持通用 Windows 平台 (UWP)、Xamarin Android 和 Xamarin iOS。 建议将 Xamarin 应用程序迁移到 MAUI 等新式框架。 阅读宣布即将弃用 MSAL.NET for Xamarin 和 UWP 中有关弃用的详细信息。
适用于 iOS 的中介身份验证
使用以下步骤来使 Xamarin.iOS 应用能够与 Microsoft Authenticator 应用通信。 如果面向的是 iOS 13,请考虑阅读 Apple 的重大 API 更改。
步骤 1:启用中介支持
必须为 PublicClientApplication 的各个实例启用中介支持。 默认已禁用支持。 通过 PublicClientApplication 创建 PublicClientApplicationBuilder 时,请使用 WithBroker() 参数,如以下示例所示。 WithBroker() 参数默认设置为 true。
var app = PublicClientApplicationBuilder
                .Create(ClientId)
                .WithBroker()
                .WithReplyUri(redirectUriOnIos) // $"msauth.{Bundle.Id}://auth" (see step 6 below)
                .Build();
步骤 2:启用密钥链访问
若要启用密钥链访问,必须为应用程序创建密钥链访问组。 创建应用程序时,可以使用 WithIosKeychainSecurityGroup() API 来设置密钥链访问组:
var builder = PublicClientApplicationBuilder
     .Create(ClientId)
     .WithIosKeychainSecurityGroup("com.microsoft.adalcache")
     .Build();
有关详细信息,请参阅启用密钥链访问。
步骤 3:更新 AppDelegate 以处理回调
当 MSAL.NET 调用中介时,中介将通过 OpenUrl 类的 AppDelegate 方法回调你的应用程序。 由于 MSAL 会等待中介的响应,因此应用程序需要进行协作才能回调 MSAL.NET。 若要启用此协作,请更新 AppDelegate.cs 文件以重写以下方法。
public override bool OpenUrl(UIApplication app, NSUrl url,
                             string sourceApplication,
                             NSObject annotation)
{
    if (AuthenticationContinuationHelper.IsBrokerResponse(sourceApplication))
    {
      AuthenticationContinuationHelper.SetBrokerContinuationEventArgs(url);
      return true;
    }

    else if (!AuthenticationContinuationHelper.SetAuthenticationContinuationEventArgs(url))
    {
         return false;
    }

    return true;
}
每次启动应用程序都会调用此方法。 可以借此机会处理中介的响应,并完成 MSAL.NET 启动的身份验证过程。
步骤 4:设置 UIViewController()
仍然是在 AppDelegate.cs 文件中,请设置一个对象窗口。 对于 Xamarin iOS,通常不需要设置对象窗口,但若要发送和接收中介的响应,则需要一个对象窗口。
若要设置对象窗口:
在 AppDelegate.cs 文件中,将 设置为新的
App.RootViewController。 此分配确保对中介的调用包含UIViewController。 如果此设置的分配不当,可能会收到以下错误:"uiviewcontroller_required_for_ios_broker":"UIViewController is null, so MSAL.NET cannot invoke the iOS broker. See https://aka.ms/msal-net-ios-broker"在
AcquireTokenInteractive调用中使用.WithParentActivityOrWindow(App.RootViewController),然后传入对所要使用的对象窗口的引用。在 App.cs 中:
public static object RootViewController { get; set; }在 AppDelegate.cs 中:
   LoadApplication(new App());
   App.RootViewController = new UIViewController();
在
AcquireToken调用中:result = await app.AcquireTokenInteractive(scopes) .WithParentActivityOrWindow(App.RootViewController) .ExecuteAsync();
步骤 5:注册 URL 方案
MSAL.NET 使用 URL 调用中介,然后将中介响应返回给应用。 若要完成往返过程,请在 Info.plist 文件中注册应用的 URL 方案。
CFBundleURLSchemes 名称必须包含 msauth. 作为前缀。 前缀的后面是 CFBundleURLName。
在 URL 方案中,BundleId 用于唯一标识应用:$"msauth.(BundleId)"。 因此,如果 BundleId 为 com.yourcompany.xforms,则 URL 方案为 msauth.com.yourcompany.xforms。
注意
此 URL 方案会成为重定向 URI 的一部分,该 URI 用于在应用接收中介的响应时对应用进行唯一标识。
 <key>CFBundleURLTypes</key>
    <array>
      <dict>
        <key>CFBundleTypeRole</key>
        <string>Editor</string>
        <key>CFBundleURLName</key>
        <string>com.yourcompany.xforms</string>
        <key>CFBundleURLSchemes</key>
        <array>
          <string>msauth.com.yourcompany.xforms</string>
        </array>
      </dict>
    </array>
步骤 6:将中介标识符添加到 LSApplicationQueriesSchemes 节
MSAL 使用 –canOpenURL: 来检查是否在设备上安装了中介。 在 iOS 9 中,Apple 锁定了应用程序可以查询的方案。
将 msauthv2 添加到 Info.plist 文件的 LSApplicationQueriesSchemes 节,如以下示例所示:
<key>LSApplicationQueriesSchemes</key>
    <array>
      <string>msauthv2</string>
      <string>msauthv3</string>
    </array>
步骤 7:向应用注册中添加重定向 URI
使用中介时,需要满足重定向 URI 的额外要求。 重定向 URI 必须采用以下格式:
$"msauth.{BundleId}://auth"
下面是一个示例:
public static string redirectUriOnIos = "msauth.com.yourcompany.XForms://auth";
请注意,重定向 URI 与 Info.plist 文件中包含的 CFBundleURLSchemes 名称匹配。
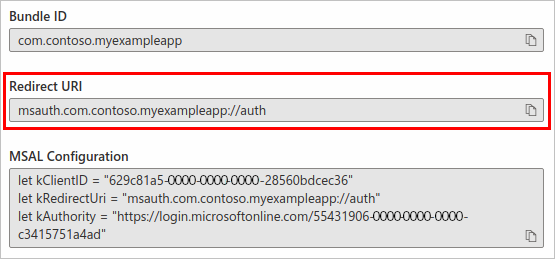
将重定向 URI 添加到应用的注册。 若要生成格式正确的重定向 URI,请使用“应用注册”基于捆绑 ID 生成中介重定向 URI。
若要生成重定向 URI,请执行以下操作:
至少以云应用程序管理员身份登录到 Microsoft Entra 管理中心。
浏览到“标识”“应用程序”>“应用注册”。
搜索并选择应用程序。
选择 “身份验证”“添加平台”>“iOS/macOS”
输入你的捆绑 ID,然后选择“配置”。
复制在“重定向 URI”文本框中显示的已生成的重定向 URI,以将其包含在代码中:

选择“完成”以完成重定向 URI 的生成。
适用于 Android 的中介身份验证
步骤 1:启用中介支持
已按 PublicClientApplication 启用中介支持。 此项默认禁用。 通过 WithBroker() 创建 IPublicClientApplication 时,请使用 PublicClientApplicationBuilder 参数(默认设置为 true)。
var app = PublicClientApplicationBuilder
                .Create(ClientId)
                .WithBroker()
                .WithRedirectUri(redirectUriOnAndroid) // See step #4
                .Build();
步骤 2:更新主活动以处理回调
当 MSAL.NET 调用中介时,中介转而通过 OnActivityResult() 方法回调你的应用程序。 由于 MSAL 会等待来自中介的响应,因此应用程序需要将结果路由到 MSAL.NET。
通过重写 SetAuthenticationContinuationEventArgs(int requestCode, Result resultCode, Intent data) 方法将结果路由到 OnActivityResult() 方法,如下所示:
protected override void OnActivityResult(int requestCode, Result resultCode, Intent data)
{
   base.OnActivityResult(requestCode, resultCode, data);
   AuthenticationContinuationHelper.SetAuthenticationContinuationEventArgs(requestCode, resultCode, data);
}
每次启动中介应用程序都会调用此方法,你可以借此机会处理中介的响应,并完成 MSAL.NET 启动的身份验证过程。
步骤 3:设置活动
若要启用中介身份验证,请设置一个活动,使 MSAL 可以通过中介发送和接收响应。 为此,请将活动(通常是 MainActivity)提供给 WithParentActivityOrWindow(object parent) 父对象。
例如,在对 AcquireTokenInteractive() 的调用中:
result = await app.AcquireTokenInteractive(scopes)
             .WithParentActivityOrWindow((Activity)context))
             .ExecuteAsync();
步骤 4:向应用注册中添加重定向 URI
MSAL 使用 URL 调用中介,然后返回到你的应用。 若要完成往返,请为应用注册重定向 URI。
应用程序的重定向 URI 的格式依赖于用于对 APK 进行签名的证书。 例如:
msauth://com.microsoft.xforms.testApp/hgbUYHVBYUTvuvT&Y6tr554365466=
URI 的最后一部分 hgbUYHVBYUTvuvT&Y6tr554365466= 是签署 APK 时使用的签名的 base64 编码版本。 在 Visual Studio 中开发应用时,如果你在调试代码时未使用特定证书对 APK 进行签名,则 Visual Studio 会为你签署 APK,方便进行调试。 当 Visual Studio 以这种方式为你签署 APK 时,它将为用于生成的计算机提供唯一的签名。 因此,每次在不同的计算机上生成应用时,需要更新应用程序代码中的重定向 URI 和应用程序的注册,以便使用 MSAL 进行身份验证。
调试时,可能会遇到 MSAL 异常(或日志消息),指出提供的重定向 URI 不正确。 此异常或日志消息还会指明重定向 URI,你应该在当前正在调试的计算机上使用它。 只要在代码中更新重定向 URI 并将提供的重定向 URI 添加到应用的注册,就可以使用提供的重定向 URI 继续开发应用。
准备好最终完成你的代码后,请更新代码中的重定向 URI 和应用程序的注册,以便使用签署 APK 时使用的证书的签名。
实际上,这意味着你应当考虑为开发团队的每个成员添加一个重定向 URI,并为 APK 的生产签名版本添加一个重定向 URI。
你可以自行计算此签名,类似于 MSAL 计算它的方式:
   private string GetRedirectUriForBroker()
   {
      string packageName = Application.Context.PackageName;
      string signatureDigest = this.GetCurrentSignatureForPackage(packageName);
      if (!string.IsNullOrEmpty(signatureDigest))
      {
            return string.Format(CultureInfo.InvariantCulture, "{0}://{1}/{2}", RedirectUriScheme,
               packageName.ToLowerInvariant(), signatureDigest);
      }

      return string.Empty;
   }

   private string GetCurrentSignatureForPackage(string packageName)
   {
      Android.Content.PM.Signature signature = null;
      if (Build.VERSION.SdkInt >= BuildVersionCodes.Tiramisu)
      {
          var packageInfo = Application.Context.PackageManager.GetPackageInfo(packageName, PackageManager.PackageInfoFlags.Of((long)PackageInfoFlags.SigningCertificates));
          if (packageInfo.SigningInfo != null)
          {
              var signatures = packageInfo.SigningInfo.GetApkContentsSigners();
              if (signatures != null && signatures.Length > 0)
                  signature = signatures[0];
          }
      }
      else
      {
#pragma warning disable CS0618 // Type or member is obsolete
          var packageInfo = Application.Context.PackageManager.GetPackageInfo(packageName, PackageInfoFlags.Signatures);
          if (packageInfo != null && packageInfo.Signatures != null && packageInfo.Signatures.Count > 0)
              signature = packageInfo.Signatures[0];
#pragma warning restore CS0618 // Type or member is obsolete
      }

      if (signature != null)
      {
          // First available signature. Applications can be signed with multiple signatures.
          // The order of Signatures is not guaranteed.
          var md = MessageDigest.GetInstance("SHA");
          md.Update(signature.ToByteArray());
          return Convert.ToBase64String(md.Digest(), Base64FormattingOptions.None);
          // Server side needs to register all other tags. ADAL will
          // send one of them.
      }
   }
也可选择使用 keytool 和以下命令获取包的签名:
- Windows:
keytool.exe -list -v -keystore "%LocalAppData%\Xamarin\Mono for Android\debug.keystore" -alias androiddebugkey -storepass android -keypass android - macOS:
keytool -exportcert -alias androiddebugkey -keystore ~/.android/debug.keystore | openssl sha1 -binary | openssl base64
步骤 5(可选):回退到系统浏览器
如果将 MSAL 配置为使用中介但未安装中介,则 MSAL 将回退到使用 Web 视图(浏览器)。 MSAL 会尝试使用设备上的默认系统浏览器进行身份验证,这将失败,因为重定向 URI 是为中介配置的,系统浏览器不知道如何使用它导航回到 MSAL。 若要避免失败,你可以使用在步骤 4 中使用的中介重定向 URI 配置一个意向筛选器。
修改应用程序的清单以添加意向筛选器:
<!-- NOTE the SLASH (required) that prefixes the signature value in the path attribute.
     The signature value is the Base64-encoded signature discussed above. -->
<intent-filter>
      <data android:scheme="msauth"
                    android:host="Package Name"
                    android:path="/Package Signature"/>
例如,如果你的重定向 URI 为 msauth://com.microsoft.xforms.testApp/hgbUYHVBYUTvuvT&Y6tr554365466=,则清单应当类似于以下 XML 代码片段。
/ 值中签名前面的正斜杠 (android:path) 是必需的。
<!-- NOTE the SLASH (required) that prefixes the signature value in the path attribute.
     The signature value is the Base64-encoded signature discussed above. -->
<intent-filter>
      <data android:scheme="msauth"
                    android:host="com.microsoft.xforms.testApp"
                    android:path="/hgbUYHVBYUTvuvT&Y6tr554365466="/>
若要详细了解如何配置应用程序以实现系统浏览器和 Android 11 支持,请参阅更新 Android 系统浏览器支持清单。
替代方法是将 MSAL 配置为回退到嵌入的浏览器(不依赖于重定向 URI):
.WithUseEmbeddedWebUi(true)
Android 中介身份验证的故障排除技巧
下面是在 Android 上实施中介身份验证时避免问题的一些技巧:
重定向 URI - 将重定向 URI 添加到应用程序注册。 重定向 URI 缺失或不正确是开发人员遇到的常见问题。
中介版本 - 安装所需的中介应用最低版本。 这两个应用都可用于 Android 上的中介身份验证。
- Intune 公司门户(5.0.4689.0 或更高版本)
- Microsoft Authenticator(6.2001.0140 或更高版本)。
中介优先级 - 当安装了多个代理时,MSAL 会与设备上安装的第一个代理通信。
示例:如果你首先安装 Microsoft Authenticator,然后安装 Intune 公司门户,则代理身份验证只会发生在 Microsoft Authenticator 上。
日志 - 如果你遇到中介身份验证的问题,查看中介的日志可能有助于你诊断原因。
获取 Microsoft Authenticator 日志:
- 选择应用右上角的菜单按钮。
- 选择“发送反馈”“遇到了问题?” 。
- 在“你想要做什么?”下,选择一个选项并添加描述。
- 若要发送日志,请选择该应用右上角的箭头。
发送日志之后,会出现一个对话框,显示事件 ID。 记录该事件 ID,并在请求帮助时将其包含在内。
获取 Intune 公司门户日志:
- 选择应用左上角的菜单按钮。
- 选择“帮助”“电子邮件支持” 。
- 若要发送日志,请选择“仅上传日志”。
发送日志之后,会出现一个对话框,显示事件 ID。 记录该事件 ID,并在请求帮助时将其包含在内。