将 Orleans 部署到 Azure 容器应用
本教程介绍如何将示例 Orleans 购物车应用程序部署到 Azure 容器应用。 本教程扩展了将 Orleans 部署到 Azure 应用服务中介绍的示例 Orleans 购物车应用的功能。 该示例应用添加了 Azure Active Directory (AAD) 企业对消费者 (B2C) 身份验证,并部署到 Azure 容器应用。
你将了解如何使用 GitHub Actions、.NET 和 Azure CLI 以及 Azure Bicep 进行部署。 此外,你还将了解如何配置容器应用的 HTTP 入口。
在本教程中,你将了解如何执行以下操作:
- 将 Orleans 应用程序部署到 Azure 容器应用
- 使用 GitHub Actions 和 Azure Bicep 自动完成部署
- 配置 HTTP 入口
先决条件
- 一个 GitHub 帐户
- 阅读 Orleans 简介
- .NET 6 SDK
- Azure CLI
- .NET 集成开发环境 (IDE)
- 任意使用 Visual Studio 或 Visual Studio Code
在本地运行应用
若要在本地运行应用,请创建 Azure 示例:Azure 容器应用上的 Orleans 购物车存储库的分支并将其克隆到本地计算机。 克隆后,在所选的 IDE 中打开解决方案。 如果使用的是 Visual Studio,请右键单击“Orleans.ShoppingCart.Silo”项目并选择“设为启动项目”,然后运行应用。 否则,可使用以下 .NET CLI 命令运行应用:
dotnet run --project Silo\Orleans.ShoppingCart.Silo.csproj
有关详细信息,请参阅 dotnet run。 应用运行时,你将看到一个讨论应用功能的登陆页。 在右上角,你将看到一个登录按钮。 可以注册帐户,或者登录(如果已有帐户)。 登录后,可以四处导航,并可以自由测试其功能。 在本地运行时,该应用的所有功能依赖于内存中持久性和本地群集,它使用 Bogus NuGet 包来生成虚构产品。 通过在 Visual Studio 中选择“停止调试”选项或者在 .NET CLI 中按 Ctrl+C 停止应用。
AAD B2C
虽然讲授身份验证的概念不在本教程的范围内,但你可以了解如何创建 Azure Active Directory B2C 租户,然后可以注册 Web 应用来使用它。 对于此购物车示例应用,需要在 B2C 租户中注册最终部署的容器应用的 URL。 有关详细信息,请参阅 ASP.NET Core Blazor 身份验证和授权。
重要
部署容器应用后,需要在 B2C 租户中注册该应用的 URL。 在大多数生产场景中,只需注册一次应用的 URL,因为它不会发生更改。
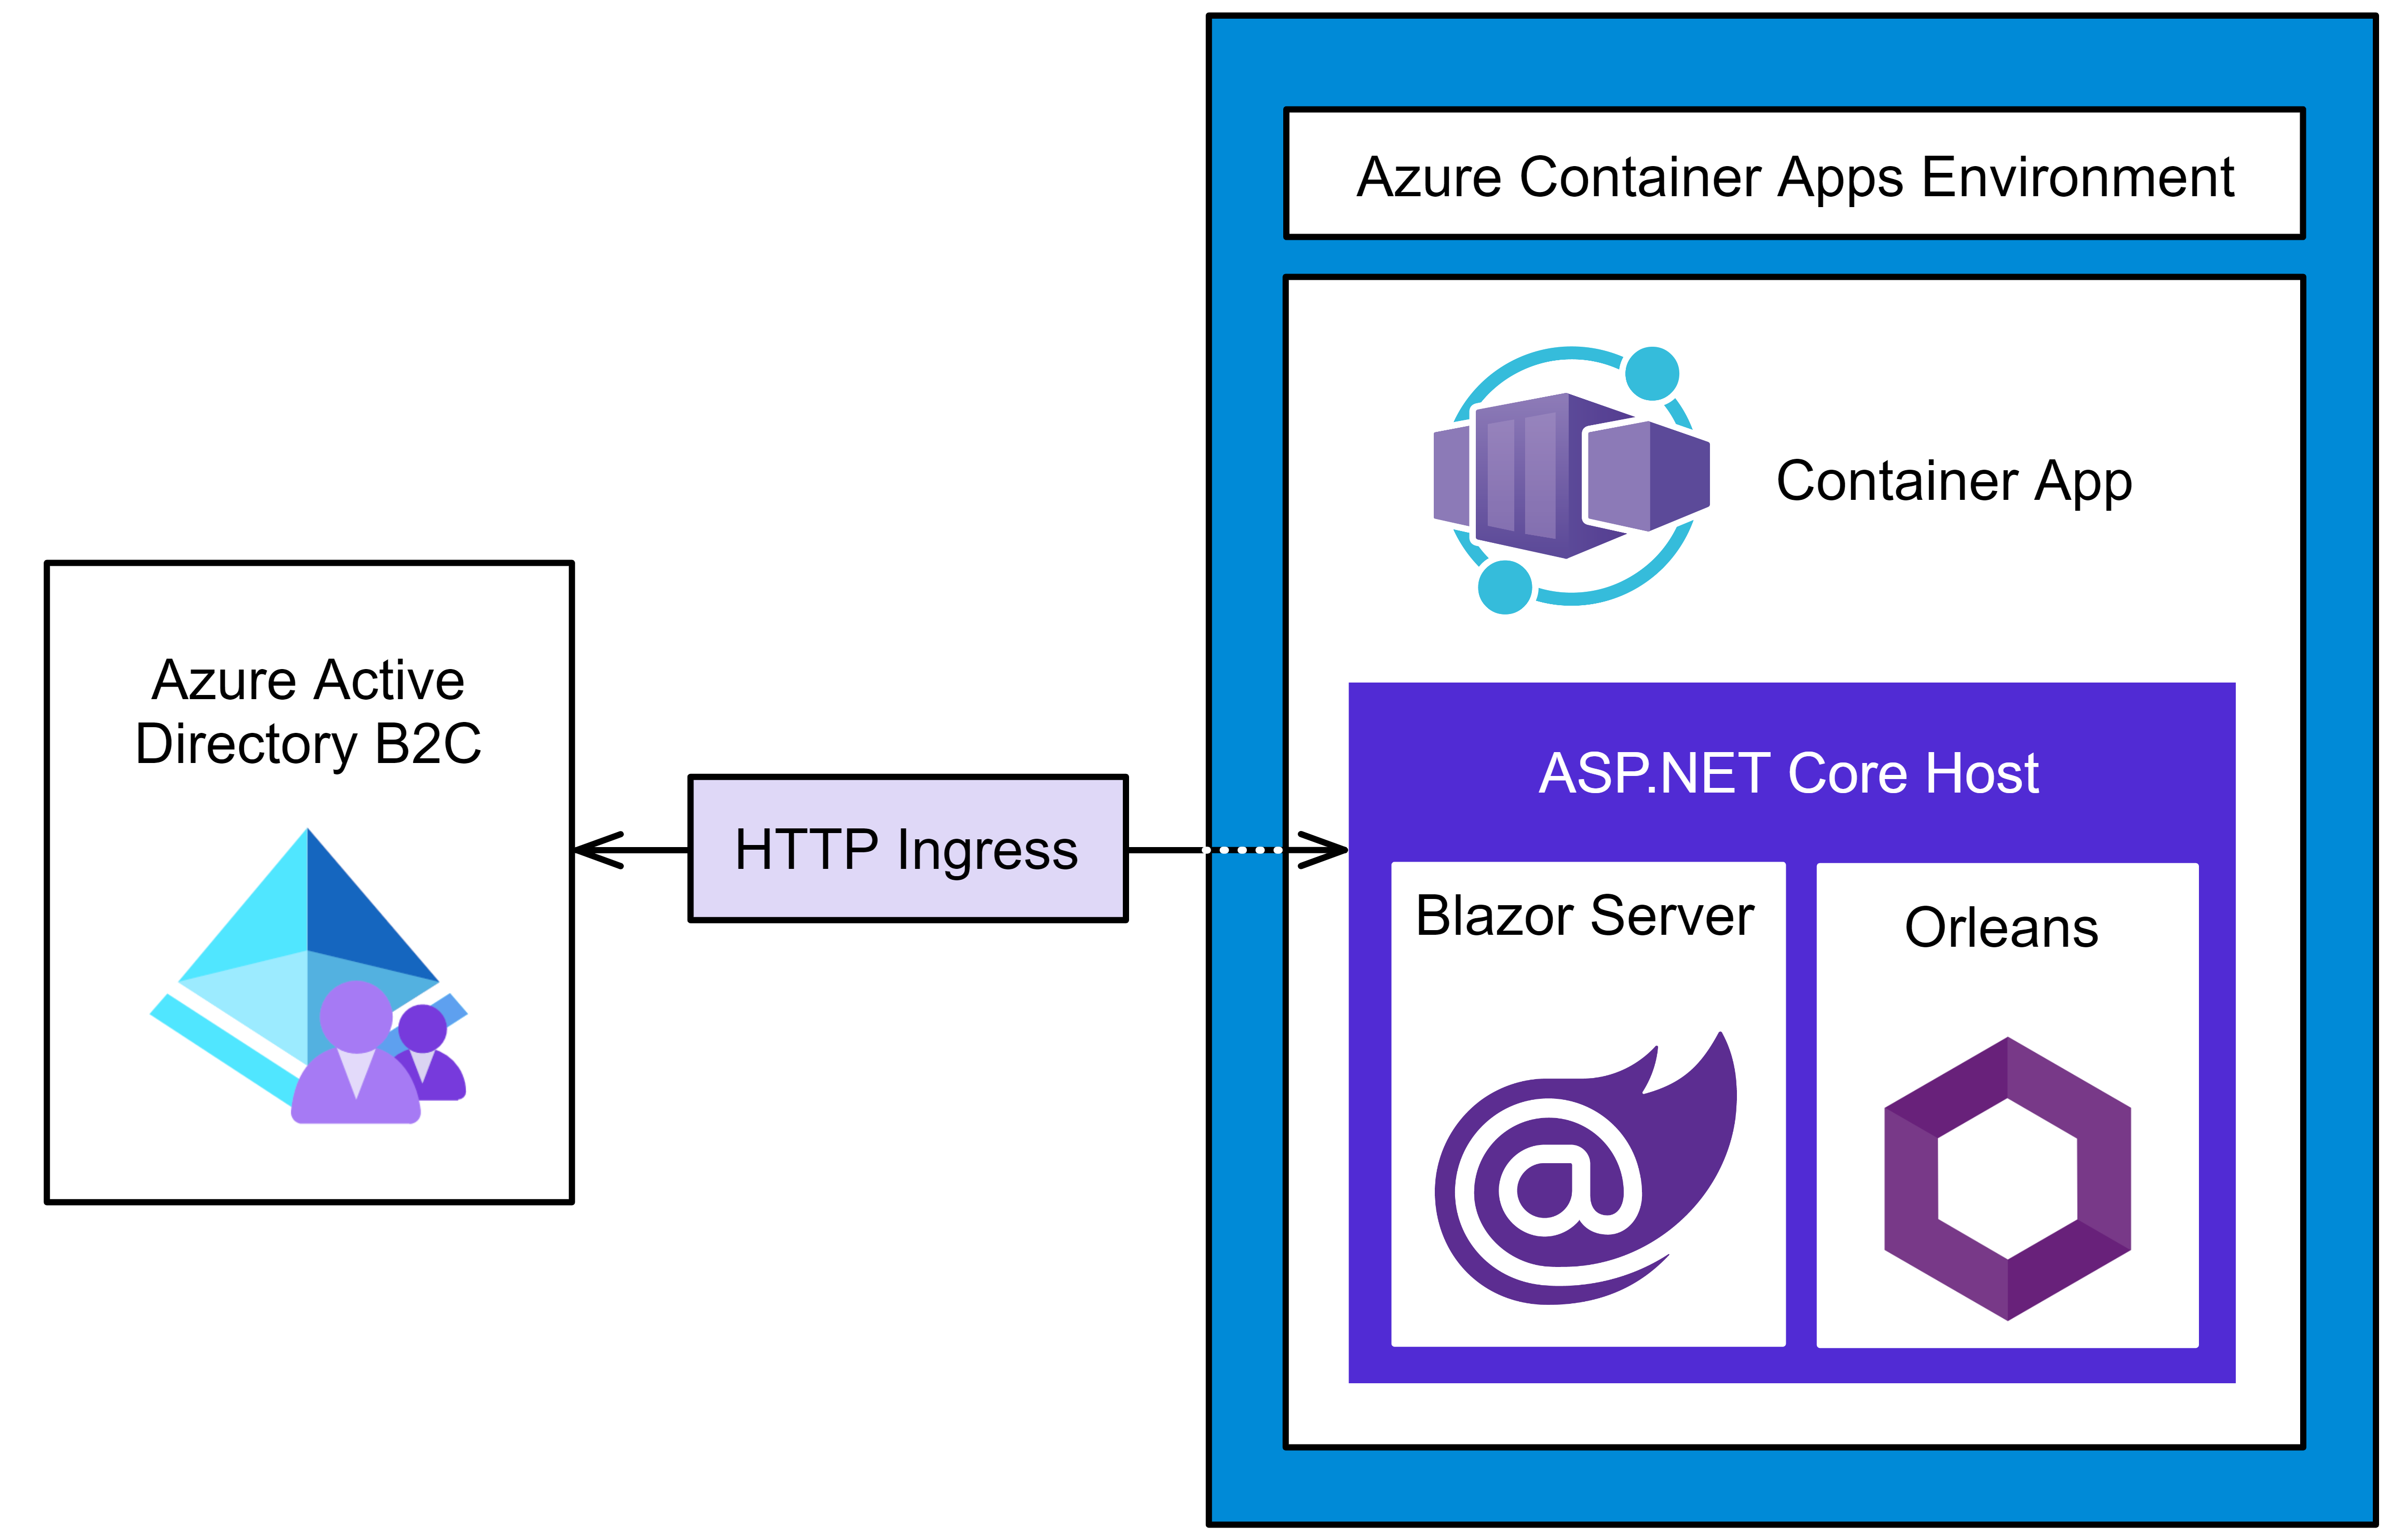
若要帮助直观显示如何在 Azure 容器应用环境中隔离应用,请参阅下图:
在上图中,所有流向应用的入站流量都通过一个安全的 HTTP 入口。 Azure 容器应用环境包含应用实例,应用实例包含 ASP.NET Core 主机,该主机公开 Blazor Server 和 Orleans 应用功能。
部署到 Azure 容器应用
若要将应用部署到 Azure 容器应用,存储库将使用 GitHub Actions。 在进行此部署之前,需要一些 Azure 资源,并且需要正确配置 GitHub 存储库。
在部署应用之前,需要创建一个 Azure 资源组(或者可以选择使用现有的资源组)。 若要创建新的 Azure 资源组,请参阅以下文章之一:
请记下所选的资源组名称,因为稍后需要用它来部署应用。
创建服务主体
若要自动部署应用,需要创建一个服务主体。 这是一个有权代表你管理 Azure 资源的 Microsoft 帐户。
az ad sp create-for-rbac --sdk-auth --role Contributor \
  --name "<display-name>"  --scopes /subscriptions/<your-subscription-id>
创建的 JSON 凭据如下所示,但其中包含了客户端、订阅和租户的实际值:
{
  "clientId": "<your client id>",
  "clientSecret": "<your client secret>",
  "subscriptionId": "<your subscription id>",
  "tenantId": "<your tenant id>",
  "activeDirectoryEndpointUrl": "https://login.microsoftonline.com/",
  "resourceManagerEndpointUrl": "https://brazilus.management.azure.com",
  "activeDirectoryGraphResourceId": "https://graph.windows.net/",
  "sqlManagementEndpointUrl": "https://management.core.windows.net:8443/",
  "galleryEndpointUrl": "https://gallery.azure.com",
  "managementEndpointUrl": "https://management.core.windows.net"
}
将命令输出复制到剪贴板,然后继续执行下一步。
创建 GitHub 机密
GitHub 提供了用于创建加密机密的机制。 创建的机密可在 GitHub Actions 工作流中使用。 你将了解如何结合 Azure Bicep 使用 GitHub Actions 来自动部署应用。
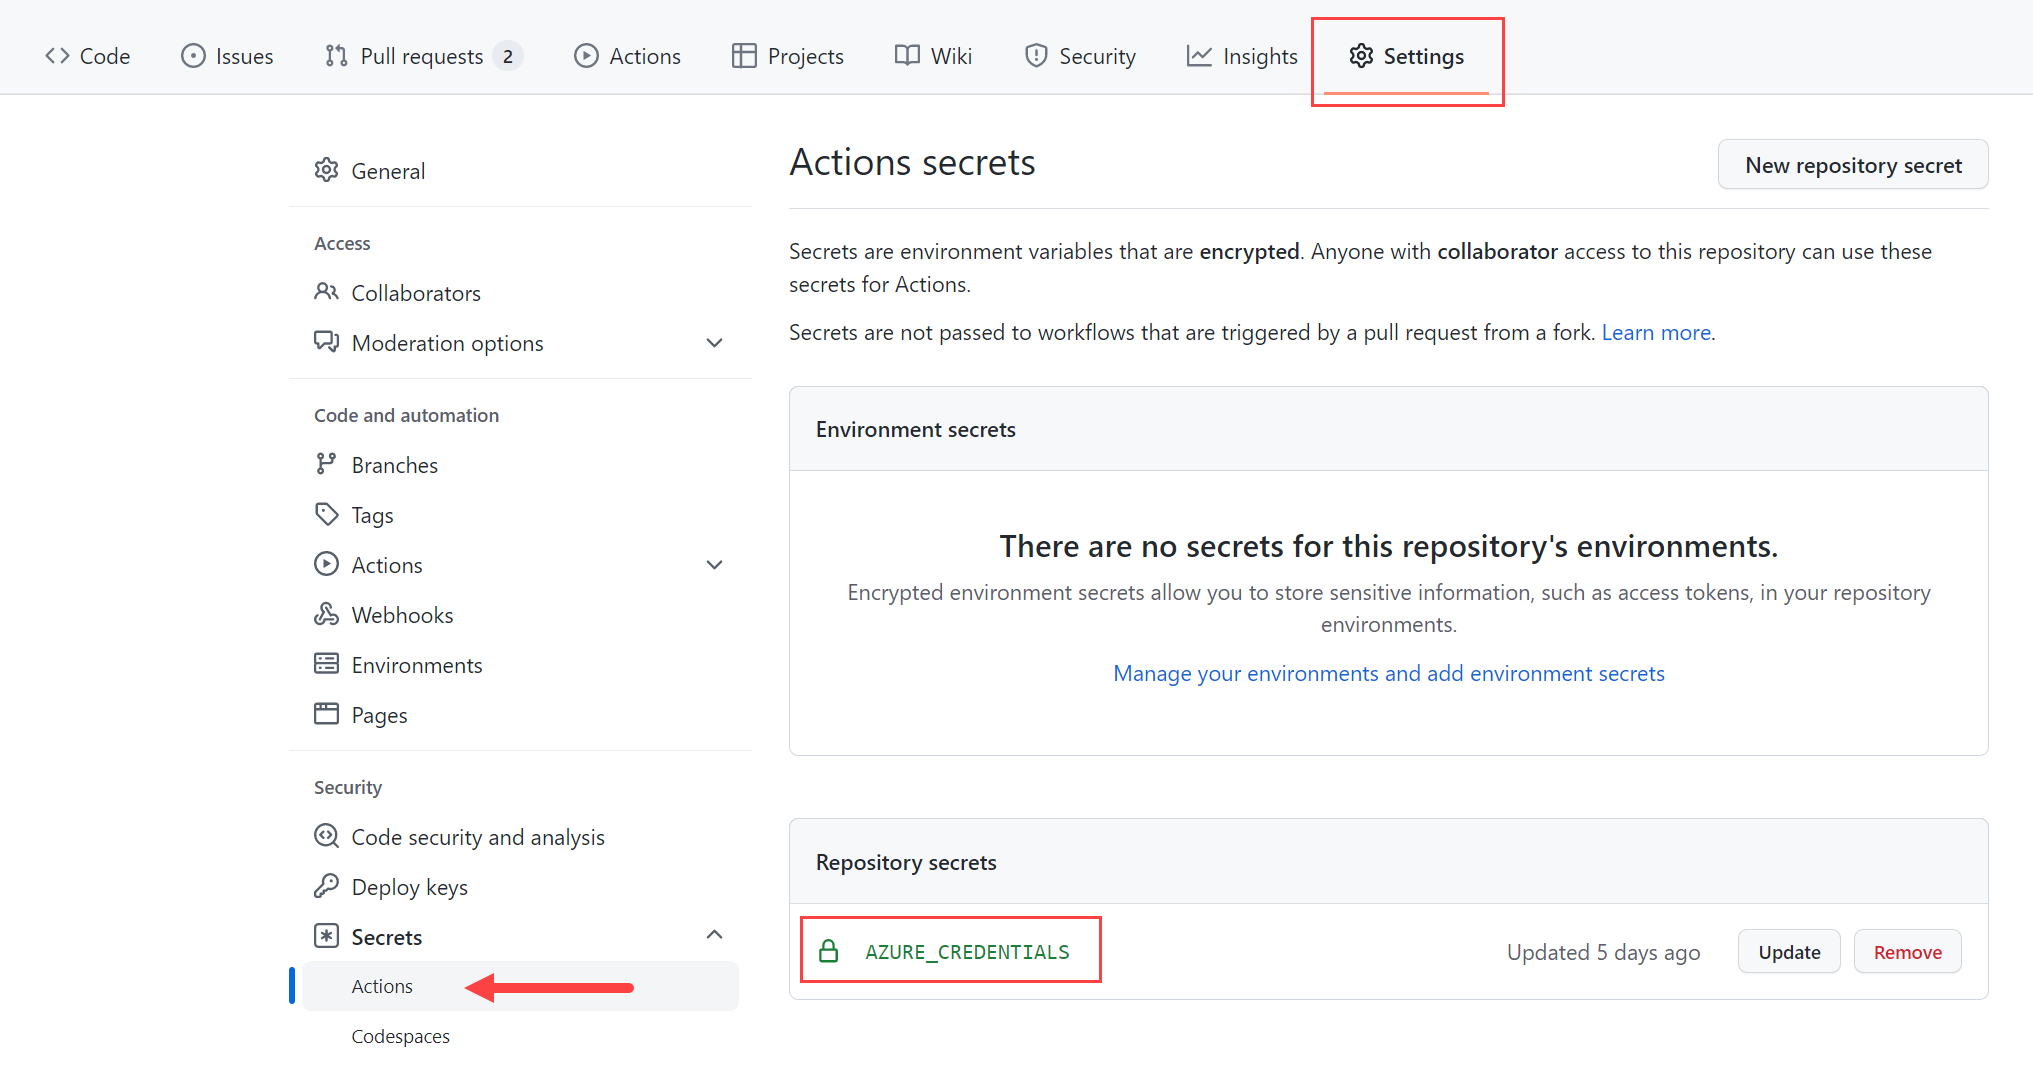
Bicep 是一种特定于域的语言 (DSL),使用声明性语法来部署 Azure 资源。 有关详细信息,请参阅什么是 Bicep。 需要使用创建服务主体步骤的输出,创建名为 AZURE_CREDENTIALS、包含 JSON 格式的凭据的 GitHub 机密。
在 GitHub 存储库中,选择“设置”>“机密”>“创建新机密”。 输入名称 AZURE_CREDENTIALS,然后在“值”字段中粘贴在上一步骤中创建的 JSON 凭据。
有关详细信息,请参阅 GitHub:加密的机密。
准备 Azure 部署
需要打包该应用以进行部署。 在 Orleans.ShoppingCart.Silos 项目中,我们定义了在 Publish 步骤之后运行的 Target 元素。 这会将发布目录压缩成 silo.zip 文件:
<Target Name="ZipPublishOutput" AfterTargets="Publish">
    <Delete Files="$(ProjectDir)\..\silo.zip" />
    <ZipDirectory SourceDirectory="$(PublishDir)" DestinationFile="$(ProjectDir)\..\silo.zip" />
</Target>
可通过多种方式将 .NET 应用部署到 Azure 容器应用。 在本教程中,你将使用 GitHub Actions、Azure Bicep 以及 .NET 和 Azure CLI。 考虑 GitHub 存储库根目录中的 ./github/workflows/deploy.yml 文件:
name: Deploy to Azure Container Apps

on:
  push:
    branches:
    - main

env:
  UNIQUE_APP_NAME: orleanscart
  SILO_IMAGE_NAME: orleanscart-silo
  AZURE_RESOURCE_GROUP_NAME: orleans-resourcegroup
  AZURE_RESOURCE_GROUP_LOCATION: eastus

jobs:
  build-and-deploy:
    runs-on: ubuntu-latest
    steps:
    - uses: actions/checkout@v3

    - name: Setup .NET 6.0
      uses: actions/setup-dotnet@v3
      with:
        dotnet-version: 6.0.x

    - name: .NET publish shopping cart app
      run: dotnet publish ./Silo/Orleans.ShoppingCart.Silo.csproj --configuration Release

    - name: Login to Azure
      uses: azure/login@v1
      with:
        creds: ${{ secrets.AZURE_CREDENTIALS }}

    - name: Flex ACR Bicep
      run: |
        az deployment group create \
          --resource-group ${{ env.AZURE_RESOURCE_GROUP_NAME }} \
          --template-file '.github/workflows/flex/acr.bicep' \
          --parameters location=${{ env.AZURE_RESOURCE_GROUP_LOCATION }}

    - name: Get ACR Login Server
      run: |
        ACR_NAME=$(az deployment group show -g ${{ env.AZURE_RESOURCE_GROUP_NAME }} -n acr \
        --query properties.outputs.acrName.value | tr -d '"')
        echo "ACR_NAME=$ACR_NAME" >> $GITHUB_ENV
        ACR_LOGIN_SERVER=$(az deployment group show -g ${{ env.AZURE_RESOURCE_GROUP_NAME }} -n acr \
        --query properties.outputs.acrLoginServer.value | tr -d '"')
        echo "ACR_LOGIN_SERVER=$ACR_LOGIN_SERVER" >> $GITHUB_ENV

    - name: Prepare Docker buildx
      uses: docker/setup-buildx-action@v1

    - name: Login to ACR
      run: |
        access_token=$(az account get-access-token --query accessToken -o tsv)
        refresh_token=$(curl https://${{ env.ACR_LOGIN_SERVER }}/oauth2/exchange -v \
        -d "grant_type=access_token&service=${{ env.ACR_LOGIN_SERVER }}&access_token=$access_token" | jq -r .refresh_token)
        # The null GUID 0000... tells the container registry that this is an ACR refresh token during the login flow
        docker login -u 00000000-0000-0000-0000-000000000000 \
        --password-stdin ${{ env.ACR_LOGIN_SERVER }} <<< "$refresh_token"

    - name: Build and push Silo image to registry
      uses: docker/build-push-action@v2
      with:
        push: true
        tags: ${{ env.ACR_LOGIN_SERVER }}/${{ env.SILO_IMAGE_NAME }}:${{ github.sha }}
        file: Silo/Dockerfile

    - name: Flex ACA Bicep
      run: |
        az deployment group create \
          --resource-group ${{ env.AZURE_RESOURCE_GROUP_NAME }} \
          --template-file '.github/workflows/flex/main.bicep' \
          --parameters location=${{ env.AZURE_RESOURCE_GROUP_LOCATION }} \
            appName=${{ env.UNIQUE_APP_NAME }} \
            acrName=${{ env.ACR_NAME }} \
            repositoryImage=${{ env.ACR_LOGIN_SERVER }}/${{ env.SILO_IMAGE_NAME }}:${{ github.sha }} \
          --debug

    - name: Get Container App URL
      run: |
        ACA_URL=$(az deployment group show -g ${{ env.AZURE_RESOURCE_GROUP_NAME }} \
        -n main --query properties.outputs.acaUrl.value | tr -d '"')
        echo $ACA_URL

    - name: Logout of Azure
      run: az logout
上述 GitHub 工作流将:
- 使用 dotnet publish 命令将购物车应用发布为 zip 文件。
- 使用创建服务主体步骤中创建的凭据登录到 Azure。
- 评估 acr.bicep 文件,并使用 az deployment group create 启动部署组。
- 从部署组获取 Azure 容器注册表 (ACR) 登录服务器。
- 使用存储库
AZURE_CREDENTIALS机密登录到 ACR。 - 生成接收器映像并将其发布到 ACR。
- 评估 main.bicep 文件,并使用 az deployment group create 启动部署组。
- 部署接收器
- 注销 Azure。
推送到 main 分支会触发该工作流。 有关详细信息,请参阅 GitHub Actions 和 .NET。
提示
如果在运行工作流时遇到问题,可能需要验证是否为服务主体注册了所有必需的提供程序命名空间。 以下提供程序命名空间是必需的:
Microsoft.AppMicrosoft.ContainerRegistryMicrosoft.InsightsMicrosoft.OperationalInsightsMicrosoft.Storage
有关详细信息,请参阅解决资源提供程序注册错误。
Azure 对资源施加命名限制和约定。 需要更新以下各项的 deploy.yml 文件值:
UNIQUE_APP_NAMESILO_IMAGE_NAMEAZURE_RESOURCE_GROUP_NAMEAZURE_RESOURCE_GROUP_LOCATION
将这些值设置为唯一的应用名称,以及 Azure 资源组名称和位置。
有关详细信息,请参阅 Azure 资源的命名规则和限制。
浏览 Bicep 模板
运行 az deployment group create 命令时,它会评估给定的 .bicep 文件引用。 此文件包含详细说明你要部署的 Azure 资源的声明性信息。 此步骤的作用是预配所有部署资源。
重要
如果使用的是 Visual Studio Code,则使用 Bicep 扩展可以改善 Bicep 创作体验。
评估的第一个 Bicep 文件是 acr.bicep 文件。 此文件包含 Azure 容器注册表 (ACR) 登录服务器资源详细信息:
param location string = resourceGroup().location

resource acr 'Microsoft.ContainerRegistry/registries@2021-09-01' = {
  name: toLower('${uniqueString(resourceGroup().id)}acr')
  location: location
  sku: {
    name: 'Basic'
  }
  properties: {
    adminUserEnabled: true
  }
}

output acrLoginServer string = acr.properties.loginServer
output acrName string = acr.name
此 bicep 文件输出 ACR 登录服务器和相应名称。 遇到的下一个 Bicep 文件包含的不仅仅是单个 resource。 请考虑主要由委托 module 定义组成的 main.bicep 文件:
param appName string
param acrName string
param repositoryImage string
param location string = resourceGroup().location

resource acr 'Microsoft.ContainerRegistry/registries@2021-09-01' existing = {
  name: acrName
}

module env 'environment.bicep' = {
  name: 'containerAppEnvironment'
  params: {
    location: location
    operationalInsightsName: '${appName}-logs'
    appInsightsName: '${appName}-insights'
  }
}

var envVars = [
  {
    name: 'APPINSIGHTS_INSTRUMENTATIONKEY'
    value: env.outputs.appInsightsInstrumentationKey
  }
  {
    name: 'APPLICATIONINSIGHTS_CONNECTION_STRING'
    value: env.outputs.appInsightsConnectionString
  }
  {
    name: 'ORLEANS_AZURE_STORAGE_CONNECTION_STRING'
    value: storageModule.outputs.connectionString
  }
  {
    name: 'ASPNETCORE_FORWARDEDHEADERS_ENABLED'
    value: 'true'
  }
]

module storageModule 'storage.bicep' = {
  name: 'orleansStorageModule'
  params: {
    name: '${appName}storage'
    location: location
  }
}

module siloModule 'container-app.bicep' = {
  name: 'orleansSiloModule'
  params: {
    appName: appName
    location: location
    containerAppEnvironmentId: env.outputs.id
    repositoryImage: repositoryImage
    registry: acr.properties.loginServer
    registryPassword: acr.listCredentials().passwords[0].value
    registryUsername: acr.listCredentials().username
    envVars: envVars
  }
}

output acaUrl string = siloModule.outputs.acaUrl
前面的 Bicep 文件:
- 引用
existingACR 资源,有关详细信息,请参阅 Azure Bicep:现有资源。 - 定义委托给 environment.bicep 定义文件的
module env。 - 定义委托给 storage.bicep 定义文件的
module storageModule。 - 声明接收器模块使用的多个共享
envVars。 - 定义委托给 container-app.bicep 定义文件的
module siloModule。 - 输出 ACA URL(这可能用于更新现有 AAD B2C 应用注册的重定向 URI)。
main.bicep 委托给一些其他 Bicep 文件。 第一个是 environment.bicep 文件:
param operationalInsightsName string
param appInsightsName string
param location string

resource appInsights 'Microsoft.Insights/components@2020-02-02' = {
  name: appInsightsName
  location: location
  kind: 'web'
  properties: {
    Application_Type: 'web'
    WorkspaceResourceId: logs.id
  }
}

resource logs 'Microsoft.OperationalInsights/workspaces@2021-06-01' = {
  name: operationalInsightsName
  location: location
  properties: {
    retentionInDays: 30
    features: {
      searchVersion: 1
    }
    sku: {
      name: 'PerGB2018'
    }
  }
}

resource env 'Microsoft.App/managedEnvironments@2022-03-01' = {
  name: '${resourceGroup().name}env'
  location: location
  properties: {
    appLogsConfiguration: {
      destination: 'log-analytics'
      logAnalyticsConfiguration: {
        customerId: logs.properties.customerId
        sharedKey: logs.listKeys().primarySharedKey
      }
    }
  }
}

output id string = env.id
output appInsightsInstrumentationKey string = appInsights.properties.InstrumentationKey
output appInsightsConnectionString string = appInsights.properties.ConnectionString
此 Bicep 文件定义 Azure Log Analytics 和 Application Insights 资源。
appInsights 资源的类型为 web,logs 资源的类型为 PerGB2018。
appInsights 资源和 logs 资源均在资源组位置进行预配。
appInsights 资源通过 WorkspaceResourceId 属性链接到 logs 资源。 此 Bicep 中定义了稍后将由容器应用 module 使用的三个输出。 接下来,让我们看看 storage.bicep 文件:
param name string
param location string

resource storage 'Microsoft.Storage/storageAccounts@2021-08-01' = {
  name: name
  location: location
  kind: 'StorageV2'
  sku: {
    name: 'Standard_LRS'
  }
}

var key = listKeys(storage.name, storage.apiVersion).keys[0].value
var protocol = 'DefaultEndpointsProtocol=https'
var accountBits = 'AccountName=${storage.name};AccountKey=${key}'
var endpointSuffix = 'EndpointSuffix=${environment().suffixes.storage}'

output connectionString string = '${protocol};${accountBits};${endpointSuffix}'
上面的 Bicep 文件定义了以下内容:
- 对应于资源组名称和应用名称的两个参数。
- 存储帐户的
resource storage定义。 - 构成存储帐户的连接字符串的单个
output。
最后一个 Bicep 文件是 container-app.bicep 文件:
param appName string
param location string
param containerAppEnvironmentId string
param repositoryImage string = 'mcr.microsoft.com/azuredocs/containerapps-helloworld:latest'
param envVars array = []
param registry string
param registryUsername string
@secure()
param registryPassword string

resource containerApp 'Microsoft.App/containerApps@2022-03-01' = {
  name: appName
  location: location
  properties: {
    managedEnvironmentId: containerAppEnvironmentId
    configuration: {
      activeRevisionsMode: 'multiple'
      secrets: [
        {
          name: 'container-registry-password'
          value: registryPassword
        }
      ]
      registries: [
        {
          server: registry
          username: registryUsername
          passwordSecretRef: 'container-registry-password'
        }
      ]
      ingress: {
        external: true
        targetPort: 80
      }
    }
    template: {
      revisionSuffix: uniqueString(repositoryImage, appName)
      containers: [
        {
          image: repositoryImage
          name: appName
          env: envVars
        }
      ]
      scale: {
        minReplicas: 1
        maxReplicas: 1
      }
    }
  }
}

output acaUrl string = containerApp.properties.configuration.ingress.fqdn
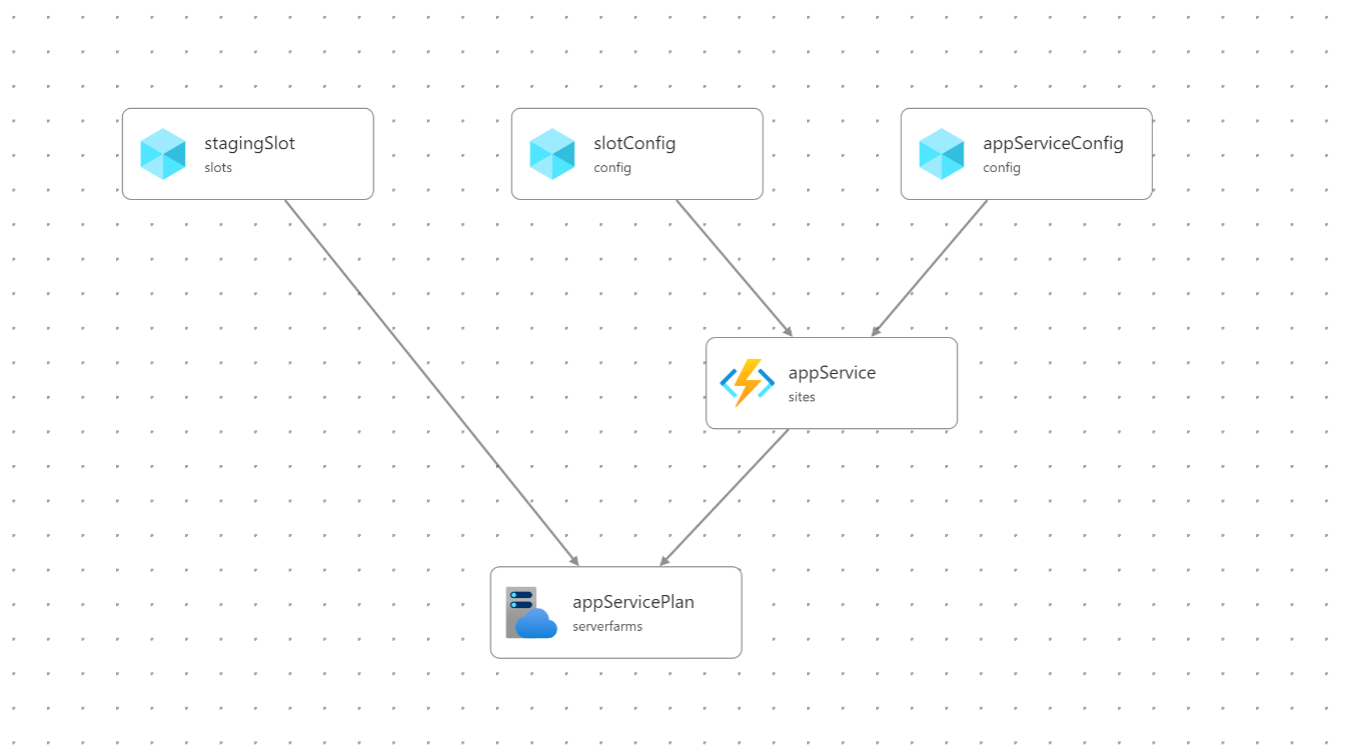
上述适用于的 Bicep 的 Visual Studio Code 扩展包含一个可视化工具。 下面是所有这些 Bicep 文件的可视化效果:
摘要
更新源代码并将更改 push 到存储库的 main 分支时,将运行 deploy.yml 工作流。 该工作流预配 Bicep 文件中定义的 Azure 资源并部署应用程序。 修订将自动在 Azure 容器注册表中注册。
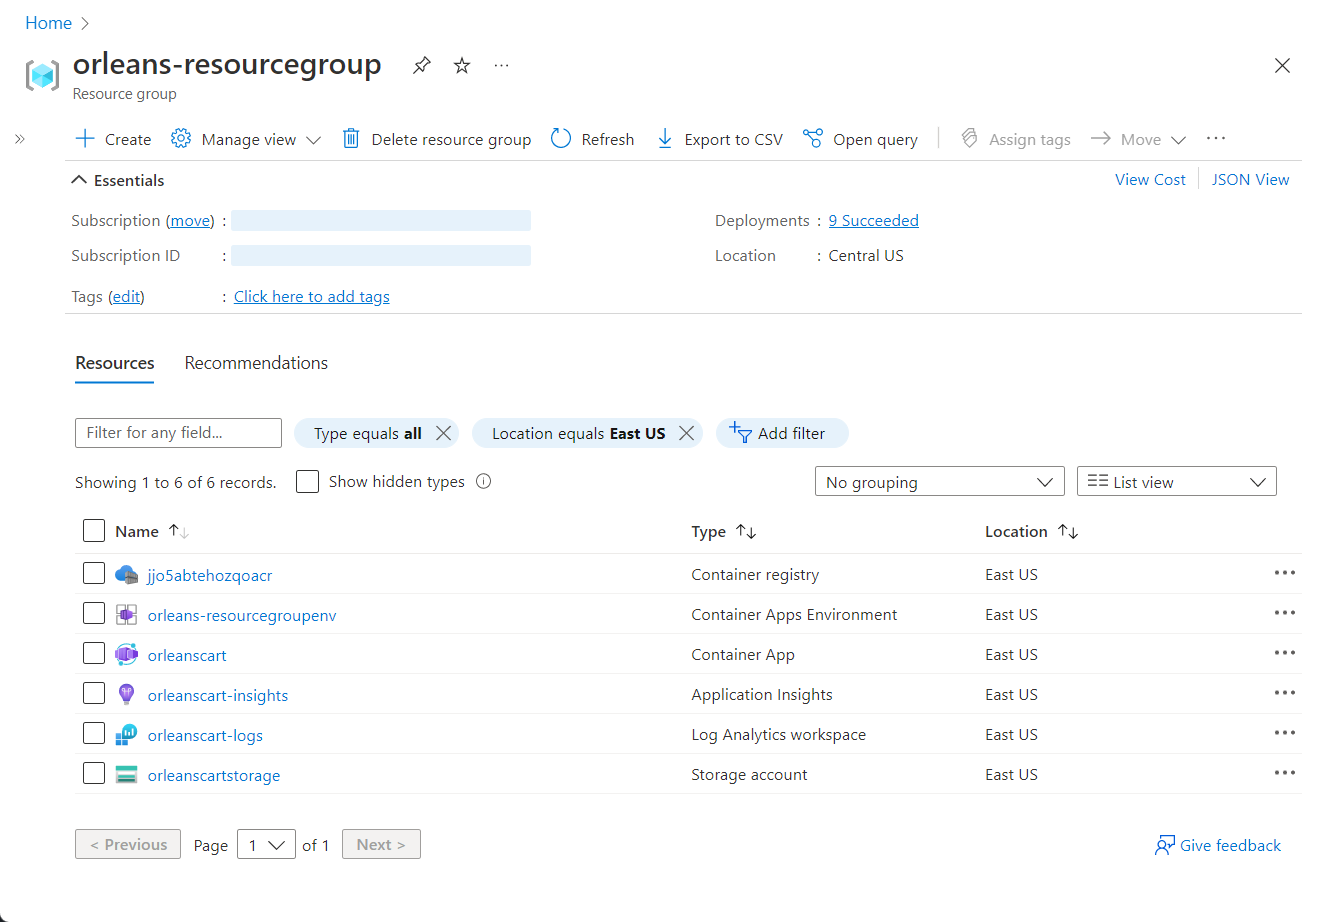
除了 Bicep 扩展中的可视化工具外,在预配并部署应用程序后,会显示如以下示例所示的 Azure 门户资源组页面:


