TileBrush 概述
使用 TileBrush 对象,可以非常自如地控制如何使用图像、Drawing 或 Visual 来绘制区域。 本主题介绍如何使用 TileBrush 功能来更好地控制 ImageBrush、DrawingBrush或 VisualBrush 绘制区域的方式。
先决条件
若要了解本主题,了解如何使用 ImageBrush、DrawingBrush或 VisualBrush 类的基本功能会很有帮助。 有关这些类型的简介,请参阅使用图像、绘图和视觉对象进行绘制。
使用图块绘制区域
ImageBrush、DrawingBrush是 VisualBrush 类型的 TileBrush 对象。 使用平铺画笔,可以非常自如地控制如何使用图像、绘图或视觉对象来绘制区域。 例如,不使用单个拉伸图像绘制区域,而是使用创建图案的一系列平铺图像绘制区域。
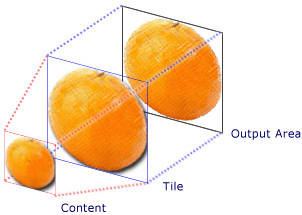
使用瓷砖画笔绘制区域涉及三个组成部分:内容、基础瓷砖和输出区域。

具有单个图块的 TileBrush 的组成部分

已指定图块的 TileMode 的 TileBrush 的组成部分
输出区域为正在绘制的区域,例如 Ellipse 的 Fill 或 Button 的 Background。 后续部分介绍 TileBrush的其他两个组件。
画笔内容
TileBrush 有三种不同类型,其中每一种都使用不同类型的内容进行绘制。
如果画笔是 ImageBrush,则此内容是图像。ImageSource 属性指定 ImageBrush的内容。
如果画笔是 DrawingBrush,则此内容是绘图。 Drawing 属性指定 DrawingBrush的内容。
如果画笔是 VisualBrush,则此内容是视觉对象。 Visual 属性指定 VisualBrush的内容。
可以使用 Viewbox 属性指定 TileBrush 内容的位置和维度,尽管通常将 Viewbox 设置为其默认值。 默认情况下,Viewbox 配置为完全包含画笔的内容。 有关配置 Viewbox的详细信息,请参阅 Viewbox 属性页。
基本图块
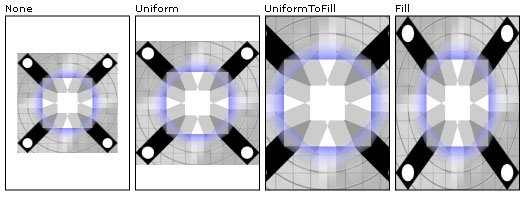
TileBrush 将其内容投影到基本图块上。 Stretch 属性控制如何拉伸 TileBrush 内容以填充基本图块。 Stretch 属性接受由 Stretch 枚举定义的以下值:
None:不通过拉伸画笔的内容来填充图块。
Fill:缩放画笔的内容,使其位于图块内。 由于内容的高度和宽度是独立缩放的,因此可能无法保留内容的原始纵横比。 也就是说,为了完全填充输出图块,画笔的内容可能会弯曲。
Uniform:缩放画笔的内容,使其完全位于图块内。 内容的宽高比得以保留。
UniformToFill:缩放画笔的内容,使其完全填充输出区域,同时保持内容的原始纵横比。
下图阐释了不同的 Stretch 设置。

在以下示例中,设置 ImageBrush 的内容,使其不通过拉伸来填充输出区域。
<Rectangle
  Width="125" Height="175"
  Stroke="Black"
  StrokeThickness="1"
  Margin="0,0,5,0">
  <Rectangle.Fill>
    <ImageBrush
      Stretch="None"
      ImageSource="sampleImages\testImage.gif"/>
  </Rectangle.Fill>
</Rectangle>
// Create a rectangle.
Rectangle myRectangle = new Rectangle();
myRectangle.Width = 125;
myRectangle.Height = 175;
myRectangle.Stroke = Brushes.Black;
myRectangle.StrokeThickness = 1;
myRectangle.Margin = new Thickness(0,5,0,0);

// Load the image.
BitmapImage theImage =
    new BitmapImage(
        new Uri("sampleImages\\testImage.gif", UriKind.Relative));
ImageBrush myImageBrush = new ImageBrush(theImage);

// Configure the brush so that it
// doesn't stretch its image to fill
// the rectangle.
myImageBrush.Stretch = Stretch.None;

// Use the ImageBrush to paint the rectangle's background.
myRectangle.Fill = myImageBrush;
' Create a rectangle.
Dim myRectangle As New Rectangle()
With myRectangle
    .Width = 125
    .Height = 175
    .Stroke = Brushes.Black
    .StrokeThickness = 1
    .Margin = New Thickness(0, 5, 0, 0)
End With

' Load the image.
Dim theImage As New BitmapImage(New Uri("sampleImages\testImage.gif", UriKind.Relative))
Dim myImageBrush As New ImageBrush(theImage)

' Configure the brush so that it
' doesn't stretch its image to fill
' the rectangle.
myImageBrush.Stretch = Stretch.None

' Use the ImageBrush to paint the rectangle's background.
myRectangle.Fill = myImageBrush
默认情况下,TileBrush 生成单个磁贴(基磁贴),并拉伸该磁贴以完全填充输出区域。 可以通过设置 Viewport 和 ViewportUnits 属性来更改基磁贴的大小和位置。
基本图块大小
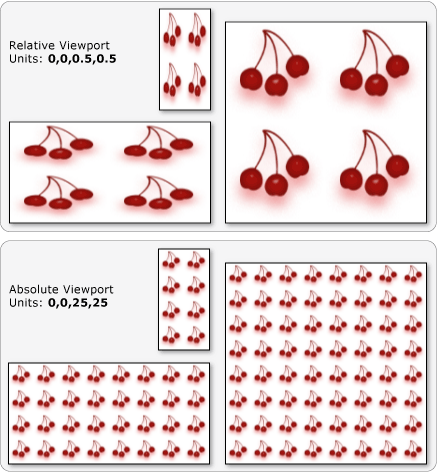
Viewport 属性确定基块的大小和位置,ViewportUnits 属性确定是使用绝对坐标还是相对坐标指定 Viewport。 如果坐标是相对坐标,则它们相对于输出区域的大小。 点(0,0)表示输出区域的左上角,(1,1)表示输出区域的右下角。 若要指定 Viewport 属性使用绝对坐标,请将 ViewportUnits 属性设置为 Absolute。
下图显示了具有相对和绝对 ViewportUnits 的 TileBrush 之间的输出差异。 请注意每个图都显示了一种图块图案;下一节介绍如何指定图块图案。

在以下示例中,图像用于创建宽度和高度为 50%的磁贴。 基本图块位于输出区域的 (0,0) 处。
<Rectangle
 Width="50" Height="100">
  <Rectangle.Fill>

    <!-- Paints an area with 4 tiles. -->
    <ImageBrush ImageSource="sampleImages\cherries_larger.jpg"
      Viewport="0,0,0.5,0.5"
      ViewportUnits="RelativeToBoundingBox"
      TileMode="Tile" />
  </Rectangle.Fill>
</Rectangle>
// Create a rectangle.
Rectangle myRectangle = new Rectangle();
myRectangle.Width = 50;
myRectangle.Height = 100;

// Load the image.
BitmapImage theImage =
    new BitmapImage(
        new Uri("sampleImages\\cherries_larger.jpg", UriKind.Relative));
ImageBrush myImageBrush = new ImageBrush(theImage);

// Create tiles that are 1/4 the size of
// the output area.
myImageBrush.Viewport = new Rect(0,0,0.25,0.25);
myImageBrush.ViewportUnits = BrushMappingMode.RelativeToBoundingBox;

// Set the tile mode to Tile.
myImageBrush.TileMode = TileMode.Tile;

// Use the ImageBrush to paint the rectangle's background.
myRectangle.Fill = myImageBrush;
' Create a rectangle.
Dim myRectangle As New Rectangle()
myRectangle.Width = 50
myRectangle.Height = 100

' Load the image.
Dim theImage As New BitmapImage(New Uri("sampleImages\cherries_larger.jpg", UriKind.Relative))
Dim myImageBrush As New ImageBrush(theImage)

' Create tiles that are 1/4 the size of
' the output area.
myImageBrush.Viewport = New Rect(0, 0, 0.25, 0.25)
myImageBrush.ViewportUnits = BrushMappingMode.RelativeToBoundingBox

' Set the tile mode to Tile.
myImageBrush.TileMode = TileMode.Tile

' Use the ImageBrush to paint the rectangle's background.
myRectangle.Fill = myImageBrush
下一个示例将 ImageBrush 的图块设置为 25 x 25 与设备无关的像素。 由于 ViewportUnits 是绝对的,因此无论绘制区域的大小如何,ImageBrush 磁贴始终为 25 x 25 像素。
<Rectangle
 Width="50" Height="100">
  <Rectangle.Fill>

    <!-- Paints an area with 25 x 25 tiles. -->
    <ImageBrush ImageSource="sampleImages\cherries_larger.jpg"
      Viewport="0,0,25,25"
      ViewportUnits="Absolute"
      TileMode="Tile" />
  </Rectangle.Fill>
</Rectangle>
// Create a rectangle.
Rectangle myRectangle = new Rectangle();
myRectangle.Width = 50;
myRectangle.Height = 100;

// Load the image.
BitmapImage theImage =
    new BitmapImage(
        new Uri("sampleImages\\cherries_larger.jpg", UriKind.Relative));
ImageBrush myImageBrush = new ImageBrush(theImage);

// Create tiles that are 25 x 25, regardless of the size
// of the output area.
myImageBrush.Viewport = new Rect(0, 0, 25, 25);
myImageBrush.ViewportUnits = BrushMappingMode.Absolute;

// Set the tile mode to Tile.
myImageBrush.TileMode = TileMode.Tile;

// Use the ImageBrush to paint the rectangle's background.
myRectangle.Fill = myImageBrush;
' Create a rectangle.
Dim myRectangle As New Rectangle()
myRectangle.Width = 50
myRectangle.Height = 100

' Load the image.
Dim theImage As New BitmapImage(New Uri("sampleImages\cherries_larger.jpg", UriKind.Relative))
Dim myImageBrush As New ImageBrush(theImage)

' Create tiles that are 25 x 25, regardless of the size
' of the output area.
myImageBrush.Viewport = New Rect(0, 0, 25, 25)
myImageBrush.ViewportUnits = BrushMappingMode.Absolute

' Set the tile mode to Tile.
myImageBrush.TileMode = TileMode.Tile

' Use the ImageBrush to paint the rectangle's background.
myRectangle.Fill = myImageBrush
平铺行为
当 TileBrush 的基本图块未完全填充输出区域并且指定了除 None 以外的平铺模式时,它将生成一个平铺图案。 当图块画笔的磁贴未完全填充输出区域时,其 TileMode 属性指定是否应复制基磁贴以填充输出区域,以及如果需要复制,应如何进行复制。 TileMode 属性接受由 TileMode 枚举定义的以下值:
下图说明了不同的平铺模式。

在以下示例中,图像用于绘制宽度为 100 像素且高 100 像素的矩形。 通过将画笔的 Viewport 设置为 0,0,0.25,0.25,使画笔的基本图块占输出区域的 1/4。 画笔的 TileMode 设置为 FlipXY。 这样它便可以用图块行来填充矩形。
<Rectangle
 Width="100" Height="100" >
  <Rectangle.Fill>
    <ImageBrush ImageSource="sampleImages\triangle.jpg"
      Viewport="0,0,0.25,0.25"
      TileMode="FlipXY"
      />
  </Rectangle.Fill>
</Rectangle>
// Create a rectangle.
Rectangle myRectangle = new Rectangle();
myRectangle.Width = 100;
myRectangle.Height = 100;

// Load the image.
BitmapImage theImage =
    new BitmapImage(
        new Uri("sampleImages\\triangle.jpg", UriKind.Relative));
ImageBrush myImageBrush = new ImageBrush(theImage);

// Create tiles that are 1/4 the size of
// the output area.
myImageBrush.Viewport = new Rect(0,0,0.25,0.25);

// Set the tile mode to FlipXY.
myImageBrush.TileMode = TileMode.FlipXY;

// Use the ImageBrush to paint the rectangle's background.
myRectangle.Fill = myImageBrush;
' Create a rectangle.
Dim myRectangle As New Rectangle()
myRectangle.Width = 100
myRectangle.Height = 100

' Load the image.
Dim theImage As New BitmapImage(New Uri("sampleImages\triangle.jpg", UriKind.Relative))
Dim myImageBrush As New ImageBrush(theImage)

' Create tiles that are 1/4 the size of
' the output area.
myImageBrush.Viewport = New Rect(0, 0, 0.25, 0.25)

' Set the tile mode to FlipXY.
myImageBrush.TileMode = TileMode.FlipXY

' Use the ImageBrush to paint the rectangle's background.
myRectangle.Fill = myImageBrush
